Why grow potatoes from seeds?
Some vegetable growers have no idea why growing potatoes from seeds is better than other methods of planting this root vegetable. There are the main reasons why you should try this method of planting potatoes:
- this root crop, grown from tubers, begins to degenerate after a few seasons;
- Potatoes grown using the tuberous method accumulate a number of basic diseases inherent in nightshade plants. But seed material does not have this problem. As a result, vegetable plants obtained from seeds will be strong and healthy, and their yield will be higher.
Planting potatoes with seeds: features and technology
Many experienced summer residents eventually face the problem of potato degeneration. It is characterized primarily by a decrease in yield. It happens that the potato harvest dug up in the fall is much smaller than that planted in the spring, or the size of the resulting tubers leaves much to be desired. In addition, old potatoes are more likely to get sick and be affected by pests. You can get out of this situation by completely replacing the planting material. You can purchase it or grow it yourself with seeds. The second option is more economical, but more time-consuming and labor-intensive. By growing seed potatoes with your own hands, you will protect yourself from being deceived by unscrupulous sellers and purchasing low-quality material. But is it so easy to grow potatoes from seeds and is it worth spending time on?
Where are the potato seeds?
Of course, you can buy potato seeds in specialized stores. But you can also collect it yourself from your own potatoes growing in the beds. Flowers bloom on the vegetative mass, after they bloom, small balls appear, similar to small green tomatoes, and the seeds ripen in them.
When the potato tops begin to turn yellow and wither, these small fruits need to be collected, but the seeds in them are not yet fully ripe. Therefore, these balls are placed on a windowsill (or any other warm place) to ripen until they become soft - this means that the seeds are ripe and can be removed from the fruit.
The collected seed material is laid out on paper to dry. Then they can be put away in rag bags until the next season.
How to collect potato seeds from fruits
Everything is done quite simply and quickly.
- Cut the fruit in half, place the halves on a clean sheet of paper, cut side down;
- Gently press the halves of the balls on top with a knife - the seeds themselves come out of the fruit;
- Distribute the seeds evenly on the sheet so that the layer of seeds is thinner. Leave the seeds to dry for a while. The moisture will be absorbed into the sheet in a couple of hours. We give the seeds time to dry completely;
- Dried seeds are carefully collected and poured into paper bags. Or just leave them on the same sheet, and wrap the sheet itself like a medicine bag. Don't forget to label the potato variety. Place the bag in a dry place, along with other vegetable seeds. In spring, potato seeds can be sown for seedlings.
What is the elite and super-elite of potatoes
Elite and super-elite potatoes can also be obtained in your own garden by collecting planting material over several seasons. And how such seeds are obtained is worth telling separately.
- In the first season, potatoes are grown in test tubes on specialized farms. The main advantage of such planting material is the complete absence of pathogenic microorganisms on it. It is planted in open ground and by autumn you get miniature nodules - completely disease-free seed material.
- In the second season, a wonderful harvest grows from the planted nodules. The collected root vegetables are considered super-elite.
- In the third year, seeds are collected from super-elite potato bushes, and the next year vegetable growers receive super-elite tubers.
- In the fourth season, the collected tubers are considered simply elite.
- In the fifth season, gardeners receive the first reproduction, and the next year - the second reproduction.
Calendar schedule
First year
- March - sow seeds in a tray with loose soil;
- April - plant grown seedlings in peat pots;
- May - plant seedlings in protected soil;
- June-July - hill up, feed, mulch;
- September-October – collect potato sets and store them.
Second year
- End of April – put out for vernalization;
- May – planting in open ground;
- June-August – traditional care: hilling, fertilizing, mulching.
- September-October – harvesting.
For the next three years , potatoes can be planted as tubers; they will not lose their elite qualities, but in the fourth year, growing potatoes with seeds will have to be repeated.
What conditions are needed to grow potatoes at home?
Growing potatoes from seeds at home does not require special conditions - emerging sprouts need an air temperature of about 17-19°C, good light for 12-14 hours and constantly moist soil.
If the daylight hours are too short (less than 11 hours), the seedlings will need to be illuminated with fluorescent lamps.
At the beginning of seedling growth, heating devices are still working in apartments; it is not recommended to place containers with seedlings near them, because the soil will dry out too quickly.
Indoor air humidity should be maintained at 60-65%.
Preparing for landing
The key to obtaining healthy bushes and a good potato harvest will be proper seed preparation. To increase the immunity of plants, experienced gardeners recommend stratification and germination before rooting in the soil.
Stratification involves hardening the material. Seeds soaked in water are kept in the refrigerator overnight, and stored at room temperature throughout the day, keeping within the range from +18C to +22C. They are subjected to such sudden changes for 2-3 days.
Related article:
7 main problems with potatoes that can significantly ruin the harvest
The next preparatory activity will be soaking. For these purposes, use cool water. The procedure lasts at least 7 days. The fluid must be changed regularly. Before immersing the material in water, it is laid out on gauze or a cotton pad.
As a rule, viable seeds with good germination will hatch within 5-6 days. Sowing work can be planned as early as 9-11 days.
How to plant potatoes from seeds: video tips
When to plant potatoes for seedlings
Potato seedlings usually grow at home for 2-2.5 months before they can be transplanted into open ground. Based on this, the time for planting seeds in containers is calculated. This usually happens in early March, when daylight hours are still short.
In the Moscow region, middle zone
In the middle zone, it is recommended to plant strong, healthy potato seedlings no earlier than mid-May, when the threat of spring frosts has passed. Therefore, it is recommended to sow seed in mid- to late March. In this case, the seedlings will have time to grow and get stronger.
In the Urals and Siberia
In these regions, warmth comes late - at the end of May - beginning of June. Therefore, it is recommended to replant potato seedlings in early June. It is recommended to plant seed material in early April.
In the Leningrad region
The Leningrad region in its climatic conditions is close to Western Siberia - the likelihood of spring frosts remains in this region until the end of May. Therefore, seeds should be planted for seedlings no earlier than the first ten days of April.
According to the Lunar calendar in 2021
According to the Lunar calendar for 2021, favorable days for planting potato seeds for seedlings in 2021:
- in April - 2, 3, 21, 24, 26, 29, 30;
- in May – 1, 4, 20, 23, 27, 31.
Propagation by seedlings
This option will allow you to get the earliest possible harvest, and will also allow the crops to get stronger before rooting in open ground.
Optimal timing
It is recommended to plant seedlings from the second half of March to mid-April. Some gardeners are already planting in late February. The work carried out in this period will make it possible to plant strong vegetable seedlings on the site as early as May.
Related article:
What potato varieties are best suited for the Urals
Preparing containers and soil
It is best to choose low containers or boxes up to 10 cm. A mandatory requirement for containers will be the presence of drainage holes, thanks to which it will be possible to eliminate the risk of rotting of the underground part of the plants.
Land is needed with maximum levels of micronutrients. Soil mixture can be purchased at the store or prepared yourself.
Nutrient substrate can be made from the following components:
- peat or soil from the forest, garden;
- humus;
- river sand.
We recommend reading: How to prepare soil for seedlings
Regardless of which type of land was chosen for planting, the composition will need to be disinfected. For these purposes, they resort to calcination, freezing or spilling the soil with disinfectants.
How to sow
The work algorithm looks like this:
- the ground is pre-moistened, small grooves are made no more than 1.5 cm with a step between rows of 7-9 cm;
- seed material is laid out in recesses at a distance of 2-3 cm, sprinkled with soil mixture or a layer of sand;
- moisturize by spraying;
- cover with a transparent lid or film;
- Place the container in a warm place with good access to sunlight, maintaining the temperature at +21C-24C.
Related article:
9 Tips for Growing Potatoes
Further care
Young potato shoots should appear in one and a half to two weeks. Until this point, it is necessary to ensure regular moistening and ventilation.
After germination, additional feeding with nitrogen-containing compounds in the form of urea or ammonium nitrate will be required. For 1 bucket of water use 10-15 g of dry matter.
It is important to provide good access to light. The duration of daylight should be at least 12 hours. Therefore, it is additionally recommended to use fluorescent lamps or special phytolamps. With a lack of lighting, seedlings become thin and elongated.
Watering young plants should be done from a spray bottle; you can also practice introducing moisture through a tray.
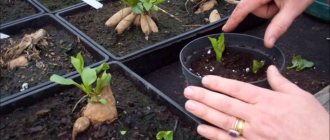
Picking is carried out when 1-2 true leaves appear. During this period, the potatoes are planted in separate containers. To do this, you will need to use peat pots, plastic cups, plastic bags, and film.
Related article:
Potato care
Hardening is carried out in May, when the air temperature outside will no longer drop below +9C-11C. The container with seedlings is taken out of the room into fresh air, gradually increasing the time it stays outside the house.
Transplanting into the garden
The work is planned for mid-to-late May, when the risk of return frosts can be eliminated.
The rooting process looks like this:
- holes are prepared, 10-12 cm deep;
- 250-350 g of humus is added to each;
- each crop is planted separately;
- sprinkle with earth, moisten with a spray bottle.
Further agricultural technology
Care in open ground comes down to the following activities:
- plantings are regularly moistened;
- after 10-14 days, the bushes are hilled;
- weed the beds;
- pest control.
Tips for summer residents: Good fertilizing for active potato growth
Fertilizers are used according to the following scheme:
- for early varieties - 3-4 weeks after transplantation;
- for middle and late ones - during the period of active growth of tops and in the budding phase.
Related article:
How to fertilize potatoes
It is recommended to prepare a mixture for fertilizing plants from nitrogen, phosphorus and potassium compounds in a ratio of 1:2:1 or 1:2:1.5. You can also use nitrophoska or nitroammophoska. One bush will require about 30-35 g of the substance.
For the second feeding, it is worth stopping at potassium sulfate and phosphorus fertilizers in proportions of 1: 1.5. The use of ash or kemira is practiced. Fertilizers are applied by the root method.
How to properly plant potato seeds for seedlings: step-by-step instructions
Potato seeds can be planted both in containers and in greenhouses, from which the finished seedlings are then transplanted to a permanent place in open ground. It is recommended to grow potatoes from seeds using the seedling method in most regions of Russia, where the possibility of spring frosts in April - May is high.
Land preparation
Soil for planting seed material can be purchased at a specialty store - a nutrient substrate for vegetable plants is best. But you can prepare such a nutrient mixture yourself.
The composition of this mixture is easy to prepare.
You need to mix garden soil and peat in a ratio of 1:4, add a handful of complex fertilizers and spill it with a disinfectant solution. You can use a weak solution of potassium permanganate as a disinfectant solution. You can also heat the prepared substrate in the oven.
The soil prepared in this way can be laid out in prepared boxes.
Seed preparation
If seed material was purchased in a specialized store from well-known companies, then pre-sowing preparation does not need to be carried out - the company has already done this before packaging the seeds.
But the collected seeds from your garden should still be processed before sowing. It should be remembered that such seed has low germination, so you need to prepare more seeds for planting.
To increase the chance of sprouting, soak the seeds in cool water for 48 hours. Simultaneously with the soaking procedure, it is necessary to harden the seed material. To do this, keep the container with seeds warm for the day, and put it in the refrigerator at night, where the temperature is maintained at +1, +2⸰С. This procedure allows you to prepare the seed material for growth in open ground.
You can sow seeds only when they begin to hatch. It is in this case that you can see which seeds were viable and which were not.
Sowing
The sprouted seed should be planted in wide boxes in rows. The distance between the seeds should be about 3 cm, and the row spacing should be about 9-11 cm. In this case, the seedlings will have enough nutrients and will also have enough space to grow.
The seeds are laid out on the surface of the moist soil mixture. And on top they should be sprinkled with a thin layer of river sand (the thickness of such a layer is no more than 0.5 cm). the emerging sprouts are too weak and tender, they will not be able to break through the too thick layer of sand.
After planting the seed, the boxes are covered with polyethylene and put in a dark, warm place so that sprouts appear faster. Typically, germinated seed material produces the first shoots 12-14 days after planting.
First shoots, what to do
After the first shoots appear, remove the polyethylene from the boxes and move them to window sills, closer to the light. After a pair of permanent leaves appear on the seedlings, they should be pruned so that the plants have more space.
Transplant the seedlings into plastic cups with drainage holes in the bottom. But many vegetable growers recommend using peat pots for this purpose. In which it will be fashionable to then plant seedlings in open ground - these cups will dissolve in the soil and serve as additional fertilizer. Another advantage of such containers is that when planted in open ground, plants are not injured and quickly acclimatize to a new place and hardly get sick.
How to grow potatoes from seeds: video
Where to get planting material
There are two ways to obtain seeds for propagation at home:
- purchasing store products;
- independent collection from growing crops.
In the first case, the gardener will be able to buy potato seeds of any variety, from early varieties to late ripening ones.
It is important to purchase growing material in specialized stores, giving preference to trusted brands.
Related article:
5 easiest ways to plant potatoes
Potatoes from seeds: varieties
As practice shows, material purchased secondhand is of extremely low quality. This significantly reduces the chances of getting a good harvest. Therefore, you should refrain from such acquisitions.
The second method will require a lot of labor from the gardener. Self-collection is recommended to be done as follows:
- At the end of summer (August), you need to select the strongest bushes, picking from them the large berries growing at the top. Outwardly, they will resemble unripe tomatoes containing seed material for planting. The maximum number of berries is formed on the bushes after rains.
- The berries are collected in a bag made of cloth or gauze and left for several days in a bright and warm place. A window sill is suitable for further ripening.
- Subsequent preparation work must be carried out at the moment when the collected fruits become soft. Wilted berries should be removed from the bag, crushed, and then the seeds carefully collected.
- They must be thoroughly washed in warm water, dried and stored in a paper or plastic bag until directly sown as seedlings or in open ground.
Related article:
Popular varieties of purple potatoes
What are the seeds of potatoes?
This material retains its viability for 2-3 years. However, gardeners should take into account that collected seeds are not always able to inherit their varietal qualities. To ensure good yields, you will need to prepare as much root crop seed material for propagation as possible.
Seedling care
Further care of the plants consists of creating certain lighting, regular watering and fertilizing. Each of these procedures needs to be discussed separately.
Additional lighting
Young sprouts need a sufficient amount of light - about 11-13 hours. If the seedlings are planted in March, when the days are still short, then fluorescent lamps should be installed next to the boxes and the seedlings should be illuminated in the morning and evening hours, as well as in cloudy weather. It is also necessary to periodically rotate the boxes so that the seedlings are illuminated by the sun evenly from all sides.
Watering
Watering should be done with filtered water at room temperature. Watering should be frequent, but not too abundant - moisture should not accumulate in either drawers or cups.
The irrigation regime should be as follows - the top layer of soil should be constantly moist, but without stagnation of moisture.
Top dressing
Seedlings must be fed, because there is too little soil in the boxes and plastic cups, so the sprouts quickly select the nutrients necessary for growth. A couple of weeks after the appearance of the first shoots, the first fertilizing is carried out with a solution of ammonium nitrate. The nitrogen included in its composition activates the growth of above-ground and underground parts of plants.
After the seedlings have been picked, they should be fed again. The second feeding is carried out 12-14 days after transplanting the sprouts to a new location. Ammonium nitrate is again used as a fertilizer, which helps plants get stronger after transplantation and grow faster.
Picking
Picking seedlings is necessary if the plants in the boxes are planted too densely. After all, growing seedlings require more space and nutrients. Therefore, experts recommend carrying out this procedure, but carefully so as not to damage the delicate root system of young plants.
Preparing the soil for potato seedlings
The soil for potato seedlings should be loose, water- and breathable, that is, approximately the following composition: to 6 parts of turf soil or 4 parts of high-moor peat add 2 parts of garden soil and 1 part of sand. The ingredients are thoroughly mixed, the soil mixture is spilled to protect against soil fungi with a solution of Trichodermin or Fitosporin-M, prepared in accordance with the instructions, and 10-15 g of Nitrophoska is added for every 10 kg of substrate. Biological products Trichodermin and Fitosporin have the property of not only destroying pathogens, but also promoting the proliferation of microflora beneficial to plants. After treatment with biological products and application of fertilizer, the soil mixture is thoroughly mixed again and dried at room temperature.
Mistakes and problems growing
But potato seedlings do not always grow strong and healthy - they can stretch out too much, and sometimes turn yellow and wither. What are the reasons and how to correct the situation?
What to do if seedlings stretch out
Typically, seedlings stretch out because there is not enough light for them, or they are not turned towards the light often enough so that the plants are illuminated by the sun's rays from all sides.
If it becomes noticeable that the stems are stretching too much, it is necessary to install additional lighting near the plants - potato sprouts require lighting for at least 10 hours a day.
If it turns yellow and withers
There may be several reasons for the appearance of yellow leaves and wilting of seedlings:
- the temperature regime in the room is not maintained;
- air humidity is too low;
- plants lack nutrition;
- the seedlings are sick;
- The plants were attacked by pests.
The air temperature in the room should be adjusted - it should be about 20⸰C. You also need to ensure that the air humidity in the room is about 60%, this is especially important during the heating season, when the radiators dry out the air in the room too much.
It is necessary to apply fertilizer to the seedlings at least 3 times during the time that the potato seedlings are growing indoors - in this case they will not experience a lack of nutrients.
The presence of diseases or the appearance of pests can be seen by visual inspection. If yellowing and wilting of the above-ground parts of plants is associated with these reasons, you need to start fighting the disease or insects immediately to save the seedlings.
Potatoes from seeds - first mistakes: video
Seed potato varieties
There are the following categories of seed potatoes:
- super-elite (SE class);
- elite (class E);
- first reproduction (class A);
- second reproduction (class C) and so on - every year the potato category is automatically lowered by one class.
Early potato varieties
Of the early varieties of seed potatoes, the following are available for sale:
- Red Scarlet is a universal and high-yielding variety, resistant to drought, cancer, late blight, nematodes, viral diseases, downy mildew, scab and mechanical damage with oval-shaped tubers in red skin and yellow flesh;
- Impala is a table variety resistant to cancer, viral diseases, potato and golden nematodes, and fusarium. The tubers are oval, light-skinned, with dark yellow pulp of good taste, resistant to darkening after cooking. The variety is weakly resistant to late blight of tops;
- Zhukovsky - round-oval pink tubers with colored small eyes and white flesh. The variety is resistant to heat and drought, cancer, rhizoctonia, scab, potato nematode, sometimes affected by Alternaria, but weakly resistant to late blight. Has good keeping quality;
- Udacha is a table variety that is resistant to drought, late blight and viruses, but is moderately resistant to scab. The tubers are white, smooth, round-oval, with small eyes, weighing 100-130 g. The pulp is white;
- Christina is an early potato variety of Dutch selection with smooth oval tubers of rich red color and shallow eyes. Has powerful immunity to scab, rhizoctonia and other diseases;
- Gypsy is a mid-early productive and disease-resistant potato of Ukrainian selection with smooth, rounded, elongated blue-violet tubers weighing 100-130 g with small eyes and white flesh with purple veins. The variety has good keeping quality.
In addition to those described, seed potatoes of such early varieties as Tiras, Rosara, Povin, Tornado, Infinity, Adretta, Banba, Serpanok, Minevra, Bellarosa, Nevsky, Alvara, Bikini, the super-early Dutch variety Orla and others are popular.
Mid-season varieties of seed potatoes
The best mid-season seed potato varieties include the following:
- Savannah is a high-yielding variety of Dutch selection, resistant to all types of scab and late blight. The tubers are large, oval, smooth, cream-colored, with small eyes. The pulp is white or cream;
- Electra is a highly productive variety of Dutch selection, resistant to scab and late blight. Its tubers are oval, large, smooth, yellow, with small eyes. The pulp is light yellow;
- Aurora is a productive table variety, resistant to cancer and various types of nematodes, with smooth oval tubers and small eyes. The skin of the tubers is yellow, partly red, the flesh is creamy. The keeping quality of the variety is excellent;
- Wendy is a table variety of excellent taste, resistant to darkening of the flesh when raw and cooked, to viral diseases, rhizoctonia, blackleg and late blight. The tubers are medium and large, round-oval, the skin is smooth-mesh, yellow in color, the eyes are small, the flesh is yellow;
- Nectar is a highly productive Dutch variety, highly resistant to scab and late blight. The tubers are oval, large, smooth, cream-colored, with small eyes. The flesh is yellow or light yellow. Keeping quality is good;
- Setanta is a high-yielding variety of Dutch selection, resistant to scab, late blight and other fungal diseases. The tubers are large, oval, smooth, red in color, yellow flesh. The keeping quality of tubers of this variety is very good.
In addition to those described, mid-season seed potato varieties such as Inara, Jelly, Zekura, Mayak, Khozyayushka, Pirol, Mont Blanc, Rosalind and Roko are of interest.
Late potato varieties
There are not as many late-ripening varieties of seed potatoes as there are early, early-ripening and mid-ripening varieties. The best of them are:
- Pheasant is a versatile table variety, resistant to diseases and pests, with medium-sized yellow tubers, mesh skin and light yellow flesh. The keeping quality of tubers of this variety is good;
- Merlot is a table variety with elongated oval, medium and large tubers. Their skin is smooth, slightly mesh, rich red in color, the eyes are small, and the flesh is yellow. The variety is resistant to blackleg, scab, late blight, rhizoctonia, glandular spot and viral infections. The keeping quality of the tubers is very good;
- Picasso is a productive table variety, resistant to potato nematodes and canker, moderately resistant to scab, late blight and viruses. The tubers are round-oval, yellow with pink spots, the pulp is creamy in color and has excellent taste. The mass of tubers is from 75 to 125 g;
- Zhuravinka is a disease-resistant table potato variety bred by Belarusian breeders, with round-oval red tubers with light yellow flesh;
- Blakit is a table variety with oval-round tubers with yellow flesh of excellent taste. The variety is resistant to cancer and relatively resistant to late blight.
Late varieties of seed potatoes such as Nikulinsky, Chaika and Lasunok have proven themselves well.
Advice from experienced gardeners
Many vegetable growers who have grown potatoes from seeds note the following features of such seedlings:
- potatoes grown in this way have higher immunity to most diseases;
- the yield of such potatoes is higher;
- seedlings grown from seeds are stronger because they are usually not attacked by insects or pathogens during the growth process.
However, this method of growing potatoes also has some disadvantages:
- a full harvest can only be obtained in the second season, since in the first year vegetable growers receive only nodules for planting the next year;
- Potato seeds collected from your garden do not have a very high germination rate;
- emerging seedlings are very weak and tender, so they should be properly cared for in order to get a full harvest in the future.
But despite a number of disadvantages, growing potatoes from seeds is quite popular among vegetable growers. And sometimes it’s worth trying new ways of growing vegetables in order to get larger yields as a result.
Harvest and storage
The harvest of varietal potatoes, which I planted as seedlings from seeds, was harvested separately (that is, by variety).
There weren’t many potatoes, so I prepared several cardboard boxes (as many varieties, as many boxes) and labeled them with the names of the varieties (they also need to be stored separately)
.
As a result of my experiment with planting potatoes as seedlings, one and a half 10-liter buckets of seed potatoes were dug out of 6 holes.
The tubers varied in size: the largest (and there were few of them) were the size of a chicken egg.
I left all the potatoes to green up in the sun. What does it mean? If anyone deals with planting potatoes, he knows that if some part of the potato was not covered with earth, or during the process of growth “peeped out” of the ground, then its barrel becomes green.
What is solanine and what is greening for?
When exposed to light, potatoes produce the natural poison solanine. It is not recommended to eat such potatoes (unless you cut off the entire green layer), otherwise you can get poisoned.
Solanine does not dissolve in water, and even boiling water does not take it, so in case of such poisoning you need to be treated only in a hospital!
The advantage of green potatoes is that they are better stored for planting in the spring, but they should be placed in a dark place (preferably at a temperature of +2.+ 4 degrees) so that they do not germinate ahead of time. For example, we store potatoes in the basement.
We select potatoes for planting in the spring: varietal potatoes, which were put aside in the fall, are also planted separately from potatoes harvested at the same time of year.
After this, again at the beginning of the row we place a peg with a sign on which the variety is written - and so on until all the potatoes are gone.
We throw 3-4 tubers of varietal small potatoes, if not large potatoes grow, but small ones, then they will be used for seeds.
If it was not possible to plant with new varieties, then the area intended for planting potatoes should be planted with the varieties that are available.
But be sure to leave seeds of new varieties next year so that you can gradually replace all the potatoes with new ones or one you like.
Seedless method
This method is suitable only for southern regions with a warm climate. Potatoes can be grown there by sowing the seeds directly into open ground. For planting, choose a well-lit area, protected from the wind. The bed is prepared in advance. After harvesting, it is dug up and green manure is sown in this place. After 1.5-2 months they are mowed and embedded in the soil. Then in the spring the bed will be ready for sowing seeds.
Important!
If the soil is acidic, additionally add dolomite flour or wood ash, 2 cups per square meter.
It may be interesting How to hill potatoes with a walk-behind tractor and a cultivator: useful tips The main secrets of planting bulbs (potatoes) Technology of growing potatoes and caring for them in a barrel
Pre-planting preparation of seeds is carried out in the same way as for seedling cultivation. Sowing is carried out from May 1 to May 20. The reference point is the soil temperature. It should warm up at a depth of 10 cm to a temperature of +14 degrees.
The soil is moistened before sowing. To plant seeds, make holes 4 cm deep with an interval of 40 cm. Place 3 seeds in each hole and sprinkle with soil. Shoots appear after 10 days. After the seedlings have formed 2 true leaves, they are thinned out by moistening the soil first. The plants are carefully pulled out, leaving the strongest ones. If the extracted specimens are not damaged, they can be planted in another place, placing them at a distance of 20 cm from each other.
At first, the growth rate of seedlings is very low. Therefore, they need constant clearing of weeds, loosening and watering with moderate amounts of water. In a month the bushes will strengthen. Then they are cared for in the usual way.
Disadvantages of seed propagation
With all the advantages, growing potatoes with seeds also has some disadvantages. For example, it will be possible to obtain potatoes suitable for consumption not in one season, but after 2 years: in the 1st season, small nodules weighing 20-40 g will grow from the seeds, which will need to be planted in the ground next spring.
Another disadvantage of seed propagation is the difficulty of growing seedlings. To grow it, you will need patience and providing the potatoes with the necessary conditions for normal growth and development. You will need:
- A very loose and airy substrate, for example, sawdust, because potatoes obtained from seeds have weak, fragile roots that can only develop normally in light soil.
- Sufficient and uniform lighting so that the seedlings do not stretch.
- Treatment of seedlings with fungicidal preparations for prevention or treatment.
But, if you manage to do everything right, then there will be no problems with obtaining potato seedlings.
Advantages of seed propagation of potatoes
Let's look at the advantages of propagating potatoes by seeds. For example, the fact that purchased seeds will cost less than varietal tubers, since there is no need to store them until spring, or maintain certain conditions in the storage under which they should be stored. The seeds can be kept in the room along with the seed material of other vegetables, or you can simply purchase them in the spring shortly before germination.
Potatoes from seeds are distinguished by the fact that they are not infected with any diseases, including late blight, are resistant to many unfavorable environmental conditions, and adapt well to the climate of various regions. And the main advantage of seedling potatoes is that you can get a much larger harvest from it than using seed tubers, and the potatoes grown from seeds are of higher quality and more numerous. The high performance of such potatoes lasts for 5-7 years.
Varietal seeds retain good germination for 5-6 years. With their help, you can easily update potatoes, which have been grown on your site for many years, and get a new variety of this garden crop.
Processing and sowing potato seeds
Seed preparation
Planting potatoes with seeds for seedlings begins with processing the seed:
- Hardening. For three days, the planting material is kept at room temperature during the day and in the vegetable section of the refrigerator at night.
- Soak. The seeds should be kept moist for 5 to 7 days. To do this, they are laid out on damp cotton pads or cotton fabric folded in several layers, sprayed generously with cool water and covered with a layer of wet pads or another piece of fabric (gauze can be used). Do not pour water over the seeds, as they may “suffocate”.
You will be interested to know: Treatment of potatoes before planting against diseases, wireworms, and Colorado potato beetles
Around the fifth or sixth day, the seeds should begin to sprout.
Preparing soil and containers
Soil for planting potato seeds can be purchased at the store by choosing a soil mixture that includes humus, peat, garden soil and sand. If you have all these components, then you can prepare the soil yourself, taking into account that there should be one part of sand and humus, 3 parts of peat, and 2 parts of soil from the garden.
There is no need to treat soil from the store, but soil mixed independently should be disinfected with Fitosporin.
Seedling containers must have drainage holes and be about 10 cm high. If they are not new and have already been used, do not forget to rinse the container with a pink solution of potassium permanganate before use.
How to sow seeds correctly step by step with video
Seedling containers need to be filled with moist soil, so the day before planting, spill the soil in a basin or bucket.
The procedure for sowing potato seeds for seedlings:
- We make grooves in the soil with a dove of one to one and a half centimeters.
- We place the seeds in grooves with a distance of 4-5 cm.
- Sprinkle the crops with sand or soil mixture, spray with settled water from a spray bottle and cover with polyethylene. It is very convenient to use cling film.
Before emergence, the crops are placed in a warm, bright place. The air temperature should not be lower than +21 degrees. The first seedlings will begin to appear in 1.5-2 weeks. During this time, every day you need to remove the film and remove condensation. If the top layer of soil begins to dry out, it is sprayed with warm water.
WATCH THE VIDEO OF PLANTING POTATO SEEDS FOR SEEDLINGS AND HOW TO CARE FOR THE SEEDLINGS
Rules and features of caring for potatoes grown from seeds
The place for potato seedlings or seeds must be selected in a bright, open area. It is not advisable to plant in the shade: the bushes stretch out, and the potato sets turn out to be too small. The best predecessors for this crop are legumes, beets, carrots, cucumbers and other pumpkins, cabbage and other cruciferous vegetables, and corn.
The site begins to be prepared in early autumn. You need to remove the weeds from it and dig up at least a spade's worth of soil. If the soil is acidic, then 1 tbsp should be added to it for each m2. dolomite flour or slaked lime and 2-3 tbsp. wood ash. Then sow green manure in this area, for example, rapeseed, barley, mustard, peas or rye. When 5-8 weeks have passed, the area needs to be dug up again along with the green plants.
If you plan to prepare the land without green manure, then during autumn soil preparation it is necessary to add 0.5-1 bucket of rotted humus or compost. The second option: in the spring, when digging, add mineral fertilizers. The best solution for this is nitrophoska, which needs to be added at a rate of 30-40 g per m2.
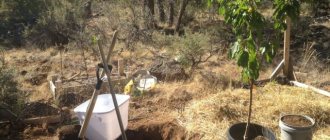
Potato seedlings obtained by yourself should be planted in open beds at the age of approximately 40-55 days, that is, approximately in the middle or end of May (in the south), in the middle zone and in the north of the country even later. Potato bushes should be placed in holes to a depth of approximately 10 cm. The distance between plants should be 25-30 cm in order to obtain good quality potato sets. In the first days after planting, potato seedlings need to be covered with lutrasil or spunbond so that they do not burn in the sun during the day or die from cold weather at night. When it takes root and begins to grow in a new place, the cover must be removed.
Agricultural technology for obtaining potatoes from seeds involves further care of plants planted as seedlings in beds or grown from seed in open beds. What does it consist of? In watering, loosening, weeding and fertilizing. Potato seedlings grow slowly at first, so the soil must always be kept loose and moist so that it does not dry out or become hard.
When the potato bushes grow, the frequency of watering should be reduced so as not to make the soil too wet. It is necessary to water with warm water, in the morning or evening, but not in the heat of the day. Bushes at one month of age already consist of several stems. Caring for them is practically no different from that recommended for potatoes grown from tubers.
It is necessary to feed potato seedlings as follows:
- Early varieties - 1 time 30 days after planting in the beds. At the same time, carry out hilling.
- For medium and late varieties - 2 times (1st time as for early varieties, second time - before flowering).
You can feed seedlings or seedlings for the first time with a mixture of nitrogen, potassium and phosphorus fertilizers in a ratio of 1:1:2. You can use nitroammophoska (30 g per bush). You can also feed the potatoes with any complex fertilizer, for example Kemira (10 g per sq. m). In the 2nd feeding, you need to exclude nitrogen, but leave phosphorus and potassium (in a ratio of 1.5: 1). These elements can be added to the soil in the form of ash (1-2 tbsp per sq. m). At the end of flowering, to stimulate the outflow of nutrients into the nodules, potatoes can be sprayed on the tops with a solution of superphosphate (dissolve 20 g of this fertilizer in 10 liters of liquid, leave to infuse for 2 days).
When receiving potatoes from seeds, the potato set and the resulting tubers remain completely healthy, but the plants themselves can become infected with rot, late blight, fusarium, potato cancer, and scab. They can also be damaged by pests found in the soil: mole crickets, wireworms, nematodes, or those that can fly to potatoes (Colorado beetles, moths, aphids, cutworms). To combat diseases, you can use the fungicides Fitosporin, Fitolavin, Trichodermin, Planriz, and to exterminate pests you can use the drugs Fitoverm, Boverin, Bicol, Bitoxibacillin, etc.
Features and possible difficulties of the method
The seedling method of growing potatoes is not popular today. It is practiced only at breeding stations to preserve the genetic characteristics of existing and new varieties. According to experts, it is possible to maintain high fruiting, marketability and taste of root crops at home if in the spring you abandon the usual planting of tubers and sow ripe grains instead.
Despite the effectiveness of the seed method, most vegetable growers are afraid of it because of the many troubles and difficulties that will have to be overcome from the moment of sowing the grains to transplanting the seedlings to a permanent place. Find out whether the result is worth the effort spent on it from the table below, where the advantages and disadvantages of the method are presented in comparison.
- Advantages:
- Buying seeds is much cheaper than buying tubers.
- Storing grains does not require a cellar and a lot of space.
- Plants grown by seed are characterized by increased immunity. They are not afraid of late blight and can fully develop even under unfavorable external factors.
- The productivity of such bushes is 40–50% higher.
- Root vegetables are characterized by a richer color and taste.
- Flaws:
- Slow development of the root system of potato seedlings. At this stage, it is important to provide the plant with as loose soil as possible. Breeders advise growing seedlings on sawdust until they reach a height of 3 cm.
- Capriciousness and demandingness of seedlings to growing conditions. Young shoots need enough heat, moisture and light for proper development. Otherwise, the stems will become very elongated and brittle.
- At the initial stage of cultivation, potato seedlings are very sensitive to pathogens of fungal and bacterial diseases (in particular, blackleg), so regular disinfestation with Planriza and Trichodermin preparations is indispensable.
- Fragility of potato seedlings. Because of this feature, seedlings need to be replanted carefully.
- Duration of cultivation. In the first year, a seed will grow weighing about 10–45 g; the next year it will ripen into elite tubers for table use.