Hosta, also known as funkia, is valued primarily for its decorative leaves, and even non-flowering specimens add special charm and originality to flower beds. Hosta prefers loamy, humus soils with an acidic reaction and high humidity.
Hosta is a perennial and is distinguished by its longevity, therefore, when choosing a place to grow it, you should take into account the lighting regime, the attitude to which differs among different types of hosta. For example, green-leaved plants are especially valuable for areas with strong shade, where they grow and develop well. Variegated forms (with patterned leaves) require a bright location. Although they also feel great in the shade, the characteristic color of the leaves disappears, causing the decorative effect to be lost.
Hostas reproduce primarily vegetatively (by dividing rhizomes and cuttings), but often there is a need to obtain a plant from seeds, which is quite problematic, and without knowledge of the specifics of agricultural technology, growing hostas is doomed to failure.
Soil and cultivation containers
The main reason for failures in seed propagation is the unsterility of the soil and cultivation containers.
To treat seed containers, you can use a strong solution of potassium permanganate or, preferably, medical alcohol. All instruments used for sowing must also be sterilized with alcohol.
Special cassettes with cells (preferably with a lid made of translucent material), which can be purchased at flower shops, are ideal as containers. There you can also buy the ingredients for making the soil: peat, vermiculite and perlite, which are taken in equal proportions. The peat crumbs will first need to be crushed to the size of coarse river sand, for which you can use metal sieves with a mesh size of 1 mm.
The finished soil mixture must be watered with a strong solution of potassium permanganate and treated with superheated water steam for half an hour. To create the simplest “steam bath”, you can use a wide saucepan, into which water is poured halfway. A sieve containing the soil mixture intended for processing is placed on top. The water in the pan should be actively boiling. The sieve should also be covered with a lid to enhance the effectiveness of the steam treatment.
After the “steam bath”, the sterile soil must be cooled to a temperature of 20 - 25 ° C and you can start sowing.
Growing seedlings
Hosta seeds have a low germination rate - about 70 - 80%, so before sowing it is advisable to treat them in a solution of stimulants, which are widely available in the retail chain.
Hosta seeds need to be planted shallowly, up to 5 - 7 mm. It is most correct to adhere to this technology:
Compact the soil surface with a wide wooden plank. – Carry out sowing. – Sprinkle with a layer of perlite and compact again.
The “rolling” method allows for excellent contact of seeds with the soil, which will create optimal conditions for germination, and at a temperature of 20 °C the first shoots can be expected to appear within 2 weeks.
The appearance of the first true leaf is a signal for picking - transplanting seedlings into separate containers with sterile, but more nutritious soil. The top of the soil is covered with a small layer of sand. Watering will now have to be done “bottom-up”, by immersing the cultivation container in a container of water.
In order to adapt young plants to future growing conditions, seedlings must be hardened off, gradually lowering the temperature. You also need to accustom the seedlings to sunlight - take them outside, gradually increasing the exposure time, starting from 10 - 15 minutes.
The showiness of the hosta is worth spending your time raising strong and healthy seedlings!
Before you grow hosta from seeds, you need to know that it is a difficult business. Success depends on what kind of substrate you use.
The substrate for germinating hosta seeds must be sterile; if fungi or other microbes are present in it, the hosta seeds will immediately become infected and the young seedlings will be sick. It is recommended to use store-bought substrate.
Seed container
hosts also need to be processed. To do this, you can use medical alcohol or a manganese solution. The most suitable container is one with cells or compartments. Drainage should be laid at the bottom of each cell, and then the substrate. Water the soil well because hosta is a moisture-loving plant.
If the container has a lid, it will be easy for you to maintain the required humidity. If there is no lid, use clear glass.
Hosta seeds should be planted to a depth of no more than 5 mm. After planting, the soil needs to be compacted a little, this is necessary so that the hosta seeds quickly absorb moisture, and this is only possible when the seeds come into contact with the ground.
With good humidity and air temperatures above +20 degrees, hosta seeds germinate in two weeks. Plants need to be picked after a few pairs of leaves appear. Hosta is planted outside in the spring, when the soil warms up to +10.
Then collect seeds from your hosta if it blooms for you this year. Practice shows that the hosta is ideal for landscape design. Its spreading foliage goes well with stone, with other plants, with flowering and non-flowering plants.
Since growing hosta from seeds is not very difficult, you will have the opportunity to test yourself in this matter. It is better not to plant hosta seeds this year. Dry the seeds in a fabric bag in partial shade, and next year the seeds will be ready for germination.
Funkia or Hosta is an ornamental and beautiful plant. Distinctive feature: large and fleshy leaves with different shapes and sizes, depending on the variety. The plant adapts well to new growing conditions, so funkiya can be grown on depleted and moisture-deprived soils. It tolerates short-term drops in temperature well and fits perfectly into the overall landscape.
If you look at the funkia that grows in natural conditions, we can say that it is a giant plant. The leaves are very large and thick, spreading. The hosta looks somewhat mysterious. Only in one place can you see several species of a plant, because they quickly interbreed and as a result new variations are formed.
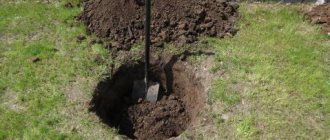
Transplantation into open ground
Closer to July, you can start preparing a permanent site. Even shade is suitable for hostas - this is its advantage. It is believed that the maintenance conditions depend on the variety, because the brighter the leaves, the more light the plant will need. Although even in this case, a few hours in the sun (preferably in the first half of the day) is enough. At the chosen location, you need to remove all debris and dig up the ground well, carefully selecting weed roots and breaking up large clumps. To prevent water from flowing to one side when watering, the future flower bed should be level.
At the same stage, you can correct the condition of the soil using various additives. To make the soil more loose and crumbly, sand is usually added to it. This will not only prevent moisture retention, but also ensure good air exchange in the soil. Another important indicator is acidity. To make the soil neutral, you can use slaked lime, dolomite flour or ash diluted in water.
All additives must be distributed evenly and dug to a depth of at least 15 cm.
Then you can follow the instructions:
- form a hole, add a little sand to the bottom, and then earth;
- carefully remove the seedlings from the container;
- Without clearing the soil, place it in a hole, sprinkle it on top and lightly compact it.
The distance between the pits depends on the splendor and size of the hosta in adulthood. For medium-sized people, 50 cm is enough. For curvier and taller people, this distance should be increased to a meter. All plantings must comply with the selected site design. Single planting is possible, but they look best in a group. They can be planted as an independent flower bed or combined with some flowers and shrubs.
Hosta flower - description
The plant is not large, so hosta can be grown at home. There are many varieties of this plant, adapted varieties - which can be grown in open ground and plants that are intended for growing in pots.
There are more than 60 species of herbaceous perennial plants. They belong to the “Asparagus” family, but previously this type of plant was classified in another family: “Liliaceae”.
The hosta has an unusual name, thanks to the name of a botanist from Austria, who paid a lot of attention to the reproduction and development of this plant. Previously, the flower was called funkia. The countries of East Asia, as well as the southwestern part of the Far East, the Kuril Islands and Sakhalin are considered the birthplace of this plant. Despite its excellent survival rate even in conditions of lack of liquid, hosta can be found more on soils rich in moisture. The plant feels great near the banks of reservoirs and on mountain slopes. Hosta also grows on the edges.
In Japan, this plant is revered and even considered sacred; the Japanese use some parts of the plant in cooking to prepare delicacies.
The plant is low, rosette type, grows in the form of small but rather dense bushes with large and fleshy basal leaves. The rhizomes are thickened with branches - thread roots.
Since in nature there are more than 60 varieties of this plant and more than 4 thousand varieties (!), the leaves can differ not only in size, but also in shape. You can find miniature specimens, with small leaves, no more than 5 cm in size, with different shapes and colors. The color of the leaves can be either light green or dark with a transition to a grayish-blue tint.
In some species, the leaves may not be a single color, but with patterns: with white stripes, light stripes or strokes. Patterns can be varied in shape and length. Interestingly, depending on the plant variety and growing conditions, the shape of the leaves can change: the edge can be smooth, sharply defined, or, conversely, wavy.
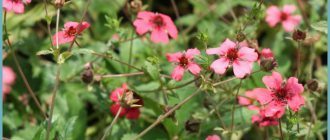
Hosta flowers are beautiful, somewhat reminiscent of lilies, of various colors. Despite the attractiveness of the flowers, hostas still attract the eye more with their dense basal rosettes. They can reach up to a meter in diameter!
The plant is unpretentious and hardy, it is stable - from the moment the leaves unfold (this happens at the end of spring) until the end of October, the plant pleases with its unusual beauty.
Varieties and types of hosta
Plants are very popular in landscape design; there are more than 4 thousand hybrid varieties, but only a few deserve special attention, since they served as the basis for the creation of new plant varieties.
- Curly, height up to 60 cm maximum, leaves are very wide and dark in color with a white, clear and beautiful border.
- Tall - reaches almost a meter in height, the leaves are equally large and dark.
- Fortune - an adult plant grows to only 50 cm in height, the border is a soft cream color, the leaves are succulent, bright green.
- Siebold - the plant grows a little more than half a meter, the leaves are large with veins.
- Wavy - height up to 75 cm, beautiful wavy leaves with a white center and patterns.
- Plantain hosta has large bright and glossy leaves, the plant is not tall, only 50 cm.
All varieties are classified by type:
- Plant color.
- Leaf size.
If we consider the first group separately, then it includes 5 types of plants that differ in the color of the leaves: blue, yellow, green, variegated (with a border along the edge of the leaves of a light shade) and vice versa, the leaves are light and the border is dark green.
Plant sizes by group:
- Group 1: dwarf. This is an indoor hosta flower, grows up to a maximum of 10 cm. The leaves are gray-blue, the shape of the leaves is similar to mouse ears;
- Group 2: miniature, 5 cm larger than dwarf ones with leaves of green, yellowish or blue shades;
- Group 3: small, reaching a height of 16 cm to a maximum of 25 cm. The leaf color is rich green with a white or yellowish stripe. There are also varieties with blue leaves;
- Group 4: medium hostas, height up to 50 cm maximum. The leaves are dark in color with a light center. There are varieties with white leaves, but over time they darken;
- Group 5: large plants, up to 70 cm with leaves of different shapes and colors: smooth, crinkled, with a light border and strokes;
- Group 6 – huge, gigantic plants, more than 70 cm in height with leaves of different colors and shapes. Distinctive feature: thick and large leaves. There may be a wide gold-colored strip along the edge; there are hostas with bluish leaves along the edge and a green center.
How to grow hosta at home
Hosta is an unpretentious plant, adapts well to any conditions and this flower can be called a plant for the lazy.
Let's look at all the ways to propagate hostas at home.
If you seriously decide to start breeding this plant and grow hosta from seeds at home, you need to pay special attention to preparing the seeds.
Preparing seeds and growing hosta at home:
- Before sowing the seeds in pots, they need to be soaked for 30 minutes in aloe juice or any other growth stimulant. For example, root or epina are suitable. The fact is that the seeds are very weak and their germination rate is poor. Therefore, experts advise doing this or hardening the seeds with cold: keep them in the cold for 4 weeks.
- A sterile substrate is also an important point; there should be no microorganisms or fungi in the soil, since the seedlings, although they will rise, will be weak and painful. For this reason, experts recommend purchasing a ready-made substrate in a store. You need to add vermiculite, peat or perlite to it. Or immediately buy a substrate with these components.
- Processing the pot is a mandatory procedure. The pot needs to be wiped with a solution of potassium permanganate or alcohol. After which you can start filling the pot with the previously prepared substrate (moistening). You need to pour a little drainage at the bottom and place moistened soil. Scatter the seeds on top and cover with a small layer of soil, about 1 cm thick or a little less. Light compaction is allowed so that moisture from the soil does not evaporate too quickly. But to preserve the moisture, you still need to cover the pot with a bag or a glass flask, or a cut-off plastic bottle.
- The soil temperature at this stage should not be lower than +18 degrees, or even better – up to +25 degrees. Then the shoots will appear faster. You need to wait for the first shoots to appear within 2-3 weeks.
- The seedlings are still weak, so they need to be protected from direct sunlight. It is necessary to remove condensate in a timely manner and ensure timely watering.
- The seeds feel great in a shaded place until the first shoots, then they need more light.
- Pick the hosta as soon as the first pair of leaves appears. Then you can plant the seedlings in separate pots.
- Pour drainage into the pots, a layer of store-bought soil and fine sifted sand on top.
- At first, seedlings need to be moistened by bottom watering: pour water into a pan, place the pot in it and wait until the soil layer is thoroughly wet.
- Hardening of seedlings: the film can be removed for 1-2 hours during the day, the plants can be left outdoors if the temperature outside is optimal (not lower than +18 degrees and there is no gusty wind).
- The hosta home flower develops slowly, so you need to be patient, and also take into account the fact that hosta seeds may lose varietal characteristics. Therefore, you should not rely on leaf shape, color and patterns.
One of the most common and simplest methods of propagating this plant is the method of cuttings and dividing the bush. If this is an adult plant, over 4 years old, it tolerates division well and this procedure will not affect its development and growth in any way. If the manipulation is performed at an early age, growth rates may be inhibited. But it all depends on the plant variety and climate. Some hosts will tolerate the division procedure just fine, while others will need a long recovery period of 1-2 years.
Features of hosta propagation by cuttings:
- Dates: late summer or spring. But you can propagate hosta with the onset of spring and until mid-autumn, that is, the entire warm period. As soon as the shoots appear, in early spring the hosta should be carefully dug up with a pitchfork so as not to damage the rhizomes and carefully divided into several parts with a sharp knife or shovel.
- How to divide rhizomes with a fork: you need to insert the fork, bring them together and move them apart - this method will allow you to not injure the plant as much as when dividing with a sharp knife.
- Some gardeners are in no hurry to dig up the entire bush, but carefully separate a small triangle from the adult plant. The resulting hole is filled with fertile soil.
- If by chance, when you divided the bush, the roots broke off, but a piece of rhizome remained on the shoots, don’t worry. You need to place the cutting in a greenhouse, plant it in the shade and cover it with a plastic bottle (transparent). After a few weeks, the young plant should take root.
- To make the hosta take root faster, you need to cut the foliage of the cuttings in half.
What hosta seeds look like: photos, how to collect and store
Growing hosta from seeds is a very labor-intensive and time-consuming process. This is a favorite plant of many gardeners. Due to its luxurious head of leaves and high decorative value, the plant is often used in landscape design. True, in order to preserve the varietal attributes of the flower, it is necessary to grow it from seeds. In the future, it can be used to decorate the garden and house area.
Is it possible to grow hosta from seeds?
The main method of dividing hosta is vegetative (cuttings, division of rhizomes). But in the process of such cultivation, the plant gradually loses its main varietal prerogatives: the color and shape of the leaves, frost resistance. The solution is to grow by seeds. In this matter, gardeners need specific knowledge of the agrotechnical process.
However, it is possible to grow hosta from seeds at home, although its germination rate will not exceed 80%. To increase this value, you will have to use special containers, sterile soil and growth stimulants.
Pros and cons of propagating hostas by seeds
The seed method of growing hosta is considered the least popular among existing ones. There are several reasons for this:
- A long time from the moment the seeds are planted in the ground until the desired bush is obtained.
- The inability of a flower to retain the main varietal characteristics - the resulting offspring are distinguished by a variety of different colors.
The seeds produce healthy and strong hosts with excellent external characteristics.
Growing hostas with seeds also has positive aspects:
- At the end of summer, seed pods appear on almost any flower bush, from which it is easy to collect seed.
- The health and quality of the bush depends entirely on the gardener.
- Great for decorating shady corners of the garden.
What varieties of hostas can be grown from seeds?
Almost any type of flower can be grown from seeds. But there is a list of the most favorite hosta species among gardeners that deserve special attention:
- Wavy - a variegated, bright variety with wavy, large leaves.
- Bloated is a colorful hosta with heart-shaped greenery.
- Siebold is a waxy variety with heart-shaped leaves.
- Lanceolate is a dense but very compact bush with narrow stems.
- Malaya is a low variety with a developed rhizome.
- Upright - hosta with vertical and narrow leaves.
- Ovate - a flower with wide leaves and a massive bush resembling a ball.
It is better not to experiment with growing hybrid varieties of flowers - bushes with different characteristics can grow from such planting material.
What hosta seeds look like + photo
In order not to make a mistake with the right planting material, you should know what it looks like. The seeds of the described plant resemble a small dark brown raisin with a diameter of no more than 1 cm. They are located in the place of faded buds in yellow dry boxes.
Mature seeds can be collected in August-September
How to collect hosta seeds
To collect planting material for further cultivation, you need to wait until it ripens. This happens in the second week after pollination of the flower. A more precise time is the end of August or the first week of September. It is very important not to miss the moment when the hosta seed pods acquire a rich brown color, dry out and open. It is at this moment that you need to start collecting seeds, having managed to carry out the procedure in a maximum of 5 days.
Drying and storing hosta seeds
Before sowing hostas with seeds, you need to properly prepare them: dry them, send them for storage until planting and cultivation begin. To do this, the collected material is dried at high temperatures (300 degrees) for about 10 minutes, then placed in the refrigerator for 30 days.
The seeds should be oblong and dark brown, shelf life - no more than 2 years
It is better to store hosta grains in small bags or paper towels. The main condition is the absence of direct sunlight and a temperature of at least 10 degrees.
Planting hosta seeds at home
To grow hosta yourself, you first need to sow it. To do this, you will have to take into account the appropriate planting time, select a container of the right size, prepare the soil and stimulate the seeds.
When to sow hosta seeds
There is no big difference when exactly to sow hosta seeds. To ensure that the seedlings are strong enough to be transplanted into open ground before consistently warm weather, it is recommended to carry out this process in the first ten days of January.
Selection of container and soil preparation
The key to quickly and successfully growing a flower is using the right soil and suitable containers. It is best to plant the seeds in a small plastic pot with a few holes in the bottom.
The soil for planting will need to be prepared. To do this, equal parts of perlite, peat and vermiculite are combined in a large container. The finished composition is placed in the oven for some time (1-2 hours), then placed in the freezer for 24 hours.
A less time-consuming option is to treat the soil with a solution of potassium permanganate and wipe the inside of the pot with regular medical alcohol.
Preparing hosta seeds for sowing
Growing a flower begins with preparing its seeds. To do this, planting material should be placed in the freezer for stratification for 30 days, then soaked in aloe juice for 30 minutes.
How to plant hosta seeds
The next stage of cultivation is embedding the prepared elements into the soil. You just need to scatter the seeds over the surface of the prepared container, cover them with a small amount of soil and lightly moisten them.
Next, the blanks are covered with polyethylene or glass is placed on top, and transferred to a room with a temperature ranging from 18 to 25 degrees. The first hosta shoots will appear after 21-25 days.
It is important to choose soil for growing hostas.
To prevent young shoots from getting sick, it is important to prevent direct sunlight from hitting them. The stem develops very slowly, so it will require mandatory picking. 14 days after the emergence of seedlings, you need to begin to harden them little by little - take the hosta out into the fresh air.
How to grow hosta seedlings from seeds
In order for green shoots to turn into healthy and strong planting material, you need to properly care for them. Hosta cultivation should be carried out in accordance with such agrotechnical indicators as the correct temperature, regular watering, picking and the addition of nutrients.
Microclimate
In order for young seedlings to appear on the surface of the earth 3 weeks after planting, they are grown at the correct temperature - from 18 to 25 degrees. This process can be slowed down by an incorrectly selected container: too low or deep. The rhizome of the bush fits perfectly in a pot up to 10 cm high.
While growing hostas, you need to constantly monitor the room temperature.
Watering and fertilizing schedule
To speed up the growth and development of the hosta, it is enough to constantly water it and, if necessary, periodically feed it with nutritional compounds.
It is recommended to moisten the seedlings at any time as the soil dries out. It is better to use filtered, not completely cold water for these purposes. The first sign of fluid deficiency is the appearance of dry rusty spots on the tips of the sheets. The main thing is not to get water on the young shoots of the hosta, but to moisten only their root zone.
According to experienced gardeners, growing seedlings is carried out without additional fertilizing - the plant has enough nutritional components from the soil, if it is correctly composed at the preparation stage. The only thing you need is to mulch the surface with organic compost.
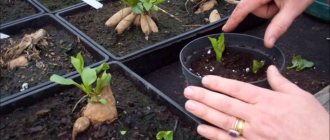
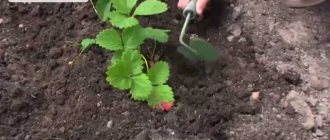
Picking
As soon as the first leaf appears on the seedlings, it’s time to pick it. To do this, young bushes are moved to larger, necessarily sterile containers with more nutritious soil. The top layer of earth is covered with a small amount of sand. Subsequently, until the seedlings are transplanted into open ground, the hosts are watered by immersing the pot in a container of water.
Landing in the ground
As soon as the hot July days arrive, hosta cultivation moves to a new stage - moving the grown and strengthened seedlings into open ground.
- The area suitable for planting should be located in the shade of the garden.
- The soil needs to be dug up and all weeds removed from it.
- Each seedling will require a sufficient amount of free space, so the distance between individual elements should be at least 50 cm.
- To avoid losing slow-growing plants in the grass, it is recommended to fence them.
- It is necessary to remove all weeds before transplanting the seedlings. In the future, it is better to weed the area weekly, otherwise it is easy to damage the delicate root of the flower.
- In order for young shoots to become well strengthened by the end of summer, you need to constantly water them with warm water (at least 2 times a week in the evening) and periodically loosen the soil.
It is important to understand that planting hosta seeds and then growing it is a long process. Until the end of the growing season, no more than 3-4 leaves will appear on the plant, which is quite normal. It may take at least 3 years for the host to acquire the desired appearance. This nuance should be taken into account before you start growing an ornamental bush on your own.
It should be planted in open ground in July.
Diseases and pests
In order for the plant to always be healthy, it is important to notice and eliminate problems in time.
Hosta has several main diseases:
- Virus X and HVX. Small round specks appear on the leaves, quickly growing throughout the bush. It is impossible to cure a flower from a virus. The only solution is to burn the affected plants.
- Botrytis or gray mold. It first attacks the leaves and quickly spreads throughout the entire stem. In the early stages, spraying infected bushes with Bordeaux mixture or cuproxate will help.
- Phyllosticosis. The fungus, which appears as brown spots with a coating, affects both the stems and flowers of the hosta. You will have to get rid of the infected flower elements. To prevent the disease from spreading, the plantings are stopped watered and treated with colloidal silver, potassium permanganate or pharmaceutical preparations.
- Root collar rot. An infection that causes hosta leaves to die. Infected parts of the plant should be cut off with a knife, treated with a fungicide and, if possible, the bush should be transplanted into another pot.
- Rust . It appears due to severe dehydration of flowers.
The plant also has plenty of pests:
- slugs - characteristic silver stripes with holes appear on the leaves;
- beetles and caterpillars are insects that quickly destroy the entire bush. Eliminate them using a special insecticide;
- nematodes are small pests that inhabit green stems in large numbers, leaving behind black stripes. Unfortunately, there is no effective control method, so the infected bush will have to be burned;
- rodents - attack the roots and damage the stems of the plant, which is why the hosta quickly fades. To eliminate the problem, baits with poison are used.
In order to notice and promptly eliminate the problem that has arisen, you need to periodically check the condition of the flower during its cultivation.
Planting hostas in a flowerpot at home
In order to plant a seedling or cutting separated from an adult plant, it is necessary to prepare the soil and pot. The container should be spacious and suitable for the size of the plant. Therefore, at the initial stage you need to know what variety you are dealing with. Not all hosta varieties can be grown at home in pots and flowerpots. There are special varieties adapted for growing indoors.
Preparation for landing:
- We take a medium-sized flowerpot or pot, taking into account that as the plant grows, it will be necessary to transplant it into a larger flowerpot. The pot should have a hole for drainage.
- We prepare a fertile mixture and drainage. Soil requirements: optimal humidity, slightly acidic or neutral, so that there is good drainage. Plants do not like heavy soils and sand.
- You need to pour drainage into the bottom of the pot, then fill it halfway with soil and insert a rhizome with a cutting or plant a seedling in the center. Carefully fill all the free space around with soil, lightly compacting it with your fingers. The soil used for planting is pre-moistened (water thoroughly 2 hours before planting).
- If this is a planting with dividing the bush, then you need to remove all damaged and dry roots.
- Choosing a place: the host needs to be placed in a place where the pots are not heated by direct sunlight. The rhizomes cannot withstand heat and can even get burned. The plant will feel great in partial shade and in a place where there are no drafts.
- When choosing a growing location, keep in mind that if the leaves are bright and have stripes/patterns, the plant will need more light. If the colors are variegated, then partial shade, but let the sun illuminate the hosta in the morning and evening. If this is a species with blue leaves, then plant the hosta only in a shaded place. These species only need sun for a couple of hours a day.
- Watering is moderate, as soon as you notice that the soil has begun to dry out.
- In the warm season, the pots can be taken out to the balcony or loggia, and with the onset of cold weather, they can be brought indoors. Hostas will do well in a cool, dry environment.
- In winter, watering is reduced to a minimum, but drying out of the soil is also unacceptable. Therefore, check the soil once every 4 weeks. Watering is easy.
- With the onset of spring, hostas will wake up faster at home than those left to winter in the open ground. If you see that the plant does not wake up and does not grow, leave the hosta indoors until it gets warmer. During the day, you can take pots with plants out into the fresh air, and take them back at night, since the nights in spring are still cold.
Landing in the ground
As soon as the hot July days arrive, hosta cultivation moves to a new stage - moving the grown and strengthened seedlings into open ground.
Stages:
- The area suitable for planting should be located in the shade of the garden.
- The soil needs to be dug up and all weeds removed from it.
- Each seedling will require a sufficient amount of free space, so the distance between individual elements should be at least 50 cm.
- To avoid losing slow-growing plants in the grass, it is recommended to fence them.
- It is necessary to remove all weeds before transplanting the seedlings. In the future, it is better to weed the area weekly, otherwise it is easy to damage the delicate root of the flower.
- In order for young shoots to become well strengthened by the end of summer, you need to constantly water them with warm water (at least 2 times a week in the evening) and periodically loosen the soil.
It is important to understand that planting hosta seeds and then growing it is a long process. Until the end of the growing season, no more than 3-4 leaves will appear on the plant, which is quite normal. It may take at least 3 years for the host to acquire the desired appearance. This nuance should be taken into account before you start growing an ornamental bush on your own.
It should be planted in open ground in July.
Hosta - home care
In fact, caring for a flower at home is not difficult, but here the opinions of experts and flower growers differ, since some believe that the hosta will wither over time, since it is more suitable for growing in open ground, while other experts believe that, despite all the favorable conditions, conditions, the plant can please for 10-15 years.
Hosta flower - how to care:
- Small varieties of plants are suitable for growing on a windowsill. And although the hosta is not an evergreen plant, it is still worth a try;
- experts recommend putting the flower in the basement, where the temperature will not be lower than +2 degrees. This is necessary so that the plant goes through the same phases of development even in open ground;
- Does the hosta need to be replanted in a large pot? If this is a dwarf plant, then it is enough to immediately plant the seedlings in a spacious pot. And if the plant is medium-sized, it will need a larger pot as it gets older. Hosta tolerates transplantation well, but there have been cases when the plant did not take root well in a new place. Because of this, mass was lost, flowering was not as long;
- Mature plants do well on shaded windowsills, but they need occasional sunlight. But it should not be direct sunlight;
- if some rare variety of dwarf hosta was purchased, then it is undesirable to divide the bush into several elements in order to plant plants and thus propagate. Hosta does not accept this and may not take root or may take a long time to take root. If you purchased your hosta in a container, then it needs to be grown in it until a strong root system develops. And then decide what to do next: leave it as is or transplant it into open ground;
- When growing in pots, every gardener wants the bush to look neat and not spread to the sides. Therefore, the flower stalks need to be broken out. Otherwise, when flowering ends, the plant may fall apart. And one more thing: after a few years, the hosta will still grow greatly, so it needs to be divided: separate the young cuttings from the root and plant them in a new place.
Further care
Particular attention should be paid to fertilizing. To fertilize the soil well, humus can be used at the stage of cultivating the site. Usually this measure is enough to provide the plant with everything it needs in the first year or even two. The same method can be used every year at the end of summer or early autumn, so that the seedlings have time to prepare well for wintering.
In spring and summer, hostas require frequent watering. This is usually done in the morning and evening. For young hostas, it is desirable that the water be warm.
The stream is directed under the leaves using a separator. It is better if watering is frequent and moderate than rare and abundant, because the roots may suffer from excess moisture. In addition to watering, the soil should be regularly loosened and free from weeds. However, if the hostas are still too small, the weeds near the roots are not completely pulled out so as not to damage the roots of the young growth.
The shape of the bush deserves special attention. To prevent it from becoming too spreading and sparse, it is recommended to remove the first flower stalks. For the same purpose, hosts should be replanted regularly (every five years). In addition to correcting the appearance, replanting provides material for propagation, allows you to unload the flower beds and assess the condition of the root part. Any changes in the form of spots on the leaves or drying require action. Although hostas are considered hardy, they sometimes suffer from infections and pests. At first, you can use fungicides, but if the disease develops, the plant will have to be removed.
There are two points of view regarding circumcision for the winter. Some gardeners advise removing all greenery, others - only damaged or dried leaves. But in any case, it is better to insulate the flowerbed, especially in regions with a harsh climate. To do this, you can use any available materials - straw, spruce branches, burlap or cardboard. The protective layer is removed in the spring, when the likelihood of frost decreases.
How to grow hosta from seeds, see below.
Hosta domestica: diseases and pests
Since the plant is grown indoors, hosta pests are not a problem. But this plant is susceptible to diseases not only when grown in open ground, but also in pots. Hosta is very susceptible to virus X - small yellow dots or spots appear on the leaves. If the plant becomes sick, it will have to be thrown away because neighboring hostas in pots may become infected. It is also necessary to get rid of gloves and all tools that were used in the work. Disinfect the tools, but it is better to replace the pots with new ones.
Another hosta disease is follistictosis, when large brown and yellow spots appear on the leaves. Over time, they will begin to merge with each other, and a coating will form on the surface. The spores affect the entire plant, including flower stalks. The soil also becomes infected, so you need to completely get rid of such a plant and throw away the pot.
Spraying with fungicides will help protect the plant from infection.
Liven up your garden with colorful greenery, and use a hosta to help you do this. It is unpretentious when planting, caring for and growing. This plant is popular in landscape design, because its leaves have different shapes and colors, depending on the variety.
Tips and warnings
The material obtained by dividing the hosta bushes must be planted at the same depth as the root of the mother bush. In this case, the distance between individual plants should be at least 30-35 cm.
When planting cuttings in the ground, it is undesirable for the leaves to be large.
In this case, moisture will evaporate too much from them. To prevent this, the largest leaves are cut off by one third.
When planting in open ground, it is recommended to add mulch to the top layer. For this you can, for example, use crushed bark.
Description, varieties and varieties
The beauty of this plant is in the leaves, not the flowers. From green to golden and white, from long to round and heart-shaped - this is what hosta comes in. Planting and caring for it in open ground are very simple - another reason to pay attention to this perennial.
Hosta will be a wonderful garden decoration from early spring to late autumn
- green;
- blue (with a bluish tint);
- yellow;
- variegata (this includes variegated and light-colored hostas);
- mediavariegata (leaves are light, with green edges).
There is a huge variety of hosta species
Those who grow hosta in open ground are also familiar with the classification of varieties by size:
- dwarf (up to 10 cm);
- miniature (10-15 cm);
- small (16-25 cm);
- medium (30-50 cm), the most numerous group;
- large (55-70 cm);
- giant (from 70 cm).
The main species, which are also used for breeding:
Among the hostas there are chameleon varieties that change color during the summer season. Some species of this plant are difficult to classify because their leaves have a blurred color. And foreign breeders have developed three-color hybrids. There are plenty to choose from!
How to grow hosta seedlings from seeds
In order for green shoots to turn into healthy and strong planting material, you need to properly care for them. Hosta cultivation should be carried out in accordance with such agrotechnical indicators as the correct temperature, regular watering, picking and the addition of nutrients.
Microclimate
In order for young seedlings to appear on the surface of the earth 3 weeks after planting, they are grown at the correct temperature - from 18 to 25 degrees. This process can be slowed down by an incorrectly selected container: too low or deep. The rhizome of the bush fits perfectly in a pot up to 10 cm high.
While growing hostas, you need to constantly monitor the room temperature.
Watering and fertilizing schedule
To speed up the growth and development of the hosta, it is enough to constantly water it and, if necessary, periodically feed it with nutritional compounds.
It is recommended to moisten the seedlings at any time as the soil dries out. It is better to use filtered, not completely cold water for these purposes. The first sign of fluid deficiency is the appearance of dry rusty spots on the tips of the sheets. The main thing is not to get water on the young shoots of the hosta, but to moisten only their root zone.
According to experienced gardeners, growing seedlings is carried out without additional fertilizing - the plant has enough nutritional components from the soil, if it is correctly composed at the preparation stage. The only thing you need is to mulch the surface with organic compost.
Picking
As soon as the first leaf appears on the seedlings, it’s time to pick it. To do this, young bushes are moved to larger, necessarily sterile containers with more nutritious soil. The top layer of earth is covered with a small amount of sand. Subsequently, until the seedlings are transplanted into open ground, the hosts are watered by immersing the pot in a container of water.
Advice! The humidification process is best carried out with warm water at room temperature.