What is culture
The orchid is gaining more and more fans every day, and there is no point in explaining what orchids look like. Despite the difficulties of growing a flower, many people purchase sprouts and seedlings. But not everyone can afford to buy an adult plant.
The history of the appearance of this flower is ancient. The very first mentions of orchids were found approximately 130 million years ago. Previously, this plant was classified as a medicinal crop.
Growing an orchid at home has become possible thanks to the effective work of botanists. They have developed varieties that can grow and reproduce at home. The orchid is a very capricious home crop; you can get abundant, beautiful blooms by fully observing all the requirements and conditions for growing.
An orchid is an indoor crop that reproduces by seeds, shoots, and bulbs. The most difficult method is growing from seeds.
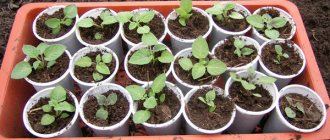
Photo
In the photo you can see the orchid seeds themselves, as well as what grew from them. This is what the seeds look like:
And this is an adult plant:
Features of care
Orchid care procedures bring a lot of trouble to a novice gardener. But professionals say that it is easy to get beautiful flowering at home if you follow all the conditions and rules.
It is very important to provide proper lighting, which is of great importance for the flower. It is necessary to provide bright light, but it must be diffused.
On a note! The flower will not die under direct rays. But the bright light will cause the leaves to lighten and stretch, but the flowers may not appear. Thin tulle or lutrasil is enough to diffuse the rays.
Temperature changes are beneficial for orchids to bloom abundantly. Temperatures can range from 18 to 27 degrees.
During the active growth period, abundant watering is important, and in winter the moisture supply should be reduced. Drought is not as bad for an orchid as excess water. It is best to water according to the shower principle, or pour it into a plate and place the pot in it for 15 minutes.
During the dormant period (from autumn to spring), the flower can not be shaded, since there will be few rays. There will be enough of them for new shoots to form and buds to form. During this period, the temperature is reduced to 13-18 degrees.
Sterilization
Using a glass funnel, pour the resulting substance into a special container for sowing (prepared flasks). All you need to do is pour a layer into each vessel to a height of no more than 1.5-2 cm. After the flask, you need to tightly close it with stoppers, and cover the stoppers themselves tightly with a layer of foil. If you used jars rather than flasks, they also need to be carefully and tightly closed. Be careful: do not tilt the flasks until the solution has completely hardened, otherwise the protofeed will cover the walls of the test tube or jar, and this can lead to the development of microorganisms.
To sterilize the substance, you will need a regular pressure cooker. Place a regular mesh on the bottom, which is used for steaming products. Add water, but be careful that it does not reach just a little to the mesh. Carefully place the containers with the solution on the grid. Place the pressure cooker on the stove. As soon as an acceptable pressure is established in the apparatus, we set aside 10-15 minutes for the medium to undergo processing. After this time, let the pressure cooker cool down a bit. After this, we take out the vessels and carefully place them on a flat surface, without tilting or turning them over until the solution has completely hardened. Vessels with the finished substance can be stored for quite a long time, up to several months (preferably in the refrigerator).
There is another method of sterilization, in which the entire nutrient medium is processed in one container. Tindalization (differential boiling) method. A standard saucepan will do. Bring the water to a boil, place a tightly closed flask with the prepared solution in it. Boil for 20 minutes. Remove and leave the vessel to cool, repeat the procedure in a day. Repeated boiling is necessary to destroy microorganisms that were not killed during the first treatment. The substance sterilized in this way is also stored for quite a long time. The advantage of this method is that there is no need to use additional dishes. Disadvantage: all proto-feed must be melted before each sowing, and this may negatively affect its properties.
Orchid seeds, what are they?
Orchid (phalaenopsis) seeds ripen in a box with 3 or 6 leaves. There are up to 4 million of them, the length of one reaches from 0.3 to 3.3 mm. You can only use mature seed after the boll has dried. Orchid seeds look like dust or sand due to the large number and small quantity. The dust from the seeds is not black, but yellowish-cream in color.
Collecting seeds is very difficult. But nature compensated for the size of the achenes with a large number of them in the box. Under natural conditions, orchids reproduce by seeds. The wind carries the seed dust, the seeds fall on the bark and leaves of the trees and germinate.
It takes about 2.5-3 months for the seed to fully ripen.
Collecting seeds
Collecting seeds is difficult, but doable. As the box grows, a napkin is tied to it in the form of a pocket so that dust does not fly away when the walls begin to crack. A mature capsule turns brown (in rare cases it remains green).
When the boll is dry, cut it off and transfer the seed dust onto a piece of paper. Planting such small seeds is very difficult. This is another reason why seed propagation often fails.
Breeding orchids by seeds
Orchid seeds are not able to germinate under normal conditions, like other plants. Since they do not provide special nutrient reservoirs (endosperm) that nourish the embryo in the first stages of growth.
On a note!
Germination requires a special nutrient medium for orchid seeds. Under natural conditions, the culture grows in symbiosis with fungi.
What you need
To grow orchids from seeds, you will need to ensure you have:
- glass containers with a volume of 300-400 ml (flasks or jars with lids) where the seeds are sown;
- a small glass jar for the sterilization procedure;
- rubber or cotton wool plugs;
- disposable syringes;
- litmus strips;
- 2% hydrogen peroxide solution.
The lids are also prepared before use. They are placed in a thin glass tube, the top hole of which is closed with a cotton ball. A second similar hole is also made and covered with an adhesive plaster (seeding is performed through it).
Preparing tools
All materials, instruments and containers are sterilized before use. This will help protect young shoots from damage by pathogenic bacteria.
If at the very beginning of the experiment you violate the basic rules of sterility, then you may not continue the experiment. The seeds will no longer be viable.
Soil preparation
To germinate orchid seeds, you can use a ready-made nutrient medium or make it yourself. You can grow an orchid at home from seeds with large flowers only in a special composition. It will not be possible to sow seeds in ordinary soil; they will die immediately.
Ready mix options
To grow an orchid from seeds at home, you can buy Knudson’s ready-made nutrient medium. It is dissolved according to the instructions. Orchids from seeds should be grown in this composition due to their special composition:
- agar-agar (a polysaccharide that helps the composition achieve jelly density);
- sugar;
- the salts included in the composition are in a balanced amount.
After preparation, use a litmus strip to check the acidity of the resulting medium.
On a note!
It is necessary to check acidity only at room temperature, since in warm compositions the acidity is lower.
After preparation, the nutrient mixture is heated and poured into jars (no more than 60 ml of the jelly-like composition is placed in 200 ml).
Making your own mixture
You can make a nutrient medium for germinating orchid seeds on your own, following simple step-by-step instructions.
- 10 g of fructose glucose and 8 g of agar-agar are added to half a liter of boiling distilled water.
- Mix the options over low heat until the agar-agar dissolves.
- In the second container, another 0.5 liters of water are heated and 1.5 g of fertilizer (nitrogen, phosphorus, potassium), 5 drops of phytostimulant for root formation, 1 g. activated carbon.
- After all components have dissolved, both solutions are combined and stirred.
- If necessary, you need to reduce the acidity to 4.8-5.2 pH. The indicator is reduced by introducing a solution of potash, and increased by orthophosphorus liquid.
- 30 ml of prepared liquid is poured into each sterilized seed container.
- The flasks with the special medium are closed and sterilized for about half an hour.
- The nutrient medium and containers are left for 4-5 days. If mold forms, you will have to re-prepare the growing composition.
You can use folk recipes to make a nutrient medium.
- 450 ml potato juice, 40 g powdered sugar, 7 g special fertilizer, 20 g agar-agar, 1 tsp. lemon juice.
- 200 g of starch (from potatoes), 500 ml of coconut water, 20 agar-agar, 1-2 ml of orchid fertilizer, freshly squeezed puree from 0.5 kg of tomato.
- 460 ml distilled water, 1 tab. activated carbon, 5 g sugar, 40 ml pineapple juice, 5 g honey, 100 g starch, 2-3 special fertilizers.
To prepare a properly favorable substrate, you need to be very careful; compliance with sterility requirements is the main and important condition.
Seed treatment and direct sowing
Before planting orchid seeds, you need to sterilize them. First, the seed box is wiped with a cotton swab dipped in alcohol. Then the seed dust is poured into a small glass jar and closed with a lid. Using a syringe, a little 2% hydrogen peroxide solution is injected into the container with the seeds.
The seeds are in the container for about 5-10 minutes. The liquid containing the seeds is removed using another syringe. Pour through a hole sealed with an adhesive plaster into a jar. The liquid is carefully distributed over the surface of the nutrient medium.
On a note!
All sowing procedures are performed directly over a saucepan where water is boiling.
If you do not adhere to sterile conditions when germinating seeds, colonies of microorganisms will form on top within a week. These containers are subject to rejection.
Conditions of detention
After transferring the seeds to the nutrient medium, the jars are provided with the necessary conditions. It is important to monitor the temperature and lighting.
The sown seeds will require a temperature in the range of 20-23 degrees to germinate. 12 hours of lighting is important. At the same time, they provide diffused light.
Features of caring for sprouts
The duration of emergence of seedlings varies for different varieties. The first shoots can appear in 4-6 weeks, and sometimes wait up to 6-9 months. First, a small ball with threads of shoots is formed. They cling to the surface and consume the necessary components for further development. The first leaves will appear next, and only then the real roots will begin to form.
As long as the crops are kept under sterile conditions, no special care is required. It is important not to open the jars while they are in glass containers, violating the sterility.
Is it possible to grow a flower from them?
The main difficulty in growing an orchid from scratch lies in the physiological characteristics of the seed. The seed does not have endosperm - a protective shell that should nourish the embryo. In nature, an orchid seed receives nutrients through symbiosis with fungi, since it adheres to the mycelium and develops simultaneously with the mycelium.
The absence of a protective shell affects the immunity of the seed. Orchid seed material is susceptible to rotting, parasites and is not capable of rapid adaptation to external influences. For successful germination, seeds need to create sterile conditions.
When and how to replant sprouts
It takes up to a year from sowing the seeds to the moment they are transferred to the substrate. The following composition is prepared for transplantation:
- 1 part each of crushed coniferous bark, sphagnum moss, fern rhizomes;
- 10 tab. activated carbon (pre-crushed).
A layer of classic drainage is placed at the bottom of the plastic cups, then the prepared soil is placed. The seedlings are removed from the original container in a circular motion, and the roots are washed. Carefully transfer the sprouts into cups with substrate. At first, small orchids are not watered, but simply sprayed, making sure that the soil remains moist.
The orchid is left untouched for six months, and then it is replanted in the usual traditional soil for orchids.
Caring for young orchid sprouts
After transplantation, young orchids are closely monitored, providing the necessary care. Watering is carried out by spraying the useful substrate.
On a note!
Overmoistening should not be allowed, as the small roots are very thin and vulnerable. They can instantly rot, which will lead to the death of the young plant.
In six months, the sprouts will become stronger, they will begin to be transplanted into classic soil for adult specimens and will begin to be cared for in the traditional way. Flowers will appear after transplantation in 4-5 years.
Problems you may encounter
You can encounter difficulties when growing phalaenopsis from seeds at home at any stage of this procedure.
There are many reasons for poor germination:
- poor quality seed material:
- non-compliance with humidity and lighting conditions;
- flaws in creating sterility and so on.
As a result of any mistake, seeds or seedlings can be destroyed, or a plant can grow but not bloom.
Seed material
This is the first problem you may encounter. When collecting it yourself, it is difficult to guess when the seed box is at full maturity.
Buying ready-made germinating seed material is even more difficult. They purchase it by ordering on Chinese websites. But when the parcels arrive, apart from the bag of seeds, there are no instructions, collection date, variety name, and so on. There is a high probability that instead of the treasured orchid, you received the seeds of a simple lawn.
On a note!
Planting an orchid with seeds from China is like playing the lottery: you don’t know the end result. It all depends on the seller’s honesty and integrity.
Maintaining sterility
Its violation can be judged by the appearance of mold in containers. You can save germinating seeds by trying to change the substrate.
- A new jelly is prepared from the nutrient medium.
- Fill the flask with warm water and shake it slightly.
- What is contained is poured into a small container. Any 1% fungicide solution (1-2 drops) is added to the mass.
- After 15 minutes, the sprouts are placed in the prepared substrate.
Next, the container is closed again, ensuring sterility for the sprouts.
You may be interested in:
Orchid in hydrogel: planting, growing and care Orchid is a decorative flower that appeared on windowsills not so long ago. Among the various species, the most…Read more…
Culture media
You can purchase ready-made substrates on which orchid seeds are strengthened in a specialized store. You can also try making your own environment. This poses some difficulties in finding the components.
To successfully grow seeds from China, you need the following components:
- Agar-agar - about 4 g;
- Distilled water - 200 g;
- Calcium nitrate - 200 mg;
- Ammonium sulfate - 125 mg;
- Potassium phosphate - 0.6 mg;
- Magnesium sulfate - 0.6 mg;
- Iron sulfate - 0.025 g;
- Manganese sulfate - 0.0075 g;
- Sucrose - 5 gr.
You can also modify the medium in order to germinate the seeds more successfully.
It will be as follows:
- Distilled water - 200 g;
- Potassium nitrate - 200 mg;
- Potassium phosphate - 0.6 mg;
- Magnesium sulfate - 0.6 mg;
- Iron chelate, sodium humate – 0.01 mg each;
- Ammonium sulfate – 0.125 mg;
- Activated carbon – 0.25 mg;
- Sucrose – 2-4 g.
Important! For successful sowing, you need to select chemically pure substances and store them in special conditions before use. If any of the substances seems suspicious, you should familiarize yourself with the requirements for its quality, and if necessary, replace it with a quality one.
Preparation progress
Distilled water is mixed with agar-agar and left until it swells. After 2 hours, place it in a water bath and add the remaining ingredients with constant stirring. After preparation is completed, check the pH of the medium, which should be neutral. The prepared medium is left to cool. The nutrient medium is ready.