Is it possible to grow cherries from seeds?
Many gardeners dream of growing cherries on their plot. But this tree is quite whimsical, and often the experiment of growing cherries ends in failure. If you want to enjoy the taste of cherries, you must definitely follow the requirements for planting, caring for, and watering this tree. We will tell you about the subtleties and rules with which you can grow cherries and reap a good harvest.
Many people are interested in: is it possible to grow cherries from seeds? Often this idea comes suddenly when you bought or were treated to delicious, fleshy cherries.
Important: Cherries can be grown from seeds. But you shouldn’t wait for a good harvest. Such a tree will begin to bear fruit at 5 or even 8 years. The berries will be small and sour. In other words, it will grow up wild.
You can grow cherries from seeds as an experiment. Many people like the process of such growth and the final result of their experience, for the sake of sporting interest. You will be surprised, but there are benefits to growing wild game.
Wildflower is ideal for grafting good varieties of cherries. Demanding cherries are susceptible to diseases and depend on temperature changes, but wild cherries are unpretentious, grow well and can become a real assistant in the formation of an orchard.
Transplanting cherries into open ground
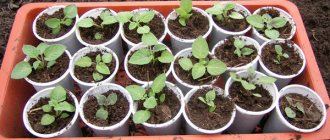
In order for the plants to quickly adapt to the conditions of the garden, containers with seedlings can be buried in the ground, placing them in partial shade so that during the midday hours they are protected from direct sunlight. Under favorable conditions, by autumn, cherries from pits can be grown to a height of 30-40 cm. It’s time to prepare the plants for planting in open ground and their first wintering.
For transplantation, choose a warm, cloudy autumn day (late September - early October). The cherry grown from the seed is rolled out of the pot, while the earthen lump remains intact. The planting hole is prepared taking into account its size, filling it with humus and ash, and also pouring it with plenty of water.
How to properly germinate cherries from pits: a step-by-step guide
To grow cherries from seeds you will have to proceed in several stages:
- Choice of material.
- Preparing material for planting.
- Planting sprouts in pots.
- Planting sprouts in the soil.
Let's look at what these stages include.
Material selection
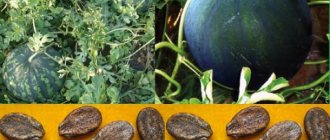
The cherries you bought at the market are not suitable for growing from seed. The fact is that unripe berries are picked for sale; the embryo in the seed is not fully formed. Choose only ripe cherries from the tree; you can take fallen fruits. Check that there are no chips on the bones. If you have collected fruits from different varieties of cherries, sort the seeds into different containers.
Important: There should be a lot of seeds. During the process, most of the planting material will be eliminated.
Selected ripe cherries
Preparing material for planting
- Dry all collected seeds. Then wrap them in paper and cover with film on top. In this form, the seeds should be stored until the end of November in a cool place.
- At the end of November, place the seeds in water for no longer than 3 days.
- After 3 days, place the seeds in damp sand, cover the container with film and place in a cool place with a temperature no higher than 2°.
- Water and ventilate the planting material every day.
- We just have to wait for the sprouts to appear.
Sprouted cherry pit
Planting sprouts in pots
Important: Large containers are not suitable for planting sprouts in pots. This can cause rotting. You can use many small pots or one long container.
Recommendations for planting sprouts:
- It is advisable to buy soil in a store. It contains all the necessary additives for the growth of the tree.
- If you take soil from the garden, you need to thermally treat it. For example, in a microwave or in a water bath.
- A layer of drainage (crushed stone, fragments of clay products, expanded clay) should be placed at the bottom of the container.
- Add coal to the soil to loosen the soil.
- Plant the seeds in moist soil to a depth of 2 cm.
- Cover the container with film and place it in a well-lit, draft-free place.
- Ventilate the sprouts every day, make sure the soil is moist, but do not overwater it.
Planting sprouts in open soil occurs in the spring, when the snow has completely melted, before buds appear on the trees.
How cherries grow from seeds
Selection and preparation of cherry seeds
The germination rate of most stone fruit crops is very good. Out of 10 cherry drupes, 7–8 form a strong, viable sprout. Whether a cherry will grow from a seed largely depends on the quality of the seed and its proper preparation.
To increase the chance, it is better to take drupes from fruits that are completely ripe or have already lost their marketable appearance. The fresher the seed, the easier it will hatch. Dried seeds stored from last season are not suitable. But what to do, since planting in the second half of summer will lead to weakening of the sprouts, which risk stretching out or even dying over the winter?
You can preserve the germination and vigor of seeds by placing them in barely moistened and pre-calcined sand. In addition, in this form it is convenient to send the drupes for stratification, which imitates wintering in natural conditions and prepares the embryos inside the shells for germination.
At what distance should cherries be planted from each other?
Cherries need cross-pollination. Therefore, it is recommended to plant 2-3 trees at once so that they pollinate each other.
Important: The distance between trees is of great importance. As long as the seedlings are small, this is not critical. But in the future, the trees will grow, and the crowns of neighboring trees may interfere with each other. They shade each other and do not give the branches space. This affects the harvest.
Therefore, even at the moment of planting the garden, you should take care of the correct distance. It depends on the dimensions of an adult tree and is calculated using the formula: A1 + A2 (m). Where A1 and A2 are the maximum height of the tree.
If it is not possible to calculate the height of the trees or there is no space in the garden, the average distance between the trees should not be less than 3-5 m.
When to plant
Reproduction of cherries by seeds is possible in the spring. The seeds of collected ripe berries should be separated from the aromatic pulp. Rinse the planting material well and dry. To increase the percentage of germination, seed stratification is necessary. That is why 2 months before sowing they are hidden in a cold place.
It is possible to propagate cherries using the seed method without the stratification process. But the resulting seedlings in this case will not please you with strength. Seedlings will require hardening off.
Caring for cherries in the first year of planting and beyond - watering, fertilizing, spraying: timing
Caring for cherries in the first year is extremely important. Proper care will determine whether the cherry tree will take root or not.
Wintering
It is necessary to help the tree to survive the winter, since cherries tolerate climate change painfully.
To do this, in winter the trunk is insulated with burlap. But if the winter is warm, there is no need to do this so that the tree does not grow. If the winter is warm, it is enough to cover the trunk with snow, protecting it from the wind.
In winter, rodents become more active, wanting to feast on the bark of young trees. To combat uninvited guests, pesticides are scattered around the trees.
Watering
A young tree needs regular watering. Cherry loves water, but does not tolerate stagnation of water. A young tree needs about 3 buckets of water. During drought, young cherries need to be watered once a week. If there is no drought, once a month will be enough. Watering is carried out through a hole, which is gradually expanded as the tree grows.
Top dressing
- If you add fertilizer to the hole during planting, then no additional fertilizers other than nitrogen are required for the next 3 years.
- Nitrogen fertilizers stimulate vigorous tree growth. They need to be applied in early spring or in the second year after planting. Nitrogen cannot be applied in the fall.
- If you did not apply any fertilizers when planting the seedlings, you can add organic and mineral fertilizers: humus, ash, chicken droppings, potassium, superphosphate. Fertilizers are applied with watering. To water a young tree with mineral fertilizers, you should take 3 tbsp. superphosphate, 2 tbsp. l. potassium sulfate in a bucket of water.
- Don't overdo it with fertilizers. The result may be the opposite of expectations.
Spraying
Spraying is carried out in the spring to destroy pests that have overwintered in the soil and bark. To do this, the trunks are sprayed with Bordeaux mixture.
The next spraying is in the summer - to combat insects. For this, copper or iron sulfate and urea are used.
The last spraying is in the fall. Spraying is carried out with iron sulfate or Bordeaux mixture in order to prevent putrefactive diseases.
Young cherry tree
How to plant a cherry seed in a pot
To plant cherries, use individual glasses, a common box or a large clay pot. The container must be disinfected by dousing it with boiling water or soaking it for an hour in a dark pink solution of potassium permanganate.
For planting you will need soil . It is prepared from 1 part river sand and 3 parts garden soil. Purchased soil mixture for seedlings is also suitable.
To reduce the likelihood of moisture stagnation, use drainage : expanded clay, crushed brick or ceramic dishes, small crushed stone, purchased drainage stones.
The soil and drainage are also disinfected . They are calcined in the oven, poured with a dark pink solution of potassium permanganate or copper sulfate (1 tbsp per bucket of water).
Step-by-step instructions for planting cherry pits:
- A 1-5 cm layer of drainage is poured onto the bottom of the container. The remaining volume is filled with soil so that a distance of at least 3 cm remains free to the edges of the container.
- Furrows are made in the ground 1.2-2 cm deep. Planting material is placed in them so that the distance between individual units is at least 3 cm.
- The furrows are filled with soil without compaction.
- The soil is moistened with warm water from a spray bottle. The box is covered with film and placed on the windowsill in a cool room.
Possible mistakes
Novice gardeners make mistakes that negatively affect the germination procedure :
- Refusal of stratification. In this case, the sprouts turn out weak and die when transplanted to a permanent place.
- Growing in a drafty room. The room should be cool, but without drafts. They contribute to seedlings being affected by blackleg.
- Lack of lighting. The sprouts turn out weak and elongated.
- Watering the plantings too much. In this case, the bones rot.
Cherry diseases and pests: description with photographs and control measures
Dangerous cherry pests:
- Cherry fly . Activates in May. First it feeds on the juice of the leaves, and then begins to lay eggs on the cherry fruits. Over time, the larva makes its way into the pulp and eats it. The fruit becomes soft and falls off the tree. There are white worms inside the fruit. To combat this pest, dig up the soil around the trunk in the fall, and spray it with insecticides before flowering in the spring.
- Aphid . Damages tree leaves and shoots. You can suspect the presence of aphids by curled leaves and twisted shoots. You need to fight aphids in 2 stages: in the spring before the buds swell and after the buds open. For the first time, the trees are treated with nitrophen, and then with metaphos and karbofos.
- Cherry slimy sawfly . An insect that feeds on tree leaves. After fattening, the greenish-yellow larvae go under the bark and may not emerge from there for 2-3 years in case of drought. You can fight this insect with the help of chlorophos, karbofos, cyanox, etc.
- Cherry pipe maker . A dark green beetle up to 1 cm in size. It feeds on the bark, leaves, fruits and even seeds of cherries. The female lays her larvae in the pulp. Control methods: spraying with actellik, gardon, karbofos after flowering of the tree.
- Brown fruit mite . It affects cherries, leaving larval skins on the bark. A sign of fruit mite infestation is a silvery tint of the tree. You need to fight the tick in several approaches with different types of acaricides: colloidal sulfur, metaphos, zolon. This type of tick quickly becomes accustomed to the drug.
Cherry pests: cherry fly
Cherry pests: cherry aphids
Cherry pests: cherry weevil
The most dangerous cherry diseases:
- Coccomycosis . Small brown dots form on the leaves, which subsequently grow. The disease destroys fruits and trees. Prevention of coccomycosis - treating trees with copper sulfate and Bordeaux mixture.
- Cherry rot (brown, brown, fruit). Formed as a result of damage to the skin of the fruit. Insects and pests often destroy the integrity of the skin, causing rot to form on the cherries. You can prevent rot by preventing insects from infesting the tree.
- False tinder fungus . Causes wood to rot from the inside. As a result, the tree becomes weak and sick. Control methods: disinfection of tree wounds with garden varnish and treatment with copper sulfate, whitewashing the trunk with lime, increasing the frost resistance of trees.
- Moniliosis . A fungal disease of a tree that can destroy an entire garden. Externally, the trees look dry - shoots, leaves, buds dry out and turn brown. If you notice this disease on your tree, prune the diseased branches, then burn the diseased branches. And disinfect the cuts. Copper-based preparations are also used.
- Clusterosporosis . The main symptom is that the leaves become holey. Methods of combating this disease, as with coccomycosis.
Cherry diseases: clusterosporosis
Cherry diseases: moniliosis
Cherry diseases: fruit rot
Landing in the ground
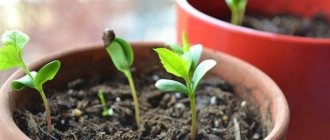
As soon as the cherry sprout shows its delicate greenery, the seed needs to be planted.
For sowing you will need:
- Medium size pot (ideally 0.5 liter capacity). Both plastic and ceramic flowerpots are suitable.
- Drainage material, which is poured into the bottom of the pot in a layer of 2-3 cm.
- Light fertile soil. You can use soil taken from under the mother plant.
Seeds are sown to a depth of no more than 1 cm in pre-moistened soil. When sowing in groups, the distance between the seeds should be at least 8-10 cm.
The first shoots appear after 1 month. Seedlings should be picked only when necessary.
Why the cherry tree doesn’t bloom or bear fruit: reasons, what to do?
Cherries bloom when the average daily air temperature is 10-12º. During the day the temperature should be above 15º. These are the spring months of March-April.
Let's look at the reasons why the cherry tree did not bloom:
- No pollination . To do this, you need to plant not one tree on the site, but several. Cherries are not suitable for pollinating cherries.
- Incorrect pruning . The crown should be formed in the form of tiers or a bowl at an angle of branches of 50 *. Pruning must be done on time.
- Excess or lack of moisture . During heavy rains and when water stagnates, the soil around the cherries should be mulched with a special film. It should be watered not too often, once a month in the summer and once in September before the onset of cold weather.
- Incorrect landing . The root collar should not be planted deep in the ground or, conversely, positioned high. The optimal height is 5 cm above the ground.
- Pests and diseases . The tree may not bloom because it is affected by the disease.
- Frosty winter . Cherries simply may not survive the winter if the frost resistance of the variety is low and the winter is cold.
- The time has not come . Some varieties may not bear fruit for up to 5 years.
- Wrong place . The cherry tree may not bloom because the planting site was chosen incorrectly.
- Feeding . If you do not apply any fertilizer, the cherry tree may stop blooming.
Cherry blossoms
How to graft a twig grown from a seed
Often, cherries propagated generatively do not bear fruit. Vaccination will help correct this. Cleft grafting technique :
- The three-year-old rootstock is pruned so that the remaining trunk rises 15-20 cm above the ground. A split 4-5 cm deep is made in the center.
- The rootstock is taken from a cultivated tree that has already bear fruit. It must have at least 3 healthy buds. All leaves are torn off. The lower part is sharpened with a flat wedge 4-5 cm long.
- The scion is inserted into the rootstock so that the wedge completely coincides with the split, and the cambial tissues on at least one side are at the same level.
- The connection point is fixed by wrapping it with garden tape or electrical tape.
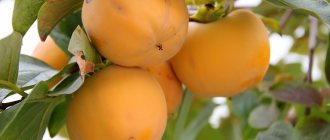
When do cherries ripen?
Cherries are one of the berries that can be enjoyed earlier than other berries and fruits. The ripening of the first berries depends on the climate of the trees and the variety.
In the south, cherries begin to ripen in mid-May. By July, cherries usually finish bearing fruit.
Cherry varieties:
- Early: Rubinovaya early, Valery Chkalov, Melitopolskaya, Iput, Italian, Franz Joseph. These varieties ripen in mid-May - early June.
- Medium: French large-fruited, Gini, Amber, Drogana yellow, Generalskaya, Dneprovka. Ripening time is June-early July.
- Late: Melitopol dense, Leningrad yellow, Leningrad black, Izyumnaya large-fruited. Ripening time is July.
Early varieties are suitable for eating immediately; they are generally not preserved. These varieties are soft and tender. Medium and late varieties are excellent for harvesting for the winter.
Cherry variety - Valery Chkalov
Cherry variety - Priusadnaya
Cherry variety - Iput
The subtleties of growing a tree at home
A good result when planting cherries from pits depends on various factors.
To increase the efficiency of the process you should:
- Select high-quality berries and carefully prepare the seed.
- Carry out stratification that imitates natural germination conditions.
- Prepare a soil mixture suitable for the crop, as well as disinfect the soil and equipment.
- Select and prepare in advance the garden area where the trees will grow.
- Properly care for seedlings before and after planting in a permanent place.
Selection and preparation of seeds
In terms of germination, seeds of stone fruit trees are highly productive. Viable seedlings are obtained from 70-80% of berries that have reached biological ripeness. Cherries for sale are picked after reaching the technical stage of ripening and are therefore not suitable for planting.
See also How to plant and care for cherries in open ground
The seed preparation technique includes:
- Selection of the ripest fruits. Even carrion is suitable for this if the tree is completely healthy.
- Peel the pulp from the berries with care so that the surface remains intact.
- Rinse the seeds with water until the outer fibers are completely removed.
- Disinfection with fungicidal preparations to protect against fungal spores.
It is recommended to use more berries than you plan to plant cherry trees. Then it will be possible to select the strongest sprouts for cultivation.
Hardening of cherry drupes before planting
The preparatory process also consists of adapting the seeds to future growing conditions. Stratification of the material allows the cherries to be hardened to increase the chance of sprout survival. The procedure consists of several stages:
- Heat and moisten the sand.
- Fill the container 2/3 full.
- Bury the seeds in the sand.
- Mulch the soil surface with sawdust and crushed peat.
- Place the container in the basement or refrigerator, where the air temperature is maintained at 2 to 6°C.
- Check the condition of the bones weekly. Specimens damaged by mold or rot must be removed and dried sand must be moistened.
In the south, stratification continues until the end of autumn; in the middle zone it is recommended not to interrupt the process until spring.
Planting process
Growing seedlings in a pot involves the following technology:
- Choose one container with low sides or individual containers with a volume of about half a liter.
- Line the bottom with a drainage layer of about 3 cm of expanded clay or small crushed stone.
- Pour loose soil rich in nutrition for fruit trees.
- Deepen the seeds into the ground 1 cm, keeping the distance between the holes 10-15 cm.
- Sprinkle the surface with peat mulch.
- Moisten the soil with warm water from a spray bottle.
Growing seedlings can be planted in the garden plot. If you plan to plant trees in a permanent place in a year, then the seedlings can be transplanted into larger pots.
It is possible to plant cherries from the pit without prior germination. This method is characterized by a decrease in germination, but allows for easier care. The garden area for planting should be well lit and protected from drafts. The seeds are planted in rows every 0.3 m, and the gap between the seedlings is at least 15 cm. The depth of digging the seeds is small - only 3-4 cm.
What to do if the cherries are frozen?
Both an old tree and a young one can freeze. Most often, young trees suffer after the first winter. If the first frosts hit in the first half of winter, the tree will probably survive this phenomenon normally. Much worse is the first severe frost that appears in the middle of winter. By this time, the tree loses its frost resistance.
Important: You can determine if a tree is freezing by darkened shoots, buds, bark, and roots.
When the snow melts, you can check if the roots are frozen. To do this, carefully dig out a small area and make a cut on the wood. If the color darkens, it means the roots are frozen. In the same way, you can check for freezing of shoots.
If the buds are frozen and darkened, there will be no harvest. They will crumble. This often happens in the spring, when frosts suddenly begin.
A frozen tree cannot always be saved. There are times when a tree is so damaged that all that remains is to uproot it and plant a new one. In most cases, the tree can be treated.
How to revive a frozen tree:
- Trim off diseased, damaged parts.
- Frost holes need to be cleaned before the spring sap flow begins, treated with copper sulfate and garden pitch.
- Tree trunk circles must be mulched with humus.
- A frozen tree needs special care. This includes frequent watering, weeding and loosening the soil.
- If frozen cherries have bloomed, 1⁄4 of the flowers are left, the remaining ovaries are removed. This is done so that the cherry tree regains its strength and does not waste it on the fruiting process.
Care
The care is neither original nor exotic. It consists of loosening, timely watering, weeding and regular addition of fertilizers during the summer. It is correct to fertilize the beds with humus and wood ash 5-6 times during the growing season.
It makes sense to plant annual shoots in a stable place. For this purpose, dig a medium-sized hole with a depth and a diameter of half a meter, this will ensure spacious development of the roots. The soil for backfilling must be flavored with ash, superphosphate, humus and potassium.
Growing figs at home - tips and instructions for care and maintenance indoors (155 photos and videos)
- Norway spruce - general information, description, properties, characteristics and cultivation features. 105 photos of using spruce in landscape design
Why cherry trees dry out after flowering - searching for the reason and tips on how to save the tree and harvest (125 photos)
Breeding a two-year-old shoot follows the same scenario as a one-year-old shoot. Only in the second year of the plant’s life should the top be cut off, at a distance of 1 meter from the ground, thanks to which the cherry will accelerate the appearance of lateral shoots.
These manipulations make sense if your desired result is to obtain a berry harvest. If you want to exploit the plant as a rootstock, then in the third year of the growing season it is worth grafting the cherry with shoots from cultivated plants that have shown themselves to be successful.
Sometimes people plant cherries in pots, and only then transplant them into garden beds. For this method, it is especially important to meticulously prepare the soil, whether it be soil or soil. Otherwise, all your work will be destroyed by mold.
When using soil, it must be warmed up or watered with fungicidal preparations.
Why cherries dry out: reasons
Cherries dry out for the following reasons:
- Diseases
- Improper care
- Close occurrence of groundwater.
- Pests
There are two diseases that most often cause leaves and branches to wither:
- Moniliosis
- Verticillium
Examine the tree carefully. With moniliosis, the branches dry out, as if struck by fire. With verticillium, you can see brown spots on the tree from which gum oozes. When a disease is detected, it is necessary to begin the fight:
- Remove diseased areas, clean off the gum.
- Treat the cuts with garden varnish.
- Treat the tree with a special antifungal agent that fights the disease.
- Burn the cut branches to prevent spores from getting back onto your trees.
- Continue to care for the tree throughout the year, following the rules described above.
- In the fall, dig up the soil in the tree trunk circle and apply fertilizer.
Now you know how to plant cherries and care for them to get a rich harvest.
Planting in spring
Planting cherries in the spring has its pros and cons; the former include high energy consumption, and the latter - efficiency. Preparing the seeds requires more time and effort. This happens due to the fact that you have to independently organize “winter” for the seedlings.
Japanese quince: description of the plant, features of planting and care. 100 photos and videos of applications for decorating an ornamental garden
Where cherries grow - conditions for the maintenance and growth of the tree. Tips for choosing a place on the site and choosing neighbors for cherries (145 photos)
- Poplar tree: description of the main types and beneficial properties of the tree. Tips for choosing a place for planting and care features (110 photos and videos)
At the end of November - at the beginning of December, the seeds must be placed in water for up to one week so that they are sufficiently saturated with moisture. To avoid fungus and mold, the water should be changed as often as possible, every day.
After this period, the bones should be buried in a non-insulated container filled with moss, sand or sawdust. The seeds should be kept in the container for 13 weeks at a comfortable temperature of +3 degrees. During this period, the shells of the seeds should begin to separate - this indicates their readiness for planting.
The most ideal time is the end of March and before the buds open. In this case, after planting the seeds, it is advisable to cover the beds with polyethylene. If everything is done correctly, shoots should appear after a month.
Advantages and disadvantages of the method
Growing a tree from a seed will not help you get a varietal plant. The resulting plant will produce small berries with a sour taste. However, it can hardly be called useless. The main advantages of fruit-bearing crops include the following:
- is considered unpretentious and does not require special conditions;
- has resistance to major diseases;
- is resistant to frost;
- not susceptible to pest attacks;
- adapted to the climatic characteristics of the region.
Stratification
To prevent the seeds from freezing in the cold winter, it is better to postpone planting until spring. Before doing this, carry out stratification. The process helps prepare the seeds for the cold, this is a kind of wintering in natural conditions. Stratification will help them germinate successfully. The further south the region where cherries are supposed to be grown, the shorter the stratification period and the higher the probability of obtaining viable seedlings.
The bones should be placed in a small container, sprinkled with wet peat, sawdust or sand. Place in a room with a temperature of 2°C to 6°C. The planting material is checked weekly to see if it has become moldy or rotten. The seeds are poured onto a clean surface and examined. They also check the soil, so they dump it back again. If necessary, moisturize. Seed material must be treated with fungicidal preparations. After this procedure, they are better preserved, dangerous microbes and fungi stop developing.
Care instructions
If you managed to germinate a cherry seed, then the next step is to bring the plant to a viable state. Caring for sprouts at first is in many ways similar to caring for indoor flowers. Regular treatments include:
- Watering. The soil in the container with seedlings should always be moist, but not wet. As the soil dries, it is advisable to irrigate it using a spray bottle. Direct watering leads to waterlogging and the appearance of rot, so you should not pour water at the root of the plant.
- Loosening. The introduction of moisture into the soil should be accompanied by light digging. At the same time, the earth is saturated with oxygen, which has a positive effect on the growth of the root system. There is no need to go deeper than 1-2 cm, since the roots are located close to the surface.
- Sprinkling. The green crown of the cherry tree needs additional moisture. It is recommended to irrigate the leaves of the seedling weekly with warm water. In this case, the soil must be covered in such a way that water does not enter the ground.
- Air temperature regulation. In the warm season, cherries grow in living quarters, but in winter the pots should be moved to a cooler place. The optimal winter temperature is +12°C.
- Fertilizer application. For active growth in the first year of life, cherries require organic feeding. For example, watering with mullein solution or adding humus to the soil. It is enough to feed the seedling in the warm season 2 times a month.
- Protection from diseases and harmful insects. The risk of infection is higher for seedlings planted in open ground. However, even indoors there is a chance of aphids attacking or fungal spores getting on the plants. To prevent cherries, it is recommended to treat them with copper-containing preparations in spring and autumn. And the ash solution helps protect trees from insects.
- The formation of the crown and sanitary pruning of shoots should begin in the 2nd year of the cherry seedling’s life, after planting in the garden plot.
See also Why cherries are good and bad for health
Propagation of cherries by seeds in autumn
Cherry pits, stored until autumn in a pot with sand, are taken out of it and sown on a growing bed in pre-prepared grooves to a depth of 3-4 cm, where they undergo natural stratification. Sowing is done in late autumn, so the planting site is prepared in advance. The plot is cleared of weeds, dug well, adding humus (1 bucket per 1 m²). The distance between rows is 20-25 cm, in a row - 1-2 cm. The furrows are sprinkled with sifted dry humus or peat.
In the spring, the emerging seedlings are thinned out, leaving 15-20 cm in the row between neighboring plants. Further care for them includes weeding, watering, and loosening. During the season, plants are fed 4-5 times with organic (slurry) or mineral fertilizers.