Before weaving onions into braids, familiarize yourself with the basic braiding techniques, because the quality of the created “structure”, the duration of its operation and the safety of the vegetable depend on this. Thanks to this, the onion does not lose its beneficial properties, does not rot, and retains its taste and aromatic qualities. Convenience when removing each bulb is also important.
Why do they weave braids from onions?
You can put the tubers in a box, but it’s difficult to preserve the onions that way. Why braids? The reasons for the need for weaving are as follows:
- Free air circulation is ensured, which increases shelf life. Without proper ventilation, the bulbs are susceptible to mold and rot as a result of exposure to moisture.
- Saves space in the storage room (braids are hung).
- Signs of diseases are detected in a timely manner because access to every root crop is open. As a result, the spread of infection to other units can be stopped.
- The consumption of vegetables by rodents and insects living in the floor area is excluded.
- Possibility of moving the scythe to another location.
- Preservation of aroma and taste, nutrients.
- There is no need to carry out antiseptic treatment of the room, since onions release phytoncides that suppress pathogens.
- You can create a unique interior design in a rustic style.
- Quick access to the product.
- Saving money - the harvest is completely preserved, there is no need to purchase additional containers.
Braid plait without weaving
- Make a regular ponytail;
- Divide your hair into 2 equal sections;
- Now you begin to twist each part in one direction, say to the right;
- Then you twist these two bundles together into one large one in the other direction, that is, to the left.
Video on creating easy hairstyles in 5 minutes based on braiding
If you want quick braids, then these hairstyles are perfect for you. They are all done quickly and easily - up to 5 minutes, depending on the length of the hair.
To braid yourself, just adhere to 3 main rules and follow step-by-step instructions. The more often you do your hair, the better it will turn out.
In some cases, it may take you a few tries - keep this in mind if you're trying out a new hairstyle for an important event.
Tags: video tutorials, Dutch braid, fishtail braid, braids for yourself, step-by-step weaving, French braid for yourself
Optimal timing for weaving
The bulbous harvest is harvested in July-August, so you can weave braids during this period, but after the root crops have completely dried. This takes approximately 2 weeks. However, onions also dry out in braids, so depending on the chosen method, you can start weaving as early as 3 days after harvesting.
The optimal period can be accurately determined based on the maturity of the tubers, as evidenced by the following indicators:
- leaves become yellow and dry;
- the bulbous necks become thinner and soften;
- the husk becomes yellow;
- scales are easily removed from the bulb;
- the fruits gain juiciness, crunchiness, aroma and taste.
Sometimes it is impossible to determine the date of harvesting and, accordingly, braiding, since the bulbs turn yellow unevenly. But there is a main symptom - lodging of the stems, even if they are still green.
Weaving patterns
Scheme No. 1. To weave a tight and strong braid using this method, you will need ribbon and rope from available means. So let's get started. The rope is folded in half and the base of a strong onion with the longest tops is tied. We should have three ends for weaving, two of which are rope and one is the top of the bulb. Next, we continue to knit the braid alternately, adding bulbs on one side and the other. Try to braid each subsequent head as close to the other as possible so that the product does not fall apart. If such a decoration hangs in a prominent place, then it can be supplemented with ribbons, flowers, and dry herbs.
Scheme No. 2. To quickly understand how to weave a bow in this way, you need to remember the technique of weaving a wreath of flowers. We choose the strongest onion and tie it well with a rope at the base. We begin to tie the rope itself with the second onion and so on, gradually adding onions.
Scheme No. 3. For this scheme you need onions with well-dried tops. In this case, the bulbs are tied in pairs and secured to the base. As a base, you can use a gauze bandage, wire, or tourniquet.
If you don’t know how to knit braids, then how to braid a bow beautifully in this case? There is one easy way: just tie the bows into bunches and hang them on a crossbar. You can also store garlic in this convenient and practical way.
Preparing the bulbs
In order for the bulbs in braids to be stored for as long as possible, they need to be properly not only woven, but also collected and prepared. What is included in these activities:
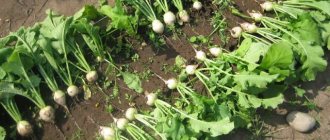
- Harvesting is best done in the morning, after the sun appears.
- You cannot pull out the tubers - they are damaged from the inside. How to remove from the ground: dig up the soil with a shovel, carefully pull the onion.
- Shake the remaining soil off the root vegetables, but do not hit the heads together. Otherwise, the bulbs will begin to rot.
- Place the tubers in the garden or indoors to dry. The first option is preferable, since the onions must be dried in the sun. Place woven material under the vegetables that allows air to pass through - they will remain clean and “breathe” from all sides. Why exactly under the sun? The answer is simple - the heat emitted by the rays promotes disinfection and rapid natural drying.
- Do not cut off the feathers immediately, as the tails will be needed for braiding. Their length should be at least 15-20 cm.
- You should not leave root vegetables outside at night - it is better to bring them indoors or cover them with film. This is necessary to prevent morning dew from saturating them with moisture.
- Before braiding, the bulbs are freed from the husks, which are easily removed, but do not allow the scales to be completely removed.
- Be sure to wipe each vegetable with a soft, dry cloth.
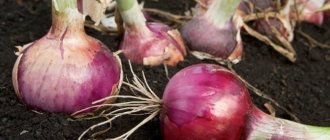
- Calibrate the bulbs (select whole, undamaged fruits that are fully ripened).
- For braids, select turnips of the same size.
- Do not allow the tops to dry out - they should be elastic.
How to store onions for the winter? Knitting onion braids
Just recently you were harvesting ripe onions. To keep onions in good condition and marketable condition for the winter, there is one very good way - tying onions in braids.
With this method, the bulbs will be preserved in high quality, and with their appearance they can decorate the kitchen interior.
Let's take a closer look at how to preserve onions for the winter, master class on knitting onion braids.
To weave onion braids, we will need 1.5 m twine, scissors and a bow. The onion itself should be well dried, but the tails should remain elastic so that they do not break during weaving.
Prepare the required number of onions in advance, preferably of the same size; a braid of onions will look more aesthetically pleasing.
Trim the ponytails, leaving approximately 7 cm long. This can be done with scissors or pruning shears.
Fold the twine in half and tie the ends in a knot. Hang the twine on a hook or nail at a convenient height for weaving, the most important thing is to ensure even tension on the threads.
How to tie a bow into braids?
1. At the end of the twine we make a loop and extend the tail of the first onion into it.
2. Spreads the twine, extends the second bulb into the middle, wraps the tail alternately around each strand of twine, and bends the remaining edge of the tail down.
3. We weave the next onion in the same way.
4. During further weaving, place the onion fruits evenly, turning the bundle.
5. When 10-15 cm of twine remains, secure the last onion in the loop. We tighten the onion braid and hang the harvest.
The resulting onion braids look beautiful, and this is also the best option for drying onions, so they will be stored longer.
Another advantage of this method of storing onions is that you save space by hanging garlands of onions in any storage room.
By the way, garlic can also be braided in this way.
Weaving methods
There are a lot of methods for weaving braids from bulbous crops, so gardeners can choose the most convenient and optimal one for themselves. The standard generally accepted weaving principle is shown in the photo:
Method No. 1:
- take bulbs with long tops;
- select the largest vegetable that will become the basis;
- attach another root crop to it on the left side, crossing the shoots (the tail of the base lies straight, the tops of the bulb on the left have the opposite direction);
- on the right side do the same;
- weave to the required length (no more than 2 m), adding new bulbs each time;
- At the bottom, secure the tops with a rope, making any knot.
If the feathers are not long enough, use a rope that is applied to the greens and woven together with the tops. Remember that the ends of the strings must be smooth and identical, the weaving density must be maximum. At the end, tie a loop to hang the bow from. You can do it this way:
- You will need 3 twines of the same length. Tie them together at the top.
- Attach an onion to one of the ropes at the top and make a strong knot.
- Also apply tubers to the other two ends, but do not tie them to the rope, but start three-strand weaving, as in the previous method. The result will be a compacted bundle.
Method number 2:
- Fold the long rope in half. Make a loop at the fold and tie the ends with a knot at the bottom.
- Insert the shoot of a large onion into the loop and tighten it tightly.
- Next, alternately apply the tails of the bulbs to one rope, then to another, like a horizontal figure eight. Hold the tip of the tops with your fingers and pass it between the rope ring.
- Weave in the rest of the bulbs in this manner. In the common braid, there are tails of the tops that can be trimmed with ordinary scissors.
Method number 3:
- Fold a long piece of twine in half, making a loop through which you pass the tops of one onion. You should get 3 strands - one from feathers (place in the middle), two from ropes.
- With each weaving step, add one root vegetable, weaving them into the side strands (rope and onion).
- Having reached the end (the length of the twine is 10 cm), make a knot.
Method number 4:
- Fasten 2-3 bulbs together in any way, but the integrity of the tops should not be compromised.
- Fold the rope in half, make a loop through which you thread the feathers of the first pair of vegetables.
- Place the remaining pairs on opposite sides of the twine so that when weaving the bulbs turn in diametrically opposite directions.
- After weaving each pair on the rope, make a knot, fixing the braid.
- Fix the structure at the bottom.
The result is a very dense braid. Remove the remaining elements of the tops with scissors.
If you plan to use onion braids as a decorative element, weave in dried flowers, spikelets and other “accessories” that match the interior design.
One of the ways to weave a bow into braids is clearly shown in the video below:
Why you should store onions in braids
Onions (especially onions) are consumed by most people throughout the year. It can be pickled, added to first and second courses, made into salads, used as a filling or cold medicine. This is a vegetable that should always be on hand, so it is important to take care of its preservation for the winter.
Find out the best way to store onions in winter at home.
There are several ways to store onions:
- freezing (onions are chopped and frozen in bags);
- in mesh bags (vegetables are placed in bags and piled on top of each other);
- in nylon stockings (this “Soviet”, not entirely aesthetic method also paid off, because the stockings are perfectly breathable);
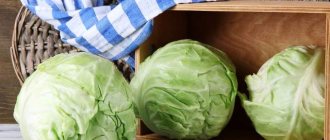
- in other containers (wooden boxes, cardboard boxes, baskets, fabric bags).
On a production scale, storage options in containers, boxes or bags are used to save time. At home (in an apartment, in a house, in a country house), the best option is to braid an onion.
By using it, you provide the following conditions:
- Air circulation . The bulbs “breathe” evenly, which serves as a preventive measure against rotting and other painful processes.
- Preservation of taste . The bulbs do not take on the smell of the container and do not lose their aromatic properties.
- Constant control over the condition of the plant . You can notice deteriorating heads in time and remove them. Due to the fact that the bulbs hardly touch, diseases are not transferred to neighboring heads.
- Safety from rodents . Bulbous braids are suspended from the ceiling, and this limits pests’ access to them (when stored in a cellar or basement).
- Additional decor . Braided bulbs are not only convenient, but also beautiful. They can be a successful addition to an eco-style interior.
In addition, such an onion is always nearby, because to take it, you don’t need to take out boxes and look for an onion of the right size - all the vegetables are always in sight.
Did you know? Onions are the only vegetable crop that has worldwide use. The cuisine of any nation in the world cannot do without this vegetable. Crops of more than 200 types of onions are three times larger than those of wheat, and they are a national product in 175 countries.
Important nuances
Regardless of the chosen method of weaving braids from onions, it is necessary to adhere to the general rules, so that the bundle will not fall apart and the onions will be securely fixed.
8 useful tips:
- Follow the rules for preparing the bulbs before weaving - the duration of storage depends on this.
- Try to leave the feathers as long as possible, as they are easier to work with and the weaving becomes stronger.
- For braids, you can use not only the feather part, but also the arrows. Although they are considered less elastic.
- For convenience, while braiding, hang the future braid on a nail/hook. But to make the “structure” stronger, it is better to lay the bulbs on the table surface.
- If you are making braids without rope, do not make the bundles too long, as the bulbs are heavy. Consequently, the braid will break under its own weight.
- Among ropes, give preference to reinforcing fibers, that is, those types that are not slippery and therefore securely hold the bundles. This is twine, bandage, cord.
- If you braided a braid, but it turned out to be not so strong, braid it right away before the tops dry out.
- Don’t be afraid to weave in still green feathers - they will dry out in the braid, but the bundle will be more reliable.
Weaving pattern
Most often, amateur gardeners resort to the simplest method of storing onions at home.
Typically, wicker baskets, wooden boxes or cardboard boxes are used for this, where the bulbs are laid out, and then the containers are placed in basements and cellars. However, with dense packaging, it is difficult to ensure ventilation of the fruits so that they do not begin to rot. In this regard, you can use old storage methods by braiding regular bow braids. First of all, you should know how to properly harvest the crop, so that in the future you can make large wicker bundles with onions.
The harvest should be harvested in late summer or early autumn. Harvesting time depends on weather conditions, as well as the type of vegetable crop. For two weeks, you should take the onions every day to a dry, sunny place to dry. In the evening, the vegetables are brought into the shelter so that they do not become moist again in the morning when dew falls. By drying well, you can prevent the process of rotting when the onions are stored indoors.
When vegetables dry, their tops will become much harder. Without sap and moisture, the plant fibers will become very strong. They will be able to withstand greater tensile load. And this will allow the tops to withstand a large mass, weaving them from a large mass of bulbs. Signs that a vegetable crop is ready for storage include the acquisition of yellow outer husks and dry tops.
Before weaving onions, you should select whole vegetables without damage, rotten rot, mold or other signs of a low-quality product. If there are a couple of such bulbs in a bundle, then during storage this can lead to damage to a larger crop, since this may not be noticed immediately.
Only perfectly dry ponytails can be woven, as they will not break under heavy load and twisting of the fibers.
It is advisable to weave together approximately the same size of fruit and the same variety. Before you begin to set the fruits, you need to remove lumps of earth, and you can also cut off the roots without damaging the integrity of the bulb head.
Braiding a bow is not difficult. Beginners will need more time, but the technique is quite simple. With a little practice you will develop speed, and then you can do it almost automatically. In one of the weaving patterns, a rope can be used as the base. Since the design can turn out to be quite heavy when knitted, you need to provide a strong base, otherwise everything may fall apart in the end, and you will have to redo everything.
Then we find the onion with the longest stem. It is attached to the rope so that we get 3 branches - 2 ends of the string and 1 onion stem. Begins to braid a regular braid. After each new grip, you will need to add one fruit on both sides. It is advisable to braid the tops as close as possible so that they can be firmly secured to the base. Weaving should be continued until the twine is about 20 centimeters long. After this, we tightly tie the bow with a rope, make a loop so that you can conveniently hang the finished bundle on a hook.
There is another way of knitting. Excess husk is removed and the tops are leveled. You will need to form a ring of about 75 centimeters from the rope. It is then secured to a hook for greater convenience. At the beginning of the ring you will need to attach a pair of onions that are connected to each other. Then the same second pair is taken and secured crosswise to the first. Then you will need to take one plant at a time, wrapping its tops around the twine.
Thus, the fixed pairs are connected from above. As a result, the stem should remain between the heads of the bulbs; there is no need to touch the ends, since after the weaving is completed they can be cut off.
The fruits must be spaced evenly to ensure an even weave. After weaving a bundle of about 10 kilograms, you need to make a small loop (up to 10 centimeters) so that you can hang the crop from it. After completing the work, you can cut off the excess tops so that they do not interfere. Garlic can be knitted in a similar way.
How to store onion braids?
To ensure that the bulbs are stored in the braid for at least six months, create optimal storage conditions. What experts and experienced gardeners recommend:
- The room must be dry - humidity level up to 70%. If you do not adhere to this requirement, the root crops will rot.
- Air temperature plays a critical role. The best indicators are from +18 to +22 degrees, that is, room temperature, so use the kitchen, hallway, closet. Bulbs should not be placed in cellars or basements.
- Braids require frequent airing. If you store fagots in the pantry, remove them periodically and keep them in a ventilated room overnight.
- Do not hang onions over heating appliances - this will cause excessive drying.
- Once every 2-3 weeks, inspect the bulbous crops for rotten elements. If mold and rot are present, cut off such bulbs to prevent the rot from spreading and affecting other vegetables.
- When the humidity is high, the bulbs will germinate, so inspect the heads carefully.
- Before storage, it is advisable to cut off the root system a little - this way the bunch will look aesthetically pleasing.
- There is an opinion that in autumn and spring onion bundles require warmer storage conditions, and in winter the temperature drops by 5-7 degrees.
Having mastered the skill of weaving braids from onions, you will not only preserve vegetables for a long time, but also create special comfort in your home. Weaving bundles is not difficult - it is enough to know the basic principle of weaving ordinary braids. Follow the instructions, adhere to the rules of preparation and storage, and come up with new weaving options yourself.
0
0
Copy link
When is the best time to weave a bow?
The fact that the onion is ripe will be indicated by its dried lower leaves. Once this happens, it is dug up and prepared for braiding. Each bulb is carefully dug up with a shovel or pitchfork so as not to damage it and pulled out of the ground. It is not advisable to touch the tops - they can easily come off, and for weaving they will need to be long and strong.
Reference. If the time is right, but the onions still haven’t ripened, trample the bed - walk on top of it or rake off some of the soil from the bulbs. The procedure is carried out 2-3 weeks before harvesting.
It is better to make a braid of onions 3-4 days after digging and drying, when the tops have become soft, but have not yet dried completely.
step-by-step diagrams with photos and videos
Onions are an integral part of many people's daily menu. Vegetables should always be on hand.
The root crop is harvested for future use in the winter, and it can be stored in different ways. The most practical and beautiful is braiding onion braids. To create them, each onion is thoroughly dried and combined into clusters.
There are several options for braiding onions for storage. The finished bunch is secured with a tourniquet, which is tied into a knot and the root crops are hung from the ceiling or wall using it. Place braids of bulbs both in storage and in the kitchen.
Optimal timing for weaving
Onions ripen 63-83 days after planting.
Braiding is used only for mature specimens. One of the first signs of ripening of a vegetable is yellowing and drying of the lower feathers. When the onions are ripe, you need to start harvesting. Dig out the vegetable carefully so as not to damage the root crop. The feathers need to be preserved because they are used to bind the bulbs for drying and storage.
In warm, sunny weather, the harvested crop is left to dry directly on the beds, but if it suddenly rains and becomes damp, there is a risk of damage to the crop.
Particular attention should be paid to the safety of the tops. Only if it is available and properly prepared for storage can you begin weaving. When harvesting, it is recommended to ensure the safety of the entire length of the tails. Feathers that are too long are trimmed, leaving 12 cm for weaving.
Preparing the bulbs
In order to be able to store onions in braids throughout the winter, you need to take a responsible approach to harvest preparation. The length of its storage and taste depend on the correct processing of onions.
The harvested crop must be cleared of soil residues and laid out on any material to dry in a well-ventilated and dry place. An oilcloth or blanket is suitable for this purpose.
You need to dry the plant until the tops begin to dry out. It is important to dry the feathers a little, but at the same time maintain their elasticity. Dried tails are fragile and crumble. The method of storing onions in bundles can only be used if the elasticity of the tops is preserved.
Drying takes 5-7 days. At the end of the procedure, the crop is placed under the sun's rays, but not for long, so that the bulbs are not exposed and the tops do not dry out. Sometimes drying takes 2-3 days depending on the air temperature.
After this, you need to sort out the onions, remove damaged specimens and sort the heads by size. It is recommended to remove excess husks and trim the roots a little. This will make the braid look more beautiful.
Popular ways to weave onion braids
Storing and drying onions in braids has been done for a long time. This is a time-tested method that has its advantages.
In braids, onions take up less space. When suspended, it is inaccessible to pests and rodents. This method is also suitable for drying. Over the years, several methods of weaving onion braids have been developed.
The braid must be woven only from bulbs of the same size.
Option 1
Since the weight of the braid is quite large, it is necessary to use a rope to secure it. You can take twine, tape, bandage or nylon cord. Then you need to decide what pattern to use to knit the bow into a braid.
For the first method, you need to select the bulb with the longest feathers, tie the tail to a rope of the required length so that 3 edges are formed - 2 from the rope and 1 from the tops. The latter should be located in the middle.
Then you need to braid the onion according to the principle of a simple braid, only with each grip you need to add one onion head on both sides. They must be woven tightly enough to securely fix the heads. Weaving continues until 10 cm of rope remains to the top of the braid. A strong loop is tied from the remaining ends.
Option 2
I have been braiding bows this way for years. The cord must be folded in half, the ends tied on one side, and a loop made on the other.
The rope is fixed on a hook or nail for more convenient work. As in the previous option, it is recommended to choose the first onion with a long feather. It is tied in a loop, and the remaining tail is passed between the two sides of the cord, wrapping around each of its sides.
Then they continue to work according to the same principle, adding each bulb and wrapping feathers around the cord. The ends of the tops are brought out alternately from the opposite side (toward and away from you).
Option 3
For this option, several pairs of bulbs are first tied together. This is done carefully and at the same time firmly, but so that the tops remain intact. Then you will need a rope folded in half.
One large head is tied to the cord in the middle. The tied pairs are placed between the ropes, alternating them so that each subsequent bulb is turned in the opposite direction.
After the second pair, we tie the rope into a knot, fixing the finished section. Then we put 4 onions again and knit a knot. We continue this way until 10 cm of rope remains. Onion braids, tied using the latter method, turn out strong and attractive.
Storage conditions for onion braids
The storage conditions for fagot have the following criteria:
- Only well-ventilated, dry rooms are suitable for their placement. The onion must “breathe”.
- The optimal storage temperature is +18…+20 °C.
- Humidity in the room should not exceed 70%.
Taking into account the recommended storage conditions, the wicker can be hung in the kitchen, hallway or closet. The basement is not the best place to store onion bundles. There is a risk of root crops rotting.
dachamechty.ru
step-by-step diagram and tips with photos and videos
There are many ways to braid onions for storage. A tourniquet is woven into the tops, which is finally tied into a knot and hung. Before you braid the tops, you need to know how to prepare the bulb. If you follow the step-by-step instructions, the storage of the culture will be long, the bulb will not lose useful components and will delight you with its taste and aroma. There are other positive aspects of this option for storing vegetables.
Optimal timing for weaving
The main advantage of storing onions in braids is free ventilation of all the bulbs.
Other advantages include:
- the ability to quickly select the bulb of the desired size;
- you can immediately see the head, which has begun to deteriorate;
- you can easily change the hanging location;
- a suspended vegetable will not be accessible to pests and rodents;
- saving space;
- vegetables retain their taste and aroma for a long time.
Harvesting of the spicy vegetable begins at the end of July. The maturity of the bulbs is determined mathematically, calculated according to the lunar calendar, or by observing the appearance of the tops and underground parts of the plant.
- By the time they are fully ripe, most of the feathers in the garden turn yellow, dry out and lie to the ground.
- The neck of the bulb becomes thinner and dries out.
- The head becomes dense, the top layer of scales rustles and is easily separated.
After digging up the crop, they begin to dry it. You can dry it in the beds, if the weather permits, or in a room with good ventilation by tying the tops of several bulbs together. You should tie the onion to dry with a thick rope. Drying continues for at least 12-14 days. Only after this they begin to prepare the crop for storage.
Braiding should begin 3-4 days after digging. The feathers will be limp at this time and will not dry completely. The tops are pre-cut, leaving a length of 25-30 centimeters. There are several ways to weave onion braids.
Preparing the bulbs
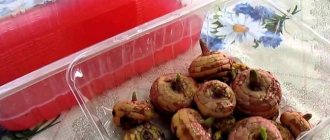
After digging, all heads must be dried. Then you need to decide on how to store the onions. There are three main ways to store crops: warm, cold and mixed. You can store onions in glass containers, boxes, fabric bags, plastic containers, or simply in bulk.
If the vegetable is supposed to be kept in boxes, baskets or boxes, then the tops are cut off, leaving a stump of 3-4 centimeters. When storing spicy vegetables in braids, the length of the tops is approximately 30 centimeters.
- Each bulb is dug up with a shovel and only then pulled out by hand.
- It is necessary to shake the adhered dirt carefully. Even minor damage can affect shelf life.
- It is necessary to dry the head together with the tops, since many nutritional components have accumulated in it. Throughout the drying period, the bulb will receive beneficial substances.
The room temperature for sweet and semi-sharp varieties should be from 0 to -1 degrees. It is recommended to store spicy onions at temperatures from -1 to -3 degrees. In apartment conditions, the temperature should be maintained at +18 to +22 degrees.
Popular ways to weave onion braids
Among the variety of methods for drying onions, the most convenient is braiding using rope. Vegetables dry more evenly and faster, so they last longer. The tops are braided in different ways. If the harvest is small, then you can do without a rope. In this case, use the wreath weaving technique.
Option 1
Since it is difficult to braid feathers alone, twine, a tourniquet, a cord or any other strong rope comes to the rescue. You can knit a bow into a braid according to the following pattern.
- From the entire harvest, you should choose a dense head with thick and strong tops, which will serve as the basis. A rope of the required length is tied to the base of the tops and its ends are aligned.
- From the resulting three ponytails, they begin to weave a braid. With each subsequent capture of the side tail, new bulbs are applied. They should be woven as tightly as possible to the base of the head so that the bunch does not fall apart.
- Continue braiding the onion braid until the ends of the rope become short (18 centimeters).
- The ends of the rope are tied around the tops and a loop is made, from which the entire bunch is then hung.
The maximum length of such a braid should be no more than two meters.
Option 2
Another method of weaving a braid from onion feathers is considered simple.
- The first bulb should be selected with the longest and strongest tops.
- The rope is tied at the base of the bulb and aligned so that you get three tails of the same size.
- Then take two onions and weave a braid between their tops.
- The pairs are woven into one common braid and secured with a knot.
At the end of the weaving, a loop is made from the rope, with the help of which the resulting bunch will be suspended for further storage.
The method is considered the simplest and best for drying and storing crops. Each bulb receives sufficient fresh air, resulting in a reduced risk of rotting and disease development.
Option 3
For the third method, you need to take a rope and fold it in half. The loose ends are tied with a knot and hung on a hook.
Turnips will subsequently be attached to the two resulting ropes.
- A loop is made at the bottom of the rope, onto which two onions with the longest and strongest tops tied together are attached.
- Next, another pair of heads is secured.
- The tops of the next one head are wrapped first around the first rope, then around the second and brought forward.
- The tops of the next onion, after wrapping around the ropes, are brought back.
- Work continues until the working rope runs out. Leave a 10 cm loop on top. All protruding tails are cut off with scissors.
To store the crop in braids, only dense, undamaged heads are selected. The top husks are peeled off and the roots are cut off.
Option 4
Onion braids are also woven according to the following pattern:
- The tops of three onions are tied together with a rope.
- Other bulbs and tops are woven in alternately.
This same simple method can be slightly modified. The rope is folded in half. At the place where the loop has formed, fix the head with strong and long tops. Then they begin to knit the bulbs on three sides. Tied onions can become a decoration for the kitchen if you interweave onions of different colors and attach pepper branches between them.
Storage conditions for onion braids
To store the spicy vegetable, choose well-ventilated places. The ideal option is a cool cellar or basement. The air temperature should not be lower than -3 degrees. Air humidity should be 80-90%.
You can hang onion braids in the apartment (in the kitchen, in the hallway, in the pantry), but away from heating appliances. The vegetable is stored well at a temperature of no more than +22 degrees, and the humidity should be 60-70%.
moefermerstvo.ru
Storing onions and garlic in braids bookmarks 17
It's July and onions are in their prime! Green powerful feathers delight the soul! The time is not far off when digging up the bulbs will begin. Before storing onions, be sure to dry them and remove any remaining soil. It has long been known that onions are best stored in a dry room; the air temperature should not be higher than 12-15 degrees. What's the best way to preserve onions? In boxes, in bags? No! The best option for storing onions is hanging in braids!
“It was an old custom. When a wedding cortege walked down the street in the southern villages, it was led by a peasant carrying a huge wreath of onions - an emblem of the well-being of a young family. The wreath was worn around the neck, and the large onions sparkled in the sun and rustled with their special onion rustle.”
This is a quote from Alexey Smirnov’s book “Stories about Cultivated Plants.” And I started with her for a reason. Because further there the main secret of onion braids is revealed: “They are made not for the sake of beauty, but according to tradition. Tradition often has a reliable practical basis, writes Alexey Volodikhin.
To this day, in southern markets you can see, if not wreaths, then braids woven from onions. The fact is that onions are, frankly speaking, difficult to store. The onion is growing. Or it rots. The textbooks clearly state that northern onions can be stored for seven to eight months. Southern - and even less... No matter how you store it - in boxes, in nets, in bags, in cellophane - the end is the same. There is only one way to delay the sad outcome: keep onions in wreaths and braids.”
But even here, not everything is so simple. Onions will be good all winter only if they are collected on time.
“An inexperienced gardener waits for the onions to ripen. Until the greenery falls down and withers. Then he digs up the turnip and begins tying it into braids. And nothing comes of it. Dry tops crumble and break. It doesn't make rope. It is necessary to very accurately determine that mysterious day X, when the tops are still green, but are already beginning to turn yellow little by little. This is where you need to remove the onions. And it’s okay that it seems raw and unripe. He’ll have time to finish his hair in braids.”
It is equally important to remove the onion correctly. The bulbs should not be pulled out - this can damage the bottom
They need to be dug up with a shovel.
Onions removed from the soil are left in the garden bed to dry for several hours, then dried indoors for several days.
You can't store turnips in the basement - it's too damp there. But the storage room for onions should not be too warm, otherwise they will dry out. You can store your braids in your room. The optimal temperature is 20 °C.
This is perhaps the only reliable way to store onions.
Garlic can be stored in the same way as onions - in braids. But with slight variations.
Firstly, dried garlic stalks are not as strong as onions, so tufts of straw or twine are woven into the braid.
Secondly, garlic prefers cool weather. The ideal temperature for it is 1 - 2 °C (for seed - about 0 °C). And in warm rooms it dries out and is affected by diseases.
The keeping quality of garlic also depends on the size of the heads. Large ones last longer, small ones spoil faster. Therefore, in winter it is necessary to eat up small things first, and only then large ones.
By the way, in the old days garlic was stored in jars with flour.
How to prepare for weaving
Before tying onions in braids for storage, you need to remove the crop from the garden in time. Overripe bulbs have good taste, but their leaves dry out completely, and it will be impossible to tie such an onion into a braid. Unripe root vegetables have poor taste and spoil quickly.
The bulbs are carefully removed from the soil, shaken off the ground and left in the fresh air to dry, maintaining the entire length of the tops. In the southern regions, where it is very hot, onions are tied into braids after harvesting.
In regions where the summer is humid and the air temperature does not exceed 30ºC, the onions should be laid out to dry before tying. If it is sunny, the harvest can be spread out in a thin layer and left in the open air. During periods of bad weather, the bulbs along with the tops are removed under a canopy, where the crop will lie and gradually dry. A place where the tops will dry faster could be a greenhouse, a bathhouse, or a roof.
Onions of the same size are braided into a braid. It is better to knit the selections and sets in a separate braid to preserve the planting material until spring. The long feather is trimmed to 10 cm. Damaged and damaged specimens are removed for urgent processing.
step-by-step diagrams with photos and videos
Onions are an integral part of many people's daily menu. Vegetables should always be on hand.
The root crop is harvested for future use in the winter, and it can be stored in different ways. The most practical and beautiful is braiding onion braids. To create them, each onion is thoroughly dried and combined into clusters.
There are several options for braiding onions for storage. The finished bunch is secured with a tourniquet, which is tied into a knot and the root crops are hung from the ceiling or wall using it. Place braids of bulbs both in storage and in the kitchen.
Optimal timing for weaving
Onions ripen 63-83 days after planting. Braiding is used only for mature specimens. One of the first signs of ripening of a vegetable is yellowing and drying of the lower feathers. When the onions are ripe, you need to start harvesting. Dig out the vegetable carefully so as not to damage the root crop. The feathers need to be preserved because they are used to bind the bulbs for drying and storage.
In warm, sunny weather, the harvested crop is left to dry directly on the beds, but if it suddenly rains and becomes damp, there is a risk of damage to the crop.
Particular attention should be paid to the safety of the tops. Only if it is available and properly prepared for storage can you begin weaving. When harvesting, it is recommended to ensure the safety of the entire length of the tails. Feathers that are too long are trimmed, leaving 12 cm for weaving.
Preparing the bulbs
In order to be able to store onions in braids throughout the winter, you need to take a responsible approach to harvest preparation. The length of its storage and taste depend on the correct processing of onions.
The harvested crop must be cleared of soil residues and laid out on any material to dry in a well-ventilated and dry place. An oilcloth or blanket is suitable for this purpose.
See also: Planting, growing and caring for multi-tiered onionsRead
You need to dry the plant until the tops begin to dry out. It is important to dry the feathers a little, but at the same time maintain their elasticity. Dried tails are fragile and crumble. The method of storing onions in bundles can only be used if the elasticity of the tops is preserved.
Drying takes 5-7 days. At the end of the procedure, the crop is placed under the sun's rays, but not for long, so that the bulbs are not exposed and the tops do not dry out. Sometimes drying takes 2-3 days depending on the air temperature.
After this, you need to sort out the onions, remove damaged specimens and sort the heads by size. It is recommended to remove excess husks and trim the roots a little. This will make the braid look more beautiful.
Popular ways to weave onion braids
Storing and drying onions in braids has been done for a long time. This is a time-tested method that has its advantages.
In braids, onions take up less space. When suspended, it is inaccessible to pests and rodents. This method is also suitable for drying. Over the years, several methods of weaving onion braids have been developed.
The braid must be woven only from bulbs of the same size.
Option 1
Since the weight of the braid is quite large, it is necessary to use a rope to secure it. You can take twine, tape, bandage or nylon cord. Then you need to decide what pattern to use to knit the bow into a braid.
For the first method, you need to select the bulb with the longest feathers, tie the tail to a rope of the required length so that 3 edges are formed - 2 from the rope and 1 from the tops. The latter should be located in the middle.
Then you need to braid the onion according to the principle of a simple braid, only with each grip you need to add one onion head on both sides. They must be woven tightly enough to securely fix the heads. Weaving continues until 10 cm of rope remains to the top of the braid. A strong loop is tied from the remaining ends.
See also Terms of harvesting onions for storage in central Russia and the regionRead
Option 2
I have been braiding bows this way for years. The cord must be folded in half, the ends tied on one side, and a loop made on the other.
The rope is fixed on a hook or nail for more convenient work. As in the previous option, it is recommended to choose the first onion with a long feather. It is tied in a loop, and the remaining tail is passed between the two sides of the cord, wrapping around each of its sides.
Then they continue to work according to the same principle, adding each bulb and wrapping feathers around the cord. The ends of the tops are brought out alternately from the opposite side (toward and away from you).
Option 3
For this option, several pairs of bulbs are first tied together. This is done carefully and at the same time firmly, but so that the tops remain intact. Then you will need a rope folded in half.
One large head is tied to the cord in the middle. The tied pairs are placed between the ropes, alternating them so that each subsequent bulb is turned in the opposite direction.
After the second pair, we tie the rope into a knot, fixing the finished section. Then we put 4 onions again and knit a knot. We continue this way until 10 cm of rope remains. Onion braids, tied using the latter method, turn out strong and attractive.
Storage conditions for onion braids
The storage conditions for fagot have the following criteria:
- Only well-ventilated, dry rooms are suitable for their placement. The onion must “breathe”.
- The optimal storage temperature is +18…+20 °C.
- Humidity in the room should not exceed 70%.
Taking into account the recommended storage conditions, the wicker can be hung in the kitchen, hallway or closet. The basement is not the best place to store onion bundles. There is a risk of root crops rotting.
openfile.ru