Soil for planting tulips
Gardeners most often use propagation of tulips by children and daughter bulbs.
Seed propagation is usually used by breeders. With the vegetative method, weather conditions and insect activity are not very important than with seed propagation. The rapid development of tulips in spring places special demands on the soil. It must be highly fertile, contain a large amount of nutrients in a form accessible to the plant, have a favorable environmental reaction and good physical properties (sufficient air and moisture capacity).
The most suitable soil for tulips is sandy loam or light loamy, well cultivated. Acidic soils must be limed. The groundwater level for tulips should be no higher than 60-80 cm.
To prevent infection with fungal and bacterial diseases, tulips should be returned to their original place no earlier than after 5-6 years. This is also necessary so as not to contaminate some varieties with others if baby bulbs have been lost in the soil.
Propagation of tulips by bulbs will be successful if they are properly prepared and stored. If you decide to propagate tulips in the fall, around July you need to separate the daughter bulb from the mother bulb. After this, it needs to be cleaned and dried in fresh air. Then the bulb is sent for storage.
In August - early September, as soon as tulip bulbs appear on sale, gardeners are simply itching to buy them. And really: how can you pass by such beauty! What if they snap everything up later! And in general, if you don’t hurry, at the end of the season there will only be poor planting material left, which is unlikely to please you with germination.
But you should understand that it is difficult to preserve bulbs at home without a cellar. Before planting, they should be kept in a dry, cool and ventilated place. Without access to air, the bulbs will “suffocate”; in a too hot room they will rot, and in a damp room they will become moldy. In August, the storage temperature should be 20°C; in September it is reduced to 15°C.
When buying tulips on the market, beware of unscrupulous sellers who, under the guise of elite varieties, sell the cheapest planting material. Another problem with bulbs from the market is the risk of mis-grading, that is, you may get good tulips, but not the variety that you liked. Therefore, we recommend purchasing bulbs in the store, and if you need a rare or collectible variety, order it by mail.
To choose good bulbs, take a cheat sheet with their classification by size to the store or market so that you can correctly understand the designations on the labels.
A good bulb should be dense, weighty, with thin golden-brown scales and without mechanical damage. The root tubercles should be clearly visible at its bottom, and the neck should be dense and dry to the touch. Also pay attention to the presence of the tip of the future stem, which has not yet begun to grow.
Bulbs of any size are suitable for growing outdoors. But it is worth remembering that children, as well as planting material from the 3rd (and sometimes 2nd) selection, may not produce flowers in the first year after planting. If you want to buy tulips for forcing, look for only extra-class bulbs or, at most, first-class bulbs.
In addition to planting in holes, there are other options for growing tulips - in a basket, on a net or in decorative boxes.
- Planting in a basket. There are special containers for planting bulbs on sale. Thanks to them, planting tulips is much easier. You don't have to bend down every time to pick up the next few onions. When using such a basket, you will only have to bend over once - to bury the container in the ground. Another advantage of this method is that all the plants can be arranged in the flower bed according to variety, and they will definitely not get mixed up. And the presence of sides (10-12 cm) serves as additional protection against rodents. To dig a basket, just pry up its corner with a fork, and it will appear on the surface along with all its contents. If you are using containers with large holes in the bottom, aim the fork below the bottom to prevent small onions from popping out through the holes.
- Landing on plastic mesh. We are talking about nets in which potatoes, carrots and other vegetables are sold. The point of this “invention” is to protect against voles. At the intended location, it is necessary to remove the soil to the required depth and level the bottom. And then the cut mesh is placed so that its edges protrude above the surface of the landing groove, and covered with sand 2-3 cm. The next task is to arrange the bulbs and carefully cover them with soil. Finally, hide the edges of the mesh in the ground so that they do not spoil the appearance of the flowerbed.
- In decorative boxes and vases. If your plans include decorating the garden with boxes of flowers, choose bulbs of low tulips in the fall. Plant them several at a time in plastic pots or any other containers (for example, cut-off water cans) with plenty of drainage holes. Dig it into the ground or leave it in a cold basement. In spring, place in decorative containers and place in the garden.
There is another way to plant tulips - for forcing for the holidays. In this case, you need to act somewhat differently.
There is nothing difficult about planting tulips. Many people do this without adhering to any technology. But if this is your first acquaintance with bulbs or if you want to do everything “by science,” our recommendations will help you get a bright flower garden in the spring.
Source
The dug up bulbs are dried in the open air, always in the shade. The timing of pre-drying depends on what soil you dug them from. If the soil was dry, then 2-5 days are enough, and if it was wet, then the drying time increases - sometimes up to 2 weeks.
Then you need tulips, or rather, bulbs:
- clear from earth;
- remove the covering scale, the one that easily separates itself;
- tear off old dried roots;
- sort the bulbs by size.
Sorting into small, medium, and large is mandatory, since the depth of planting in the fall and the planting location will depend on the size of the bulb.
Small and medium-sized bulbs most likely will not bloom next year - they can be planted for growing in a more modest, but sunny place, out of sight. And for planting large bulbs we will choose the most honorable place.
Sorted, peeled bulbs should be placed in a ventilated, dry, warm room - attic, barn, country house. They will be stored there until autumn planting at a temperature of 25-28ºС.
Read more: Propagation of chokeberry by cuttings in spring
You may be interested in the following information:
A creative approach will make any task interesting. This also applies to floriculture. Recently, unusual methods of planting tulips have been gaining popularity. They save time, decorate the garden and attract attention. In addition, they are quite simple and anyone can master them.
Planting tulips in autumn in containers
Container planting or planting in baskets simplifies the process of growing tulips. The essence of this method is to use baskets, containers and other containers instead of a flower bed or bed. They can either be dug into the ground or freely placed in any convenient place.
Advantages of this method:
- You are firmly confident that you have completely dug out the planting material. The bulbs themselves are minimally damaged and, therefore, are better stored.
- You create optimal conditions for plant growth. Relevant for infertile soils - it’s easier to create ideal conditions in a limited space.
- The likelihood of damage to the bulbs by rodents is reduced. Mice cannot overcome the barrier from below.
You can use anything as a container: plastic bottles, boxes, baskets, pots and even bags. One condition is that you need to make holes to drain excess water. Use a hot knitting needle or other similar object for this. The holes should not be large, otherwise mice will get through them.
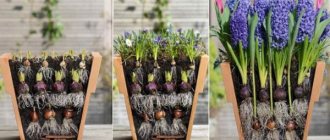
Method of planting lasagne tulip bulbs
The second way to arrange flowers in an unusual way is tiered planting. The essence of this method is to lay the bulbs at different depths. The very first layer, starting from the bottom, is occupied by large onions. The higher the level, the smaller the size. To avoid making a mistake and planting one flower on top of another, use long thin sticks.
When composing such a composition, it is important to take into account the color, size and shape of the petals. Try to play with contrasts: smooth ones with terry ones, red ones with yellow ones. Groups of flowers united by color will look beautiful. For example, variegated with monochromatic ones: the color of the inclusions should match the monocolor of the petals of the neighboring variety. A group in which tulips are selected according to flowering dates will look impressive.
Cunning
you can combine different flowers. You can add irises, crocuses, lilies, daffodils, hyacinths and other bulbs to tulips.
Video “Methods of planting tulips”
What to do with tulip babies
Tulip is a spring plant that reproduces by baby bulbs. Bulbs are planting material that carries all the properties of the variety, and therefore it is important to adhere to simple rules for timely digging and planting of children. After all, a healthy bulb that has acquired the necessary supply of nutrients is the key to getting a large flower in the first warm months.
In order to maintain their varietal properties, these flowers need to be replanted every year. Those involved in the selection of these plants claim that it is the annual replanting according to a strictly established scheme that allows them to obtain specimens with large peduncle heads in the spring, which is especially valued among fans of this flower family.
Did you know? In Quebec, Canada, tulips are grown for food. Moreover, both bulbs and buds and leaves of plants are used.
Tulips are dug up a few weeks after flowering ends. The main indicator for this is the leaf of the plant - it should become limp and turn yellow by about 2/3. Previously, it is not recommended to dig up tulips, since the bulb has not yet accumulated a sufficient supply of nutrients, and the children may be underdeveloped. Also, do not delay digging the plant out of the soil. If it is too late to dig up the bulbs, the children will separate from the mother plant, and it will be quite difficult to remove them from the ground.
Experienced gardeners, when choosing the time to dig up bulbs, are guided by the lunar calendar, which is due to the influence of the Moon on the rate of circulation of vital juices in plants.
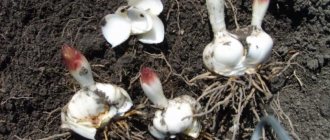
Small bulbs, with the help of which the plant reproduces, are located at the bottom of the mother bulb. As a rule, one of them, the largest, is a kind of clone of the mother tuber. It is this baby that will give the most magnificent flowering and the largest peduncle next year. The remaining flowers will bloom somewhat smaller, but will still retain their varietal characteristics. Experienced gardeners try to sow tulip seeds in the ground, but this is quite labor-intensive and troublesome.
Learn how to properly plant tulips in bulb baskets.
As soon as the plant fades, you should cut off the peduncle, leaving the stem and leaves above the surface of the ground. It is through the remaining above-ground part that the bulb receives all the necessary substances for the formation of high-quality planting material.
When to Plant Tulip Bulbs
Autumn planting is preferable, since when used, tulips overwinter in natural conditions. This ensures timely germination in the spring, as well as abundant flowering. When planting buds in spring, you may not be able to wait, since tulips do not always have time to form them before the onset of the summer heat.
Beginner gardeners often wonder: is it possible to plant these flowers in the spring? Of course, it is possible, but you will have to use a certain technology when planting. To do this, you need to put the bulbs in the refrigerator overnight, and then rinse thoroughly with a weak solution of manganese. At the end of these procedures, plant the tulips as close to each other as possible to a depth of about 5 cm. It should be remembered that flowering with this method of planting begins much later.
Choosing a place and preparing a bed
Choose a place to plant tulips so that the area is open, moderately sunny and protected from strong winds. The soil should be well-drained, leveled or with a slight slope to allow melt water to drain. Despite the fact that tulips are moisture-loving, stagnation of groundwater can destroy them.
Tulips thrive on loose, fertile, permeable sandy loams and loams with a neutral and slightly alkaline reaction. Heavy clay soils are suitable only after they have been optimized by adding coarse river sand, peat with a neutral pH and humus.
But if your soil is clay, don’t despair. Here are some tips on how you can grow tulips even in heavy soil.
To prepare the soil for planting tulips, follow the following instructions.
- Dig the area to a depth of 2 shovels. Deep digging is necessary because... The roots growing from the bottom are far from the surface. It is important to carry out the work in advance (2-3 months, at least 2 weeks before planting) so that the soil has time to settle. Otherwise, the growing roots will be damaged.
- Loosen heavy soil. If the soil is quite heavy and not loose enough, add sand, rotted sawdust or peat to it.
- Apply fertilizer. Of the organic fertilizers, compost and humus aged 2-3 years (10-15 kg/sq.m.) are best suited. Acidic soil should be limed to bring the pH to 7.1-7.5. Complex mineral fertilizers with a high percentage of potassium and phosphorus are applied immediately before planting (40-100 g/sq.m).
- Plan your landing. It is very difficult to say in advance when to plant tulip bulbs. It is recommended to plant 3-4 weeks before the first frost so that the flowers have time to take root. But because It is impossible to accurately calculate this time; deadlines may shift. In the middle zone, the optimal time is from mid-September to early October, when the soil cools to 6-10°C at a depth of 15 cm. If the autumn turns out to be warm, there is no need to rush to send tulips into the ground. After all, if the soil temperature is higher during planting, there is an overconsumption of nutrients and the plants do not overwinter well.
Do not feed tulips with fresh manure. This can cause the bulbs to become damaged by fungal diseases. In addition, fresh organic matter attracts earthworms, and then moles, which can not only spoil the appearance of the flower garden, but also contribute to plant loss.
Source
A good location of the bed and planting tulips in the fall, when and how to plant the choice will be less problematic. These flowers love sunny spaces sheltered from the winds. In spring, no puddles should form there. The soil should drain well - the best option would be loamy or sandy loam soil with a significant proportion of humus.
Cunning
asters, watermelons, melons, zucchini, cucumbers, and tomatoes are not the best predecessors for tulips.
It is worth digging up the ground to a depth of 25-30 cm, carefully removing the roots of weeds, trees and shrubs. If the soil is heavy and poor, add sand and fertilizers: compost, ash, peat, mineral complexes. Cow manure should not be used - add bird droppings instead. If the pH values are increased towards oxidation, liming is required.
The soil needs to be prepared a month before the expected planting date. This is necessary for the soil to “settle.” In a loose “cushion” there is a high probability of damaging the emerging roots. Before planting, water the ridges generously - this will completely distribute the soil.
Cunning
Sprinkle the formed rows with a thin layer of sand. This will provide additional drainage and help reduce the likelihood of rotting.
Usually this is where caring for tulips after planting in the fall ends. There is no need to cover the bed - this can lead to the bulb growing ahead of schedule, overwintering worse and blooming later. Exceptions include sudden cold weather. When the temperature drops sharply, use specialized covering material. Do not use garden waste, mulch or leaves as this may attract rodents.
Growing tulips in the country - in a greenhouse and open ground
Tulips have a huge number of fans all over the world. These representatives of lilies are rightfully considered one of the most beautiful flowering plants. It is not surprising that many people want to grow them in their country plots. We dare to assure you that growing tulips seems like a complicated process only at first glance.
Tulips are quite unpretentious in growing, but some planting and care rules should still be followed. They are different for each variety, but there is still some general rule that will be useful for every lover of these delightful flowers to know about.
Growing methods
Despite the fact that tulips themselves do not require any complex care, much depends on how this flower was grown. Growing tulips is possible in three ways.
From seeds
This method is one of the most difficult. Its success will depend on the quality of planting material. Seeds must be collected at a certain period. After the tulips have faded, you need to carefully tie the flower arrow. This is done so that when it dries, it does not fall to the ground. The seeds must ripen on the flower shoot themselves. They reach sufficient maturity when the flower arrow dries up and the box itself begins to crack slightly. It is at this moment that the seeds must be collected and placed in a dry, dark place where they will ripen completely.
Sow tulip seeds in September or October, in a greenhouse or in a garden bed. The soil should be well prepared, with an admixture of sand, and nutritious. Sow tulip seeds thickly and add an additional layer of soil on top. The first sprouts of tulip seeds are visible in early spring, when the snow melts. Externally, these shoots are very similar to the first shoots of onion sets.
At first, only a leaf wrapped in a tube is visible at the shoot, while a root is formed in the root system. After some time, a stolon is formed, on which the bulb is formed. Around mid-summer, another bulb forms inside the bulb, or rather, only its rudiments, in which very soon it will be possible to see a new leaf. The bulb will take root in the fall. By its second spring, the bulb leaf is already flat. Then, every year, all processes in the bulb are repeated, thereby all its organs are renewed. Every year that same single leaf increases in size. After the 3rd year of life, the bulbs are dug up, dried over the summer and planted in the fall.
Tulips begin to bloom around the 5th or 6th season. The color of the primary flowers is weaker. Bright colors, which are inherent in this flower, will appear only after a few years.
From an onion
Growing tulips from a bulb is considered the easiest. The quality of planting material also matters here. It is necessary to evaluate the bulb visually and palpate it. It should be quite dense, not loose, and measure at least three centimeters in length. The bulb should not have any visible damage.
Before planting, you should take care of the soil. It is better to purchase or prepare a special mixture of sand, humus and earth. Their ratio should be approximately the same, and ideally 3:4:3. This mixture is not only nutritious, but also has a very good texture for bulbous plants.
We recommend: How to grow violets in the country
It is best to plant the bulbs in groups of three, but they should not touch each other. You cannot bury the bulbs completely; their upper part should be slightly visible. Temperature is also important. 12 degrees is the ideal level that is desirable to create for growing tulips. And even more so, this temperature is important for tulip bulbs at the moment of pipping. Tap water can also be harmful to the bulbs; it is better to let the water sit for at least a few hours.
From the kids
Babies are small tulip bulbs. Baby tulips are rarely susceptible to disease, since they have not yet been damaged when planted. The children are planted in trenches to a depth that is approximately equal to two or three bulbs in height, and if there is enough sand in the soil, then the planting depth can be slightly greater. The distance between the bulbs should be approximately 3-4 cm. The top of the trench is sprinkled with earth and humus.
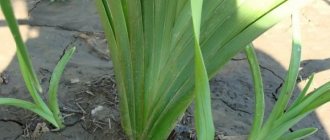
Children in their first spring are just showing their leaves. They need to be weeded, fed and loosened at least three times during the growing season. It is better to carry out the first fertilizing during the snowy period, when the snow begins to melt, because this is how manure or humus is better absorbed into the soil. The second feeding occurs at the time when buds appear on adult plants. The third feeding is carried out immediately after the flowering period.
In the first year, you don’t have to dig the bulb out of sandy soil. As for clay soil, if the bulb is left in the ground, it can rot, so you need to dig it up before next spring. Next year, the largest children can already produce their first flowers. Growing tulips from children is popular with those who want to get a large plantation of flowers, but do not want to spend a lot of money on planting material.
Where to plant
Having a suburban area, many people install greenhouses on it. Often, not only vegetables, but also flowers are grown in greenhouses. Where is the best place to plant tulips, and what are the features of growing them in greenhouses and in open ground?
In the open ground
Tulips do well in open ground. First you need to prepare the ground. If the soil is heavy and clayey, then it is necessary to add sand to it, thanks to which the water will drain better from the upper layers of the soil and the bulbs will not rot. On the contrary, in soil that has too much sand, you need to add a little humus, peat or any earthen mixture.
You should also pay attention to the choice of location. Tulips do not like too windy areas, however, they should not be planted near the wall of a house or a gate either. If the tulips do not have enough sunlight, they will show low quality flowering, weak, non-intensive coloring that is not typical for this variety. In addition, in very dark places the bulbs begin to gradually become smaller. The soil should be fairly level, without depressions, because rainwater often accumulates in them, causing the bulbs to rot and die.
We recommend: Perennial flower aster (description and cultivation)
Tulips are planted in open ground in the fall. This is done with the expectation of good rooting of the bulb before the onset of severe frosts. The ideal temperature for this is 5 degrees Celsius, which is typical for September or October in central Russia, and in the southern regions - until mid-November.
Planting depth also depends on the type of soil. Growing tulips in soil that has a lot of sand requires planting the bulbs deeper. Experts advise feeding the bulbs with a small layer of humus and also sprinkling them with wood shavings.
In the spring, after the snow melts, tulips grow rapidly. They need timely care: feeding, fertilizing, weeding and watering. Of course, it all depends on the type of soil and weather conditions. Loosening must be done systematically. It is better to feed from the period when the plant has grown 5 cm in length, and mineral fertilizers should never be poured onto the bulb, but only next to it. The second feeding is usually carried out during the appearance of buds, and the third during flowering. If the plant is grown for bulbs. If not for cutting, the flowers must be removed, leaving only the stem. Dig up tulips after the stem and leaves have dried. The bulbs are placed in a ventilated place where they dry completely.
Growing tulips in a greenhouse
A greenhouse allows you to achieve better results in growing many crops, including tulips. Before planting tulip bulbs in the greenhouse, the planting material must be cooled slightly by keeping it in a room with a temperature of 5-9 degrees Celsius for several days. Tulip bulbs must be healthy and of sufficient size. The soil in the greenhouse should be sufficiently nutritious and crumbly. You can additionally feed it with wood ash.
Tulips are planted in November. The method of planting bulbs in a greenhouse is almost the same as how they are planted in open ground. After planting them, it is necessary to set the temperature at 5 degrees Celsius for two months. At the end of January, the temperature must be gradually increased: +8, +15, +22 degrees. With the appearance of green shoots, it is necessary to equip the greenhouse with artificial lighting. Additional lighting must be turned on for at least 6 hours daily. By March 8th you can get beautiful buds.
Caring for tulips
Caring for tulips involves a set of procedures that must be carried out regularly. Not only the beauty, but also the health of flowers depends on this. Caring for tulips may differ slightly depending on the stages of their growth. What are these stages?
Getting ready to land
Before planting, bulbs should be carefully assessed for disease. The bulbs should be quite dense, without dents. Bulbs damaged by disease are discarded and discarded. Some gardeners, to save money, cut out part of the bulb, leaving a visible healthy sector. In fact, diseases can damage blood vessels that are invisible to the human eye. One such diseased bulb can infect several healthy ones in the future, so it is better to throw it away without pity. For additional neutralization, you can treat the bulbs with chemicals.
Tulips are planted in September-October, and in some regions - until November. The main thing is the air temperature, which should be about 5-6 degrees. After all, the bulbs take root at this temperature. Planting depth is from 7 to 15 cm, which depends on the soil (on sandy soils it is permissible to plant slightly deeper). You can calculate the depth as three times the height of the bulb. After planting, the area with the bulbs must be covered with peat, straw, leaf soil, and with the onset of severe frosts, with sawdust. This will not only protect the tulip bulbs from freezing, but also maintain optimal humidity. In spring, the cover is removed so that the soil warms up faster under the sun.
We recommend: How to store cannas
If the summer resident missed the autumn planting time, then you can put the bulbs in a cold place and keep them there until spring. When spring arrives, plant the bulbs in the ground. Of course, such bulbs will lag somewhat behind in development, but they should have time to form a replacement bulb.
Fertilizing can be done in early spring, when the snow has not yet completely melted. Thus, all nutrients dissolve in snow water and quickly reach the root system of the bulbs.
The stem grows and does not bloom yet
Even before flowering, the stem of a tulip can tell a lot about a gardener’s mistakes.
Many tulip lovers are faced with the problem of stem fragility. This violation is associated with a lack of calcium in the plant tissues, and can also be a consequence of improper storage of the bulbs. Also, the stem may break if a very large bud is formed. In this case, the tulips must be hilled to balance the load.
A stem that is too short indicates that the planting material has not been cooled to the required temperature.
The bud opens
When the first buds appear, you can carry out another feeding with complex mineral fertilizers with a high content of phosphorus and potassium. After fertilizing, the soil is loosened to avoid the formation of a soil edge. There are also options for foliar feeding, in which micronutrients are sprayed directly onto the plant, but they are not carried out in rainy weather or during the daytime.
Drought during budding can negatively affect the quality of flowers, so it is necessary to periodically water and loosen the plant. These procedures should be carried out until the end of flowering, and even two weeks later. Such procedures will promote the growth of bulbs. And, of course, the area must be weeded.
Tulip flowers will only be bright if there is sufficient lighting, so if mid-summer is accompanied by cloudy weather, then the flowers will be quite pale, and in some bulbs they may not appear at all.
Such familiar plants as tulips are actually very low maintenance. And what joy they give to everyone who grows them or receives a bouquet as a gift. Incredibly beautiful yellow, red, orange, white, cream tulip flowers will be a real reward for the work that the gardener has done to grow this wonderful flower.
And in this video, in five minutes you can see 22 days in the life of a yellow tulip:
When to plant
The optimal thickness of the soil layer from the bottom of the tulip to the surface of the earth is three times the height of the bulb when planting on light soils and two its heights when planting on heavy soils. Avoid planting to a depth of more than 20 cm. Children should be buried approximately 8 cm.
Do not remove the scales from the bulb, because... they perform protective functions. To repel rodents, we recommend sprinkling the planting materials with freshly ground red pepper.
The distance between the bulbs is determined by their size, as well as the purpose of planting. If you are creating a colorful flower bed for one season (the bulbs will be discarded after flowering), plant close - at a distance of 2 times the diameter of the bulb.
But if you are planning long-term cultivation, you should take care of a greater distance between flowers. This is important so that the plants receive enough light and nutrition, as well as for ease of care. Plant large bulbs in rows with an interval of 8-10 cm, leaving 20-25 cm between rows. It is believed that maximum productivity can be obtained by planting 50 large bulbs per 1 sq.m., small ones - up to 80-100 pieces.
Start planting with early flowering tulips, gradually moving to later varieties.
Traditionally, tulips are planted in holes. Moreover, if there are not too many bulbs, then a separate hole is dug for each of them. But if you are planning a large-scale planting, you can select the soil to the desired depth over the entire area, level the bottom and then arrange the bulbs.
Place a little sand at the bottom of the holes, which will create a favorable air condition for the bulb and reduce the risk of infection.
When planting, do not press the bulbs too hard into the ground. This can damage the root cushion, and this is dangerous for the development of diseases. Carefully place the bulb and cover it with soil so that there is no depression at the planting site in which water can accumulate.
It doesn't matter whether you place the onion bottom down or sideways. However, when positioned with the top down, it spends more energy and time to expel the sprout, and as a result, flowering is delayed.
It happens that the optimal time for planting has long passed, and you find forgotten bulbs in the pantry or cellar. You shouldn't store them until spring. You can read how to plant such tulips in our article.
Treat your tulip bulbs before planting in the fall to protect them from fungal infections. For this purpose, special preparations are produced that can be replaced with ordinary potassium permanganate. Inspect again: healthy and diseased plants cannot be planted together. Affected bulbs must be disposed of.
Planting depth of tulip bulbs
The standard scheme for planting tulips is as follows: rows are made at a distance of 25-30 cm. Their location should fit organically into the perimeter of the flowerbed. The distance between the bulbs is 8-10 cm. Planting depth depends on the size:
- Children: 5-10 cm.
- III and II analysis: 12 cm.
- I analysis: 15 cm.
Keep in mind that small bulbs produce small flowers. To avoid being shaded by taller flowers, plant them at the edge of the flowerbed on the south side. If you like the “uncultivated” look, then there is no need for combination. Create wider spacing between flowers and enjoy the natural state of your garden.
If you are interested in landscape design, then plant tulips according to the pattern. When compiling it, take into account the timing of flowering, the diameter of the inflorescence, and the color of the petals. Think over and sketch in advance the scheme according to which you will plant the bulbs. The picture can be supplemented with other primroses.
The timing of planting is affected by soil temperature. In the fall, the groundwork is made for subsequent flowering, so it is important to plant the bulbs in the garden on time. For all processes to start, the soil must be no colder than 10° (the lower limit is 8°). You can check the data using a depth thermometer.
In different regions, the timing of planting in open ground is different. Thus, planting tulips in the fall in the Moscow region occurs from mid-September and throughout October. The hotter the region, the closer to winter the dates shift. If, during a pre-planting inspection, you notice that the bulb is ready to actively begin to grow, it makes sense to leave it for forcing (that is, plant it in a pot and keep it at home).
In other regions, which are characterized by more severe climatic conditions, the planting period is from the end of September to mid-October. If the autumn is hot, then they are planted until the beginning of November. For example, the optimal planting of tulips in autumn in Siberia falls on the 10th-20th of October.
Tulips are the most beautiful flowers, a real decoration of the spring garden. Autumn planting of tulip bulbs is the optimal solution for early flowering. They do not require complex care or special skills, so anyone can try to master a flower unknown to them.
How to plant tulips in spring
These flowers are quite unpretentious to grow, but if you follow the basic rules of agricultural technology, you can increase the reproduction rate of tulips and improve their decorative effect.
Selecting a location
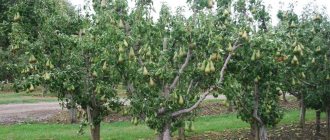
Tulips love well-lit areas, protected from drafts. Experienced summer residents often set aside a place for a flower bed under the sparse crowns of fruit trees. A little shade promotes flowering time.
Soil requirements
Tulips can take root in any garden bed, but they will only be truly fragrant on loose soil with the addition of humus. It is advisable to prepare the flowerbed in advance, in the fall, by adding bird droppings, manure and mineral fertilizers when digging.
When the soil on the site is heavy, looseness can be achieved by adding sawdust. It would also be good to use a green manure system - first grow legumes and then plow the greens into the ground.
Landing technology
Regardless of the time of planting tulips, the technology of work is practically no different. It is enough to follow these rules:
- First, the bulbs are sorted by size;
- then holes are made in the flowerbed at intervals of 7-10 cm (it all depends on the size of the variety);
- The depth of the holes is determined based on the diameter of the planting material:
- small ones (less than 2 cm) are lowered by 4-5 cm;
- medium (about 2 cm) - by 8-10 cm;
- large ones (3-4 cm) - in a hole 15 cm deep.
Experienced gardeners deepen the holes “by eye”, taking into account this point - on average, the hole should be equal to 3 times the size of the onion itself.
It is important to maintain the parameters. Otherwise, closely planted bulbs will germinate ahead of time and dry out, and deep-seated bulbs will produce late shoots that will not have time to bloom.
It is also necessary to take into account the soil structure. If it is heavy, then add a little sand to the bottom of the holes. In the case of sandy soils, another 2 cm must be added to the specified depth.
The tulips are lowered into the recesses with the bottom down, not forgetting to first moisten the soil. The holes are sprinkled with soil and the flower bed is leveled with a rake. In order for the seed to strengthen better and germinate faster, the flower garden is watered again.
How to properly store tulip bulbs before planting
Anyone wondering when to plant tulip bulbs should know that choosing the right location is just as important as choosing the right time. Well-lit areas with protection from strong winds are best suited for these plants. It is best to plant tulips on sandy loam soil. The timely application of wood ash and rotted compost has a very beneficial effect on the development, flowering and growth of these flowers.
However, you should remember that you should not fertilize tulips with fresh manure, as it contains quite a lot of fungal infections that can simply kill the young plant. Flowers must be planted deep enough. Large bulbs are usually placed at a depth of 10 to 15 cm, and small ones - up to 10 cm. After planting, the plant should be watered with hot water with potassium permanganate to prevent the development of various diseases.
How to grow tulips from children?
If there is a large amount of planting material, baby bulbs are planted on a separate ridge in trenches.
Sprinkle the top with earth and rotted manure. Planting depth - 2-3 times the height of the bulb, depending on the soil (on sandy soils it is planted deeper). If the soil is dense, then for small, flat sprouts, baking powder is added to the soil, otherwise it will be difficult for weak sprouts to break through to the surface, and they will lag behind in growth.
In the first spring, only leaves sprout from the baby. They are weeded, loosened and fed three times during the growing season. The first feeding of children is carried out while still in the snow or immediately after it melts. The second - when the buds of adult tulips develop. The third feeding is done immediately after flowering.
How to properly store tulip bulbs before planting
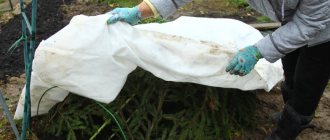
Although tulips are not afraid of frost, covered plants produce 50% more bulbs, stronger flower stalks and larger flowers. Therefore, with the onset of persistent cold weather (when the soil freezes overnight and thaws during the day), it is advisable to mulch the plantings and cover them with spruce branches.
Mulching is especially important if you have delayed planting or decided to grow capricious Dutch varieties. In this case, after the first frost, add a 5-10 cm layer of peat or compost.
Very often, beginning gardeners are interested in the question: “How to store tulip bulbs?” Follow the recommendations carefully, and most importantly, handle the bulbs very carefully, since fungi can easily penetrate into them through damage. If you dug up the bulbs in wet weather, wash the dirt off them, rinse them with clean running water and dry them.
A good place for drying would be an attic, a table under a canopy, or another place where it will be warm and dry. The condition of the bulbs must be monitored, carefully inspected and dubious specimens removed in a timely manner. It will take them two days to dry. Dry bulbs are placed in boxes in two to three layers and placed for the winter in a cool, well-ventilated room without drafts.
Read more: How to grow lemon from a seed at home with fruits
How to care for tulips in open ground
Caring for tulips begins in early spring, when their red sprouts are just emerging from the ground: remove the bulbs of unsprouted plants and destroy them so that other tulips do not get sick. The tulip is a moisture-loving plant, but due to the structure of the root system, it is unable to extract moisture from the deep layers of the earth, therefore timely watering of tulips is the most important condition for their agricultural technology.
The frequency and abundance of watering depend primarily on the composition of the soil, but during budding and flowering, watering should in any case be both abundant and regular. By the way, abundant and regular watering should remain for another two weeks after the end of the flowering period. Moisture must penetrate to the entire depth of the roots, so on average you need to pour from 10 to 40 liters of water per 1 m², and in such a way that, to avoid burns, water does not fall on the leaves.
Weeding and loosening the soil in the area with tulips should be carried out regularly; it is most convenient to do this after watering, when the soil is moist and weeds are easily removed. Weeds deplete the soil and take away nutrients from it, so controlling them is mandatory. Loosening the soil helps retain moisture in the soil and kill weeds.
Lunar calendar for August 2021 for gardener and vegetable gardener
Lunar calendar for May 2021 for gardener and vegetable gardener
Lunar calendar for June 2021 for gardener and vegetable gardener
Lunar sowing calendar for July 2021 for gardeners and gardeners
Why do you need to dig up tulips after flowering?
- Fertilizing and increased watering. Immediately after the flowers wither, the peduncle should be removed, watering the tulips should continue for another two weeks and be sure to feed, since it is during this period that the bulbs accumulate nutrients.
How to feed tulips after flowering:
- phosphorus-potassium fertilizer at a rate of 30-40g per 1 m2, for example aquarin, mortar, crystalline;
- Do not use fertilizers containing chlorine and nitrogen.
- Cutting leaves. You can cut off tulip leaves after flowering only when they turn completely yellow. If you do this earlier, the bulbs will stop developing. Experienced gardeners, in order not to lose their location, recommend leaving a leaf with a mark. To prevent the yellowing leaves of tulips from spoiling the appearance of your front garden, they can be pressed to the ground with something.
In the conditions of our flower beds, tulip bulbs (even during one season) tend to become buried and, if we do not pick them out of the ground, then every year they will go deeper and deeper. It will be difficult for the sprouts to make their way to the top from the depths - as a result, the bulbs will simply rot in the ground, not even leaving children. The spring flowerbed will be empty...
There is another reason that tulips need to be dug up. After flowering, the bulbs must form a new flower arrow during the dormant period. The main requirement is that at this time they must be at a temperature not lower than 25ºС. But the deeper you go, the lower the soil temperature. The further north tulips grow, the more difficult it is to provide them with the required temperature at depth.
Thus, there are at least two reasons why it is necessary to select tulips from the soil after flowering:
- avoid natural deepening of the bulbs;
- Ensure the storage temperature is not lower than 25ºС for the formation of a full-fledged flower arrow.
If you want to admire large tulip flowers, it is recommended to remove the bulbs from the ground every year. This is one of the main agricultural techniques for growing tulips.
By leaving the bulbs untouched in the ground, we obviously contribute to the crushing of flowers, since several children are formed next to one bulb, which will also germinate in the spring. We will get a bunch of tulip sprouts that will interfere with each other’s growth and development; they will also not have enough nutrition. As a result, every year we will get smaller and smaller flowers in the flowerbed. In addition, remaining in the ground, tulip bulbs accumulate diseases, and they will bloom later than usual next year.
For better formation of the flower arrow after flowering, immediately cut off all flower stalks, do not allow the seed box to ripen.
I am often asked whether it is necessary to remove tulips from the ground that were planted in special baskets for bulbs? Indeed, in this case, the bottom of the plastic mold will not allow the bulbs to go deeper.
That's right, deepening will not happen, but without choosing bulbs from the ground, which over time become overgrown with children, you risk losing abundant flowering - the flowers will become smaller, their number will decrease rather than grow.
By planting tulips and other bulbs in plastic bulb baskets, you make the digging job much easier and faster. All the bulbs - large, medium, small - are in one place, it is impossible to miss them or leave them in the ground.