Home Country garden
Pear is a fruit tree growing in different parts of Russia. Modern breeders have learned to create varieties that can withstand hot summer months and cold winters, while still producing a rich harvest of fruit.
When is the best time to plant a pear tree to get a good harvest? What subtleties are there in planting a pear seedling?
- 2 When to plant a pear in the fall: planting dates
- 3 How to choose pear seedlings for planting in the fall?
- 4 What fertilizers will be needed for autumn planting of pears?
- 5 How to plant a pear tree in the fall
- 6 Choosing a landing site
- 7 Preparing a hole for planting a pear
- 8 Soil preparation
- 9 Preparation of seedlings
- 10 The process of planting pears in open ground in the fall
- 11 Typical mistakes when planting pears
- 12 Caring for a pear planted in autumn
- 13 What to do if the planting deadlines are missed?
- 14 Conclusion
Is it possible to plant pear trees in the fall? Advantages and disadvantages of autumn planting
Pear seedlings can be planted in both spring and autumn. Most gardeners carry out planting work in the autumn. There are some positive aspects to transplanting a pear tree in autumn:
- pear seedlings in nurseries have gained strength over the summer and are ready to be transplanted in the fall to a new place;
- the choice of seedlings in autumn is much greater than in spring;
- autumn rains contribute to the rapid rooting of the seedling and its adaptation to a new place;
- the tree will be ready for spring and will begin to grow.
The disadvantages of autumn transplantation are that the threat of early frosts can harm the seedling and destroy it.
How to prepare a pear for winter
Preparing a pear for winter involves grouping and fixing all the branches together, attaching them to a support. The tree trunk circle must be mulched with a thick, at least 30 cm, layer of sawdust, fallen leaves or peat. To protect the trunk, covering material or cotton fabric is used to ensure air permeability. They wrap the standard and fasten the structure with wire. To combat rodents, spruce branches are used, which are placed around the tree. In addition, a mixture of clay and mullein, taken in equal proportions, repels rodents. The composition is applied to the pear trunk. All events are held until the beginning of December. Subsequently, to protect the seedlings from frost, snow is used, which is raked as close to the tree as possible.
When to plant a pear in the fall: planting dates
The timing of planting pears depends mainly on the region of planting and weather conditions. The weather on the day of planting should be warm and dry. It is advisable to carry out planting work on a cloudy day or in the evening, so that there is no bright sun. Planting should be done at least 3-4 weeks before the onset of cold weather.
At this time, the pear tree completes the growing season and prepares for wintering. Therefore, autumn is the best period for the plant to take root in a new place and take root.
If a pear is planted in the Moscow region or in the middle zone, planting procedures should be planned for mid-September. If the seedling is planted in a new place in the Leningrad region, the Urals or Siberia, it is better to choose the time at the end of August or beginning of September. Cold regions are not suitable for growing pears, so if you make a choice, you should pay attention only to winter-hardy and frost-resistant varieties.
Southern regions can shift the time of planting pear trees by 3-4 weeks and begin work as early as October.
The period of onset of cold weather should be taken as a basis when calculating planting time. The seedling must have time to take root before frost, then the pear will calmly overwinter and will not die due to spring temperature changes.
Lovers of the lunar calendar can navigate by it and choose favorable dates for work. You should also familiarize yourself with unfavorable dates for landing procedures. Practice shows that following the lunar calendar always gives positive results; plants planted on the recommended days take root faster and grow stronger.
The lunar calendar can be found at the link: https://kalendargoda.com/kogda-sazhat-grushi-2021-posadka-lunnyy-kalendar-vysazhivanie
What varieties of pears can be planted in autumn?
In regions with a relatively short spring-summer period, namely the middle climate zone, preference is given to early-ripening summer or mid-ripening varieties, the fruiting period of which occurs in early autumn.
Pears that bear fruit at a later time may not have time to ripen in harsh conditions. Most modern varieties have a high degree of winter hardiness and can be planted in the fall. In regions with cold climates, they may need additional shelter.
How to choose pear seedlings for planting in the fall?
Pear seedlings can be purchased in advance or on the eve of planting. The choice is best made in the nursery, telling the consultant the features of the site and climate. Preference should be given to varieties that are adapted to the climatic norms of the growing region.
The seedling is selected at the age of one or two years. There should be no external damage to the trunk and roots. Branches and roots should not be overdried; you should inspect them carefully.
The grafting site should be clearly visible, dry and clean. Pay special attention to the presence of living buds. You should not buy seedlings with damaged roots, bark, or broken branches. Also, do not buy pears on the market, from random sellers , as the chances of buying something other than what you planned increases.
When is it better to transplant a pear to another place - is it possible to transplant mature trees
For every experienced farmer, the pear occupies a special place in the garden. The tree is valued for its ease of care, unpretentiousness, and high level of frost resistance. In addition, fruits have long captivated consumers with their aroma and excellent taste, which is why they are in extraordinary demand on the market. However, it happens that there is a need to replant a tree, but not every farmer knows how to do it correctly so as not to destroy the plant.
What fertilizers will be needed for autumn planting of pears?
The pear tree grows well on loam and humus soils. If the area where the pear is planned to be planted is fertile, it is dug up with the addition of compost (8 kg per square meter), superphosphate (60 grams per square meter), and potassium salt (30 grams per square meter).
Depleted soils are fertilized with humus, sand, superphosphate, and potassium sulfate. This mixture is placed directly into the planting hole.
Clay and peat soils are watered with an aqueous solution of fluff lime, dolomite flour, and rotted manure or humus and compost are added.
If the pear is planted in gray forest or sod-podzolic soil, additional superphosphate, manure, compost, ash and potassium fertilizer should be added.
Fertilizers such as mineral and liquid organic fertilizers are applied to the soil during watering in spring and early summer. If the seedling remains weak, it is supported with ammonium nitrate and urea.
It is acceptable to use rotted bird droppings - it contains a large amount of mineral compounds useful for feeding pear seedlings. Cow and other manure cannot be used fresh when planting, since the process of rotting is accompanied by elevated temperatures, which will burn the roots of the seedling.
Recommendations
The pear begins to bloom and bear fruit 4–7 years after planting; a lot depends on the variety and agricultural technology.
In order for the transplanted plant to develop comfortably, experienced gardeners use agrotechnical tricks.
It is not recommended to plant a tree in shaded areas, since in this case, the active phase may not occur, and the new plant will wither over time . But you should also avoid places where there is strong wind or drafts - flower stalks and the first fruit ovaries will be torn off.
It is not recommended to use clay or marshy soils for planting - they will retain moisture, and waterlogging contributes to the development of diseases. And it is also prohibited to plant a tree in an area where rowan grows nearby. Both species suffer from similar diseases, which is detrimental to the novosad. You cannot replant a pear during the flowering period.
Choosing a landing site
The pear should be planted on the south side of the garden and given plenty of space, as the tree grows tall and spreading. The crown of a pear tree reaches 5-6 meters in diameter, so the proximity of other fruit trees to the pear is undesirable.
The pear easily tolerates the proximity of an apple tree. These crops are similar in care, flowering and fruiting. You should not plant a pear next to a mountain ash, as these trees often suffer from the same diseases.
Pear does not like wetlands, so proximity to groundwater is not the best site option. If groundwater rises above one and a half meters, it is better to abandon the idea of planting a pear tree. Or make good drainage and plant the seedling on an artificial embankment so that the roots of the tree do not rot from excess water.
The pear tree loves sunlight, so you need to choose a well-lit area for planting.
Planting a pear, video:
Planting near groundwater
Not all areas can boast of deep groundwater; in some places the water is already at a depth of 1 meter. Under these conditions, the pear will become sick and die as soon as the roots reach the water. The beginning of the problem can be determined by the drying leaves at the top of the tree.
The problem is partly solved by planting columnar or dwarf varieties. You can also use small tricks:
- Make drainage on the site. Depending on the water level and terrain, this can be expensive.
- Plant pears on a hill if they are on the site.
- Make an artificial embankment.
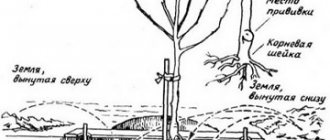
Sometimes gardeners make a square fence from boards up to 30 cm high, which they cover with earth, and dig a hole in the middle in which to place a fruit tree.
Thanks to this design, the upper roots, which absorb oxygen, are located above the groundwater level, so the tree can survive. This approach is used when growing cherries, but you can also try it for pears.
At the bottom of the planting pit you can put sheets of unsuitable slate for roofing, boards or old sheets of iron. In this case, the roots will not develop in depth, but in width, and therefore the high location of groundwater will not harm the tree.
In combination with the above method, this approach allows you to grow pears even in problem areas. However, it is better to do drainage, at least superficially, throughout the area.
Preparing a hole for planting pears
The planting pit for the pear is prepared in advance. In the summer, the site is dug up to a bayonet depth, and 6 kg of compost, 60 grams, are added when digging. superphosphate, 30 gr. potassium salt. The depth of the planting hole dug for planting a pear seedling should be 0.6 m, diameter 0.9 - 1 m.
If it is not possible to prepare a planting hole in advance, digging it immediately before planting is acceptable. In this case, the hole can be additionally watered and covered with a nutrient mixture.
How to prepare a planting hole for a pear:
How to plant or replant a pear tree in the fall
The main genetic characteristics of the pear are its moisture and heat tolerance. The fruit tree does not tolerate heavy, infertile soils, since the quickly growing, powerful root system quickly outgrows the planting hole and the fertile soil added to it. The tree will develop best on sandy or loamy soils with good moisture holding capacity and a fertile layer. This fruit crop also does not tolerate high groundwater levels, which should be located below 3 m. When planting a pear with a closed root system, be sure to pre-water the roots.
Selecting a location and preparing a planting hole
The area for the fruit crop should be sunny, protected from drafts and cold winds. The ideal place to get good harvests would be the south-eastern or southern side of the plot on a slight hill. Site preparation begins in spring or early summer. To do this, they dig up the entire area and add 5-6 kg of compost, potassium salt and superphosphate (30 and 60 g, respectively) to each square meter. Next, they dig planting holes with a depth of about 75 cm and a diameter of up to 100 cm. Stepping back a little from the center of the hole, they stick in a strong stake, which will be a support for the young pear. Fertile soil is prepared:
- from compost or humus;
- river sand;
- soil removed from the surface layer of the planting hole.
Potassium sulfate and superphosphate are added to this composition, 20 and 30 g, respectively, per pit. Acidic soil is diluted with limestone. To protect the roots from waterlogging, provide a drainage layer of gravel or expanded clay.
Preparation of planting material
Two-year-old seedlings that are sold with an open or closed root system have the best survival rate. When purchasing, you should pay attention to the quality of planting material, which is characterized by:
- the presence of a central root at least 30 cm long with several (up to 5 pcs.) branches;
- the roots are elastic, without mechanical damage and signs of rot;
- pronounced skeletal branches are commensurate with healthy roots.
Pear seedlings with an open root system are planted within 14 days after purchase. During this time, the gardener’s main task will be to prevent the roots from drying out and protect it from direct sunlight. Store them in a cool, dark place with the roots wrapped in several layers of paper and damp burlap.
Before planting, young trees are carefully inspected. Use a sharp, disinfected pruning shears to cut out rotten or damaged areas, making transverse sections. Small roots are cut out only when necessary; they are the ones that allow water and nutrients to pass through them. When the roots dry out, before planting, they are placed in water for 12 - 20 hours. All leaves are removed and the root system is dipped into a clay solution: clay, mullein and water in a ratio of 1:2:5). Then it is dried for half an hour.
Algorithm for planting pear seedlings in autumn
A step-by-step guide on how to plant a pear in the fall looks like this:
- in the prepared planting hole, dig a recess commensurate with the dimensions of the root system;
- the roots are straightened and distributed, making sure that they do not bend;
- place the seedling vertically so that the root collar is at least 4 cm above ground level;
- filling the hole with prepared soil, make sure that there are no voids left in it, periodically gently shaking the seedling;
- the soil of the tree trunk circle is compacted tightly;
- the pear trunk is tied to the support using soft material;
- the planting is watered abundantly with 3 buckets of warm, settled water;
- mulching is carried out using sawdust or peat.
Rules for transplanting pears in autumn
Pears are transplanted to a new location only for young plants. So, a tree older than 15 years will not tolerate such a procedure and will simply die.
Planting or replanting a columnar or other variety of pear in the fall is carried out for healthy trees without fungal infections. The basic rules are as follows:
- preparations for replanting begin in the spring, digging up the tree trunk circle around the perimeter of the crown, cutting off excess roots with a sharp shovel;
- before the procedure, the plant is watered abundantly;
- remove the pear very carefully along with the earthen lump and place it on prepared cellophane, tying it tightly around the trunk;
- the new planting hole must be at least 40 cm wider than the root system of the tree;
- the bottom is filled with fertile soil from turf soil and peat with the addition of sand and limestone for acidic soils;
- make sure that the root collar was above the soil level when planting;
- the tree trunk circle is well compacted and watered, mulched;
- Before the cold weather, the transplanted pear is covered.
Important! During transportation, the roots of the dug up tree are placed on sawdust and wrapped in polyethylene.
Soil preparation
The soil from the area chosen for planting the pear is carefully removed. The upper part is set aside; it will come in handy and form the top layer of soil. Next, the earth is dug up and a hole is prepared.
The soil from the planting hole is divided into two parts. Sand, compost, potassium sulfate and superphosphate are added to one part. If the soil is acidic, add additional limestone.
The prepared mixture is added to the soil and poured into the hole. A peg is driven into the hole to the side of the center, to which the seedling will subsequently be tied.
Advice from professionals
And a few more points related to planting pears in the fall.
- You cannot plant pears next to any varieties of juniper, both wild and cultivated. Despite the phytoncides secreted by the shrub, which have an antibacterial effect, it is often more rusty. Many varieties of fruit crops are also susceptible to the same fungal disease.
- The hole for planting is prepared in at least 1-1.5 weeks, but experienced gardeners say that it is better to do this in a month. Then you can be sure that the soil will not settle and the scion will not end up underground.
- Pears should not be watered at the root. This is done along a small groove dug in a circle at a distance of 20-30 cm from the trunk.
- If gardeners rarely visit their summer cottage in winter, then after snow falls it is worth coming to shovel an additional snowdrift to the trunk, and cover the tree itself with burlap or tarpaulin to the very top. Not only hares, but also roe deer love the tender bark.
This video will show you how to properly plant a pear in the fall.
Preparation of seedlings
Seedlings ready for planting are inspected for damage and rot. Using a sharp and sterile pruning shears, remove damaged or spoiled fragments. The root system cannot be severely pruned, as this process will negatively affect the rooting and survival rate of the tree.
If the roots have noticeably dried out, the seedling is placed in water for a day. Before planting the pear in a permanent place, the roots of the seedling are dipped in a protective and nutrient solution of clay, water and mullein. After this, the roots are kept in the open air for half an hour, then planted in a hole.
If the tree has leaves, they are removed so that the tree does not waste energy maintaining and growing them. The main thing after transplantation is rooting.
Aftercare
A tree planted in autumn does not require special care. Watering is carried out only in dry years. Pears do not need pruning or fertilizing after planting in the fall.
In winter, the root circle is generously mulched, using peat, sawdust, and pine needles for these purposes. The trunks are tied with spruce branches, burlap, and tarpaulin. This will protect the roots from frost and the trunk from rodents.
The process of planting pears in open ground in autumn
At the bottom of the planting pit, a rise of soil is formed. Its height must be checked with the height of the seedling, since after compacting the earth, the neck of the tree should rise 5-6 cm above the soil level.
The seedling is placed in the center of the hole, the roots are straightened so that they are all directed downwards.
It is advisable to plant the seedling relative to the cardinal directions as it grew in the nursery. This can be determined by the color of the bark: on the north side it will be lighter.
Fill the hole with the installed seedling carefully so as not to displace it, but at the same time fill the empty areas between the roots. The soil is compacted so that the tree stands stable and does not fall to the side.
The tree is tied to a peg, which should reach the height of the lower branch of the seedling.
How to plant a pear tree in the fall:
The planted pear is watered with heated water. Take 2-3 buckets for one tree; carefully, so as not to wash out the hole and deepen the neck, pour the water under the root.
If the soil begins to actively settle, you can add and lay the top layer of soil around the trunk.
After completing all the work, the pear tree trunk circle needs to be mulched. Peat, humus, sawdust, and dry leaves are suitable for this.
We care for seedlings
After the pear seedlings have taken root, the young trees need to be given attention from time to time. First of all, you need to loosen the soil around the trunk, facilitating oxygen access to the roots. Since the root system of the pear grows greatly, loosening must be done from the trunk 1-1.5 meters.
While the pear is still young, it is better to loosen it with a hoe or a flat cutter. Afterwards, sprinkle the loosened soil with fifty grams of mineral fertilizers, also sprinkle the soil with ash and peat, then water the treated area with water.
Watering
When watering pears, you need to adhere to the principle: a strong root system, a healthy tree and, as a result, an excellent harvest. Therefore, the pear needs to be watered often and abundantly. During the period of fruiting and ripening of fruits, watering must be done 3-5 times a month.
Never water a tree with a hose. Moisture getting on the fruits and leaves of the tree causes burns, forming small lenses on the surface.
Watering must be done under the tree trunk. To do this, a small side is poured around the trunk and then the loosened soil is spilled generously. One mature tree requires 100-150 liters of water.
You should not rely on the past rain; this is not enough for a tree, since rain sheds the soil by five to ten centimeters. Due to the deep root system, the tree requires a lot of moisture.
Video: How to water a pear
Top dressing
In the first year after planting, the pear does not need feeding, since the pit is already charged with all the necessary elements. Only a year later in the spring the seedling will need additional feeding.
Pear feeding should be done in the spring, as soon as the first ovaries appear. Pear is very demanding of nitrogen, so mullein is best suited for feeding. It is better to apply it to the tree trunk by watering. Approximate consumption: 10 liters per square meter.
Video: How and with what to fertilize fruit trees correctly
Weeding and loosening
Loosening and weeding are especially important for pears in the first 2-3 years of life. During this period, the tree has not yet gained strength to independently obtain nutrients. Therefore, during this period it is advisable to make tree trunk circles.
Tree trunk circles rid the young tree of competitors in the form of annual plants that collect nutrients from the surface of the soil, thereby leaving the weak root system without feeding.
Protection from pests and diseases
Like any other fruit tree, the pear has its own pests and diseases that can and should be combated. The most common pear disease is scab.
Scab is a fungus Venturia pirina, pear scab develops only on pears, without affecting other trees and can affect up to 100% of the crop. It develops especially actively in warm, humid climates, so this pest must be actively combated.
The fungus appears in the spring, and young leaves first turn red and eventually turn black, so when the first signs of the disease appear, you need to immediately begin to fight the parasite.
Products containing copper are excellent for these purposes. The most famous and popular remedy among our gardeners is Bordeaux mixture. It consists of copper sulfate and slaked lime. The product can be purchased at a specialty store.
Trees are treated three times per season:
- Before pear blossoms, use a 3% solution of Bordeaux mixture
- After flowering 1% solution
- 2-3 weeks before harvest 1% solution
The solution is applied to the affected areas with a spray and here one should take into account the fact that the fungus dies only through direct contact with the product.
It’s worth saying a few words about preventing the appearance of fungus:
- First of all, it is necessary to regularly check the condition of the young tree for the presence of fungus. The plant can become infected from spores of a diseased tree carried by the wind from a neighboring area.
- Regularly thin out branches growing inward towards the trunk. Avoid thickening the crown.
Video: What ails the pear Pear gall mite
Preparing a young pear for winter
Winter is not a problem for mature trees; they can easily withstand frost, but young seedlings should be prepared in advance for wintering.
Essentially, preparation consists of three stages:
- Treating the trunk with copper sulfate to protect the pear from pests and small insects overwintering under the bark of trees. To do this, dissolve one hundred grams of copper sulfate in 10 liters of water and carefully spray all the branches of the young tree.
- Protecting the trunk from sunburn using agrotextiles. To do this, we cut the agrotextile into strips and carefully wrap the entire trunk. This will protect the young bark from bright sunlight and severe frosts. It is worth noting that traditional whitewashing is not suitable for young trees under three years old and can only cause harm.
- Protecting the bark from small rodents and hares, this is especially important if your garden is not fenced off and protected from uninvited guests. To do this, we use wire mesh or plastic bottles attached to the trunk.
Video: Preparing fruit trees for winter, apple trees, pears, plums
Typical mistakes when planting pears
Beginning gardeners often make mistakes when planting pears, which lead to slower growth or death of the seedling.
- The tree is planted too high. This causes damage to the root systems. It is subject to weathering, excessive heating from sunlight, and freezing.
- A tree planted too deeply may deteriorate due to the deepening of the neck.
- If the roots of the tree stuck up when planting, the seedling does not take root for a long time and grows incorrectly.
- If there is too much nitrogen fertilizer, the tree actively develops the above-ground part: forms a crown, blooms lush foliage, etc. This should not happen after transplantation, since the main task of the seedling in the first year is to strengthen the root.
Planting a pear:
Useful tips from experienced gardeners
Experienced gardeners give practical advice to novice gardeners:
- Only zoned varieties should be selected. They will quickly take root and acclimatize to the site.
- You should not take seedlings with immature roots. They usually freeze out over the winter.
- Overdeveloped seedlings with lush foliage should not be taken. They may have an undeveloped root system, and the seedling itself may be overdried, because the main loss of moisture occurs through the leaf blade.
- When planting, do not use nitrogen-containing fertilizers. When planted in autumn, they will simply destroy the tree.
- The soil at the bottom of the pit must be loosened.
- We must protect the root system. It should not come into contact with potash fertilizers.
- Remove weeds. This serves as an excellent prevention of aphids.
- Try to choose the right neighbors. The proximity of mountain ash, apple trees, and conifers will be useful. It is not recommended to grow pears next to cherries, plums, raspberries and currants.
It will be useful for you to learn about the features of transplanting a pear tree to a new place in the fall.
Choosing a season for planting pears is not a fundamental point - each period has its own pros and cons. It is much more important to choose the right place, properly prepare the soil and provide decent care. Then the tree will definitely delight you with a generous, juicy harvest.
Caring for a pear planted in autumn
Caring for pear seedlings after transplantation consists of watering and covering for the winter. No fertilizing is required, as nutrients were added to the soil during planting.
Water the pear once a week with three buckets of water, provided there is no precipitation. If it rains, watering is either stopped or the amount of water is reduced.
Some time after planting, long branches are pruned and trimmed a little to bring the crown and rhizome into line.
For the winter, the trunk of a young pear is covered with cardboard or polystyrene foam to protect the tree from rodents. In the spring, with the onset of warmth, the structure is removed to avoid overheating.
Planting a seedling
Pear is demanding regarding placement conditions. This is especially true for young seedlings. In order for the tree to grow and please the eye, you need to follow a certain sequence and know some tricks:
- Having placed the seedling on a mound in the hole, you need to straighten the roots so that they do not “look” up.
- The hole is filled evenly, alternating the remaining fertile soil with infertile soil and slightly compacting it.
- Gradually adding soil, do not forget to slightly pull the seedling 2-3 cm up so that the soil is distributed evenly and voids do not form near the roots.
- As soon as the hole is almost filled, it is filled with water so that it is absorbed, but does not stagnate. Now you can fill it up along the edges and compact the soil a little with your foot.
- At the final stage, a groove is made around the tree, according to the projection of its crown. It is needed for uniform watering and application of fertilizers in liquid form.
When planting, the pear is watered; this usually takes up to four buckets of water, depending on the condition of the soil. It makes sense to make a support for the seedling; to do this, I drive or bury a peg nearby. A pear is tied to it so that the seedling has a vertical direction.
An important condition: the root collar should be slightly above ground level after watering (about 3-4 cm). If it is lower, the tree will begin to hurt.
The first time after planting, special attention should be paid to the watering regime. If the autumn turns out to be dry, then the first week you need to water the pear every other day, then reduce the watering time to once or twice a week. A special feature of this tree is the rapid development of the root system after transplantation; by maintaining humidity, the roots can be provided with the necessary elements.
When to replant a pear in spring or autumn, video and photo
Today, a pear tree can be found in almost every garden. This crop is loved no less than apple trees, because it is easy to care for, resistant even to severe frosts, and at the same time annually pleases with tasty and very healthy fruits. Moreover, the pear is able to live and bear fruit for many years.
But at the same time, the gardener is often faced with the need to replant this crop, especially in cases where there was initially an incorrectly selected planting area. In this case, the question becomes relevant: when to replant a pear in spring or autumn, and how to correctly perform this procedure?
So, we’ll share everything you need to know about replanting pears and a few tips for increasing productivity below.
Is it possible to replant an adult pear tree?
A few rules for a successful transplant
Optimal time to transplant pears
What trees are being replanted?
How to replant a pear tree correctly
Care after transplant
Care
So, a pear tree has appeared on your site. For the Leningrad region, varieties, as a rule, require moderate regular watering - no more than 10 liters per week. The only exception to this rule can be severe drought. In addition, the young tree needs spring feeding with fertilizers.
In the fall, during the last digging, the same fertilizers are applied to the soil as during planting. Around the trunk of the pear, at a distance of 30 cm, dig rounded grooves. Distribute all the fertilizers evenly in them.
Requirements for the transplant site and planting material
Since the pear is very thermophilic, you need to choose a place for it based on its needs. The crown of the tree should receive enough light - this will ensure a normal level of photosynthesis and increase productivity. Pears also love space and solitude, so they are placed no closer than 5 meters from buildings and other trees. The place should be without blowing winds, preferably on the south or southeast side. The proximity of groundwater to the roots is also important, since constant washing away leads to rotting and fungal attack: the distance should be at least 3 meters.
As for the soil, you need to pay attention to acidity and nutritional value. Heavy and infertile soil will be depleted by the tree in literally three years, and then it is no longer advisable to replant it. Loamy or sandy soil with a fertile layer of about 25 cm is optimal. The maximum acidity should be no more than 6.5. If it is higher, then lime is added to the soil. The success of growing a pear orchard depends largely on the initial condition of the seedlings.
Important! Pears need cross-pollination, so it is better to
have several of them in one area - the chances of getting a good harvest will be higher.
If you are replanting a tree from a nursery or from a neighbor’s garden, then pay attention to the following nuances:
- development of the root system. The tree should have several main roots that are externally healthy and without signs of disease, and many small ones. If there are blackened roots or they resemble a washcloth, then nothing good will grow from such material;
- the older the tree, the worse it tolerates transplantation;
- The trunk should be even, with a beautiful, smooth bark, without damage. The branches of the tree should also be smooth and elastic.
The better the pear looks, the greater the likelihood of survival after transplantation.
Timing of autumn pear transplantation
The best autumn time to transplant a pear is when the sap flow stops and goes into a dormant state. This period is easy to determine - the tree begins to actively shed yellowed leaves. After transplanting, at least 3 weeks must pass before stable autumn frosts so that the seedling has time to take root before the onset of cold weather.
For different regions of Russia this period begins at different times:
- southern regions - from mid-October to November;
- central regions - from mid-September to the second ten days of October;
- northern regions - from September to the first ten days of October.
For each individual case, the transfer is planned based on the local meteorological forecast.
If a suitable period has been missed, it is better to winterize the seedlings and postpone replanting until spring. Already dug up trees can be stored in a trench, cellar, container or basement.
Care after transplant
We discussed in detail how to replant a pear above. But at the same time, in order for the transplantation process to be successful and the tree to take root in a new place, it is very important to properly organize further care, namely:
- If the pear was transplanted in the spring, then after the procedure the crown should be trimmed.
- The first year after transplantation, the crop is not fertilized, since fertilizing was applied during transplantation. But in subsequent years the pear tree needs to be fertilized.
- If you are replanting a pear tree that is more than 5 years old, then pruning is done after replanting.
- With the onset of spring, do not forget to carry out preventive spraying with Bordeaux mixture or urea solution.
- And lastly: do not forget to water the crop regularly, because the pear is a moisture-loving plant.
As a rule, after transplanting a pear, it quickly adapts to new growing conditions. And if you organize proper care, the tree will quickly take root and begin to grow. As a result, the transplanted crop will delight you with a generous harvest for many years.
Sources:
https://frukti-yagodi.ru/kogda-luchshe-peresazhivat-grushu-na-drugoe-mesto/ https://poferme.com/sad/derevya/grushi/posad-gr/peresadka-na-novoe-mesto- vesnoj.html https://openfile.ru/dacha-i-sad/%D0%BA%D0%BE%D0%B3%D0%B4%D0%B0-%D0%BF%D0%B5%D1%80 %D0%B5%D1%81%D0%B0%D0%B6%D0%B8%D0%B2%D0%B0%D1%82%D1%8C-%D0%B3%D1%80%D1%83% D1%88%D1%83-%D0%B2%D0%B5%D1%81%D0%BD%D0%BE%D0%B9-%D0%B8%D0%BB%D0%B8-%D0%BE .html
What to do with a young tree after planting
Having completed the activity, a gardener, especially a beginner, may have a completely logical question - how to care for a pear after planting? Before we talk in detail about the main points of care, I would like to note that the tree in a new place in the garden will be vulnerable and defenseless for the first year, so regular procedures should not be neglected.
Here are some steps to take care of a seedling after planting in open ground:
- Secure the seedling to the stake . Carefully tie the tree to the support stake using soft twine. It is recommended to tie it with a figure eight.
- Water . It is recommended to make a small furrow around the tree trunk in order to irrigate by introducing water into this groove. The optimal amount of water for irrigation is three buckets per square meter of tree trunk circle.
- Mulch . Protecting the tree trunk with mulch material is an important point in caring for a tree after planting in open ground. But mulching is important not only after the procedure; it also must be done in the fall, before the winter cold. You can use peat, humus, and wood chips. The mulch layer is about 20 centimeters.
- Loosen and remove weeds . Weeds can easily encroach on your young tree, so you need to regularly monitor it and remove weeds if they appear. And loosening the tree trunk circle should be done after watering.
- Cover for the winter . The root system of the pear and the tree itself can freeze in harsh winter conditions, so it is important to provide shelter in the fall, this is especially true if planting was done in the fall. To begin, wrap the trunk and the bases of the skeletal branches with material - spunbond or burlap, fix the material so that it does not come apart, exposing the trunk. It is recommended to put spruce branches on top of the material and secure it with something.
- Protect from rodents in the fall . Many gardeners may note with bitterness that their garden becomes a feasting area for various rodents (hares, mice) in winter. To prevent them from chewing on the trunk, it is recommended to wrap it in a cut plastic bottle.
- Trim . After planting, you need to prune the pear seedling - shorten the main stem to 90 centimeters. You also need to trim the side shoots by 20 centimeters. Every year it is necessary to shape the tree so that the crown is of the correct shape (optimally sparsely layered crown) and there are no thickening, meaningless shoots.
Video: formation for the second year.
The technology for properly planting seedlings in spring and autumn is easy to implement; even a novice gardener can complete the task. But despite the absence of any complex rules, it is important to plant a tree in open ground according to the recommended scheme, following all the rules and steps.
Planting pears in the Urals
In the first year, the seedling grows very quickly, so it is worth pruning it after planting.
It is recommended to cover annual seedlings during the first winter.
To ensure strong branching, the seedling is shortened by 30% . In subsequent years, only sanitary pruning will be useful. In this region, the pear tree needs to be watered not often, but heavily . Weeds should be pulled out regularly.
Since the pear has reduced winter hardiness, it is advisable to cover it with a snowy hill in the first year. As soon as fruiting begins, winter hardiness will increase.
Rules for planting pears in this region
How you plant this tree correctly will determine what kind of harvest you will reap.
Planting hole for pear.
- The planting hole is dug in advance, measuring 1 m wide and 60 cm deep . You need to drive a wooden stick in the middle of the hole. If the soil is clayey or waterlogged, drainage is placed at the bottom of the hole, and nutritious soil is applied on top of it.
- The hole is filled 1/3 and given a cone shape.
- Then the seedling is placed at such a depth that the root collar rises 3–5 centimeters above the ground surface.
- The root system of the tree is straightened out.
- The tree trunk is tied to a buried wooden stick.
- The hole is filled with earth and compacted well.
- For better watering, the edges of the pit are made in the form of sides . The young tree is watered abundantly and mulched with compost or peat.
- There is no need to treat the trunk with lime, otherwise you can dry the bark.
In the first season, the pear is watered once a week, 1-2 buckets of water are enough.
The best pear varieties for the Urals
- " Rainbow ". The tree is not very tall, the crown is rounded, very winter-hardy, bears fruit for 4 years. The fruits are round, reach 120g, have a slight tan on the sunny side, and ripen in summer.
- " Favourite ". Fruit tree of medium density and medium height. It has good winter hardiness and high yield. The pears are greenish in color, very sweet and juicy, weigh about 180 g, and can be stored for 30 days. They make excellent compote and dried fruits.
- " New Year's ". The variety is very winter-hardy and productive, and is not afraid of scab and pear mites. The fruits are gray-green, pear-shaped, sweet and sour in taste, can be stored for 3 months.
- " Lucky Falkenberg ". The tree reaches medium height, is winter-hardy, and produces an excellent harvest. The fruits are green, weigh about 180 g, and can be stored for up to 80 days. Pears can be consumed both fresh and in the form of compotes and dried fruits.
- " Ozerskaya ". High-yielding and highly winter-hardy variety. The fruits are pear-shaped, green in color, weighing up to 180 g, can be stored for up to 4 months. The fruits make good compotes and dried fruits.
- " Ovation ". Gives a high yield and is not afraid of winter frosts. The fruits are round in shape and greenish in color. The pulp is sweet (without sourness) and very juicy.
Planting a pear tree in the Moscow region
As mentioned earlier, you should carefully consider the choice of seedlings depending on the region where they are planted. As for the Moscow region, there are certain types of pears that are worth paying attention to, as well as the features of caring for this crop. How to care for these fruit trees:
- in winter, the root system of young trees should be covered;
- constantly remove weeds around the trunk;
- the irrigation system must be of the rain type;
- to enrich the roots with oxygen, the soil must be loosened after each watering;
- in the second year after planting, the soil needs to be fertilized;
- To increase the yield, it is necessary to add the following baits: urea, superphosphate, eco plant, kemira, potassium nitrate.
Popular varieties
Currently, many varieties of pears have been bred for cultivation in Central Russia.
- "Lada". One of the most common species in this region. The harvest can be harvested as early as July. This variety belongs to the category of picky ones. The tree bears fruit well after three years.
- " Chizhevskaya ". Pretty sturdy looking. It differs in that the pears fall from the tree and do not ripen. A very bountiful harvest is harvested in August.
- "Skorospelka from Michurinsk." An early variety, the trees are very neat, the fruits are yellow and very juicy.
- " Rogneda ". Harvest occurs at the end of summer - beginning of autumn. In order for the pears to be very tasty, after picking them you need to let them sit for a while. They make very tasty compotes, jams and preserves for the winter.
- "Bere Moskovskaya". Pears can be picked by mid-September.
- " Otradnenskaya ". Harvest occurs at the end of September. Pears are perfect for winter preparations.
