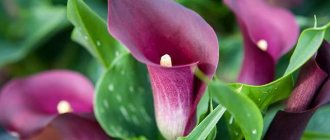
There is a very beautiful plant in my collection of decorative flowers, and recently I was given a second one. A friend gave it to me and said that it was not blooming for her. And all the beauty is not even in the flower, but in the snow-white wide collar of the Ethiopian calla lily.
I want to share my experience on how to care for this plant so that it will delight you with unusual exotic flowers almost all year round. Photos and videos will help you better understand the rules of growing and simple care.
Description
South Africa is considered the birthplace of these callas. Magnificent flowers are a real decoration for apartments and greenhouses and look great in bouquets. The plant is large, with wide, succulent and shiny leaves, heart-shaped and bright green in color. They are located on long basal petioles and collected in rosettes. The flower itself has an original structure. It is formed at the end of a towering arrow and is a yellow inflorescence-cob wrapped in a white blanket. Its smell is very faint and resembles vanilla.
Flowering usually begins in the second half of winter and lasts for 1.5–2 months. Ethiopian calla is known by different names - zantedeschia, richardia, calla lily. The tuberous rhizome produces numerous suckers every year, which must be removed so that they do not delay flowering.
Description of the plant
Ethiopian calla belongs to the family of evergreen perennial plants with a developed tuberous root system. The leaf of the plant has a glossy green surface, and in some varieties it is decorated with whitish translucent spots. The leaf length can reach up to 50 cm and the width up to 20 cm; the leaf plate is located on a thick petiole, the length of which is approximately equal to the length of the leaf itself.
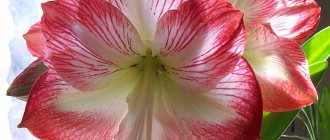
The color of the bedspread has white, yellow, pink, cream colors, but breeders do not stop there, producing creations with an absolutely unique coloring of the bedspread. All varieties have one feature: after pollination, not a trace remains of the native color of the bedspread, and the color, regardless of the original one, becomes green.
The bud consists of a blanket rolled into a tube, which is then folded back. The formed flower has a short tubular tear at the base, which smoothly expands upward and at the apex takes the form of a shell with a pointed edge. The inflorescences are located on long peduncles and are located above a small rosette of basal leaves. On a fine sunny day, calla lilies have a faint pineapple scent.
The plant reaches a height of 80 cm; at the end of flowering, the above-ground part dies off partially or completely. Fresh young shoots appear to replace dead leaves.
Soil requirements
Under natural conditions, callas prefer damp, swampy areas. This must be taken into account when preparing the soil mixture for planting, adding river silt to it and placing a deep tray under the pot (it must contain a layer of water of at least 5 cm). If you are counting on maintaining the plant for many years, it is necessary that the substrate is slightly acidic and rich in nutrients. It should contain clay-turf and peat soil, humus, sand (all in the ratio 1:1:1:0.5). It is very good if it is possible to add a little swamp substrate or river silt. Ethiopian domestic calla grows well in clean peat. Some gardeners use manure or compost to prepare the soil mixture.
Wintering conditions
Ethiopian calla is a plant with pronounced growth cycles. Usually, under favorable conditions, it begins to bloom already on the eve of Christmas. The flowers then last until summer.
Then a dormant period begins, indicated by yellow leaves. Watering is now limited and then stopped completely. Now the pot with the plant can be moved to a protected place on the balcony or in the garden. The soil can even dry out completely. Natural precipitation is usually enough to keep the tuber in the substrate from drying out completely. On the balcony, you need to lightly water the plant from time to time.
After a dormant period of about 4-6 weeks, the knobby tuber is removed from the pot, the soil is shaken off and planted in fresh soil. A heavy mixture is suitable for planting. If you use ordinary flower soil, you can add a small amount of compost or clay to it. Mixed soil is also suitable.
If the calla lily is still outdoors in the fall, before frost begins it is moved into the room and kept at a temperature of 9 degrees. Later the temperature can be increased to 14 degrees. It is very important at this time that the plant is in a bright place. Calla tolerates small portions of sun well. Under favorable conditions, calla lilies begin to bloom again by the end of winter or spring.
Landing
In March, spacious pots are prepared - for 1 tuber the capacity should be at least 3 liters. A soil mixture is poured into them with superphosphate added to it (1 tablespoon for every 3 liters of substrate). A drainage layer must be poured onto the bottom.
Tubers intended for planting must be healthy. This is evidenced by their elasticity, light yellow color and the presence of living apical buds. Overdried gray tubers with wrinkled skin are not suitable. Existing areas of rot or growths are carefully scraped off with a sharp knife.
Before planting, certain preparatory work is carried out. For 2–3 weeks, the tubers are transferred to a warm place with good lighting. Then immerse for 15 minutes in a weak solution of potassium permanganate, after which it is dried. This will help protect the flowers from rotting and damage by pests, from which Ethiopian calla often suffers.
The tubers are planted shallowly - a maximum of 10 cm - and slightly moistened. The pots are placed where it is warm and there are no drafts.
Features of planting calla rhizomes
It is recommended to plant calla lilies with rhizomes in the fall. You can buy planting material at garden centers or specialized stores. Or divide the bush if you or your friends grow a rhizomatous plant.
If the latter option suits you, then you need to carefully dig up an adult bush of the plant, very carefully and delicately break off the root collar from the main root, while maximum soil should remain on the roots. Then you need to plant them for germination in a large pot and leave them for winter storage in a humid room with a temperature of 13-15 degrees Celsius. But you need to plant rhizomes in open ground after winter at the same time and in the same way as tubers!
Watering
In the first 2 weeks, the plant does not need much moisture. Later they switch to abundant watering. Use soft, settled water. During the flowering period, additional moisture is required, so Zantedeschia leaves are sprayed with a spray bottle and bathed in the shower. It is also necessary to ensure that there is always water in the pan.
For a native of tropical Africa, the humidity in the room should be at least 55%. If this condition is met, the Ethiopian calla will delight you not only with large flowers, but also with beautiful greenery. Caring for the plant involves abundant watering only during leaf development and flowering. From the moment the rest period begins, they are reduced, then stopped altogether for 1.5–2 months and gradually resumed again. This phase in plant development usually lasts from autumn to February.
Caring for callas in the open ground after planting
When is it better to plant crops in open ground in the spring? You can plant calla lilies sprouted in a pot or the tubers themselves in a permanent place when the soil warms up to 15 degrees Celsius (to measure the t of the soil, you need to make a hole 15 cm deep and insert a thermometer there). In this case, the threat of return frosts should pass.
The timing of spring planting of callas in different regions may differ: in the South (Krasnodar Territory (Kuban), North Caucasus) you can plant them already in mid-April, in the middle zone (including the Moscow region) you can plant them in mid-May, in Siberia, on Urals, Leningrad region - at the end of May or better even at the beginning of June.
When choosing the timing of planting calla tubers in open ground or for germination, you can also be guided by the 2019 lunar calendar:
- Favorable days: in March - 12-17, 22-25;
- in April - 6-8, 20-26, 29, 30;
- in May - 6-8, 14-17, 21-23, 31;
- in June - 1, 2, 9, 10, 11.
- in March - 6, 7, 21;
Regardless of how you want to plant callas in the ground in the spring - with tubers or germinated seedlings, you need to do everything correctly and prepare for planting.
Choosing a place outside for planting calla lilies in the spring must be approached very responsibly, because these beauties are very whimsical in this regard, and not every site is suitable for them.
The place must be bright and warm. However, the plant must be protected from direct sunlight, which can burn the leaves and flower. Only slightly shaded and semi-shaded places are suitable - with such delicate lighting the flowering will be the most magnificent. But when grown in the shade, flowering will be weak or not at all!
Calla loves moist air, so it can be planted next to ponds in your garden. But provided that there is no waterlogging at the planting site (for example, it is an artificial pond with a reliable bottom through which water does not leak).
Callas are also picky about soil! For spring planting, you should choose fertile, loose, slightly acidic or acidic soil.
To successfully grow beautiful and healthy flowers in your garden plot, you need to prepare the soil in advance before planting the plant. Soil preparation consists of the following steps:
- First of all, you need to clear the area of stones, debris, and weed roots.
- Then you need to dig a trench or hole (the depth is about 30-40 centimeters, but the width is determined by the number of tubers you want to plant). And then you need to fill the hole or trench with soil:
- You can buy a special soil mixture for calla lilies at the garden center.
- Or you can prepare the soil according to the following recipe: turf soil (2 parts) leaf soil (1 part) peat (1 part) river sand (1 part).
- If you do not have the opportunity to implement the first or second point, then you can place a mixture of humus, peat and garden soil in the hole.
- It is also recommended to apply a mineral complex fertilizer, for example, “Nitroammofoska” (according to the instructions on the package). Then you don’t have to feed the plants in the future (with the exception of potassium fertilizers for lush flowering).
It is recommended to plant a calla sapling from a pot into open ground according to the following rules:
- Make the holes slightly larger in volume than the earthen ball in the pot. The distance between the holes is 20 cm (for low-growing varieties), 30-40 cm (for medium-growing varieties), 50-60 cm (for tall-growing ones).
- Now you need to carefully remove the germinated seedlings without destroying the earthen clod and transplant them into the holes of the transshipment methods. The plant can be buried 1.5-2 centimeters to preserve the surface roots.
- Fill the hole, compact the soil around it, and water it.
- After the water is completely absorbed, mulch the area with peat, a layer of 3-5 cm.
It is possible to plant garden calla lilies tubers in open ground in the spring without prior germination. To properly plant tubers, you must follow the following scheme:
- Make holes 5-7 centimeters deep, the distance between them is determined depending on the variety (see above), from 20 to 60 centimeters.
- Place the tuber with the tubercle up and the smooth side (that is, the bottom) to the ground.
- Fill the hole with soil so that the soil covers the top of the tuber by 4-5 centimeters (the layer should not be larger, otherwise they will germinate poorly and slowly, and will be weak).
- Compact very slightly (but in no case too much!).
- Water and mulch after water has been absorbed.
Proper care of garden calla lilies is important not only after planting, but also subsequently. The cultivation technology is simple, but the needs of the flower cannot be neglected.
It is recommended to care for calla lilies in open ground according to the following rules:
- Watering is very important for proper plant care. This plant is moisture-loving (especially Ethiopian calla), but it does not like excess moisture in the ground (this is critical for the tuberous calla Remani and Elliott). It is necessary to water the flower often, but moderately. The soil should always remain moderately moist, but should not be allowed to dry out or overwater.
- Flowers love feeding. If you did not add fertilizer to the soil when planting, it is recommended to apply fertilizer for corm flowers once every three weeks (according to the instructions for the preparation). But during flowering, it is recommended in any case to feed with potassium sulfate (1 tablespoon per plant, distributed evenly around the plant, lightly embedded in the soil), it increases the number of flower stalks and makes flowering more lush. It is not recommended to use nitrogen fertilizers, as they provoke the growth of green mass to the detriment of flowering.
- Loosening is an important element of caring for outdoor callas; it ensures a normal supply of oxygen to the roots. It is necessary to loosen the soil around the plant after each watering or rain. Do not allow the formation of an earthen crust in the flower garden.
- Immediately after flowering, it is necessary to carefully cut off the withered peduncles for a more aesthetic appearance and the growth of new peduncles.
- In the fall, around the end of September, it is necessary to prepare the plant for winter. To do this, you need to cut off the above-ground part, leaving a small area with two or three leaves, and dig up the tubers (if you have a tuberous flower). First clean, dry, and then store in paper bags. After 2-3 weeks, you need to remove the dried leaves (this manipulation will help the tubers survive storage better).
When you see babies on a tuber, don’t rush to separate them! It is recommended to wait until they form what is called a bridge between the tuber and the baby (this will take about a year). When the jumper is 5 millimeters or more (as in the photo below), you can carefully break off the babies and plant them in the ground yourself.
If you do this earlier, then a too large wound will remain on the tuber (if a bridge is formed it will be much smaller), which can provoke infection and death of the planting material.
Previously, calla lilies grew only in South Africa, but now they can be grown not only in their homeland, but also in the garden, at the dacha, or on the plots of private houses in our country. The flower is definitely worthy of attention; its elegant and sophisticated beauty cannot but fascinate!
You can start planting calla lilies as early as March. In nature, flowers grow in swampy areas, which must be taken into account when preparing the soil and choosing a flowerpot.
For one tuber you need a pot with a capacity of at least 3 liters, and the tray should be chosen deep enough (water should be in it constantly to create the required level of humidity).
It is better to take nutritious and slightly acidic soil for calla lilies. Flowers grow well in a clay-peat mixture (1:1) with the addition of one part of humus and half of sand.
Some gardeners also add a little river silt to the calla lily substrate.
Temperature and lighting
It is advisable that the room for growing calla lilies be light and spacious. Direct sunlight is harmful to the plant. It's better if the light is a little diffused. A flower pot can be placed on a north or east window. Ethiopian white calla grows well even in artificial light, the main thing is that it is chosen correctly, otherwise the plant may not bloom. Daylight hours should last 10–12 hours.
The temperature in the room where zantedeschia grows plays an important role. It may fluctuate depending on the phase of development of calla lilies. During flowering, it is necessary to maintain the temperature within 15–18⁰С. Increasing it even by 2 degrees will lead to a decrease in the quality of flowers. During the dormant period, it is recommended to remove callas in a room where the temperature is from 8 to 10⁰C.
Transplantation and propagation
How to plant this plant? Replant the flower annually. It is best to do this in July-August. Each time you replant, choose a new pot based on the size of the flower bulb. Do not replant the flower in pots that are too wide. The diameter of the pot should be only a couple of centimeters larger than the diameter of the root system of this plant.
You can propagate Ethiopian calla by dividing the bush during transplantation. At this time, carefully separate the lateral shoots of the root system and plant them in small pots.
Top dressing
Fertilizers begin to be applied when the first leaves appear. Combine both root and foliar feeding. Mineral and organic fertilizers are used on average 2 times a month. At the beginning, at the stage of plant development, it is mainly nitrogen fertilizers. During the flowering period, more phosphorus and potassium are needed. You can use regular complex fertilizers for indoor plants containing these elements. Long-lasting and more beautiful flowering largely depends on them. Ethiopian calla with its appearance signals a lack of one or another nutrient. With a lack of nitrogen, the leaves become dull, losing their luster. Potassium deficiency is expressed in raising their pointed tips upward.
When performing foliar feeding, it is very important that droplets of the solution do not fall on the white cover of the flower. This may lead to loss of its decorative effect. By periodically replacing the top layer of the substrate, you can do without replanting the plant. At a time when the Ethiopian calla blooms, home care also allows for the introduction of fertilizing in the form of tea leaves, egg shells, and fruit peels.
general characteristics
This flower can be successfully grown both in a pot at home and in the garden outdoors.
The plant is very popular among florists, because when cut in flower arrangements and ordinary bouquets, it not only serves as an accent flower due to its shape and color, but does not lose its freshness for a long time, almost 2 weeks.
- In fact, this perennial herbaceous plant has a completely different name - Zantedeschia Ethiopian. Arum and Whitewing are also all about her. The flower belongs to the Araceae family and the Zantedeschia genus.
- In southern Africa, which is its homeland, the plant grows wild in damp, swampy places and its height often reaches two and a half meters. Of course, in cultivation, for a bouquet and at home, it is impossible to see calla lilies above 1 meter.
- The leaves of the plant are elongated and heart-shaped, their length is about half a meter and their width is 18 - 20 cm. They are collected in a basal rosette. The color of the leaf blades is deep, rich, green, in perfect harmony with the snow-white flowers. The structure of the leaves is expressed by thin, slightly recessed vertical veins. The stem is fleshy, thick and erect.
- Above the rosette of leaves there is a tall peduncle, at least 10 cm, which is strewn with small bright yellow flowers. On top it seems to be wrapped in a snow-white blanket - an elongated petal at the end. Its diameter can reach 20 - 25 cm.
- This original structure makes the flower completely different from others. There are varieties in which the “collar” is not white, but yellow or pink, which looks very unusual and delicate.
- The flowering period of calla lilies lasts from late autumn to May. But if the conditions are very suitable for her, she can delight with flowers almost all year round.
- Grown indoors, the flowers have almost no scent, but garden callas have a delicate aroma.
Caring for the plant during the dormant period
At the end of flowering, the growth of calla lilies stops, but the roots continue to develop. This period usually lasts from May to July. Until autumn, the plant can be placed on a balcony or loggia, where piercing winds do not penetrate and it is possible to shelter from the sun. Neither watering nor fertilizing is done at this time.
You can put callas into a state of deep dormancy by completely removing the leaves and placing them in the refrigerator, cellar or any other place where the temperature is within 3–5⁰C.
How to water?
During active growth, calla lilies need regular watering to keep the soil moist, as well as spraying. With the beginning of budding, the frequency of watering should be increased, but when the plant fades, gradually begin to reduce it, bringing it to a minimum amount. This rest period should last from 1.5 to 2 months.
If the calla lilies begin to wither and shed leaves at this time, this is normal. This is how the plant gets rid of unnecessary leafy parts in order to accumulate strength before future flowering.
Reproduction
It can be produced either by suckers or by seeds. The first method is much simpler, which is why gardeners most often use it. Offshoots are small nodules that form around the main one in large numbers (sometimes there are up to 25 of them). They have to be removed in any case so as not to delay the development of the plant. The tubers are separated carefully so as not to damage the roots on them, and planted in prepared containers filled with substrate. It is obtained by mixing 2 parts of turf soil and one each of peat, leaf and sand. Then the pots are placed in a room with a temperature of +12-16⁰C and a humidity of at least 80%. There must be good lighting, because otherwise the plants become stretched, the leaves lose their bright color, and the quality of flowering may suffer in the future.
To increase the amount of planting material, the offspring can be divided in half so that at least one bud remains on each. The fracture site is treated with a weak solution of potassium permanganate or sprinkled with charcoal.
Ethiopian calla lilies also reproduce using seeds. This method is used mainly by breeders, since it allows one to preserve the varietal characteristics of the plant. Only fresh seeds are taken for planting. They are soaked for 6 hours in a special solution that stimulates development. After this, lay it out on a damp cloth, covering it with the other end on top, and place it in a warm place for 7 days. As soon as the seeds germinate, they are sown in the ground. They germinate at a temperature of 20⁰C. The emerging inputs dive into separate containers.
Calla lilies in a pot: care at home
Many gardeners have a question: why calla lilies do not bloom at home. The fact is that caring for a plant at home requires compliance with special conditions. This culture is most sensitive to light and humidity indicators, because in nature it grows in open areas around water bodies.
Lighting
The most important parameter when choosing the location of a pot of calla lilies. The plant loves bright and diffused light. The pot should be hidden from direct sun to prevent burns.
The duration of illumination is required for at least a third of the day, which in winter requires an additional light source in the evening.
And for flowering to occur, half a day is needed in diffused light, which is taken into account in the spring before the color sets, while the sun still does not sufficiently illuminate the window sills.
Temperature
Calla lilies are grown within a temperature range of 15 to 24 degrees.
In the summer season, the plant will feel good on the street or balcony. At night when temperatures are cool, it is best to bring the pot indoors.
Callas are afraid of drafts, as a result of which they may not bloom the next season.
A large amount of moisture will have a beneficial effect on the growth and flowering of callas. But this does not mean that you need to flood the flower. Regular watering is enough to prevent all the soil from drying out. Callas with colored flowers can tolerate short-term drought without deterioration, but only in rare cases.
During flowering, zantedeschia needs increased moisture, and after flowering it must be reduced to the previous regime.
There is no need to specifically increase the humidity, but during the heating season or hot summer days, spraying with water at room temperature is useful.
Advice: during the flowering period, it is better to replace spraying by regularly wiping the leaves with a damp sponge to prevent the flowers from falling off prematurely due to moisture entering the core.
You can provide plants with all the necessary minerals and trace elements in a timely manner using fertilizers.
Complex fertilizing is applied three times a month to moist soil.
Nitrogen content in the soil is especially important for lush growth and flowering. Its deficiency is manifested by lethargy of leaves and stunted growth, lack of flowering. But its excess is also harmful, as it leads to yellowing and drying of the leaves and the absence of flowers.
Nitrogen and phosphorus are contained in superphosphate and potassium nitrate, which are added to the soil before flowering.
During the flowering period, universal compositions for flower crops are suitable.
The rest period for some varieties varies in duration and usually occurs after flowering has ended. The plant may completely lose its leaves, which is more typical for garden crops. On the windowsill, calla lilies slow down their growth and therefore need to change their maintenance conditions:
- air temperature drops to 15–18 degrees;
- watering is reduced to 2–3 times a month;
- fertilizing is excluded during the winter months; from spring, it is introduced gradually 2 times a month (organic compounds are preferred - infusion of nettle or manure).
This video shows how you can store calla tubers in winter.
The rhizomatous Ethiopian calla variety has a dormant period in the summer, so it needs to be provided with a cool place with preserved lighting.
Many experienced gardeners who have dealt with growing tuberous calla lilies recommend first planting them for germination at home before spring planting in open ground.
This method allows you to immediately check the viability of the planting material - you do not have to worry that some tubers will not germinate in open ground. In addition, you may see flowers bloom a little earlier.
You need to germinate the tubers in purchased soil intended specifically for growing calla lilies. You can also plant it in Saintpaulia soil (it is slightly acidic, which this flower crop will like). Or make the soil mixture yourself with your own hands by mixing:
- calcined river sand (1 part);
- peat (1 part);
- leaf soil (1 part);
- turf soil (2 parts).
It is best to use a pot as a container for germination. It must be spacious - at least 3 liters (optimally 3.5 liters). There must be drainage holes at the bottom of the container.
To properly plant calla tubers in a pot for germination, it is recommended to follow the following scheme:
- Place drainage at the bottom, preferably expanded clay.
- Fill the pot with soil, leaving 3-4 centimeters to the edges of the container.
- Make a small hole in the center of the pot, place the tuber in the hole, it should be the tubercle up (the fact is that the tubercle is the top part of the tuber), and the smooth side is the bottom, it should be at the bottom.
- Fill the hole with soil so that the tuber is covered with a small layer of soil. Since the roots grow along the entire height of the tuber, you need to plant it at such a depth that the thickness of the soil above it is 1.5-2 centimeters, no more!
- Water carefully so as not to wash away the soil above the tuber. If this does happen, then you need to carefully add more.
Caring for tuberous calla lilies during germination at home before planting in open ground is very simple:
- Immediately after spring planting, you need to place the pots in a bright room with a temperature of 18-20 degrees Celsius.
- It is necessary to regularly water the pot when the top layer dries out, constantly maintaining moderate soil moisture. If there is water left in the pan after watering, it should be drained immediately.
- As soon as you see a sprout, you need to place the pot in a bright place, but it should not be exposed to direct, scorching sunlight.
- After the sprouts grow to five to seven centimeters, it is recommended to add soil to the pot (the layer thickness is approximately 2-3 centimeters).
- Once every two weeks you can fertilize with complex mineral or humic fertilizer for seedlings.
Experienced flower growers classify the plant we are considering as an unpretentious inhabitant of window sills.
Diseases and pests
Ethiopian calla lilies mainly suffer from fungal and infectious diseases. Planting and care carried out without following the rules of agricultural technology are the main reasons for their occurrence. Overmoistening of the soil and excess nitrogenous fertilizers usually lead to fungal infection of the plant. At the first sign of this, it is necessary to stop watering, replace the soil and treat the flower with fungicides.
It is most important to prevent such diseases, because getting rid of some of them can be very difficult. Prevention consists of disinfecting tubers, removing parts of the plant with the slightest signs of disease.
Of the insect pests for calla lilies, the greatest danger is spider mites and aphids. To combat them, it is recommended to spray the plant with special preparations (Fitoverm, Vertimek) and a soap solution.
With proper care, Ethiopian calla lilies can become a real home decoration. Photos of these amazing flowers confirm the fact that, with very little effort, you can grow such beauty in your home.
Possible diseases
Most often, domestic calla lilies get sick due to the forgetfulness of inexperienced gardeners. Their mistake is that after flowering has finished, they continue to water the plant abundantly. Meanwhile, at this time she falls into a state of rest. The root system becomes flooded and quickly begins to rot. The second reason is drafts and unacceptable changes in air temperature.
If the pot is too small or wide for the calla lily, it will not bloom. This plant also reacts to low light by lack of flowering. The same thing can happen if feeding is done incorrectly.
It should be said that this plant is almost never attacked by harmful insects. Only in rare cases does a spider mite appear among its leaves. In this case, simply wash the plant with soapy water, and then rinse off the remaining soap with clean warm water.
Varieties and type of calla lilies
Among the eight main types of calla lilies, there are 3. They are used by breeders to obtain new varieties.
Ethiopian calla (Calla aethiopica)
This is a variety of tall calla lilies characterized by large foliage. Under natural conditions, its height reaches 1 m. This is a rhizomatous plant and during the dormant period it does not shed its leaves or go into hibernation. Only its growth stops. The flowers are predominantly white or green.
Popular varieties:
Nicolai is a plant 1.5 m high. The leaves are dark green in color, large flowers (diameter more than 10 cm) are greenish. Suitable for growing in open ground.
Green Goddess is a variety with unusually beautiful funnel-shaped flowers of a bright green hue. Plant height is about 0.9 m. Suitable for both open ground and indoor growing.
Albomaculata is a plant with a large white candle-shaped flower. It is characterized by the aroma of vanilla.
Schone Zweibruckerin is a tall plant (1 m) with dark green flowers, which are covered with a waxy light coating. The flower reaches 15 cm in diameter. Its heart-shaped leaves are light green in color.
Calla rehmannii
A low-growing variety with a height of up to 0.5 m. A plant with narrow green leaves up to 30 cm, which shed when going into winter dormancy. Small flowers of red, burgundy or pink. Reproduction using tubers. Suitable for growing indoors.
Popular varieties:
Evening - the variety is distinguished by its uniqueness. The flowers are dark, sometimes black-blue or black-lilac. There are varieties with a purple border.
Indian Summer is a rare variety with unusual compact forms. The flower is bright red with a hint of garnet color.
Chameleon - a variety ideal for growing in pots. A plant with dark green leaves that are covered with white speckles. The flowers have golden and peach tones.
Calla Eliotta (Calla elliottiana)
The plant is characterized by a small height and large heart-shaped leaves with white dashes. The flowers are variegated, the inflorescences are yellow-green. This tuberous variety reproduces vegetatively.
Known varieties:
Yellow Corner is one of the popular varieties of Eliott calla lilies. The color of the stem gradually turns from green to yellowish. A flower with a soft yellow, sunny tint. The leaves are bright green with speckles.
Vermeer - the plant is characterized by high decorative properties. Carved leaves with white specks. The edges of the flower are white with a smooth transition to burgundy towards the stem.
Black-eyed beauty - the leaves of the plant are dark green in color with large white spots. A wide flower of a light yellow hue with a deep purple center, in the center of which there is a corn yellow stamen.