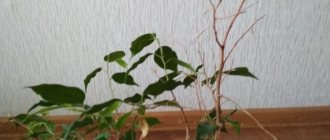
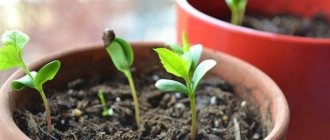
Novice florists often don’t understand why the orchid’s roots dry out and peek out of the pot. The shoots sticking out on top of the container and breaking through the drainage holes look strange and unusual for those who have not dealt with orchids before. This situation can either be the norm or indicate improper care, so it is important to understand all the nuances before taking any measures.
Orchid root system (Photo used under standard license ©azbukaogorodnika.ru)
When does a pot become too small for a plant?
During the development of roots in a large group of orchids, three stages of development can be observed :
- Formation of young roots and their growth . During the growth period, they penetrate into the gaps between the components of the substrate and “stick” to it, thereby allowing the plant to gain stability.
- In the second year, they branch , increasing the surface area of the root part, which allows them to increase the area of absorption of nutrients and moisture.
- Over the years, the oldest roots die off .
Important! The development of the root system is quite closely related to the phases of development and growth of the above-ground part.
The growth of the root part requires a large absorbing surface area. The lack of nutrient solutions, oxygen and lighting does not allow the plant to grow and develop effectively. As a result, aerial roots appear that resemble fantastic monsters.
In nature, they cover large areas along tree trunks, rocky ledges, etc., to increase the surface area for receiving nutrients and moisture. At home, in a cramped pot, they reach out to get what they need from the air .
Plant in nature
Under natural conditions, the plant is characterized by an epiphytic form of existence. It grows in gorges, on rocky soil, and is attached by branching shoots to trees and large plants, without parasitizing them.
The orchid makes up for the lack of nutrients from the environment thanks to its aerial root system:
- Such roots are thicker than underground ones and are processes of an oblong, rounded shape. Their surface contains a spongy layer of cells (velamen), which absorbs moisture and nutrients from the air.
- Under the velamen there is a vascular network that acts as a moisture storage device (transported to other parts of the plant).
Indoor orchids are adapted to home conditions; their root system is fed from the substrate (located under a layer of soil). Sometimes some of the roots may come out. This is considered the norm, but the appearance of the air shoots serves as an indicator of the health of the flower.
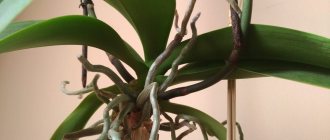
Aerial roots - normal or pathological?
The fact that they escape and stick out of the container is a natural process that does not pose a big threat. There is no pathology in this. The presence of aerial roots in epiphytic orchids is a natural and normal phenomenon.
They serve not only as a support for the aerial parts and a nutritional tool, but also actively participate in photosynthesis .
The main reasons for the “running away” of more than 3-4 roots : violation of the irrigation regime and the size of the growing container.
Other causes of root damage, elimination of consequences
Roots can dry out or rot not only from lack of moisture. Unfavorable health is often caused by diseases and pests. In this case, simple pruning will not help. Resuscitation should begin with replacing the substrate, since pathogens most often live in the cortex.
Sick roots need serious treatment and transplantation into a new substrate
Note!
A newly acquired orchid must be kept in quarantine for two weeks separately from other house plants. This is due to the fact that when purchased, the soil mixture in the pot may be contaminated. Then the infection will spread not only to “your” plant, but also to those nearby.
If an orchid that has been living with you for several years is sick, the first thing you need to do is replace the substrate. Before planting, the bark must be heat treated. You can pour boiling water over it and leave until it cools completely. Then repeat the procedure twice.
This will destroy pathogenic microorganisms and harmful insects if they are present in the substrate. Before planting, all dry and damaged roots must be removed and treated with medications.
Roots are alive or dead - how to determine?
Since roots are active participants in the process of photosynthesis, it is quite simple to determine their viability. Working, living roots have a bright emerald color , signaling their optimal functioning.
The green tint of the roots indicates the presence in their structure of chlorophyll or symbiotes that take an active part in photosynthesis.
Faded, light or gray color, wrinkling, shrinking indicates a malfunction. There may be several reasons for the non-working state. The main one is improper orchid care.
If, when immersed in water, the roots fill and absorb moisture , then vital activity is not impaired and with proper care they will quickly restore their functions.
Dead roots will not absorb moisture , and those affected by infections will have a soft, loose and slimy structure when pressed. In addition to being green, healthy roots have good density.
An example of dry orchid roots.
Transplantation - a solution to the problem of crowded containers
When is the best time to transplant a tropical beauty?
Any indoor plants periodically need replanting , and exotics, due to their capriciousness and special care, even more so. And although they have a negative attitude towards this procedure, a transplant is still necessary every 2-3 years. The optimal period for transplantation is spring, when the plant's growth processes are activated.
But often, to save a tropical beauty, drastic measures have to be taken at other times of the year. Such reasons are putrefactive processes inside the flower pot , withering and falling of leaves, instability of the plant in the container.
Recommendation! If the roots are crowded, they spoil the aesthetic appearance, but the exotic feels normal and there are no obvious signs of any disease, then the plant should not be disturbed until a planned transplant.
How not to harm the plant in the process?
In order not to harm the plant during the transplantation process, you should adhere to certain rules developed over the years by experienced gardeners:
- A couple of days before an emergency transplant, cut off the flower stalks to allow the plant to accumulate strength.
- The procedure for extracting the root part of the flower must be carried out carefully and consistently to avoid damage to the roots, which strongly intertwine fractions of bark and inert components.
- Trimming damaged roots and other parts is done only with a sharp, disinfected instrument . Moreover, each cut requires processing.
- The cut sites are treated with crushed activated carbon or other special preparations. After processing, long drying of the sections is required.
Orchid transplant.
Is it necessary to remove dry and rotten roots if they do not affect the health of the orchid?
The structure of orchid roots is very complex. Outwardly, they may look painful, have a white or yellow color, shrink and wrinkle, but the inside remains alive.
This happens due to dry air, applied fertilizers or other reasons. Therefore, you should not trim dry roots without checking them for absorption. It is worth putting them in warm water and if they absorb moisture, then they are quite healthy. Otherwise, they should be removed.
Rotten ones should also be checked for the spread of rot. And cut only to living tissue . It should be remembered that the cut sites need antiseptic treatment.
The process of transplanting a plant into a large container
The transplant procedure is performed carefully and sequentially:
- Having grabbed the rosette, the root part is removed from the pot along with the substrate . If it is difficult to remove, the container should be cut or broken so as not to damage the roots.
- Rinse the root ball well under running warm water to remove any remaining substrate. Carefully detach the adhering fractions of the bark from the roots. After washing the roots, conduct a visual inspection of their condition.
- Use a sharp, disinfected instrument to remove thread-like and rot-damaged roots . If the damage is not complete, cut off only the rotten part. Leave only healthy, green and elastic roots.
- For prevention, you can wash the root part in a weak solution of potassium permanganate .
- Treat the cut areas with activated charcoal or crushed cinnamon.
- Remove dried leaves. To do this, the leaf is cut lengthwise and each half is disconnected from the stem by twisting.
- The plant must be dried for 8-12 hours.
- The new container is selected 2-3 cm wider than the volume of the root part . The required number of drainage holes is made in it. Before planting, it should be washed in a soapy solution to disinfect.
- The treated and dried plant is planted according to the recommended instructions in a new high-quality substrate.
Step-by-step instructions: how to carry out the procedure correctly?
It is advisable to prune dead roots when your flower has already bloomed and is at rest. But there are times when replanting a plant and pruning putrefactive formations is urgently necessary. Then you have to choose between blooming and saving the flower.
So, you've decided to trim. If the orchid is in bloom, then first of all you need to remove the peduncle. Alas! Beautiful flowers will have to be sacrificed.
This must be done so that the flower’s forces are switched to the creation and growth of a new healthy root system.
Preparing tools
To remove infected and dry roots, you need to prepare the following tools and devices::
- Knife (scissors, pruning shears) .
They must be well sharpened so that unnecessary roots are removed in one motion. It is not advisable to use nail scissors for this procedure. They are too small and can cause irreparable harm to the plant. - Antiseptic agent for disinfection of instruments . In the absence of such, burning the instrument with fire is allowed.
- Medical rubber gloves . They are necessary not only to protect your hands, but also to prevent substances on the skin of your hands that are unnecessary for the plant from getting onto the cut plant.
- Powdered activated carbon (if unavailable, can be replaced with charcoal). It will protect fresh cuts from drying out and infections.
- Oilcloth and a new pot (if the old pot is the right size for your orchid, you can use it after treating it with an antiseptic).
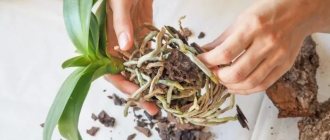
Search for roots
- First you need to carefully remove the orchid from the pot, being careful not to damage the root system. This is easiest to do when the soil is dry.
- Then shake the roots off the soil. If that doesn’t work, carefully untangle the roots with your hands and remove excess substrate.
- Let's move on to inspecting the root system.
Rotten roots are immediately visible; they acquire a peculiar brownish color and are characterized by excessive moisture. We check dried roots with water to see if they are capable of further life. If not, feel free to classify them as circumcised.
So, we have identified the roots that need to be removed.
Process
- Cover the table with oilcloth.
- Wear rubber gloves.
- Treat instruments with an antiseptic.
- Cut off damaged roots with a knife:
- If the rot is located only in the lower part of the root, only the affected area needs to be cut off.
- If the root has rotted at the base of the flower, it is cut off completely.
- Treat the sections with an antiseptic.
How to treat the damaged area?
A cut for a plant is like a wound for a person. Through it, the flower can become infected. Therefore, processing the cut is a mandatory procedure when cutting roots. There are several ways to process slices :
- Crush the activated carbon tablet into powder and sprinkle on the cut area.
- You can do the same with charcoal.
- A good anti-rot agent is sphagnum moss. It must be crushed and applied to the cut site.
- Manganese solution. Process the cut area.
- Zelenka. Process the cut area.
- Ground cinnamon is an excellent fungicidal agent for treating orchid cuttings.
Do not treat cut areas on orchid roots with vodka or alcohol. They can dry out healthy roots.
After the cut areas of the orchid have been treated, a vitamin compress can be applied to the exotic roots. To do this, dilute 1 ampoule of vitamins B12, B1, B6 in 1 liter of water. Place the roots of the flower in this solution and keep them there for 10-15 minutes.
Is it possible to cut off roots that have come out of the pot?
Aerial roots of orchids are a modified version of the root system, located in the above-ground part of the plant and performing various functions. Basically, this is the extraction of food, moisture and as a supporting part .
Only diseased roots are partially or completely cut off. Healthy ones should not be removed , even if they spoil the appearance or there are too many of them. A large number of them are due to improper care.
Advice! The absence or long-term non-appearance of young aerial roots indicates an adjustment in the frequency of watering. A large number of them (more than 7-8) indicates a reduction in the frequency of watering.
Poor watering
Both insufficient and excessive watering can also cause roots to grow upward. If the air is saturated with moisture and the soil is dry, the orchid will release aerial roots in order to obtain the missing moisture.
Excessive irrigation provokes a lack of oxygen, the growth of pathogenic fungi and rotting of the root system. In this case, the roots also come out of the pot.
It is considered optimal to water the flower 2-3 times a week in the summer and once every 10 days in the winter. The air temperature in the room should be within +20-25 degrees.
An important condition for growing is to carry out the next watering after the substrate has completely dried. This sign is an indicator that the soil can be moistened.
The pot in which the plant is grown should be placed in a tray. 5 minutes after watering, the water from the pan must be drained, otherwise pathogenic microorganisms may appear in the substrate.
What to do with roots that come out:
From the bottom of the pot, from the holes in the container
Sometimes roots grow into drainage holes. Experienced gardeners do not recommend cutting them or taking any action before transplanting. If the orha blooms, then wait for the end of flowering and transplant it into a large container .
The best option is to ensure the safety of the roots and wait for a planned or unscheduled replanting immediately after flowering. If it does not bloom, then it is advisable to replant it.
From the pot on top
Numerous flow of roots on top of the substrate or their growth only upward is generally normal.
To prevent this from happening, you should plant it in a high-quality substrate with the right components and ensure proper watering with high-quality water. Usually the roots strive upward for food, which they are not given inside the pot . Or alkalization, salinity of the substrate or its compaction has occurred.
The first reason is waterlogging.
If watering is abundant and a lot of moisture accumulates in the pot, the orchid begins to abundantly grow roots directed outward. In this case, their task is to increase the area of evaporation and remove excess liquid in order to prevent the onset of rotting.
Excessive humidification at low indoor temperatures is especially dangerous.
To stop the growth of aerial roots in this case, you need to reduce watering and place the flower pot in a warm, well-lit place. It should be borne in mind that the orchid does not tolerate direct sunlight.