Pros and cons of this landing
Baskets for planting bulbous flowers are plastic containers with a mesh at the bottom. There are cutouts along the walls, in some cases they are also made of mesh. As a rule, the diameter of the containers does not exceed half a meter. Such baskets are purchased at gardening stores. Growing tulips in baskets has both pros and cons.
Advantages:
- When digging up the bulbs after flowering, there is no need to remove them from the ground; the containers can be removed from the soil without any problems, and the tubers remain undamaged.
- When grown in open ground, tulip bulbs go deep into the ground and in order to find them, you need to dig up the flowerbed, which is inconvenient if other flowers are planted nearby.
- Since tulips need slightly alkaline sandy loam soil for full development and decorative appearance, it is much easier to provide such a composition in a compact container than in a whole flowerbed.
- Rodents love tulip bulbs, but in baskets they will not be able to get to them.
This method has few disadvantages, but they still exist:
- As the bulbs grow, they become crowded, which negatively affects the size of the buds.
- A flower bed with baskets does not look as decorative as when planting flowers naturally.
How to plant tulips. Planting tulips in spring
Tulips are most often planted in autumn. During the winter, plants manage to accumulate enough strength for spring flowering. But what to do if tulip bulbs appear in the spring?
Using the tips from our article, you will learn how to plant tulips in the spring so that they bloom immediately.
How to plant tulips in spring
It is believed that it is better to plant tulips in the fall, since in this case the plants will have time to acclimatize in a new place before spring and will bloom early.
However, planting plants in the ground in the spring is also possible. In this case, the buds will appear later, but such technology will not affect the development of plants in any way.
It is worth considering that spring planting has some features:
- It is advisable to harden the raw materials for planting by placing them in the refrigerator for 12 hours;
- Before planting, it is advisable to wash them in a weak solution of potassium permanganate to increase viability and disinfection;
- Planting is carried out only in heated soil, so that the plants quickly take root in the new place.
It is important to choose the right location if you are going to plant tulips in the spring so that they bloom. To do this, choose a place that is well-lit and protected from the wind. This will accelerate the growth of the crop and provoke earlier flowering. Examples of flower bed placement are shown in Figure 1.
Figure 1. Options for the location of the flower bed on the site
It is also not recommended to place the flower bed in areas with close groundwater. The roots of the plant penetrate quite deeply into the soil, and excessive moisture can cause rotting of the underground parts of the plants.
How to prepare bulbs for planting in spring
If you are interested in how to plant tulips in the spring, you should know that proper preparation of planting material plays a key role in early flowering.
There are certain measures that will help harden the material and speed up its germination (Figure 2):
- At night, the planting material is placed in the vegetable drawer at the bottom of the refrigerator. The temperature in it reaches +4 degrees, which allows you to strengthen the bulbs and make them more viable.
- After this, they are dipped in a light pink solution of potassium permanganate for 30 minutes to prevent the development of diseases and pest damage.
- Before planting, all specimens are cleaned of the upper hard husk and carefully inspected for damage.
The best varieties of tulips for planting in baskets
Before you start planting, it is worth finding out which varieties of tulips are best suited for this growing method.
As a rule, experienced gardeners prefer the following varieties:
- White Prince with snow-white buds on long stems and strong peduncles.
- Sunny Prince with bright yellow bud petals.
- Pearl Prince with purple flowers.
- Monte Carlo, which belongs to the terry varieties and has a rich yellow tone.
- Ice Cream, characterized by creamy pink shades and reminiscent of a peony flower in bloom.
- Khavran, which has a tall and strong stem on which there is a flower of a rich purple tone.
- Long Lady, which has petals with yellow-pink tints.
When planting tulips, varieties with the same flowering period are selected.
Selecting container and soil
When starting planting, first select suitable strong containers and prepare the soil with the recommended composition.
If you plan to plant several specimens in a limited area, take a wide basket. Plastic boxes with holes to prevent water from stagnating are sold in agricultural stores. If it is not possible to purchase suitable containers, take a regular plastic container and use a soldering iron to make small holes at the bottom for liquid drainage.
See also
Description of the hybrid peony variety Bartzella, planting and care rules
Read
Tulips prefer loamy soil with a slightly alkaline reaction. If there is soil on the site in which these primroses have already grown and developed well, you can take it from there. Since the previous plants have already taken most of the nutrients from the soil, compost is added as a fertilizer. Also, suitable soil for growing tulips can be purchased at a flower shop; it should be marked “for bulbous flowers.”
How to choose a container
To start growing tulips, you need to select a container in which you will plant the bulbs. Try to choose containers and baskets that are not the smallest sizes so that the plant does not lack space for development. This should be done based on the quantity and size of planting material. The larger your bulbs, the larger the basket or container you will need. This will have a positive effect on the health and appearance of the future flower.
Often they use ordinary plastic boxes with holes formed in them. The only drawback is their size. It is not always possible to place them in a convenient place.
Instead of a basket or box, you can take a very ordinary mesh. It needs to be placed in the ground, and flowers should be planted on top. This option is not always convenient to use due to the fact that mice can chew on the mesh.
The best solution would be to contact flower shops, where you can buy ready-made containers for your flower beds.
Plastic containers
It cannot be said that planting tulips in containers in the fall is very different in technology from planting in open ground. To plant bulbs, you need to select better ones, treat them with manganese solution and prepare the planting site.
How to plant tulips in containers in the fall: they should be rectangular and their walls smooth. If you choose a container with sharp corners, this will not only complicate the maintenance process, but may also cause damage to the root system.
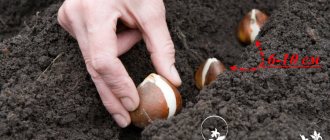
First, dig a hole so that its shape matches the size and shape of the container. After this, the container is immersed in the planting hole. A little sand is poured into the bottom of the container for better air exchange. The bulbs are laid on top of it and gently pressed into the soil.
The planting pattern will depend on how large the seed you selected. Large varieties should be planted at a distance of 30 cm. Medium bulbs are planted at a distance of 10 cm. If the seeds are small, then the distance between them can be no more than 5 cm. When you finish pressing the seed, cover it with soil.
Tulips prefer to grow in loamy or chernozem soils. To protect the area from freezing, you can mulch using humus or peat. The layer of such flooring should be 3 cm.
Flower pot
If you notice that shoots have appeared on the bulbs, and severe frosts do not allow planting in open ground, there is only one practical solution - planting in pots. This should be done in November or December.
Tulips are often planted in a pot at home. Typically this option is used when:
- a person wants to see a tulip bloom in winter;
- already sprouted bulbs disappear and have to be rescued.
To plant a quality plant, follow simple steps.
- Prepare the soil: take a soil base that needs to be mixed with additives (humus, perlite). This is done so that your plant is 100% rooted.
- Select and disinfect the most lively bulbs.
- Plant some flowers. Distribute the seeds in the pot depending on its size. You can experiment and plant several species in a large pot.
- The final step will be to place the pot of tulips in a cool place.
An important point after planting will be proper care. To prevent the flowers from disappearing, they will have to be kept in a cold room all winter. The calculation is that as soon as the tulips are warm, they will immediately germinate and bloom. Plants are not watered often, and the soil is not over-moistened to avoid root rot.
Double drawer
The double box method allows plants to overwinter without being exposed to freezing temperatures. To do this you will need several tools:
- boxes measuring 60x10x10 cm and 80x20x20 cm. It is better if they are made of fiber cement;
- expanded clay is an ideal ingredient for drainage;
- land for planting. It is better to choose nutritious soils that consist of loam or black soil;
- canvas made of waterproof fabric will protect containers from rainy weather;
- film;
- spruce branches;
- Styrofoam and tulip bulbs.
The timing of planting tulips in boxes in the middle zone of the country is within mid-September or its end.
The boxes should have 5 cm of expanded clay, which will serve as a drainage system. It is important to do this so that it does not mix with the soil. Pour nutritious soil on top, the height of such a layer should be at least 5 cm. Stick the bulbs inside so as not to damage the shoots on them. After this, 5 cm of soil is poured again and compacted.
The second box must be completely wrapped in polyethylene film and filled with styrofoam granules. A smaller container is placed in the second, and the distance between the boxes (walls) is filled with the same granules. Before frost sets in, it is necessary to water the soil regularly. As soon as the temperature is below zero, cover the plantings with spruce branches. In spring, the shelter is removed so as not to provoke root rot.
Preparing the bulb
Before starting work, the bulbs are sorted, rejecting specimens with traces of disease and damage. In a compact container, infections and fungi develop quickly and affect plants, so it is better to throw away such bulbs.
As a preventive measure, it is recommended to soak the tubers for 15 minutes in any fungicide solution, for example, Fitosporin, diluting it according to the instructions on the package.
Soil for bulbs in a container
Pour loose soil into containers, preferably purchased soil, since it is already disinfected and there are no pests in it. When preparing the substrate yourself, it is mixed with perlite, perliculite, sand, coconut fiber (if possible). In such soil, water does not retain and there is air access to the roots. The root system will take nutrients from humus and dry fertilizers, which are applied as top dressing according to the instructions.
Working with planting material
Before planting, diseased and damaged bulbs are discarded, then the planting material is disinfected with a weak solution of potassium permanganate or a special preparation from a flower shop, for example, Fitosporin.
Schemes and methods
There are several ways to plant tulips in baskets in your garden. With the help of pre-thought-out schemes, you can create a spectacular landscape design at your dacha.
Traditional
The easiest way to plant plants on your site:
- Recesses are made in the ground, corresponding in volume to the size of the basket.
- The container is immersed in the ground, and a little river sand is poured onto its bottom.
- The bulbs are placed on top and sprinkled with prepared soil.
- After the tulips rise in the spring, they are provided with proper care.
Patterns
Before starting work, planting primroses in patterns, it is necessary to apply markings. This is done using pegs and ropes. After the markings are applied, the lawn is removed and the tulips are planted in the same way as with the traditional method.
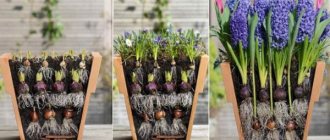
Multi-level
For this planting method, you need to purchase round containers.
Algorithm of actions:
- Prepared soil is poured into the bottom of the basket, and the largest tubers are placed on top.
- Again there is a layer of soil on top.
- Small specimens are laid out on it and covered with soil to the very edge of the container.
- The baskets are placed in holes of a suitable size so that 5 cm of the container is visible above the ground level.
The advantage of this method is that when winter comes, tulips do not need to be dug up from the flowerbed; they overwinter well when planted in a multi-level manner.
How to care for a plant
After the first shoots appear from the ground in the spring, the plants are provided with competent agrotechnical care.
See also
Top 10 products and rules for treating tulips in the fall before planting
Read
Watering and adding nutrients
It is necessary to irrigate flower beds with tulips regularly, but avoid waterlogging. Dry crust on the ground also negatively affects plant development. The procedure is carried out once a week, using 10 liters of water per square meter of plantings.
The first application of nutritional components is carried out as soon as the tulips emerge from the ground. At this stage, crops need compounds with a high nitrogen content for rapid growth and expansion of green mass. Use nitroammophoska or crystallin with the addition of trace elements.
Expert opinion
Zarechny Maxim Valerievich
Agronomist with 12 years of experience. Our best country expert.
Ask a Question
After 2-3 leaves are formed, complex mineral fertilizer is applied. At the budding stage, plants must be fed with phosphorus and potassium, and nitrogen is excluded from the fertilizer composition. The last fertilizing is carried out with mineral fertilizers during the flowering period of tulips.
Preventative treatments
To prevent diseases and pests from affecting tulips, preventive treatments are carried out. Before being sent for storage, the bulbs are kept in any fungicidal preparation or potassium permanganate. Other preventive measures include:
- Maintaining crop rotation.
- Avoiding excess nitrogen in the soil.
- Treating the soil with fungicides before planting flowers.
- Preventing planting density.
- Regular weeding and destruction of infected specimens.
- Storing bulbs in cool rooms with low humidity.
Trimming
You cannot trim tulip foliage and stems immediately after flowering, as they contain nutritional components that the bulbs need for storage. The procedure is carried out when 2/3 of the stem turns yellow.
Shelter in winter
Before winter frosts, tulip bulbs must be insulated. The type of shelter depends on the growing region. In the southern regions, it is enough to throw a layer of dry foliage on top, and in the northern regions they are additionally covered with spruce branches and any natural material. With the arrival of the first warm days, the insulation is removed so that the bulbs do not rot.
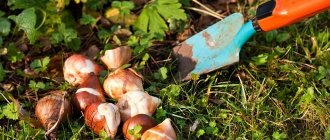
Digging and storing bulbs
Tulips are dug up every year. Exceptions are baby bulbs, which remain in the ground for 2 years. Why is this needed: diseased specimens are discarded, appearance improves (flowers become larger), and the ability to produce children increases.
There are a number of rules for when and how excavation is carried out:
- Don’t miss the moment: you need to dig up tulips when the leaf is 2/3 dry. If you get the bulb early, it will not have time to accumulate the required supply for subsequent flowering. Late extraction is fraught with the risk that the maternal part will go deeper underground, and the children will separate from it. There is a high probability of missing or damaging planting material.
- Arm yourself with a bayonet shovel: you should stick it deep and with a “margin” around the edges so as not to damage the flowers.
- Change the bed every 3 years.
Now let’s learn more about how to store tulips before planting in the fall. The resulting nests must be divided, freed from husks, roots, and leaf residues. Then they are washed (if necessary), treated with antifungal treatment and dried. Before putting planting material into boxes, it is necessary to sort it by variety and sorting. Remove diseased specimens.
Successful planting of tulips in the ground in autumn depends on maintaining temperature and humidity conditions. The bulbs are stored in boxes without a lid, arranged in 2-3 layers. They need to be inspected periodically to remove rotting specimens. The storage temperature is gradually reduced: in July it is 23-25°, in August – 20°, in September – 17°. Failure to comply with temperature limits leads to the appearance of blind shoots on which a flower does not form.
If during the inspection you find rot or mold, you can try to save the tulips. If the mold spread is small, remove it with a dry cloth and sprinkle with ash. If the rotting is deep, cut off the affected part with a knife. Sprinkle the cut with ash or lubricate it with brilliant green.
Video “How to dig up and store tulips after flowering”
Analogs of baskets for bulbs
If the store does not have baskets for planting tulips, use containers that are in every home.
Pots
Holes are made in ordinary plastic pots to drain water and used for planting tulip bulbs.
Bottles
You can make containers for flowers with your own hands:
- Take a plastic bottle with a volume of 5 liters.
- Use a sharp knife to cut off one of the side parts.
- On the other, rectangular holes are made.
- Holes are cut out in a checkerboard pattern at the bottom of the bottle.
Grids
Nets are also used for planting tulip bulbs. They are laid out along the walls of the pit, sand is poured onto the bottom, bulbs are placed on top and covered with prepared soil. The disadvantage of this method is that the mesh can be damaged by rodents.
Containers
Containers with holes are an ideal replacement for baskets. In them, plants receive enough air and nutrients, and the liquid does not stagnate after watering.