Selection and preparation of fruits
When choosing fruits for harvesting, you need to pay attention to:
- plum quality. The shelf life of fresh prunes is much longer;
- there should be no traces of disease on the plum skin;
- do not choose soft, “pliable” plums.
Preparation comes down to thoroughly washing the fruit. This will remove debris and insects, which will have a positive effect on the taste and shelf life of the final product.
Why dry plums yourself?
Store-bought prunes are often treated with sulfur and other preservatives to preserve the fruit's best color and last longer. Sulfur can cause headaches, nausea, vomiting and diarrhea in sensitive people. In addition, it is a real vitamin B1 killer.
Therefore, it is always safer to dry plums yourself, using a special dryer (dehydrator) or a conventional oven. Only in this case will you get a guaranteed natural product without any additives. Usually, the result is very good, even with the most inexpensive dryer models.
It is believed that real prunes are not obtained from any plum, but only from special varieties - Italian Hungarian, Domestic Hungarian, Vengerka-Pokrovka, Renklod. There is nothing stopping owners of plums of other varieties from also drying their fruit. The result will be not quite the usual store-bought prunes, but completely natural.
Drying plums ensures the safety of fruits and saves space for their storage. When dried, a bucket of fresh plums will turn into a couple of cans of prunes. And they can easily find a place, even in limited space. Besides this, there is another reason for preparing homemade prunes.
Storage conditions and rules
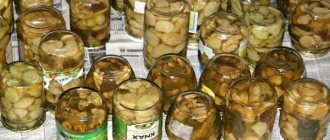
Dried plums must be stored in an airtight, sterilized container. It is advisable to put the container in a cool place. If these conditions are met, the shelf life of prunes is up to 6 months.
Note! Don’t be lazy to check the condition of your supplies from time to time, removing spoiled slices.
How to choose the right plum variety for drying
Before you start harvesting dried plums, you need to learn the specifics of how to make prunes at home correctly and what varieties of plums are suitable for this. After all, not all fruits are suitable for harvesting of this type.
The variety of fruit needs to be given great attention. To do this, you will need fruits of varieties that ripen last. Such a plum will be fleshy and sweet.
If you understand the varieties or have the opportunity to ask those who do, then choose Hungarian (Italian, ordinary, Azhan, purple), Renclod, Raisin-Erik, Stanley, Cromagne and Burton.
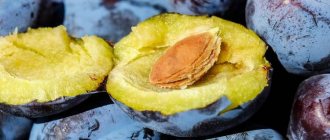
Hungarian is best suited because its fruits are large, have a dense skin, and the flesh is elastic. The stone is easily separated from the pulp, there is little acid in it, but a lot of sweetness.
3Homemade sugar prunes
This recipe is only suitable for plums that are pitted well. Hungarian is good and can be taken even slightly unripe.
- Cut large plums lengthwise into two parts and remove the pits. Weigh the halves - you will need 3 kg of them.
- Place all the plums in a wide bowl in layers, sprinkling each with granulated sugar. Take exactly 1 kg of sugar. Place the plums cut side up - this way they will quickly begin to interact with the sugar.
- Let the plums stand for 10-12 hours to release their juice.
- Place a bowl of plum halves in sugar syrup over very low heat and wait until the whole mass boils. Cook for no more than five minutes. Make sure that the plums do not boil, but rather simmer in sugar syrup. With such gentle heat treatment, the plum halves will completely retain their shape.
- Turn off the heat and let the whole halves cool directly in the syrup.
- Place the cooled halves on a sieve to drain the syrup. In the future, you can use this syrup to cook jelly or, for example, to serve it with pancakes.
- Place the sweet plum halves in a single layer on baking sheets lined with baking paper.
- Place the baking sheets in the oven at 40 degrees. Dry the plums for 2 hours with the door slightly open.
- Increase the oven temperature to 60 and dry the plums for another 2 hours. Don't forget that you don't need to close the oven tightly.
- Let the plums cool right in the oven, and then remove the baking sheets from it. Stir the plums until they come off the paper.
- Place the baking sheets on the windowsill, but if there is no sun on it. You can place it in another suitable place.
- Cover the plums with gauze and dry them until they are internally elastic and have a hard top layer for 20-24 hours.
- Place the finished plums in small paper bags. In turn, put them in plastic bags and, in double packaging, send the sugar prunes to the freezer.
- Remove prunes from the refrigerator as needed and keep them in a warm kitchen for 1 hour before eating. During this time, the dried halves will soften and look as if they had just been cooked.
In this video you will see how to prepare homemade prunes from varieties that seem to be not suitable for this preparation at all.
How to prepare plums for drying
Now the plum needs to be prepared for the drying process, let's look at how to make prunes at home.
It is important that the process of storing fruits is not delayed for more than 3 days, since ripe plums will begin to deteriorate and ferment.
The plum must be thoroughly washed. You need to rinse until the water becomes clear.
Fruits must be sorted by size, since their cooking time depends on this. You also need to remove the seeds.
Also, before making prunes at home, you need to blanch the plums in a 1% soda solution. In other words, run hot water and baking soda over them for 25-30 seconds. This is necessary so that the tissues of the plums become softer, and their cells become larger, and so that the fruit is deprived of excess air. Next, the plum must be thoroughly rinsed again.
At the last stage, the fruits will need to be cooled. After you have completed all these processes, you will see small cracks in the skin. This is correct, since they will promote the release of water during drying, the juice will remain inside.
How to make prunes in an electric dryer
For the preparation of dried fruits, special equipment was recently invented - an electric dryer.
This device can be used for preparing not only prunes, but also for drying any other fruits and vegetables. Before making prunes in an electric dryer, you need to arrange the fruits on the bowls so that they do not touch or overlap each other.
Depending on the type of equipment, up to 600 grams of plums can be placed on the tray, and the dryer can be designed for different volumes, for example, 14 kg. In total, the electric dryer must be turned on for 41 hours until the prunes are completely cooked. The processing temperature will be 55 degrees Celsius.
After cooking, the finished product is easy to separate from the trays, they are well dried and ready for use. From 16 kilograms of plums you can get about 2.5 kilograms of prunes.
How to make prunes in the oven
A more popular method of cooking prunes is in the oven. You don't need any special equipment for this. And the process itself is different from how to make prunes in a dryer.
You need to spread the plums on a baking sheet in one layer. The temperature regime for this is also selected in the range of 50-55 degrees at the initial stage. The plum will need to dry for 3-4 hours.
After the first interval, you need to take out a baking sheet, turn all the fruits over to the other side and give them time to cool (for 4-5 hours, in order for the product to be of high quality).
The next stage will also take 3-4 hours, but the drying temperature will now be higher - 60-70 degrees. After the specified time has passed, the prunes must be taken out again, mixed and left to cool.
The last stage will take at least 5 hours. Prunes will need to be dried at a temperature of 90 degrees. To obtain a shiny surface at the end of drying, you can raise the temperature to 100-120 degrees.
Thus, the question of how to make prunes has been resolved. The procedure is simple and does not require special knowledge, but only time and a little patience.
How to dry plums at home in the sun
The simplest and, by the way, ancient way of drying fruits is with the help of sunlight. When there was no electricity or gas, everything was dried in the sun. But, despite its simplicity, this method has its own rules.
And you need to start, naturally, with the fruits themselves. The plums must be sorted, rejecting all the rotten ones and even those with signs of rot.
After this, you need to wash it well and, dividing it in half, remove the bone from it.
You can, of course, dry it entirely, but then all this will last quite a long time, and it’s not a fact that it will dry as it should.
Next, you will need sheets of cardboard or newspaper, boxes or pallets, baking trays, in general, everything where the fruits can be laid out to dry. The plum is laid out with the cut part up, and then taken out into the sun. Or first you spread cardboard or paper in the sun, and then lay the plum on it. If you have a large flat roof area, this would be an ideal option for drying.
When night falls, or if it starts to rain, you can bring the dryer into the house. To ensure uniform drying and to prevent the plum from becoming damp, turn it over every two days.
If the weather is good, sunny, without precipitation, drying only takes about a week. However, readiness must be checked by touch. The plum should be elastic, and when pressing on it, no juice should be released!
In general, for drying it is better to choose fruits that are not watery, but with strong pulp. Experienced gardeners recommend using varieties such as “Hungarian” or “Renklod”.
In order for the plum to dry better, you can blanch it. What does it mean? A weak solution of soda is made (approximately 0.1%), into which the plum is immersed for a few minutes. After this, it is washed with cold water and only then dried. During blanching, the skin of the fruit becomes covered with cracks, which accelerates the process of evaporation of moisture from it.
Storing dried plums
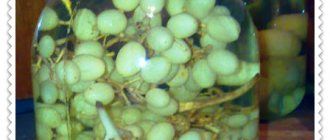
After drying, I transfer the plums into prepared jars. I use glass jars that I previously sterilized in the oven for 15 minutes at +120C.
After the plums have been distributed into the jars, they need to be filled with hot vegetable oil. I take a ladle and pour about 300 ml of sunflower oil into it. Today I will have budget plums. But you can also use olive oil.
Now you need to heat this oil to a temperature of 65-70C. But it is very important not to heat the oil to a boil. Otherwise, if you pour boiling oil over the plums, they will simply cook in it.
Then close the jars with lids and leave on the counter until completely cooled. And then put the jars of dried plums in the refrigerator.
I store dried plums in the oven in the refrigerator at a temperature of +3-4C not only all winter, but all year!
They are really very tasty, so be sure to cook them. I wish you good luck and see you again! See you soon!
History of Prune Preparation
When a person first came up with the idea of drying a finished plum in the sun, no one can reliably say, but the fact that this was done many years ago is a fact. Historical documents indicate the characteristics of prunes, and they date back to the 6th century BC.
Everyone knows that sweet plums are used to make zakatka - prunes. To do this, it is washed and dried in the sun. If weather conditions cannot ensure a normal process, this can also be done in a stove or oven. When the oven is used, the prunes become especially tastier, with a better aroma, largely due to the smoldering wood.
Much to the regret of consumers, not all manufacturers adhere to the correct technology for preparing prunes. Today it is possible to achieve the maximum possible result with the help of liquid smoke and other chemicals. That is why it is recommended to prepare the fresh product at home so that you can eat your own prunes all year round.
Natural drying of prunes
As the starting raw material for producing prunes, it is recommended to choose plum varieties with large dark-colored fruits, a sweet taste and an easily separated pit, for example “Ugorka”, “Tragedy”, “Vengerka Vanheima” or “Hungarian Azhanskaya”.
To prepare 1 kg of prunes, you will need to take 4.5 kg of fully ripened, dense fruits. The process of harvesting prunes is carried out in several ways - in natural conditions, in the oven and in an electric dryer. It will take 8-10 days to harvest prunes using the natural method. The process itself includes several stages:
- Preparation. Before laying out for drying, the stems of the plums selected for harvesting are removed, then they are washed and divided into halves. Place on wooden trays in one layer, cut side up, at some distance from each other.
- Drying in the sun. To carry it out, trays with plums are taken out into the air and placed in the sun. Cover with gauze to prevent insects and leave for about 5 days. To prevent mold from forming on them during this time, the fruits must be turned several times daily.
- Drying in the shade. Already dried plums should be transferred to a shaded place and kept there for about 3-4 days.
Advice. Preparing prunes will go faster if you blanch the fruits first by dipping 1 tbsp in boiling water and soda for a minute. soda per 1 liter of water, and then, after removing, rinse with cold water. The cracks that form on the plum skin will allow the pulp to dry out faster.