Loading…
Loading…
Forest sphagnum moss (from the Greek “sponge”) is a type of marshy plant that actively absorbs and retains water throughout its green mass. Dried sphagnum moss is an environmentally friendly material that is used in construction, floriculture, pharmacology, and veterinary medicine. Overheating, the lower layers eventually turn into peat, forming a natural nutritious sponge. It is this feature that is valued by flower growers.
Forest sphagnum moss is actively used when growing phalaenopsis, mixing the dried plant with the bark. Young plants and cuttings are rooted in it.
How to grow moss at home: tips, subtleties, secrets
Not everyone likes to tinker with indoor plants. Not everyone has a talent for this, and the flowers die before they have time to take root. However, without greenery, the window sills look lonely and the interior looks boring. And if you share this point of view, you should find out how to grow moss at home. It does not cause allergies, is very unpretentious, resistant to the vast majority of diseases and pests, and does not require fertilizers, pruning or hilling. You can also create wonderful mini-landscapes and amazing compositions with it.
Types of moss
There are a huge variety of types of moss. But they are all united by the lack of a root system and flowers. Green pads need very little to grow: moisture and diffused light. Many people believe that moss causes allergies. However, this opinion is erroneous, as people often confuse moss and mold. Therefore, if you want to decorate your apartment, garden, aquarium or vegetable garden with a beautiful green carpet, then you should not deny yourself this. Bryophyte will not cause any harm, as it is a full-fledged ornamental plant.
How to grow moss at home: basic principles
Before you start breeding mosses, you need to understand their needs and needs. First, mosses growing on trees will not survive on rock or soil, and vice versa. So you need to place the brought “shred” on a suitable base.
Secondly, mosses need diffused and indirect light. If the sun shines on them only in the mornings or evenings, the mosses will delight you with their bright colors. But the midday rays will make the moss pale, dull, and may even completely destroy it.
Thirdly, the source of planting material is important. Before asking yourself how to grow moss at home, ask specialty stores if they sell it. This way you will definitely be dealing with healthy specimens and will not infect any existing plants at home. If there is no moss on sale, go to the forest. Just clearly remember what came from where, and remove the moss with a layer of turf.
Landing
It must be taken as seriously as possible, since it is unrealistic to grow moss at home that was initially placed incorrectly. Any vessel can be used for plantation. But it will look most impressive in a glass bowl, rounded vase or spherical aquarium. In addition, it is easier to create and maintain the desired microclimate in such containers.
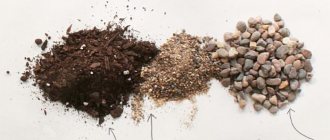
To make moss feel comfortable at home, small expanded clay or washed pebbles are poured into the bottom of the vessel. Granulated coal is placed on top of the drainage, and the substrate is placed on it. For soil, take one that is intended for epiphytes and marsh plants, then the mosses will settle in faster. A landscape is formed on the ground and moss is laid out, with light pressure from above. After the landscape is formed, it is watered abundantly to stimulate survival.
The moss composition does not require special attention. But only after the “greenery” takes root. Therefore, the main subtlety of how to grow sphagnum moss at home is to provide it with abundant moisture at first, and then maintain this at a constant average level. The pads should be sprayed daily for a week or two, while monitoring to ensure there is no flooding effect. Condensation should form on the walls of the vessel only in the morning. If the moss covering begins to darken, it means that the intensity of watering needs to be reduced. When the mosses begin to grow, spraying is carried out less frequently, once every three or even five days.
Growing moss at home may also involve fighting mold at the first stage. It usually appears if the “rugs” were not brought from the store. In this case, problem areas are treated with phytosporin. Although some moss growers believe that the plantings themselves will cope with this scourge. But it seems to us that it is better to help them: the moss is weakened until it fully adapts, and it does not need additional stress and load.
If you created an installation in an open flowerpot, then you need to spray the moss daily. Otherwise, it will quickly dry out and lose its decorative effect.
Care
The moss composition does not require special attention. But only after the “greenery” takes root. Therefore, the main subtlety of how to grow sphagnum moss at home is to provide it with abundant moisture at first, and then maintain this at a constant average level. The pads should be sprayed daily for a week or two, while monitoring to ensure there is no flooding effect. Condensation should form on the walls of the vessel only in the morning. If the moss covering begins to darken, it means that the intensity of watering needs to be reduced. When the mosses begin to grow, spraying is carried out less frequently, once every three or even five days.
Growing moss at home may also involve fighting mold at the first stage. It usually appears if the “rugs” were not brought from the store. In this case, problem areas are treated with phytosporin. Although some moss growers believe that the plantings themselves will cope with this scourge. But it seems to us that it is better to help them: the moss is weakened until it fully adapts, and it does not need additional stress and load.
If you created an installation in an open flowerpot, then you need to spray the moss daily. Otherwise, it will quickly dry out and lose its decorative effect.
Moss in the garden
The situation is much simpler with the cultivation of moss cover in the open air. Here you don’t have to painstakingly create the necessary conditions and plant pads. You need to get a sufficient piece of moss, healthy, without dried or suspicious areas. Two glasses of water and milk are loaded into the blender, plus extraction from the forest. Having obtained a cocktail consistency, you “paint” the intended area with this composition. Thanks to milk, moss takes root over the entire treated surface with a probability of 90-95 percent.
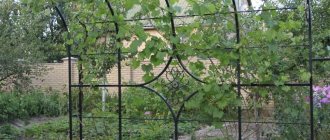
With some hard work and expressed artistic talent, your fence, house wall or rock garden can become a real work of art. Your immediate task will only include regular watering of the “picture” until the moss is firmly established in the territory provided to it.
Stages of planting and growing
To plant, you will first need the moss itself. It can be obtained in the forest, in a store or in the yard. Any species growing in your area can be used as planting material. The taken plant can be either dried or alive. Next, begin preparations for planting:
- two glasses of water along with two glasses of milk are poured into a blender;
- Moss is placed on top of the milk and water;
- Whisk all ingredients well. The resulting mixture should resemble a milkshake.
This mixture can be applied to trees, fences or even foundations.
It is advisable to plant in rainy weather. This advice is especially relevant when landing on the ground. The plant must be carefully placed on the ground (pressing is prohibited), and then soaked in a special nutrient medium. This medium is made from fermented kefir and unfiltered beer. When the soil is saturated with an acidic environment, cover the plant with film. In these conditions, that is, under the film, it should remain until it sticks to the ground.
In addition to soil and trees, moss is planted on stones.
How to grow moss on a rock? To plant on stone, you will need to create a special paste mixture. Mix two glasses of yogurt with a glass of chopped plant. The resulting mixture is applied to the stones by hand or using brushes. The surface of the stone for planting should be rough. Next, the stones are watered with water and covered with earth.
How to care for plants?
Caring for planted plants involves monitoring the process of their growth. They need daily watering. They should be watered at least once a day for three weeks. At the same time, monitor their condition after watering. If the plant begins to turn yellow, it means that it needs to be watered not once a day, but two or even three times. Also, do not forget to maintain humid air under the film. To do this, spray the plants with water. A humid environment is an ideal condition for the successful growth of planted plants, including garden ones.
-2
( 21 ratings, average: 3.90 out of 5)
Back
About dry toilets and their features (peat, chemical, electric)
MORE
Fundamental Principles
Mosses, or bryophytes, are higher plants without a root and vascular system. They appeared more than 400 million years ago; they do not grow only in deserts and semi-deserts due to the lack of water there. Accordingly, the first condition for growing a plant is a sufficient amount of moisture. Water also serves as a source of nutrition for him.
The second condition for the development of bryophyte is the absence of direct sunlight: under the influence of ultraviolet radiation, the plant loses its color and gets burned.
How to plant at home
Mosses have been used in design for a long time and in a variety of ways: they are grown for bonsai, used as a decorative substrate around other plants and indoor mini-gardens. Bryophyte can be grown in any container and on any surface. For indoor plantings, you can use decorative glass bowls with a wide bottom and neck, small aquariums, florariums and containers, and glass jars.
You can buy planting material at a garden store or nursery, or you can dig it up in the forest.
Drainage in the form of small river pebbles or expanded clay is placed at the bottom of a selected container. The ideal soil for growing moss is coconut substrate for the following reasons:
- it has neutral acidity;
- it retains moisture well;
- is natural and environmentally friendly;
- it is a breathable material.
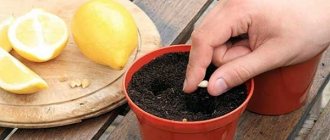
We thoroughly moisten both the soil and the planting material, lay out the seedlings, slightly pressing them into the substrate. You can see the landing process in detail in the following video:
In the first few days, seedlings should be sprayed with a spray bottle daily. The water must be clean: filtered, rain or melt. Regular tap water can leave a white coating on the planting surface.
When you see that the seedling has taken root and begins to grow, reduce watering to twice a week. The moss should be kept shaded, but in the morning when the sun appears, expose it to the rays for a couple of hours.
“Velvet carpet” as a decorative decoration
Mosses are unusual both in their structure and in their way of life. Unlike other dacha flora representatives - trees, grass, flowering plants - they do not have roots or flowers, but outgrowths that replace leaves have a unique decorative effect.
A variety of colors, from bright green to red-brown, allows you to create unusual velvety lawns, decorate alpine hills and rockeries, “aging” brick fences, tree stumps and stone framing of ponds
The Japanese, who were attentive to detail, were the first to use moss in landscape design. They noticed that miniature thickets in a certain, comfortable environment for them live and develop no worse than garden plants, and in some cases, their appearance outshines them.
Back in the 14th century, Japanese monks created the Saihoji moss garden, which, slightly modified, still exists.
Various types of mosses and lichens cover small islands, stones, tree trunks, and soil with a thick multi-colored lawn, creating an atmosphere of peace and quiet.
The tradition of using moss in landscape design spread to Europe, and then to other continents, to all regions where the climate is conducive to the growth of these special plants.
The most popular decoration technique suitable for a summer cottage is the creation of mossy stone, which is part of a stone garden or rock garden. Half covered with green velvet, the stone takes on a completely different look - more ancient, mysterious, fabulous.
Mosses and lichens fit organically into the composition of coniferous forest trees: covering the lower parts of the trunks, they simultaneously protect them from drought and overheating
From the point of view of the possibility of decorating large and small forms, moss is universal. It perfectly “ages” statues, vases, fountains and garden sculptures located in the shade, but also serves as excellent additional protection for roofs and gazebos. And of course, as a cover plant it frames garden paths, small flower beds, ponds and stream banks.
How to plant a plant on the site
In garden plots, bryophytes serve not only as a decorative decoration, but also bring benefits:
- in flooded areas absorb excess moisture;
- on rocky soils they are used instead of a lawn.
How to grow on the ground
Let's look at the detailed steps for planting bryophytes:
- Prepare the area in advance: level and clear of weeds and plant debris.
- Bring the soil acidity level to neutral. Acidic soil is limed; aluminum sulfate is added to soil with a low acidity level (both components can be found in the store).
- Using a spray nozzle, generously moisten the prepared “bed.”
- The optimal planting method is to divide a larger piece of moss into small pieces and plant them at some distance from each other, pressing them into the soil.
- Water the moss daily after planting for two weeks. During this time, the seedlings adapt to the new location.
How to grow on rocks
The instructions given above will not work when planting on rocks, since this requires some kind of adhesion to the surface. Several mixtures can play this role - use the one that is more convenient for you:
- 200 g/ml each of moss, kefir and water;
- 200 g of moss, 0.4 l of beer, 20 g of sugar;
- 200 g of moss, powder of two aspirin tablets, 200 ml of water.
Any of the three proposed mixtures must be crushed with a blender, then applied to the required surface. Treated stones should be sprayed with water twice a week.
How to grow in a decorative pond
To grow a green carpet frame on a pond, you need to purchase water- and breathable geotextiles, which are used in landscape design. On the surface of the water, in the place where landscaping is planned, lay strips of fabric and pieces of moss on top of it. There is no need to water, since the fabric immediately absorbs and retains water, and accordingly, the seedlings are also sufficiently moisturized.
Key points in caring for bryophytes:
- mandatory weed removal - mosses, in the absence of root shoots, cannot compete with herbs in the fight for nutrition and moisture;
- a few hours of sun in the morning is not necessary, but desirable;
- direct sunlight, especially at the peak of its activity, can burn the plant and change its color;
- Watering should be carried out exclusively with a sprayer - the plant absorbs moisture over its entire surface;
- equally bad conditions for moss are too acidic soil or low soil acidity;
- It is imperative to clear the planting of fallen leaves or tree branches.
In conclusion, it is worth adding: today there is stabilized moss on sale that has undergone special processing. This material is used to decorate walls, decorative panels, rugs and other design items. The method of processing the plant allows you to avoid the need to care for it and preserves the original appearance of the bryophyte for many years.
How are moss studied?
Special science deals with the study of varieties of mosses, including decorative ones. It's called bryology . With the help of this science, many once unknown plant species were explored and discovered. Also, humanity gradually learned the growth characteristics of green moss and other types. Unlike other plants, this plant has not been modified throughout the history of the Earth. In most cases, we know its forest variety. It is sometimes mistakenly confused with lichens. Therefore, in order to avoid such confusion in the future, it is necessary to become more familiar with these plants. First, let's get acquainted with the so-called general characteristics.
General characteristics of the plant
Mosses often mean low-growing plants. Unlike other plants on our planet, they completely lack a root system. However, this does not at all prevent green mosses from existing and growing. Their root system is replaced by rhizoids. Rhizoids, in turn, are called outgrowths of the epidermis. Rhizoids allow mosses to attach to the substrate. The plant receives water through the substrate.
Water is vital for this plant. The resulting water contains useful minerals. These green plants are excellent at surviving the surrounding unfavorable conditions in nature. In the presence of depressing conditions, the plant simply falls into suspended animation. In this state, green mosses can successfully live for decades. Anabiosis itself contributes to the cessation of the functioning of life processes.
During their existence, the plants themselves have learned to adapt to high and low temperatures. At the same time, it urgently needs moisture. For this reason, mosses live in damp places. They can be found in different parts of our planet. There are moss gardens. The only environment in which it does not grow is the sea and saline soils. It is often called an oligotrophic plant. It is found on a wide variety of soils. However, the growth process is very slow and this is perhaps one of its main disadvantages. Animals do not eat these plants. The animal world does not pose a threat to these ornamental plants. That's why they are planted everywhere, including in gardens.
Moss: how to easily grow it at home?
How to grow moss at home? When growing a plant, it is worth remembering its features, in particular:
- Moss requires a lot of moisture and must be maintained at a suitable level daily, otherwise the plant may not survive. But you should be careful and make sure that the plant does not develop an excess of moisture;
- The impact of light rays on the moss should be carefully controlled because too much light can harm the moss. You should allocate no more than three hours a day during which the plant is exposed to the Sun. The rest of the time it is recommended to keep the moss in the shade.
You can grow moss in any container; the plant is unpretentious. For example, you can grow it in:
- a variety of vases, preferably transparent, as this will allow you to create the most beautiful composition and adjust it if necessary;
- special open bowls;
- specialized florariums.
When choosing a container, you should proceed from what composition you want to see in the final product. If you are planning a small composition, then you should use a compact container, but if the composition is large-scale, then you need to use a large container or use several containers to best complement the composition.
How to order flowers for delivery?
Sphagnum moss - living moss for growing orchids Living sphagnum moss is nothing more than moss . It is used by gardeners in most cases when growing orchids .
When used correctly, sphagnum moss will become a real helper for you and your beautiful plants. Today we will help you understand the use and benefits of living moss for your flowers.
But still! So what is live moss ? What do flowers have to do with it? Let's find out...
What is living sphagnum moss
Sphagnum moss is a herbaceous perennial plant. The peculiarity of this plant is the complete absence of a root system; it has only one long stem with a branch.
Sphagnum peat moss
Sphagnum moss grows in swampy areas in high humidity conditions. But it doesn't grow indefinitely, and it doesn't grow very long. The lower part of the moss gradually dies and when rotting it forms peat. From this we can conclude that its native habitat is peat bogs, in the formation of which moss itself is directly involved. When the lower part dies, the upper part remains green and healthy.
Living sphagnum moss has a unique ability to absorb moisture; it is able to absorb moisture, the amount of which is 20 times the weight of the plant itself. It is thanks to this property that it was called “sphagnum”. Translated, this word means “sponge” because it absorbs moisture just like a sponge.
There are more than 380 species of this plant in the world, 40 of them grow in Russia. White peat moss is the type of moss most commonly used in growing orchids.
What part does living moss take in growing orchids?
Live moss is actively used by flower growers who breed orchids. Moss is added to the soil for their cultivation, used to reanimate damaged plants, as well as for growing young orchids. We will talk about all this in more detail.
In what form is sphagnum moss used?
Live moss or sphagnum is used in its natural form, as it grows in the places where it grows. It is also successfully used in dried form. When dried, sphagnum retains all its beneficial properties, which are contained in its natural form.
Useful properties of living moss
Living sphagnum moss, due to its structure, helps loosen the soil. It gives the plant roots a better supply of oxygen, which has a very positive effect on its growth.
Sphagnum helps maintain soil moisture at the required level. First, it absorbs excess water, and then it gives additional moisture to the roots when the substrate itself is already dry.
This moss contains polyhydric alcohol, which prevents the occurrence of root rot, which very often affects orchids.
This moss has the very beneficial property of absorbing excess salt from the water you water your orchids, which is very beneficial for them.
Sphagnum serves as the best prevention of fungal diseases of plants, to which they are very susceptible.
Sphagnum is a great source of phosphorus, which is essential for plants.
This moss benefits not only plants due to the fact that it has a pronounced antibacterial property.
(For reference). Moss was actively used during the Second World War to treat wounds in soldiers in the absence of the necessary drugs and conditions for their treatment. It was applied to the wounds and tied with bandages. Moss became a real salvation for soldiers in difficult war conditions.
How to use live sphagnum moss in growing orchids
Sphagnum moss as a mulch substrate for orchids
Live moss is usually added to the composition of the main substrate for orchids, no more than 10% of the main volume of the substrate is introduced. If you add more, there may be too much moisture in the substrate, which can still lead to root rot.
Sphagnum is used as a means for mulching the surface of the substrate. It helps maintain substrate moisture. This is especially necessary in summer, when temperatures become higher and moisture evaporates faster.
In order for the moisture level to be at the required level, and for the plant itself to receive moisture from the air, sphagnum needs to be sprayed with water every 2 days, and if it’s really hot, you can do this every day.
Reanimation of an orchid with moss
Live moss is actively used to resuscitate sick orchid plants and build up the root system. It gives the orchid enough nutrition and moisture.
For resuscitation, the plant is simply placed on the surface of sphagnum. It is strictly forbidden to deepen the neck into the moss; the orchid should simply stand on the surface, you can clearly see this in (photo).
! Remember that you cannot water the moss until it dries. When it becomes almost dry, it will need to be moistened with a spray bottle. You absolutely cannot fill it with water!
Live moss also serves as an excellent means for growing children and teenagers orchids. To grow, their roots are immersed in moss. But just don’t go too deep, so as not to moisten the neck of the plant too much. On moss they grow roots and foliage very quickly, which can speed up their growth and subsequent flowering.
How to keep moss alive
When buying live moss, the question of storing it always arises when there is excess moss left. If you leave the moss in a warm place, it will certainly dry out. If you need to store it, then put it in a plastic bag and simply put it in the freezer. After you freeze it, it will not lose its properties at all, and its structure will not change at all.
How to grow live moss at home
Living sphagnum moss can be called a truly scarce product. It is extremely rarely found in stores. Most often, moss can be purchased from a home seller who sells the same orchids or in online stores. Therefore, sometimes the question arises of how to increase its quantity and whether it is possible to grow moss at home. It is possible to grow moss at home and it is a very simple process.
To grow sphagnum moss you need to take a small amount of moss, about a small bunch with your fingers. It is desirable to have as many green tops as possible; such plants grow much faster.
Place the moss in a glass jar, preferably a liter one. Then water it a little so that there is a couple of millimeters of water at the bottom. Close the jar with a nylon lid, place the jar in a bright place, but so that it is not exposed to direct sunlight. Open the jar for 10 seconds once every 10-14 days. Make sure there is water in the jar.
If you see condensation on the walls of the jar, then there is no need to ventilate it; remember that sphagnum is a marsh plant and it simply needs to be damp.
Growing sphagnum moss in a jar
So, over time, you will be able to grow moss yourself and use it, and grow it again later yourself.
In addition to a glass jar, moss can also be grown in a transparent plastic container that is closed with a lid. Disposable plastic food boxes are great.
Can live moss be used for other plants?
Live sphagnum moss can be added to the soil in small quantities, but not for all plants. It can be used exclusively for moisture-loving plants. It is strictly forbidden to use it for tubers.
Excellent(1)Bad(0)
Growing rules
The rules are quite simple, but they must be followed, otherwise even such an unpretentious plant may not survive in new conditions. When growing moss, it is recommended to use the following instructions:
- Select a container in which the moss will be placed. Clean it thoroughly and dry it before filling.
- Line the bottom of the selected container with a not too thick layer of pebbles (it should be small, large pebbles will not work and will look ugly) or expanded clay (should also not be too large). This is necessary so that the moisture can be retained for a longer period.
- Lay a loose layer of granular coal.
- Add substrate to the current layers.
- Place the necessary elements in the resulting soil (these can be pieces of wood or other plants that you want to see decorated with moss in the future. When adding plants, it is important to take into account their attitude to moisture; if they do not like it, they will not be able to develop normally, so preference should be given to give to moisture-loving plants.Which plants belong to this type can be found in books or on specialized websites).
- Add moss.
- For the first two weeks, it is recommended to spray the moss daily. This will provide the plant with the necessary level of moisture and allow it to quickly take root in a new place. To flavor the plant, you can also initially place it on soil watered with beer or kefir. This will initially provide the moss with a fairly high level of moisture, but this will not eliminate the need for spraying. You will need to carefully spray the moss at the initial stage, because the plant will have an acute lack of moisture when planted in a new place.
Once the moss has taken root, it does not need to be watered every day; watering once every three to five days will be sufficient. If you notice that the moss has become very dark, this indicates that the plant has an excess of moisture. In this case, the frequency of watering should be reduced.
Moss does not like sunlight too much, so only three hours will be enough to interact with the rays of the Sun. The rest of the time it is recommended to keep the plant in the shade. Depending on how much light hits the moss, its color may change. In particular, with a lot of light, the moss will become lighter in color.
Imitation moss growth
How to make moss with your own hands for a craft project if you need to depict the effect of the germination of this plant? Moss shoots can be used to decorate branches and trunks of ornamental trees, stones, walls of decorative houses and much more. This decor looks very appropriate in compositions made from natural materials, miniatures and models. The main material for creating moss growth is a double-sided dishwashing sponge. The moss will be made from the hard part of the product. To do this, the rough washcloth must be separated from the soft foam rubber. Then it should be cut into small pieces or elongated “fibers” - depending on the desired texture of the moss. It is advisable to choose a green or black washcloth; in this case, poorly painted areas of the imitation will be invisible. How to make moss with your own hands for crafts from a hard sponge? The further operation algorithm is the same as in the version with soft foam rubber. The cut-up washcloth should be painted with acrylic paints, dried and glued to the desired location.
How to grow moss at home
How to grow moss at home? Just don't ask why. And don’t say that it grows well outside. Outdoors - not in a pot on the windowsill.
First, grow it in a large round aquarium with the appropriate surroundings. Admire it. Then we’ll see why, or go nuts, give me two!
Moreover, where it grows itself, let it be there. But at home you still need to work hard to grow something like this. Strict regulations on humidity and amount of light will not allow you to stuff a piece of moss from the forest into a jar and sit and wait for a beautiful picture.
So. We plant moss at home. Stop. How do we plant? Neither species has roots or seeds. How will we reproduce? Disputes, just like in nature. And where can I get them? You can’t wander around with a microscope in search.
It's actually simple. Go for a walk. We don't go into the forest. Forest moss that grows on trees is very aggressive and shaggy. Instead of an alpine idyll, you will get the ruins of a count after a bombing. We need the kind of moss that grows on stones, snags, and old walls. Even just from the shaded side of buildings.
Let's pinch ourselves a little. You can simply remove the plate. Who writes there: be careful not to damage the roots? You would like a bonus. Nobel Prize. After all, for the first time in millions of years, moss roots were discovered!
And we calmly stomp home. By the way, in nature, the ripening time for spores is approximately July and August.
Dry sphagnum moss: growing indoors
The word “sphagnum” is heard by many, but not everyone knows what exactly it means. But this is the same plant from which peat layers are formed. Sphagnum is the last species of Bryophytes from the ancient family Sphagnaceae that has survived to this day. It grows on the moist soil of raised and transitional bogs. Since sphagnum is highly hygroscopic, it absorbs and retains large amounts of moisture. Because of this, areas where there are large concentrations of plants often become swampy. But it is precisely for these properties that it is highly valued in gardening and floristry.
Dry sphagnum moss is actively used in orchid breeding. Since it has low thermal conductivity, its use as an insulating material is widespread in finishing works.
Live peat moss is not sold in flower shops: you can only buy dry one. If you are lucky enough to find it in nature, do not rush to take the plant home. It can be infected with larvae of pests and pathogens of various infections that attack your indoor plants. But you can try to revive dry sphagnum for cultivation at home. But this should not be a store-bought sample (industrially dried moss cannot be restored).
To stimulate the growth of sphagnum moss, fill it with rainwater and place it in hydroponics. To prevent rapid evaporation of water, cover the container with sphagnum with film and place it in a shaded place with moderate temperature. Please note: the chances that the moss will grow are minimal. Therefore, the answer to the question “How to grow dry sphagnum moss” is rather negative.
Vegetable cocktail
If you simply put the plant plate on the bottom of the aquarium, it will dry out. And you won’t get a beautiful landscape. So we'll make a cocktail. No, not for drinking. For lubricating surfaces. To prepare it you only need a blender. Here are some recipes:
- 100 g moss, 2 tbsp. l. sour cream, 200 ml of clean water.
- 200 g of plant, 400 ml of any beer, 1 tbsp. l. granulated sugar.
- 1 tbsp. moss, 2 aspirin tablets, 2 tbsp. plain water.
- 200 g plant, 200 ml kefir, 300 ml water, 1 tsp. Sahara.
We take ingredients from any recipe. Well, those that are at hand. Together and cheerfully we put it in a bowl or jug. Then vigorously grind with a blender. Let me warn you right away: the smells of cocktails using dairy products are disgusting. Well, nothing. Beauty always requires...
Applying the composition
Of course, even before preparing this wonderful liquid, we placed pebbles inside the aquarium. They put up an artificial lock and put some old snags on it. Sand was added to the bottom and a little fine gravel was poured. Didn't it turn out lovely? But something is missing.
What did the famous cartoon character say? It won't be enough. Not enough! Let's add aesthetics. By the way, they have already sniffed the stench from the jug. Now take the old brush. We dip it well in the cocktail and start writing. Over the stones, over the castle, over the snags. We smear from the heart, we don’t regret it. You can even splash a little.
We take what’s left to the backyard. There we select the darkest and dampest corner. And we paint directly on the walls with slurry. Everything that came to mind. At least your autograph. Good results are obtained when drawing through a stencil. Guests will wonder for a long time how the moss could grow so much. Naturally, keep them in the dark until the last minute. After all, this is your exclusive!
Of course, then the moss will fill all the free space. But even just a fluffy soft wall attracts the eye. And don’t be afraid to damage buildings. Moss does not destroy the base, but only covers it, like a carpet.
The eerie color mixture is over. But our business is not there yet. Let's move on to the next stage.
Care after sowing
Yes Yes. Our smearing of the slurry is scientifically called spore sowing. And if there is sowing, then there must be a harvest! And what else is required to get it? That's right - care.
Basically, at home it involves periodically moistening the moss and dragging the aquarium into the sun, then back. Just for two hours, early in the morning, but definitely every day. Otherwise, our pet will not have that desired juicy green shade. The rest of the time it can be kept shaded. But not quite in the back of the room. It's better somewhere near a window, but with shelter.
About hydration. We got up in the morning and looked at the glass. Is there condensation? This means there is no need to water today. Is the glass completely dry? We stomp behind the spray bottle. By the way, the water in it is exclusively melted. Or filtered. Otherwise, an unsightly white coating will appear on the moss. We don't need it at all.
Interesting usefulness
- Instead of an aquarium, you can take a wide bottle. And even with a traffic jam. There is a known case when one man planted moss in such a bottle and watered it. I closed it with a cork and never opened it again. This was over 40 years ago. And the microsystem is still alive today. With its own climate, humidity level and, of course, moss. Try again!
- By the way, the scientific world still does not know of pests and diseases that would like moss. Except that mold fungi sometimes taste it. And even then, only after severe waterlogging.
- Do not keep your plantings near a central heating radiator. Too dry air is detrimental to moss.
- The rougher the stones in your composition, the easier it will be for the plant to stick to them. Smooth pebbles will remain bald. By the way, they can be perfectly replaced with broken shards from ceramic pots. Just without glazing.
How to grow moss at home? It's very simple and fun. It's even fun at times. This will not require a lot of effort and material costs. Well, maybe for the purchase of an aquarium.
Main types
Nowadays, whole species of mosses are known. Each type has its own characteristic features. Let's pay attention to several types:
- Rozhdestvensky . The name of forest moss was determined by the shape of its leaves. All its leaves are shaped like Christmas tree needles. Christmas moss is growing slowly. It can grow safely only under special conditions. The temperature for successful growth should not exceed 22 degrees. Externally, this view looks very beautiful. And all thanks to its needle-like leaves, which grow in layers and form excellent compositions;
- Fern . The leaves of this species are similar to those of a fern. Therefore, fern is often confused with moss. The fern is quite dense. It is better for him to grow in the shade. As a rule, the fern species is small in stature. Can be used for planting in the garden;
- Richia . One of the most common species, known all over the world. Richia have the shape of a ball. This species completely lacks roots and stems. The root, leaves and stem in this case replace the layers of twigs. Richia moss grows successfully when all conditions are met. For example, it needs good consecration and an aquatic environment. The intensity of consecration affects not only the growth process, but also the color. Under the influence of consecration, the color of richia may change significantly. The standard shade is bright green;
- Hypnosis moss . Grows on stones, tree trunks, on the ground and on branches. The hypnotic species is in dire need of shade. Although it is able to withstand solar attacks. Great for constructing a variety of garden paths and lawns located in the garden or around the house;
- Key . Like richia, key moss is known to a wide range of people and is distributed almost throughout the world. The exception is Australia. The color of the key species depends entirely on the power of the consecration. It may be red or it may be dark green. In addition to consecration, color is significantly influenced by the composition of the soil in which it resides. The decorative moss itself consists of stalks on which there are many leaves. The key type does not require supernatural conditions of containment;
- Peat . This species is most often found in swamps. It is the swamps that are its main habitat. Peat mosses come in a variety of colors. Shades come in red or green. It is often used to maintain the required level of soil moisture in flower pots. In some cases, they decorate garden ponds near the house;
- Leptodiccium coastal . Another type of moss with a very interesting name. Its name comes from the stems. The appearance is very original. The same stems are located far from each other. Their vertical direction gives the plant a real airiness that will not leave anyone indifferent. The coastal species is very difficult to confuse with another species of these plants. Coastal plants are considered unpretentious plants in terms of care. The acceptable temperature for it is no more than 28 degrees. It feels good in water, for example, in a pond near the garden;
- Weeping . This species received this name due to the shape of the structure of its branches. The branches look like a weeping willow. The height of such moss is no more than 50 cm. The weeping species comes from China. Later it was brought to Europe. The plant's habitat can be both driftwood and various pebbles near the country garden. The optimal temperature for normal life should not exceed 28 degrees;
- Dicranum . This species prefers to grow on concrete walls and stones. Today there are several species of dicranum moss. All types differ from each other in shades, as well as in the shape of the leaves. Dicranum is not tall. Its height is 4 cm;
- Javanese . One of the most famous species. Javanese plants are considered the most unpretentious in terms of care. In most cases they are used by aquarists. Java moss does not require a specific temperature regime. It feels great in both dark and light ponds. Its stems are intertwined. During growth, the stems stretch down;
- Polytrichum vulgaris . This type is used in a wide variety of areas of our lives. It has proven itself well both in medicine and in the field of garden design. Habitats: swamps and woodlands;
All of the listed moss species are used in different fields and fields of activity. Some people decide to grow their own moss at home. Let's find out how to do this and what advice you should listen to.
Features of growing moss yourself
Growing moss at home is not difficult, but it requires certain skills and knowledge. You should also have some tools on hand. For successful cultivation you will need:
- a transparent container (such a container can be a round vase or a round bowl);
- blender;
- water, buttermilk or milk.
The process of growing at home consists of several stages. Before growing, it would be a good idea to familiarize yourself with the tips below:
- Before planting, you should clear the selected area of dirt, debris and leaves.
- When preparing a plant for planting, remember that the growing area must correspond to the previous habitat of the moss. For example, a plant taken from trees will take root exclusively on the tree. For example, in the garden. It is useless to grow it on the ground.
- The planting site should not only be similar, but also be in the shade. Continuous exposure to the sun will simply dry it out.
- The growing medium should be moist and acidic.
Now let’s reproduce the growing order.