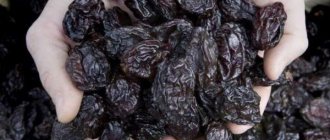
Prunes are a healthy product, on the basis of which dozens of types of recipes have been created for every taste. Such dried fruits are not cheap, and it is not always possible to understand how the product was processed.
It is best to make the preparations yourself, using various drying methods. It is necessary to know the conditions and shelf life of dried plums made with your own hands.
I have already told you how to dry apples and pears, today I will share ways to dry plums.
If you have a lot of fruits, I suggest drying them, there are different drying methods, so choose the one that suits you best.
Preparing plums - important rules
To ensure that the result exceeds all expectations, you must take into account the following recommendations:
- Use only the type of plum that is suitable for drying;
- Choose only high-quality and ripe raw materials;
- A mandatory step is blanching, which must be performed at the initial stages of preparation;
- Maintain temperature conditions during cooking in different devices;
- Periodically change sides of the fruit while drying in the sun.
Ready prunes should not be kept near sources of strong odors, as they can quickly absorb all odors.
Before starting drying you must:
1. Sort the fruits, get rid of rotten and damaged ones.
2. Rinse the product under running water and remove dust.
3. If necessary, remove the seeds.
4. Treat plums with soda solution at the rate of 5 g of soda per 1 liter.
5. Remove the fruits and rinse.
6. Dry off excess moisture with a paper towel.
How to determine the readiness of dried fruits
Ready prunes
elastic, elastic, does not stick to your hands, and the skin should not crack when bent. It should be soft, but not wet. Since it is difficult to achieve uniform drying of the fruits, to equalize the humidity in the finished product, you can put it in glass jars and seal them tightly with plastic lids for several days.
In this case, moisture from slightly underdried plums will be absorbed by overdried ones. The jars must be shaken periodically. If drops of condensation form on the walls, it means that the prunes are not ready and need to be dried.
How to dry plums at home in the sun to make prunes
The most undemanding and easy-to-follow method is to dry the fruits in direct sunlight. The method is low-cost not only in terms of financial resources, but also in terms of time.
Cooking sequence:
1. Select plums and throw away those that are rotten or show signs of rot.
2. Rinse thoroughly, divide into two halves and remove the pit.
3. If desired, you can dry the whole thing, but this will take much more time, and they may not dry properly.
4. On a flat surface, boxes, pallets, sheets of cardboard and other suitable objects, place the fruit cut side up and place in the sun.
5. This can also be done on the roof of a building, for example, in a country house.
6. When night falls, the raw materials are hidden in the house, and the same is done if it rains.
7. To prevent the workpieces from becoming damp, they should be changed sides twice a day.
8. The entire cooking process takes about a week on good sunny days.
Fruits with strong pulp are suitable for drying. Watery ones are not suitable in this case. The “Vengarian” and “Renklod” varieties are ideally suited for these purposes.
To speed up the preparation, the plum is blanched by placing it in a soda solution for several minutes. Then rinse under running water and proceed directly to the main stages of preparation.
The cracks formed on the fruit reduce the drying time, as moisture evaporates faster.
Drying plums in the oven for the winter
To keep the pan clean after cooking, cover it with a layer of baking paper. The entire process can also be performed on grates. All raw materials are placed in one layer; cut plums should be placed skin side down.
Cooking steps:
- 5 hours at 50 degrees;
- 6 hours at 70 degrees;
- until the dried fruits are completely ready at a temperature of 75 - 80 degrees.
Before each subsequent stage, the fruit is removed and turned over, and then cooking continues according to the instructions.
Rules for drying plums in an electric dryer
Prunes may or may not have a pit. When it is removed, the cooking process is significantly accelerated, and the risk of rotting of the product is eliminated.
Only high-quality and fresh raw materials without signs of rot and other imperfections are selected for drying. According to the instructions, yellow and black plums are dried in the same way:
1. Wash and cut off the stem of the fruit, throw away damaged specimens.
2. Blanch, which will allow you to preserve the finished product longer.
3. After the preparatory procedures, rinse the fruits again in cold water.
4. It is best to lay out the plums with and without pits separately; it is advisable to do this on different trays and dry them in batches.
5. Seedless fruits should be placed cut side up.
6. Cooking takes place in three stages. The first of them is drying at 40 degrees for 6 hours, after which the plums are cooled for about the same amount of time.
7. The second stage is to set the temperature to 60 degrees and cook for 6 hours.
8. And in the third, final stage, the temperature rises to 80 degrees, the cooking time is similar to the previous stages.
The best plums: how to choose and prepare the fruits
When testing store-bought prunes in a laboratory, it is often discovered that they do not contain the nutrients they should contain. Therefore, it is worth finding out how to properly dry plums in order to independently make not only a tasty, but also a healthy product that is widely used in cooking.
Selecting suitable raw materials
Do you have an electric dryer?
Not really
Plums should be fleshy and dense, but not overly watery, so that the sugar concentration is not lower than 10%. This can only be checked in a laboratory, so just buy the sweetest fruits. There are several better varieties for drying.
- Hungarian.
- Greengage.
- Raisin-eric.
- Blue bird.
- Adyghe prune.
- Nectar.
- Legend.
Plums begin to ripen in mid-July and bear fruit until the end of September. Some varieties are not at all suitable for drying. For example, Early Blue, Mirabelle and Apricot are not suitable, they are soft and watery, so a quality product will not come out of them. Is it possible to dry yellow plums? There is no difference in technology, but their taste will be more sour and their color will be brown or dirty orange.
If you select dark blue plums, the prunes will take on a characteristic deep blue-black color. It is better to take large, whole fruits without spots, with intact skin and no signs of pests.
Fruit preparation
It is recommended to store plums no longer than 2-3 days before drying. They are best kept in 16 kg wicker baskets. Larger volumes lead to rotting of the fruit.
- Immediately before drying, wash the plums thoroughly under running water.
- Sort through the fruits, discard the “substandard”.
- Place fruit on paper towels. If necessary, wipe with napkins.
To give the pulp a pleasant consistency and powerful aroma, plums are boiled in syrup.
Blanching plums before drying
Blanching in hot water will remove excess air from the fruit, expanding the cells. The oxidizing elements in them will be destroyed, and everything else will be preserved.
- Place a deep container two-thirds filled with water on the fire. Bring to a boil and reduce heat to low.
- Pour water in which soda is dissolved in a ratio of 100:1 into another pan. You can use potash (potassium carbonate).
- Blanch the plums in batches in hot water for 5-10 minutes, and then dip them in the prepared soda solution for 10 seconds to remove waxy deposits from the surface.
At the final stage, rinse the plums again to completely remove traces of potash. After processing, a network of microcracks is formed on the surface of the skin, which will prevent it from tearing.
How to properly dry plums in a gas stove oven
This method is useful for those who want to quickly and easily get delicious dried fruits at home. The preparation technology is similar to the preparation methods described above.
1. All raw materials are laid out on a baking sheet pre-lined with parchment paper with a small distance from each other.
2. Only large fruits need to be cut into two slices. Small ones can be left whole.
3. Blanch in a soda solution and rinse with a stream of water.
4. Place on a clean terry towel to absorb moisture.
5. At this time, preheat the oven to 50 degrees.
6. The prepared raw materials are placed in the oven and dried at this temperature for 4 hours, then they must cool thoroughly for 5 hours.
7. Next, raise the temperature to 80 and cook again for 6 hours, after which the product is cooled.
8. Finally, set the temperature to 100 degrees and cook for about 30 minutes.
The finished product is stored in a glass container with a tightly screwed plastic or nylon lid.
Practical advice on how to properly store the product
Ready plums are particularly elastic. They don't stick to your fingers. When compressed, they retain their original appearance. The inside is quite soft, although it remains dry throughout the season. To ensure that the product always has such advantages, we will look at how to store dried prunes at home.
The basic rule is a dark, cool place. It can be found in the refrigerator, pantry or dry basement. The main thing is that dried fruits are protected from direct sunlight.
Suitable packaging:
- paper bags;
- canvas bags;
- glass jars;
- plastic trays.
All items must be tightly closed to prevent insects from entering. The product is stored for 12 months if all conditions are met. In addition, it does not lose its beneficial properties.
We carefully looked at how to dry plums at home for compotes and dessert dishes. The process is, in principle, simple. However, do not forget about the rules for choosing a suitable crop variety. Properly prepare the product for drying and follow simple instructions during the procedure. And let dried plums delight our hearts all year round.
Drying in an electric oven
Everyone has their own oven, gas or electric; you can dry it in any oven.
Product drying is carried out in three stages:
1. The first is peeling, cutting and placing the fruit on a baking sheet.
2. All raw materials are placed in an electrical appliance, preheated to 50 degrees, and cooked for 4 hours.
3. The second stage is to increase the heating to 70 degrees and hold the fruit at this temperature for 6 hours.
4. Between all stages, you must wait for the product to cool completely.
5. The final stage will be drying the workpieces at a temperature of 90 degrees for half an hour.
6. To add shine and a sweeter taste, at the end of cooking, bring the temperature to 90 degrees. For caramelization of sugar on the surface of the fruit, 15 minutes are enough, after which the product is ready for consumption.
Storage Types
Well-dried prunes can be stored for a whole year. Keep it away from foods with strong, strong odors. The fruits should be elastic and viscous inside. Those that crumble into powder are best ground immediately and stored in tightly sealed jars.
- Plastic bags.
- Containers (plastic, glass, silicone, ceramics, enameled metal).
- Paper or canvas bags.
It is optimal to keep prunes in the refrigerator. When deep frozen, the shelf life can be extended to 2 years. It is better to eat dried prunes six months in advance, but you will have to store them in the freezer.
How to dry prunes at home
A self-dried product will guarantee that dried fruits can be eaten, cooked into compotes, and used to make a variety of dishes and sauces.
The entire product is controlled at all stages and the result is healthy and tasty prunes, completely natural without the addition of extraneous chemicals.
The benefits of the product are great: it normalizes the gastrointestinal tract, stimulates appetite and accelerates metabolism, and also removes waste and toxins from the body.
People suffering from diabetes and obesity should not abuse this dried fruit.
To get a tasty product rich in biologically active substances, it is recommended to use the following varieties:
- “Cherry plum”;
- "Hungarian"
- "Greengage";
- “Kustendil plum”.
Other varieties of plums are also suitable for preparations; the most important thing is to choose fruits that have dense pulp, are sufficiently ripe without spoilage, rot or other damage.
Microwave
For drying using this express method, fruits with a solid structure are useful so that they do not subsequently turn into mush.
Drying sequence:
1. Remove the seeds from the fruit and place the pieces in a flat container suitable for a microwave oven.
2. Line the bottom of the plate with a sheet of paper towel. Cover the laid out pieces with a paper napkin.
3. Set the average power and set the timer for 3 minutes. Place the prepared slices.
4. After the set time, the napkin must be removed and the procedure repeated in the same way.
5. The final signal from the device indicates that final drying can be carried out, which lasts about a minute at full power.
6. If there is not enough time for sufficient drying, add another 60 seconds, checking the degree of readiness of the pieces each time.
What are the benefits of prunes?
Dried plum fruits are rich in vitamins necessary to strengthen the immune system, normalize the functioning of the gastrointestinal tract and cardiovascular system. Thanks to magnesium, potassium, calcium, sodium, phosphorus in the product, hair, teeth, nails, and skin are strengthened.
A large concentration of glucose, sucrose, fructose gives the body activity, energy, and helps increase tone. The antioxidant and diuretic properties of prunes help remove toxins and fluids from the body and cleanse the intestines.