The Dadan hive has stood the test of time - the design was invented at the end of the 19th century. Thoughtful design, simplicity and reliability made it popular among experienced beekeepers and beginners.
The American Frenchman Dadan mathematically calculated the dimensions of the hive in the 60s of the 19th century. Unfortunately, the work could not be completed. A few years later, another beekeeper, the Swiss Blatt, completed Dadan’s work and patented the work as the Dadan-Blatt hive.
Hive Dadan
History of creation
Charles Dadan is a French beekeeper who for a long time has been carefully studying various designs of hives, making comparisons and making calculations. He was confident that young queens were capable of laying up to three thousand eggs in one day.
He calculated that to fill all the honeycombs in one day with honey, one and a half thousand cells would be required. That is why Dadan’s twelve-frame hive has enough space for all the honey production.
The Dadanovsky hive is in extraordinary demand among all beekeepers. It is also made by hand.
Types of hives
Dadan hives can consist of ten and twelve frames of appropriate sizes. Considering the popularity of such bee hives, it is believed that this type of design is very effective, practical and convenient for beekeeping.
- 12 frames. Such a hive has standard dimensions (450 by 450 mm). 37 mm boards are suitable for the walls of such a hive, with the exception of the roof and roof. Speaking about the visual size of a bee hive, it is approximately 524 by 524 mm. There are several varieties of such designs, the difference lies in the number of frames.
- 10 frames. You can easily make Dadan-Blat hives with your own hands, taking into account the drawings and dimensions. As a result, the height of the Dadan-blat body should be up to 325 mm, width up to 445 mm, and length 450 mm. Stores must be 165 mm high. The upper entrance should have a size of 12 by 10.
How the Dadan-Blatt hives were created
Charles Dadant (b. 1817) was the person who came up with the idea of creating a vertical hive. He studied bee house designs for many years. And in his own apiary there was an 8-frame hive.
The Frenchman took a purely mathematical approach:
- How many eggs does one queen bee lay in one day? - 3000.
- How many cells can bees fill in a honeycomb during the day? - 1600.
- This means that in 12 Quimby frames there will be 10.5 thousand cells.
These calculations and experiments allowed us to improve the design and create our own dadan hive. This invention very soon began to be used by beekeepers in various countries.
But the Swiss Blatt managed to bring it to perfection and bring it to the market. The adjustments he made to the frame made the hive suitable for winter conditions. The system, which has a frame size of 435 mm (previously it was 470), received the name Dadan-Blatt. By the way, the brand has another name, DADANT.
Features of the new hives
Despite the obvious effectiveness of the new design, the Dadanov hive still causes debate among beekeepers. Some are sure that they have long outlived their usefulness, others are sure of the opposite.
But it should be recognized that these structures have undoubted advantages:
- Even the strongest family of bees will be quite content with one body.
- The concentration of honey in the store is carried out to a maximum extent.
- The single-body version of the hive will save you from the need to move bulky bodies.
- All frames are easily accessible to the beekeeper.
- The design of the hive does not in any way contribute to the swarming of bees, therefore, it is quite easy to monitor the condition of the frames.
- In winter, not only the main family will fit here, but also a spare one. It is enough to separate them with a partition.
- This system can be easily learned by beginners due to its ease of use.
- It will serve you for 25 years if you do not violate the operating rules.
Dadan has stood the test of time - the design was invented at the end of the 19th century. Thoughtful design, simplicity and reliability made it popular among experienced beekeepers and beginners.
The American Frenchman Dadan mathematically calculated the dimensions of the hive in the 60s of the 19th century. Unfortunately, the work could not be completed. A few years later, another beekeeper, the Swiss Blatt, completed Dadan’s work and patented the work as the Dadan-Blatt hive.
Dadan hive - construction Nowadays, the Dadan hive is represented by several types of structures. The main differences are volume, material and thermal insulation. The dimensions of the structure are a strategic issue. It is important to understand what is needed in specific conditions.
- 10 frame. Classic Dadan scheme.
- 12 frame. The square section allows the frames to be positioned differently (with warm or cold drift).
- 14 and 16 frame. It's harder to work alone. An increased number of frames creates a greater load on the structure.
Dadanovsky hive frame size
For a long time, the Dadan hive was considered one of the best and most sought after. But some beekeepers still didn’t like it. The design was improved by the Swiss-born Blatt. He shortened the frames, resulting in a modern standard hive. The size of the Dadanovsky hive frame for the nest, according to this standard, is 43.5 by 30 cm, the half-frame for the store is 43.5 by 14.5 cm.
Hive Dadan
Dadan's hive is a single-hull vertical structure, expanding with a magazine extension, which is also called a magazine.
The device includes:
- reverse bottom;
- frame;
- magazine extension;
- pitched roof;
- entrance;
- arrival board;
- nesting frames;
- shop frames;
- insert boards.
What are the features of the Dadan hive?
To understand this, you need to look at a detailed diagram of such a design. If you look at the real product, you can appreciate how simple its design is. And by lifting its lid, you can get acquainted with the internal structure of this design.
The work process begins not even with reading the drawing, but with the selection of the necessary starting materials. As a rule, such structures are made of wood. The beekeeper will need to select a wooden board that does not contain resin. Many experienced beekeeping owners say that it is best to prefer willow or linden for these purposes.
As a last resort, if for some reason these trees are not available for use, it is recommended to use materials such as spruce or pine. After choosing the source material, you need to think about equipment for the production of homemade houses for winged honey insects. A tool that is especially popular is a special wood processing machine.
Features and Benefits
Firstly, the space of the box is quite conveniently organized, so one house can accommodate even two families if there is a special dividing board for the hive. Secondly, thanks to the removable bottom, there is easy access to honey. Dadan’s hive is also convenient because a large amount of honey accumulates in one place, which greatly facilitates the beekeeper’s work.
Thanks to this design, the likelihood of bees swarming is reduced. The Dadanov system can last more than 25 years, and, due to its ease of use, it is perfect for a novice beekeeper.
Why you should choose the Dadan hive
First of all, the classic version had to be abandoned as it was not voluminous enough, but the system lives on. We have a modified Dadan hive, which is in use today and consists of one or two buildings with several magazines.
There is enough space here for the bee colony when the main honey season arrives. Such a bee house has enough space for the queen, who lays eggs, worker bees, and there is still space left to process nectar into honey and store feeding. July will end and the bees will occupy the lower part of the hive to continue collecting honey at a less rapid pace.
Design features of the Japanese hive and technology for working with it
August is the time to prepare the hive for the winter. By November the hive is ready for wintering.
After the spring check of the bees, the hive is cleaned, additional food is added, and the nest is expanded if it has 10 rather than 12 frames. This usually happens in the last days of April. As soon as the entire building is occupied by the family, very quickly, so as not to disturb the temperature regime, an additional one is placed under them, with patrimony and dry land.
The bees will work hard, build honeycombs in it over the summer, and then go to the winter for fresh ones. During the period of maximum nectar intake, a store is delivered. It is here, on top of the nest, that the bees will place food. If necessary, additional ones are placed between the nest and the first store. Such a Dadan hive of many buildings becomes an ideal home for a family of bees.
Features of "lounger" hives
They are completely devoid of the described drawback with windage. Such bee hives are not afraid of hurricanes. The increased bottom area allows you to stand firmly on the ground. The inconvenience is a fair amount of weight. Moving them is not an easy task. Therefore, they are placed in hospitals. Over the past fifty years, their presence among nomadic beekeepers has practically not been observed. This type of hive is not favored by industrial beekeepers. Their adherents are exclusively elderly people who feel sorry to throw away bulky “chests”. They are familiar, like a home, yard, village. The frame size of the hive varies from fourteen to twenty-four. There are rare specimens of thirty frames!
The main counter-argument of opponents: the unnatural movement of the bee colony. Mother nature intended to move upward. Immediately the beekeeper forces him to move horizontally. I don't know how convincing the argument is. They once gave me such an old twenty-frame miracle. He consistently took at least a flask from his plot in any year. He served for another fifteen years until he retired. Yes, you have to scrupulously go through the frames and waste precious minutes. Nothing. I don’t regret spending hours on a good family.
Features of the 10th frame Dadan hive
To relieve the load from the body, a design with 10 frames is often used. This way you can achieve a compact body and it is very easy to work with. The design of Dadan hives for 10 frames will be the same. Below is a drawing that shows the features of the 10 frame hive from the front, side and top.
Drawing. “Design of Dadan hives for 10 frames”
You can easily make Dadan-Blat hives with your own hands, taking into account the drawings and dimensions. As a result, the height of the Dadan-blat body should be up to 325 mm, width up to 445 mm, and length 450 mm. Stores must be 165 mm high. The upper entrance should have a size of 12 by 10.
The design can be seen in detail in the drawing below; it is a single-hull hive, which includes two stores. On the left in front of you is a cut that is made along the frame, and on the right - across the frame.
Drawing. “Design of a single-hull Dadan hive”
Using Dadan hives in the apiary
A single-hull hive, which has only one store and the nest is not particularly convenient for collecting honey, it is best to pay attention to multi-hull Dadan hives or a single-hull hive, but with several stores.
With this design, bees will be able to:
- Efficiently process the product into honey, carefully organize food for storage.
- Build quality honeycombs and raise your brood.
- The queen will lay a large number of eggs.
- When the bribe increases, there should be more stores; it is better to have it in excess than for the bees to not have enough honeycombs.
- If the store is already completely filled with honey, you need to change the extension to an empty one.
- Be sure to place food in the hive for the winter - sugar syrup.
- You can keep a strong family in one building.
- The store collects a large amount of honey.
- Simplicity of design, no need to constantly move heavy upper bodies.
- The beekeeper can check each frame.
- The bees are protected from swarming; you can see the condition of the frames.
- In winter, you can place two families - the main one and the spare one, and separate them with partitions.
- The beekeeper can make layering while the bees are swarming.
Thus, having designed the hive, Dadan took into account all the features of the bee family, which is why many beekeepers are satisfied with this type and often use it in their apiaries. Like every design, Dadan-Blata hives have their pros and cons. With your own hands, using the drawings, it’s easy to try to make housing for bees, you just need to first decide how many frames it will be - 12 or 10.
Twelve frame design
The most popular Dadan hives consist of twelve frames. For production, carefully dried high-quality coniferous wood, as well as polystyrene foam or metal, are suitable. All parts are adjusted to the appropriate sizes.
If any cracks appear, they are carefully puttied.
The final stage of making a hive of twelve frames is high-quality grinding, which is carried out by a special machine. Then the finished hives need to be painted to protect them from environmental influences, as well as to make your own apiary bright and beautiful. They contain several housings, magazine and nesting frames, as well as magazine extensions. It is made with your own hands, using exact dimensions and drawings.
Twelve-frame hives are more popular than ten-frame ones. Ten-frame design In addition to the twelve-frame hive for bees, there is the Dadanov ten-frame design. Some frames are removed to reduce the load on the body and bottom of the hives.
As a result, the beekeeper’s work is made easier, since the bodies are more compact. As for the basic design, it remains the same. Every beekeeper is able to build a Dadan hive on his own if he uses good drawings and high-quality materials.
Features of Dadan's 12 frame hive
Most often, the beekeeper prefers to use a hive with 12 frames; to make it yourself, you can use different materials - wood, polystyrene foam, metal. It is very important to have a drawing and follow the dimensions, so the parts will be connected neatly. The cracks that appeared during construction must be filled with putty. Then sand it on a machine. Coloring is also very important.
A twelve-frame hive can have a large number of bodies, magazine extensions, nest frames and magazines.
Make a Dadan hive with your own hands
The design of the hive is so simple that, having drawings and detailed instructions, any beginner will be able to make it with his own hands.
The table shows the dimensions that characterize the Dadanovsky hive:
| Detail | |||
| Length mm | Width mm | Height mm | |
| Internal dimensions (for board thickness 35 mm) | |||
| Frame | 450 | 450 | 310 |
| Shop | 450 | 450 | 155 |
| Roof | 450 | 450 | 70 |
| External size (for board thickness 35 mm) | |||
| Frame | 520 | 520 | 320 |
| Shop | 520 | 520 | 165 |
| Bottom | 520 | 520 | 70 |
| Roof | 520 | 520 | 80 |
| Length mm | Width mm | Height mm | |
| Inner size | |||
| Frame | 450 | 380 | 310 |
| Shop | 450 | 380 | 155 |
| Roof | 450 | 380 | 70 |
| External size (for board thickness 35 mm) | |||
| Frame | 520 | 450 | 320 |
| Shop | 520 | 450 | 165 |
| Bottom | 520 | 450 | 70 |
| Roof | 520 | 450 | 80 |
Some avid beekeepers do not like to use purchased equipment, so they do everything themselves. They also make ten- or twelve-frame hives for their apiary themselves. At the same time, they take into account the exact dimensions of all parts, namely: bodies, bottom, tapholes, roof and liner, extensions. It is important that the bottom matches the other parameters. According to the recommendations of many beekeepers, it is best to make a removable bottom to make it easier to get rid of dead bodies.
Algorithm of actions of a beekeeper
- First, the wood is processed. The parameters of the boards for constructing the hulls and bottom are at least 40 millimeters in thickness;
- then special grooves are cut out, with the help of which the body walls will be connected;
- To fasten the boards together, use a cutter, leaving a special gap of at least 7 millimeters. It is left in the center of the connection of all the boards;
- making thin planks;
- construct a removable bottom;
- to create a shield, boards are coated with glue;
- Using glue and nails, they assemble Dadan’s hive;
- then painting is carried out;
- a mandatory step is disinfection, which protects the hives from diseases;
- A ventilation system is being built to avoid mass death.
Material
High-quality material will last longer and will not warp or rot. Do not use materials with a strong odor.
- Boards. Wood without knots and rot is suitable. Insufficiently dried wood will dry out over time and cracks will appear.
- Plywood and fiberboard. Cheaper, easier to process, but less durable.
- Polyurethane foam. Light, warm, durable, do not allow sounds to pass through.
- Expanded polystyrene. Lightweight, warm, do not allow sound to pass through and are less reliable.
Insulation
Depending on the temperature conditions, choose one of the types:
- Double wall. The walls are double; insulation (sawdust, moss, straw, polystyrene foam) is placed in the gap between the walls. Keeps you warm in unpredictable spring weather. Recommended in the middle and northern latitudes of Russia.
- Single wall. A lightweight option not designed for low temperatures.
What does it consist of?
Regardless of the dimensions and other features, the Dadan-Blatt hive consists of the following elements:
- Frame. Must correspond exactly to the drawing and have no distortions. All other parts of the structure are attached to it. The entrance is located in the hive body.
- Bottom. Usually made removable. The non-removable bottom is more airtight and rigid, but makes it more difficult to work with bees.
- Extension (store). Installed during the period of active honey collection. Using special techniques, the queen is not allowed to lay eggs in the store. In principle, 2 extensions mounted on top of each other can serve as a second body.
- Liner. Needed for ventilation and insulation of the hive.
- Roof. Most susceptible to weather influences. The roof is painted in 2-3 layers or sheathed with tin. Roofs can be single-pitched, gable and flat.
- Minor design details (tapholes, folds).
What material is best to make bee hives from?
Initially, wood was used for hives. Without going into details, let's say: he was chosen by the inhabitants of the amazing bee community themselves. Keeps warm perfectly. It is easy to process. Breathing. Durable. Practical. Available for sanitization. In modern conditions, it has mobility, disassembly, and interchangeability of components.
Canvas cover “Double-thread” 60x60 (for 12 frame hive)
42.00 rub.
Gate valve "Beeland" for round tap hole (5 positions)
13.00 rub.
Galvanized taphole barrier “EcoLight” (250 mm) with one grid (without additional holes)
19.00 rub.
Hahnemann separating grid “Ferolife” (set of 2 pieces)
87.00 rub.
Innovators are desperately fashionable. Innovators dream of using construction fiberboard, chipboard, etc. to make beehives for bees. I would like to immediately warn beginners. No matter how attractive and colorful the displayed samples may look, do not give in to temptation. They contain toxic volatile substances that negatively affect our bees. Chase aesthetics and simplicity - you will lose your apiary!
How to make a twelve-frame Dadan hive with your own hands
The dimensions and drawings of the twelve frame Dadan hive are given for a single-wall type, since the second walls are built on top of the internal ones and do not matter. Preparation for work With some skill, making a Dadan hive yourself is not difficult. There are several important points.
- Storing and processing wood in a dry place. Only dried wood is used.
- Study the drawings in advance and imagine the work order.
- Prepare tools and materials.
Technology for constructing a smoker with your own hands
A job well done will last a long time. The lifespan of a manufactured hive depends on the material. Work procedure
- Blanks are cut from a 35 mm board according to the drawing. The joints are prepared and the folds are selected. The workpieces are polished.
- When assembling, wide boards are contrasted with narrow ones (if the front bottom board is wide, the bottom side boards are taken narrow).
- The joints are glued. PVA or carpenter's (casein) glue is used. It is important that the glue does not have a strong odor and is not toxic to bees.
- The ends of the connections are additionally reinforced with pins or self-tapping screws. Before further assembly, you need to let the glue dry.
- The upper tap hole is drilled, the lower tap hole is cut along the edge of the body.
During the manufacturing process of the bottom, extension and roof, it makes sense to periodically try them on in order to notice errors immediately.
- The removable bottom is made wider and assembled from quarter boards (or in another way with good tightness). Three strips are stuffed in such a way as to fit into the fold at the bottom of the body. The front side remains without a strip for ventilation. You can take boards thicker than 4 cm, this will make the bottom heavier, but make it stronger.
- The superstructure (store) is assembled similarly to the body. A fold is selected along the top edge of the superstructure.
- The roof is placed on the body or store. Over time, they change shape a little, so you need to make sure the roof fits not too tightly. There are holes for ventilation on the sides or in the front part. In order for the bees to be transported, the openings must be covered with a fine mesh.
Size of a twelve-frame hiveTypical sizes of Dadan hive elements are 12 frames.
- The rebate depth is recommended 18 mm. This means that there is a space of 10 mm between the frame and the top cut.
- The depth of other folds is selected based on the thickness of the material.
- The gap between the bottom and the frames is left 25 mm, for cleaning and for the convenience of the bees.
- The upper tap hole with a diameter of 25 mm is drilled 70 mm from the top cut. An arrival board is installed under the entrance.
- The lower taphole is 10 mm high and is made almost the entire length of the wall; its length is adjusted with special liners.
The Dadan-Blatt hive is reliable for mid-latitudes.
The standard 12 frame design is easy to manufacture. Using high-quality material and following technology, you can count on a long service life of the hive. 12-frame Dadan Today we will take a closer look at the dimensions of the 12-frame Dadan hive and the drawing of this bee house, which is extremely popular among beekeepers.
The topic itself is quite controversial, since the production of hives of this type is carried out by many craftsmen who have their own experience and valuable recommendations. We will present a model made of moisture-resistant plywood 8-10 mm thick. The hive will be double-walled - suitable for wintering. The summer version is made of one wall made of fiberboard. One or two walls - features
To begin with, let us recall that we described the history of the invention of the 10-frame Dadan hive, as well as its design separately. According to the design, they are distinguished: We are talking about buildings and stores made in the classic version - from a single layer of lumber, or with insulation using frame technology.
- the housing in which the bee's nest is located;
- a store extension where marketable honey is stored during the main harvest period (in case of abundant honey harvest, it is practiced to install a second store);
- bottom – detachable or one-piece floor panel with a house;
- single-pitched roof with gables equipped with ventilation holes (optionally with a roof liner).
Single wall house
The single-wall structure is assembled from boards with a thickness of 35 to 45 mm. Chipboard is suitable as a summer option, but again, you should focus on the climatic conditions of a particular region. The internal dimensions of the Dadan hive for 12 frames according to GOST are as follows (in mm):
- 450 by 450 in length and width (square section) for bodies and extensions;
- 320 in height for cases;
- 155-165 in height for magazine extensions.
To install honeycomb frames, select folds along the upper edge of the body/magazine:
- their width is 11;
- and the depth is 20 mm.
The bee house is equipped with a set of twelve nesting frames and twelve half-frames for the extension. In regions with abundant honey production, there may be more half-frames, since up to 2-3 magazines are installed. The kit also includes two diaphragms, assembled from thin boards on dowels and equipped with hangers for hanging.
When finished, the boards have a thickness of 8 to 10 mm. They are lined with a seal around the perimeter to ensure a tighter fit of the diaphragm to the walls - for this purpose thick oilcloth or leather tapes are used. Standard external dimensions of honeycomb frames (in mm):
- 435 width by 300 height – for the nest (body);
- 435 width by 145 height – for the extension.
Half-frames can also be made 143 or 160 mm in height. The main thing is that there should be a gap of 8-10 mm between the lower bars of the semi-frames and the upper bars of the nest frames, which will allow the bees to move freely and improve ventilation.
The design of the lid is very simple - it fits onto the house. More often it is made with a single slope, less often with a gable. Ventilation slots are cut along the side gables or several holes are drilled. Ventilation is provided with a fine-mesh metal mesh.
The bottom of the Dadan hive with 12 frames must be detachable. To do this, quarters are removed from the lower part of the housings. The floor panel is mounted from boards, onto which strips are placed on three sides. On the fourth side, a tap hole is formed across the entire width of the house - its length is 450, and its height is 15 millimeters (equal to the space under the frame and the height of the stuffed planks).
It can be adjusted in length with special inserts. For additional ventilation and convenience of the bee colony, a round tap hole with a diameter of 25-30 mm is sawn through the upper part of the buildings strictly along the middle line of the front wall.
The arrival board is solid - it is a protrusion of the floor panel in the front part of the house by 4-5 cm. If necessary, you can attach an additional folding arrival board here by hanging it on hinges. It will expand the living space for bees in the summer, when they have to constantly carry pollen and nectar. The cross-sectional drawing of a single-walled house looks like this:
Double-walled hive A double-walled or insulated hive with 12 frames is an ideal choice for the northern and central regions of our country. This design is assembled using frame technology. A suitable natural insulation material is poured between the walls of the housings, for example, dry sawdust, moss or chopped straw mixed with pine needles.
Note: The internal dimensions of the cases and magazines remain standard! Moreover, stores do not need to be insulated - they are installed only in the summer.
Usually, for convenience, beekeepers make the floor solid. The detachable option involves installing plugs made of bars in the lower part of the frame, which do not allow the insulation to spill out when the bottom is removed. The height of the lower entrance gap of 20 mm is ensured by the height of the slats installed on the floor panel. The upper tap hole is made in exactly the same place as in single-wall structures.
The main advantage of frame technology is a significant reduction in heat loss. For example, lumber 35 mm thick loses up to 2.1 calories in one hour. And with frame technology, losses are reduced to 0.65. In the spring, the nests living in such a warm house do not need to be reduced!
Making an Ozerov hive with your own hands
The roof is gable, equipped with ventilation holes along the gables. Additional insulation is provided by:
- due to the outer walls - they are 1.2-1.5 cm higher than the inner ones (an insulating mattress is spread into the side obtained in this way);
- due to the greater thickness of the internal walls, which avoids the insulation getting wet due to the formation of condensation in it.
Note: If we are talking about making a 14-frame Dadan hive, the internal dimensions are determined based on the width of the inter-frame space together with the hundred-frame frame. It is equal to 37 millimeters. Accordingly, the length of the house will increase to 520 mm (52 cm), and the width remains standard - 450 mm.
Let us once again clarify the dimensions and drawings of the honeycomb frames. For a nest they look like this:
And for the store they are made smaller in height:
Canvas or coverThe dimensions of the canvas for a 12-frame hive depend on its internal dimensions. And since the classic design is square in cross-section, the canvas will also be square - 50 by 50 or 60 by 60 centimeters. When expanding the house to 14 hundred frames, the canvas is made rectangular - 50 by 60 centimeters.
It is cut out of a fairly dense material - flax, cotton fabric. Traditional burlap for this purpose, as practice shows, is poorly suited. Due to the weaving being too large, insects crawl through the fabric, gnaw the threads and litter the top of the frames. Double-walled model made of plywoodUlei Dadan 12-frame dimensions and drawings (double-walled plywood design with a fiberboard extension): Drawing of a 12-frame magazine:
Roof with roof liner:
Dimensions of galvanized iron or tin for the cover:
Bottom and production of the tap hole:
General drawing of the product for 12 hundred frames:
We present all these drawings here as a vivid example of the work of folk craftsmen. It's up to you to decide whether to take them into service or not.
What is a diaphragm in a hive and what is its role?
The diaphragm is a board made of sheet plywood. Its height and length correspond to the internal dimensions of the hive (body). In addition to the main part, the diaphragm also includes an upper bar. It corresponds to the frame dimensions for a specific hive. There are end bars on the sides, also called awards. This design is the simplest, but the diaphragm can be designed differently.
Use a hive board to enclose the bees' nest in the free space inside the hive. The diaphragm also allows you to divide the hive into compartments. It must be used in cases where the bee colony does not occupy the entire volume of the hive.
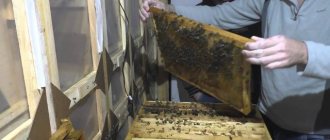
Once the honey has been pumped out, the diaphragm can be used to separate the pumped honeycombs from the bees. This ensures drying of the raw materials. You can also separate unsealed low-copper frames. In the future, they can be used to replenish winter food reserves.
To hang the diaphragm, folds are used - the principle is the same as in the case of standard hive frames. The insert hive board has a thickness of 15 mm. There should be a passage under the board for bees.
It is recommended to use 1-2 such boards in each hive. They are necessary when you need to plant a young bee colony in a hive. Such a device is also required for wintering, when there are few frames in the hive. In this case, the diaphragm allows you to separate the side spaces of the hive and insulate them.
The diaphragm (insert board, partition) is intended for fencing nesting hive frames. The most common diaphragms are a shield made up of individual planks 10-15mm thick. The partition is suspended using the top bar in the quarters of the front and rear walls of the hive.
It’s good if the hives are equipped with insulated plug-in partitions. Especially for spring and autumn. With sudden changes in night temperatures, high thermal insulation of the nest is achieved. Foam plastic is suitable for insulation. In this case, no side insulation pads will be required.
Insulating diaphragms using foam rubber also give good results, the bees do not leave the outermost street, and the edge of the nest is warm and dry. Making an insulated hive diaphragm is not particularly difficult.
You need to take the top block of a standard hive frame, cut a piece of foam rubber measuring 460x300 mm and two sheets of plywood measuring 440x315 mm. Lay the foam rubber between the plywood, insert wooden bosses into the lower part of the foam rubber, the length of which coincides with the width of the upper block. Nail the plywood with nails:
- the upper part to the block;
- the lower one - to the bosses on both sides.
Considering that the foam rubber is slightly larger in size than the internal width of the hive, and the bottom of the insulation protrudes beyond the edges of the plywood, the diaphragm fits tightly to the walls and bottom of the hive.
I had to make diaphragms, or insert boards as they are also called, using regular 435x300 mm hive frames without permanent dividers. On one side, I nailed plywood or fiberboard to the size of the hive with nails, on the other, I laid insulation and nailed a piece of burlap.
Such a diaphragm does not fit tightly to the walls and bottom of the hive, but it helps out during the wintering period of bees, say in a sunbed, water vapor freely escapes behind the partition into the free part of the hive.
In the heat of summer and during transportation, bees can hide behind the insert board. During the period of pumping out honey, at its final stage, the pumped out honeycombs can be placed behind the diaphragm for drying. The same can be done with unsealed low-copper frames, thereby replenishing winter feed supplies.
Amateur beekeepers use many designs of diaphragms, which, in addition to their main purpose, are used as a separation grid or insulator. For this purpose, the insulating diaphragm has a rubber seal at the ends and bottom, and a plastic separating grid in the middle part.
Comparison of the Dadan-Blatt hive with others
Due to the mass production of the dadan hive, the design has become widespread in the Union, although now it is retreating further and further from its leading position.
- Good for wandering. The family can easily fit into the building; the roof is removed and a mesh is nailed in its place for ventilation. Since the bottom is not removable, there is nothing to fall apart. It can be transported in 2 rows by installing bars between the layers for ventilation and securing the resulting structure.
- It is strong due to the connection between the body and the bottom.
- The volume of the dadan is sufficient for wintering, unlike a multi-body hive. In order to support a strong family, it is necessary to either allocate 2 buildings, or check: is there enough food? There is space to install side airbags if you use them. You can hang the feeder from the side, which is difficult in ten, and even more so in eight frame hives.
- Honey is selected by stores, while honey extractors are produced under case frames. In the cassette for Dadanovskaya, two magazines do not fit... Underloading leads to lower productivity when pumping out honey.
- GOST in the Union was developed for 4 Dadan frames, and even now most honeycomb bee packages are produced with them. It is convenient both to move to dadans and to select families from them for transfer.
- The work is much inferior to the work in terms of productivity, although it is superior in the thoroughness of the development of the bee colony. It’s good for hobbyists, but in large apiaries extra workers are required if there is a dadan hive there.
- The body, plus 12 large frames (full copper - 3.7 kg), plus a nailed bottom and the bees themselves... The Dadanovsky hive is too heavy for one, and too heavy for two.
- The constant occupation of 12 frame frames with brood prevents culling. Hence the frequent shortage of light sushi.
- It is difficult to accumulate frames full of copper for wintering; you have to form a nest from unfilled honey.
- Working with a helper queen, maintaining several families or a family with layers in one hive is practically impossible: it is too small for this...
In general, the Dadanovsky hive is not bad for amateurs. Disputes about the ideal design between beekeepers are an eternal topic; there are plenty of dadan fans, but it probably doesn’t meet the modern requirements of industrial apiaries.
Insulating diaphragm for the hive
It's the end of March, and the frosts at night are pressing - 12 degrees. We also have frosts in May, and I plan to do layering right at this time. And they will need to be properly insulated. I personally liked the insulating diaphragm for the hive, which I saw from Gennady Stepanenko in one of his videos.
A layer is a young colony on several frames; at first it does not occupy the entire body of the hive, and the bees need to additionally heat the free space.
To help warm the nest, they do things differently. They squeeze it on the sides with guard boards - solid wooden plates in the shape of a hive frame, with hangers, but slightly wider. And insulation pads, like these, are placed in the space between the guard board and the side wall of the evidence.
The diaphragm that I will make today will allow you to do without pillows. At least, I really hope so; there’s almost no free space left in the garage.
I put diaphragms into empty housings, but where would I put another fifty pillows? Besides, they still need to be sewn and stuffed with something...
How I made an insulating diaphragm for a hive.
The frame requires the same parts as the hive frame. The top bar and bottom bar are exactly the same size.
And the side strips are like this, smooth without any thickening.
They are 5 mm longer than the frame strips, so that the finished diaphragm, placed in the second housing, is pressed closely against the frames of the lower housing. The thickness of the slats is also greater - 14 mm, in order to close the passages between the frame and the wall of the hive; later on in the photographs this will become clearly visible.
I knock down the frame like a regular frame, only I take stronger nails - 50 mm. We get a frame with external dimensions of 235 by 443 mm (for a multi-body hive).
That is, if you put it in the case, then there will be 6 mm gaps between the side bars and the wall of the evidence, and 5 mm between the bottom bar and the frames of the case at the bottom (if it stands). These cracks will then also be closed with rubber seals.
Technological characteristics and types of wax press
Next, I take a sheet of dense polystyrene 20 mm thick and cut it into pieces according to the internal size of the frame - 415 by 200 mm.
I put it inside the frame.
I cut pieces of four-millimeter plywood, the dimensions are the same as the outer dimensions of the frame.
And with this plywood I cover the polystyrene from the bees. I sew it with a stapler. Very fast and convenient. Staples 14 mm long.
It happens that not all the staples are hammered in completely, but then I finish them off with a hammer.
It's still faster than using nails, and the plywood doesn't split. All that remains is to adjust the seal so that the insulating diaphragm fits into the hive without gaps. For this purpose, I take a regular rubber seal for windows and doors, which is sold in hardware stores.
Hollow tube with adhesive tape. The diameter of the tube is about 6-7 mm. I attach it to the diaphragm on the sides and bottom, first on the adhesive base itself.
And then I secure it with staples, only smaller ones – 6-8 mm long.
I sew the tube on both sides to make sure it doesn’t come off.
That's it, the insulating diaphragm for the hive is ready, it is also the separation diaphragm. By squeezing the nest, we at the same time insulate it.
The location in the hive is like this, it fits tightly between the walls.
If there is a lower housing, the diaphragm, with its seal, is adjacent to the lower frame.
If there is no housing at the bottom, there is a passage for bees between the bottom and the seal. I'll do layering and test it.
Manufacturing
Creating a frame for a diaphragm is similar to making a regular frame for a hive. Interestingly, the upper and lower bars will completely coincide with the size of the frame, so choosing suitable bars will not be difficult.
It is necessary to knock down a frame from the prepared slats. This process is almost the same as when making frames, only slightly larger nails are required to implement it. The best option would be a 50 mm nail.
As a result of simple manipulations, you get a kind of frame of a size suitable for a particular hive, which will fit almost tightly into its body. When installed, small gaps will remain between the frame and the walls of the hive, which in the future will be closed with insulation, and then the expected effect from the frame will be obtained.
Second phase
To carry out the next stage, you will need a piece of dense insulation, which is cut exactly to the size of the inside of the previously made frame. You can immediately insert this part into the frame. After this, a piece of plywood is cut out, the size suitable for the outer border of the frame, that is, completely corresponding to its dimensions.
We attach the plywood that protects the insulation material from bees using a construction stapler so that it holds tightly and does not move out.
Next, you should install a rubber seal on the side of the entire frame, which will eliminate the gaps from the finished diaphragm. It will become the dividing element in the design. A similar seal can be purchased at any hardware store, so there should be no problems with the choice. As a rule, such elements have adhesive tape, which will help complete the creation of the structure.
For reliability, this element can be additionally secured using a construction stapler, only in this case you will have to use smaller staples. It is recommended to fix the elastic on both sides so that it does not come off during use.
Video: warm diaphragm for the hive.