Natural fertilizers are in short supply these days when all fruits and vegetables are grown using synthetic nutrients. For those who prefer natural methods of feeding plants and at the same time have time, homemade compost is the best choice - fertilizer made from rotted plant residues. It’s not difficult to make; all you need is organic waste and a compost pit. Let's figure out how to properly make a compost pit or box.
How a compost pit works
Despite the name, a “hole” is rarely just an ordinary depression in the ground. You can, of course, arrange a place for rotting organic residues anyway, but it is more convenient to organize a special box.
In fact, this device is just a box or hole in the ground, where organic waste is placed layer by layer (not all, the list of acceptable components is given below). Under the influence of natural decay processes in the presence of air, raw materials are converted into a natural soil improver.
Since mature compost is located at the very bottom of the heap, it is necessary to provide for the possibility of its extraction without disturbing the overall structure of the stored raw materials. To do this, a door or hole is installed in the lower part of the compost box (box, basket).
It is also possible to install two or three containers into which the raw materials are transferred as they ripen or are sorted by type.
If you plan to use a traditional pit, you need to make sure it is deep enough and be prepared for the need to stir up waste.
Basic requirements for the composting process:
- free access of air (this is why it is optimal to design a compost bin, barrel, box and other above-ground construction options, rather than a pit in the usual sense of the word);
- preservation of internal heat. For this purpose, the structure is made with a continuous fence (having cracks and vents). Mesh boxes do not allow maintaining the optimal temperature of decomposition of organic matter in the layers adjacent to the walls;
- high humidity. The presence of water in the decomposing mass is a prerequisite; dry waste will not rot, so it is necessary to provide for the possibility of moistening;
- presence of microorganisms and/or worms. Vermicomposting (processing only plant waste with the help of worms) makes the mass homogeneous (homogeneous), the result of such processing is called vermicompost.
Depending on the composition of the processed raw materials, compost may contain more or less nitrogen, phosphorus, potassium, and other substances beneficial to plants in the most easily digestible form. In terms of nutritional value, compost is comparable to manure, and some varieties are superior to manure as a fertilizer.
Compost box and other containers at the dacha
What is more convenient - a purchased garden composter or a homemade compost box assembled to the required dimensions? Nowadays there are ready-made garden composters on sale. There are a large number of different models for producing compost - both with and without oxygen. They can be equipped with additional air supply equipment or be sealed. Many have a device to drain excess liquid produced during the composting process. Any containers for compost at the dacha can be used: buckets, barrels, cans, bathtubs, etc.
Such a structure looks quite aesthetically pleasing and indicates the “advancement” of the gardener. Mobility and the ability to install the container in any suitable place are a definite plus. A plastic container, made like a thermos, retains heat well, which helps warm the compost and maintain the desired temperature inside. Another plus is that you can safely place table waste there; in a closed container, it will be inaccessible to rodents. Compost prepared in a composter is considered more effective and concentrated, since during the preparation process in the container there is no “leakage” or weathering of useful substances.
Among the disadvantages is the presence of unpleasant odors; this compost is much more difficult to “regulate”.
The laying of compost components should be done at the same time, that is, before this, all components accumulate, awaiting their turn. In addition, purchasing a composter is not cheap; you have to pay a decent amount for it. And it is possible that you will subsequently be disappointed, since this purchase will not live up to your expectations. And finally, the main disadvantage of ready-made composters is the small amount of ready-made compost that can be prepared in it. What is good somewhere in Europe, when garden owners dispose of the remains of a barbecue prepared during a weekend visit, and cut grass from a small lawn, does not work here with our volumes of garden waste. There won't be enough space! Therefore, a purchased closed-type garden composter is good for those who visit their site occasionally and compost a small amount of kitchen waste in the form of potato peelings, egg shells, etc., mixed with grass from a lawn mower.
Requirements for the contents of a compost pit
In order to get truly useful fertilizer out of the composter, you need to know exactly what raw materials can be used for processing. The design of the composter itself depends to a certain extent on this.
So, the list of permitted raw materials:
- crop waste. This includes mown grass, fallen leaves, trimmed small branches, tops, roots and stems of plants, substandard fruits, berries and vegetables, weeds;
- animal waste. This is primarily manure and droppings, unsuitable for consumption by animals and poultry;
- residues from the processing of agricultural products - grain bran, grain husks, tops, fire, cleaning, etc.;
- household waste of organic origin - egg shells, tea and coffee grounds, vegetable and fruit peelings, rags made from natural fibers. Separately, it is worth mentioning human feces;
- sawdust, shavings, bark and other woodworking waste;
- peat.
You can also add organic matter remaining during the slaughter of animals, poultry, and the dressing of leather and skins.
Important: if you plan to frequently dump very fine waste for rotting, you need to take care of the minimum width of the gaps between the fencing elements.
You need to understand: any materials that come into contact with rotting organic matter will also gradually rot. Therefore, even metal sheets and long-decomposing plastic do not guarantee “eternal operation” of the composter.
General requirements: how to properly make a compost pit without harming the site
Considering that the rotting process is rarely accompanied by pleasant odors (especially when manure and feces are included in the raw materials), it is necessary to wisely choose the location of the compost heap.
It must be removed from housing (not only your own, but also your neighbor’s), water sources, fences and public roads.
Besides:
- It is worth placing the composter in the shade. In the sun, the raw material will dry out too quickly and will require frequent moistening;
- requires a relatively dry place. Location in a lowland or in an area where groundwater is high, next to a drain, is undesirable;
- it is necessary to provide access to earthworms. They should be placed in a hermetically sealed tank or deep hole with walls sealed with waterproof materials;
- It is undesirable to locate coniferous trees (evergreens) nearby. The best neighbors for a compost pit are birch and alder.
It makes sense to place a sheet of old iron at the bottom of a hole or box (box, basket). Gradually corroding, it will add useful substances to the humus - iron oxides.
Six rules for good compost
A simple compost pile will help you dispose of most of your yard waste and organic household waste, while enriching your garden soil at the same time. Experts offer six basic rules that will allow you to start producing your own compost.
1. Location
Select an area in your yard that is well-drained and close to your plantings so that you can easily move the compost there once it is ready.
size 2
For small gardens, composting in a board bin is suitable, but if you have a large plot, you will need a real compost bin. Determine how much waste you plan to produce and what style will be best for your yard. According to most recommendations, one side of the box should not exceed a meter, and the optimal dimensions of the pit are considered to be a depth of 1.25 m and a width of 1.5 meters. At the same time, the smaller the compost bin or pit, the more oxygen will be available to the bacteria that process waste into compost.
3. Components
Gather all the organic materials you find in the garden: grass, leaves, some weeds and place them in your hole or bin. Add any food waste from your kitchen to this green mass (leftover beans, fish and meat will increase the amount of nitrogen in the fertilizer). The only thing: do not throw flowering weeds whose seeds do not rot (ragweed, dandelion, etc.) and onion peels into the compost - worms do not like them. And be careful with the tops of tomatoes and potatoes. If they suffered from late blight, then it is better to put them in a separate pile, and with the resulting compost you can then fertilize plants that are not susceptible to this disease.
If you want to speed up the composting process, add a few shovels of soil to this mixture. With it, microorganisms responsible for the decomposition of plant residues will enter the compost. The soil also allows you to avoid the loss of liquid and gaseous substances that are formed during fermentation. It is best to sprinkle every 20cm layer of compost with garden soil. The ideal fertilizer contains 70% organic residues from the garden and kitchen, 20% manure and 10% soil.
4. Humidity
To get high-quality compost, you will have to control the humidity level all the time. The compost mass should not be dry, therefore, even when laying the compost, it is moistened either with a solution of microbiological fertilizers, or fresh manure, or simply with warm water. In hot weather, the compost is constantly watered, this is the most important condition for the reproduction of worms.
5. Shoveling
In summer, the compost is turned with a shovel and pitchfork to ensure uniform maturation. Here opinions differ: some experts believe that the heap should be completely moved with a shovel to another place twice a season, others argue that the compost should be turned with a pitchfork every other day, then the process of making fertilizer will be significantly accelerated.
6. Signs of readiness
If the compost no longer generates heat, smells quite pleasant, looks uniformly brown, and feels crumbly to the touch, then it is ready. It's time to find a use for it in the garden and beds, and you start producing the next batch.
Our video will help you understand what type of soil is on your site and select fertilizers for it. Read about composting tools, such as a composter bike or a composting bin.
Composter size calculation
Before starting work, it is necessary, of course, to decide on the dimensions. It is believed that humus matures completely in two years. Accordingly, it is necessary to estimate how much garbage suitable for putting into the device can accumulate during this time. If there was already a compost heap or bin on the site before, this is easier to do. If not, you should calculate how many times a week/month garbage is thrown out, what percentage of this garbage is suitable for putting in the composter and what is the volume of the trash can/bag.
For example: in a private house during the warm season, garbage is thrown out every day, the volume of the bucket is 10 liters. Organic waste accounts for 80% of this volume. In winter, garbage is thrown out every two to three days, the volume of organic matter in waste is 60...50%. Accordingly, we take as an average 7 liters per day and a half.
(365/1.5)x7=1700 l.
Considering that garbage is not water, and one cubic meter contains not 1000 liters, but approximately 700...800 (taking into account compaction and different sizes of waste), we assume the volume of the composter is approximately 4...5 cubic meters. This volume will give a box with sides 2x2x1 m (4 cubic meters) or 2x2.5x1 m (5 cubic meters).
Manufacturing from pallets
A special feature of the product is the absence of fastening screws. The connection is made through slots in the pallets.
For manufacturing you will need materials and tools:
- pallets;
- hammer;
- roulette;
- assembly adhesive;
- gun;
- level.
The work consists of the following steps:
- At the first stage, all the pallets are disassembled and slots are made in the boards using a jigsaw.
- Then they gather again. One side is installed at an angle. This is necessary to remove fertilizers.
- During assembly, you should constantly use a level to prevent distortion of the structure. All seams are coated with assembly glue.
- At the end, the product is coated with an antibacterial solution.
Making a simple compost pit with your own hands
To make a pit, it is necessary, observing the conditions listed above, to choose a suitable location. Further:
- a hole of the required size is torn off. It can be round or rectangular in cross-section. Round (oval, irregular) is convenient for the simplest structure - with earthen walls. If you plan to line the interior with boards or slate, it is better to make a rectangular pit;
- place a sheet of iron on the bottom;
- the walls can be left as is (suitable for dense rocky and sandy-clayey soils) or covered inside with boards, slate sheets, old linoleum, roofing felt. Be sure to leave air gaps;
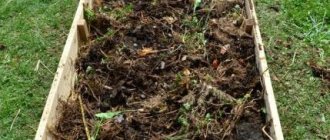
- greenery (weeds, branches with leaves, mown grass) is thrown onto the bottom.
Then you can store the waste until the pit is filled. It is advisable to cover the compost pit with a tarpaulin or grass when adding organic matter.
If you want to get a more durable structure, the walls can be laid out with blocks or bricks.
An example of such a structure - without any additional materials, with earthen walls and bottom - is shown in the video.
How to make a compost bin from slate
Another very simple option for making homemade humus. For implementation, you only need a shovel, pieces of old slate, a grinder (or saw) and some old boards with nails or screws.
Sequence of work:
- Once the location for the composter and its volume have been selected, the slate panels are cut to the required size. It is not necessary to make the walls from solid sheets - you can choose a composite structure;
- the slate is dug vertically into the ground to create a closed rectangular contour. The panels fit into loose mail quite easily; in dense mail, you will have to dig a trench and then compact the excavated soil around the sheets;
- the structure is fastened with boards or beams inside (as shown in the photo) or outside (as demonstrated in the video).
The compost bin is ready to use!
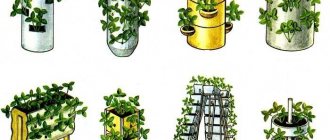
Types of composters
| A compost pit is a simple, but not very convenient way to prepare fertilizers |
A structure designed for preparing compost is called a composter. In the narrow sense of the word, a composter is precisely a box for preparing fertilizer; in a broad sense, it is any structure for producing compost. Some designs can be easily made with your own hands.
— A compost pit is a budget option for a composter. A rectangular or round hole is dug in the ground. Such a composter is easy to manufacture (you only need a shovel for construction), but it has a number of disadvantages, the main one being the lack of good ventilation, and composting is an aerobic process, i.e. occurs only in the presence of oxygen. In addition, heavy rains can fill the hole with water. On the other hand, the advantages of the pit include the contact of the composted mass on all sides with the soil, which is a supplier of beneficial microflora and earthworms.
| The upper layers of the compost heap become very weathered; to start the composting process, it is necessary to make a cover of film or slate |
— A compost heap is the most unpretentious option for preparing compost. Organic matter is simply piled up and covered with film, slate or roofing felt. The coating must have holes for air access. Fresh manure is usually composted in this form so that it does not “burn” the roots of the plants. At the same time, the process of decomposition in the heap is uneven; the center is the central part, which is not so easy to reach.
| Approximate view of a mesh composter |
- Mesh composter - this design will require a special mesh that wraps around the supports, forming a container. The mesh is easy to install and can be given any shape if desired. The disadvantage is that the outer layers take a long time to decompose due to weathering. The compost in the grid will have to be stirred regularly.
— Box – many people, out of old memory, call such a composting structure a “pit” or a “pile.” You can build a container yourself or purchase a ready-made one. Any materials are suitable for construction. Some people use old boards, sheets of steel, etc. When constructing a container, one should not forget about the ventilation holes, which should go at regular intervals and not be very wide so that the raw materials do not get weathered. After a few years, such a wooden composter will begin to rot on its own, so the boards will have to be replaced.
| A defective board is an excellent material for a composter, so don’t rush to get rid of it |
Ready-made containers for composting have a proven geometry. They are small in size and weight and are easy to move around the site. The service life is not limited to one or two seasons. Manufacturers try to make composters attractive so that their appearance does not spoil the surrounding landscape. Often finished composters have a lid, this prevents the spread of unpleasant odors.
An interesting way to obtain fertilizer is through a composting toilet. Externally, this device is a toilet with a tank with a volume of 100 - 200 liters. Peat acts as a composting and antiseptic agent.
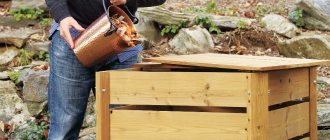
Do-it-yourself wooden compost pit at the dacha
There is a little more work here, but the labor intensity largely depends on the chosen model. Let's consider the simplest one - a box made of old boards.
The number of boards, height and cross-section of the beams for the corner posts depend on the selected volume of the composter. For dimensions 2x2x1 m you need:
- timber with a cross-section of at least 50x50 mm (preferably 50x100 or 100x100 mm) for corner posts. The length of the timber is at least 1.5 m;
- edged or unedged board 2 m long. With a width of 100 mm, 9 boards per side will be required (36 in total). Board thickness – at least 20 mm;
- additionally two boards 50...60 cm long for fastening the removable part of the side;
- screws or nails for assembly;
- antiseptic for impregnation;
- any fastener to hold the removable part of the side.
If you do not plan to regularly rake out mature compost, it is not necessary to make a removable part of the border. On the bottom boards, it is enough not to hammer nails/tighten the screws to the full depth, leaving protruding heads. Then it is easy to remove the fasteners and remove the boards.
Execution sequence:
- according to the markings, dig/drive corner posts into the ground, aligning them vertically;
- using self-tapping screws or nails, secure the boards to the corner posts so that there are gaps of at least 10 mm between the boards;
- Separately knock down the removable part of one of the walls from the boards and secure it to the structure using wire, partially driven nails, or some other way.
Important: before starting work, boards and beams must be soaked with an antiseptic!
It should look like this. This is a design with a deliberately reduced height of one side.
A simpler option may be a box without a front wall. In this case, the waste is loaded in bulk. It turns out to be more of a heap than a hole.
A thick plastic film covering the sides and bottom of the compost bin will help to avoid the “spreading” of recyclable waste throughout the area. However, in this case, we should not forget that the process of rotting organic matter is aerobic and air flow is required!
There is another way to fasten the boards that form the border of the box: using carpentry technology. In this case, corner posts are not needed, and the box is simply placed on the ground.
A rather convenient option is one with lifting, rather than removable, doors for scooping out the finished product. In this case, the racks are made with longitudinal grooves along which, like guides, the door will slide.
It is also highly advisable to place lids on compost bins. They will prevent the unpleasant odor from spreading too much, help avoid the infestation of flies and protect the processed raw materials from rain and snow.
How to make your own compost bin from pallets
We offer one of the simplest options for creating a composter from pallets. This method does not require complex carpentry tools or a lot of time to make a compost container.
We will need 6 Euro pallets, curtains for the lid and doors, screws, 5 m of mesh, 2 m of plastic film and simple tools, including a hand drill and stapler. The technology is as follows:
- We disassemble 2 pallets (we disconnect the lower part, leaving the top);
- From the 4 remaining pallets we assemble a box, as in the photo;
- We cut one disassembled pallet in half and immediately connect the halves using curtains. The front wall is ready;
- The remaining disassembled pallet will be the lid; it must be covered with film and then with a mesh using a stapler;
- We also line the entire container from the middle with mesh;
- Using curtains we attach the lid to the box. The composter is ready.
Such a DIY compost box will last a long time and will be able to postpone the natural stages of ripening of raw materials for several seasons. You can quickly extract the required amount of fertilizer from it or organize another layer from the resulting waste. It can be placed in close proximity to the area being treated.
How to make a compost pit at your dacha from pallets
To speed up the process and avoid knocking down the walls yourself, you can use available material - wooden pallets.
In this case, it is necessary to select pallets of a suitable size, remove unnecessary elements from them and connect them into a closed rectangular contour. The outside of the building can be upholstered with thick film or old linoleum.
The manufacturing process is shown in more detail in the video.