Basic requirements for feeders
When manufacturing this product, the following requirements must be observed:
- use only safe, environmentally friendly and hygienic materials;
- take into account the size of the cage and the required amount of food;
- prevent droppings or pieces of litter from getting into the food;
- make the sides high enough so that the food does not spill;
- structures must be reliable, stable and durable;
- comfortable for birds and the farmer;
- easy to maintain and clean.
Making quail feeders with your own hands
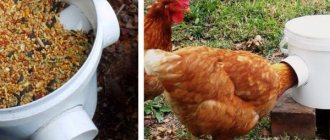
Making a feeder yourself is not as difficult as it might seem at first glance. You just need to stock up on the required materials and a little patience. Let's look at three design options - bunker, tray and plastic bottle.
Required materials and tools:
- Metal sheet;
- plumber's scissors;
- sheet bender;
- hammer;
- drill;
- riveter;
- pliers;
- clamps;
- calipers;
- ruler.
DIY metal bunker feeder for quails: video
Step-by-step instruction:
- From a metal sheet, cut out the main part measuring 340x940 mm, the internal (dispenser) measuring 200x940 mm and two side parts in the form of a rectangular trapezoid 180 mm high with bases 150 mm and 100 mm.
- To protect yourself and the bird, bend all edges tightly in one plane by 10 mm.
- Using a corner bender, give all the parts the required configuration.
- On the side parts, first bend the short side (100 mm), and then the rest. Leave small loose tabs at the top of the long side.
During assembly, the side parts are put on the main part of the feeder. The tabs on the sides are bent inward with pliers, fixing the parts.
The dispenser is inserted inside, all parts are fastened with rivets using a drill and a riveter.
- So that the dispenser does not “walk” and can be adjusted depending on the size of the feed, two metal clamp strips about 15–20 mm wide are inserted inside the feeder.
- tree;
- plywood;
- jigsaw;
- a circular saw;
- hole saw;
- screwdriver;
- calipers;
- ruler.
The length of the product depends on the length of the cage and may vary. The size of 940 mm was adopted based on the economical use of metal, since in this case, from a sheet measuring 1250 x 2000 mm, two feeders and four pallets are obtained without waste.
Required materials and tools:
DIY tray feeder: video
Step-by-step instruction:
- Prepare the base of the feeder - a wooden strip measuring 50x1000 mm and 15 mm thick.
Cut two wooden sides and one lintel in the form of rectangular trapezoids 115 mm high with bases of 95 mm and 50 mm.
Use a screwdriver to connect the bottom and side parts with the holes.
Place the sidewalls and the jumper on the glue and also attach with a screwdriver.
If you cut grooves on the side and middle parts and insert plywood partitions into them that do not reach the bottom by 2–2.5 cm, you can get a bunker from a tray-type product.
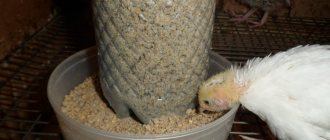
From a plastic bottle
Necessary materials:
- plastic bottle;
- sharp knife or scissors.
Step-by-step instruction:
- Cut the bottle in half.
- On the side surface of the lower part, cut 5-6 holes so that the quail’s head fits freely into them.
- Place the top part of the bottle, neck down, into the bottom so that it does not reach the bottom a little (2–2.5 cm).
- If necessary, use a knife to adjust the height of the bottom of the bottle.
- Pour food into the upper part of the structure and add as it is consumed.
Feeder made from a plastic bottle: video
Quail drinking bowls
Birds should always have clean and fresh water in their cages. Quails can quite quickly contaminate the drink or splash out water, for example, by getting their paws into it. Therefore, drinking bowls should be such that the bird cannot climb into them and at the same time always have free access to drink.
Types of drinking bowls
There are several types of quail drinkers and they all differ from each other in the principle of water supply.
- Open type. This can be any vessel from which the quail can drink water. Such drinking bowls have one significant drawback - the drink quickly becomes dirty and splashes out, resulting in an increase in the level of humidity in the cells.
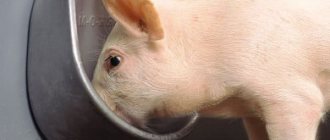
- Vacuum. The principle is based on the difference in pressure inside the container and air pressure outside. A simple example: a can, inverted and placed in a flat container on small spacers. Water fills the vessel to a certain level and then stops flowing out.
- Nipple (automatic). The principle of operation can be compared to a washstand - liquid flows when you press the nipple.
- Cupped. The bowls are filled with water to a certain level, and the gravity of the liquid regulates its flow.
What should a drinking bowl for quails be like?
- Hygienic material from which the sippy cup is made (stainless steel, food grade plastic, etc.);
- A stable design in which the bird cannot climb or fall into the drinking bowl;
- Free access to drinking bowls;
- Garbage and various impurities should not enter.
For young quails, it is better not to use open access drinking bowls, since quails are very active birds and are always ready to climb into the container, as a result the water becomes polluted and the risk of diseases increases. In addition, chicks can easily choke.
How to make a quail drinker
There are quite a lot of options for making sippy cups. Here are a few examples of how to quickly build functional and convenient drinking bowls.
How to make a nipple drinker
Such sippy cups are now on sale everywhere, and can also be ordered through online stores. But if time is pressing or finances do not allow, then you can easily assemble the device yourself.
For this we need:
- Polypropylene pipe;
- Rubber hose;
- Pipe plug;
- Nipples;
- Drop eliminators.
Water is supplied under pressure in the pipe. As soon as the bird touches the nipple, water will flow and he can drink.
- We hang the container (the higher, the better). This can be a clean plastic canister or a large bottle;
- We connect one end of the rubber hose to the container, the other to the pipe.
- We plug the second end of the pipe with a plug;
- In the pipe, at a distance of about 10-20 cm from each other, we drill holes and screw nipples into them, the threads of which must first be wrapped with sealing plumbing tape;
- We fix droplet eliminators under the nipples.
Drip drinkers for quails are perhaps the best option, since the bird does not get wet when drinking, and the water always comes in clean and fresh.
Nipple drinker for quail
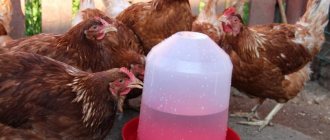
Plastic bottle drinking bowls
In the absence of the opportunity to buy ready-made drinkers, you can easily cut them out of plastic bottles. There are several options that any poultry farmer can make.
Option #1. The tools you will need are scissors, and the materials you will need are two 1.5 liter plastic bottles and wire.
- Cut one bottle in half;
- In the lower half we make two identical rectangular holes (the dimensions should be such that the bird can freely stick its head in and out);
- We make a cut in the neck at the top of the “one and a half” bottle and insert it into the bottom of the bottle, neck down;
- At the top of the support we use wire and hang this structure.
The photo below shows a drawing of the assembly process more clearly:
Drawing of a drinking bowl for quails from a plastic bottle
Thus, we have a simple DIY vacuum drinker for quails with convenient access to water.
Option #2. Instead of the lower container (bath), you can use, for example, a tin can. The bottle must be securely attached so that its neck is just below the edge of the lower container.
Option #3. Open type drinking bowl: cut a longitudinal hole about 8 cm wide along the bowl and secure it to the wall of the cage using electrical tape and wire.
Vacuum drinkers
It makes no sense to make such sippy cups yourself, because they are sold in stores at affordable prices. For example, the simplest is a bowl in which a glass jar (one-, two- or three-liter) is installed. Such a drinking bowl costs around 50 rubles. There are more voluminous and functional vacuum designs, which can be purchased for about 200-300 rubles.
Vacuum drinking bowl for quails
DIY quail drinker video
Advice! Often site visitors ask the question: how to accustom quails to a nipple drinker. In fact, the bird itself must understand where it can get water from; to do this, you need to remove the old drinker and hang the nipple drinker correctly - just below the quails’ heads at the rate of one nipple per 10 birds. If the case is very severe, then try to make sure that water leaks a little from one nipple.
Cup (microcup) drinkers
Sippy cups with a fairly simple, but at the same time functional design. Optimal for any type of poultry. They are protected from debris, food, and droppings.
The drinking supply system consists of small bowls to which water is supplied. The water supply is closed by a special rod with a tongue that floats on the surface. When the water level decreases, the tongue opens the liquid supply, and the bowl is filled again to the desired level. Cup drinkers are optimal for young animals. The bird quickly gets used to them and does not put its paws into the water.
You can make such sippy cups with your own hands, but technically it is quite difficult and time-consuming. It is better to assemble the structure from ready-made elements. For example, one thicket costs around 50 rubles.
Useful tips
To make the design truly durable and comfortable, use the following tips:
- the cut edges of the product must be well processed so that the quails do not get hurt;
A properly designed feeder will reduce feed consumption by 20%.
By building a quail feeder with your own hands, you can not only save a lot, but also get a product that takes into account all your requirements and the size of the bird cages available on the farm. In addition, if necessary, you can easily replace any of its parts or make a new feeder.
Read also: Hatching eggs with Indian ducks
Tips for using feeders
- First of all, feeders should be easy to maintain. They must be secured in such a way that they can be easily removed for cleaning and washing.
- When manufacturing, you need to take into account that there are about eleven millimeters along the length of the tray per head. Any crowding should be avoided near feeding areas.
- You can fill no more than 2/3 of the volume with food.
- Quails are active and often scatter food, so the design should be such that this does not happen at all or happens less.
- Any utensils for quails must be safe for birds. Do not injure them and do not contain toxic elements.
Many different types of feeders have been invented. Sometimes self-made designs can be superior to factory-made products in terms of convenience, originality and durability.
If you have such a project, please share it with our readers in the comments.
How to make a quail feeder with your own hands?
In the cage with quails, it is necessary to install feeders that provide free access to food. You can not only purchase them in the store, but also make them yourself, taking into account the number of heads on the farm. To do this, you will need to select a structure of a suitable type, prepare the appropriate materials and tools, and then begin assembling the feeder according to the prepared drawings and step-by-step instructions.
Making automatic feeders
At its core, an auto feeder is a device with dosed feed supply. An automatic feeder is used most effectively on large farms.
The cost of purchasing feed in poultry farming takes up a significant share of costs. Automation of feeding will reduce feed consumption by up to 20%. This is a significant reduction in the cost of producing eggs and quail meat.
Such automatic feed supply devices are manufactured in the factory. It is also possible to make such devices yourself. This will require electrical and mechanical skills.
The bunker tank can be additionally equipped with an automatic feed supply device. You will need a time relay (timer), an electric drive, a dispenser, and wires. In this case, feeding is done three times a day. The timer goes off and food comes into the tray. Then the feeder “closes”. The mechanism for opening and closing the curtains can be electrically driven. The poultry farmer saves time and feed. The benefits are obvious.
Requirements for the feeder
In order for a homemade feeder to be convenient and safe to use, it must meet the following requirements:
- It consists of materials that are safe for birds, do not emit toxic and poisonous substances, are easy to wash and clean, and are strong and durable. These requirements are met by galvanized sheet metal, sheet steel (preferably stainless steel), plastic, wood, and ceramics.
When making a feeder, never use copper or other toxic or potentially poisonous materials.
Hopper feeder options
There are various options for this design, which we will consider in more detail below.
This option is considered one of the best, although it can be assembled in an hour using materials that can be found in bins or purchased at a low price.
Here are the necessary tools and materials:
- CD-60 profile, used when installing ceilings and walls approximately 20 cm wide (recommended feeder sizes for adult quails are 2x2.5 cm);
- 2 sheets of chipboard 105x60;
- 4 mm plywood (or any sheet material fiberboard, plastic, laminate) - 2 sheets measuring 20x10.5 and 20x8.5 cm;
- silicone or similar sealant for sealing cracks;
- 10 self-tapping screws measuring 1.6x2.5 cm;
- pliers;
- jigsaw;
- drill.
Having prepared everything you need, you can start making the feeder:
Self-tapping screws should be used with a cast washer. They do not have a cone under the head, so the likelihood of cracking the ends of chipboard and plywood is significantly reduced.
It is recommended to fill bunker feeders so that there is enough food for several days and the quail do not remain hungry.
From a plastic bottle
This design is simpler than the previous one and its manufacture will take no more than half an hour. This is an excellent option for inexperienced craftsmen who do not have the skills of a carpenter or mechanic.
To make it you need to prepare:
The feeder is made in this order:
- Cut the plastic bottle almost in half.
- In the lower part, use a sharp knife to cut holes in a circle with a radius of 1 cm so that the quail can stick its head into them.
- Turn the top of the bottle over and insert it into the bottom. Pour food into it and place it in the cage with the birds.
It is recommended to place the resulting feeder in a tray and secure it with a self-tapping screw.
How to make a primitive bunker feeder is shown and explained in the video:
Made of metal
In the manufacture of feeders, you should never use toxic materials like copper, but metal is a completely acceptable option. In addition, it is easy and quick to clean and disinfect. Let us consider in detail how to make the necessary equipment from it.
Here's what you need to prepare:
- Metal sheet;
- plumber's scissors;
- sheet bender;
- hammer;
- drill;
- riveter;
- pliers;
- clamps;
- calipers;
- ruler.
It is necessary to cut 4 blanks from a sheet of metal using ready-made drawings:
- main part – 340x940 mm;
- internal part or dispenser – 200x940 mm;
- 2 side walls in the shape of a rectangular trapezoid with a height of 180 mm and bases of 150 and 100 mm:
The length of the feeder depends on the size of the cage and can vary. The size of 940 mm provides for the economical use of metal, since from a sheet measuring 1250x200 mm you can make 2 such feeders and even 4 pallets without waste, which will certainly be useful on the farm.
So, having cut out all the necessary parts, you can start assembling:
If you follow these instructions, you can assemble a feeder that can be filled with 7 kg of feed, which will provide the birds with food for 5 days. In order to complete all the work correctly, we recommend that in the following video you can clearly see the entire process of making the feeder - from cutting metal to assembling blanks:
Installing feeders in the cage
The technology for installing feeders in a cage directly depends on their type. If the structure is made of a plastic pipe and provides for semi-automatic feed supply from the bunker, it must be secured on the front side of the cage at a slight slope, this will ensure the movement of grain along the entire length of the chute. If there is no bunker, the pipe can be attached strictly parallel: in this position it will be much more convenient for the birds to remove food from the holes, but it will need to be poured into each of them, and before cleaning the feeder, pour it into one container and use it again. The structure made from plastic bottles is installed in a similar way.
Important! Feeders in cages must be installed in such a way that each adult
has at least 3–5 cm of free space near the tray.
A tray feeder for chicks, made from a profile, does not require special installation. It is simply placed in the cage and removed from it after the bird has eaten food for cleaning and refilling. Galvanized steel is a fairly heavy material compared to the weight of quail chicks, and the low sides of the feeder and its long dimensions make the structure quite stable, minimizing the risk of overturning. Nevertheless, even in this case, it is better to provide a small elevation in the cage on which a container with food will be installed, since trampling with paws on food, even if protected by a lattice, is categorically not recommended from a sanitary point of view.
Speaking about the installation of feeders, it should be noted once again: whatever modification of the container is chosen, it should not be “tightly” fixed in the cage or outside it. Fasteners should be selected based on the principle of reliability and the ability to be easily removed and reinstalled (remember, the feeder needs to be cleaned after each meal of wet food, and when using dry mixtures, simply as often as possible).
Making tray feeders
Such structures can also be made from various materials, depending on which the complexity of the assembly will be determined. Let's consider several options.
Made of metal
To assemble a primitive version of the feeder, the remains of a metal profile are used for installing suspended plasterboard ceilings.
The procedure is as follows:
This feeder can be hung on the cage using attached metal holders.
Read also: Mites in chickens: signs, control measures and prevention
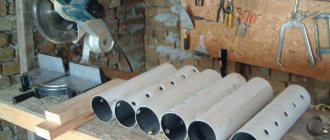
To make a tray feeder from plastic, a piece of water pipe is used. In addition to it, you will also need a cutting tool.
You can make food equipment in several stages:
- Cut the pipe to the required length.
- Cut a snake-shaped pattern into the pipe, as shown in the photo below.
- Place a plug on one end of the pipe and an 87-degree bend on the other.
This is the most complex design, but it will last much longer and will not allow birds to scatter food. Interestingly, it is universal because it has a removable partition. If it is installed, the feeder will become a bunker and can be used in the case of feeding birds for fattening.
To make it you will need:
- tree;
- plywood scraps;
- jigsaw;
- a circular saw;
- hole saw;
- screwdriver;
- calipers;
- ruler.
The structure is assembled in this order:
If you insert plywood partitions that do not reach the bottom by 2-2.5 cm, you can get a bunker-type feeder.
The entire process of assembling the structure can be seen in the video:
How to make a trough mounted feeder?
This is a simple design that is most easily made from galvanized sheet. If you don't have one at hand, you can use aluminum.
You need to prepare in advance:
- galvanized sheet 0.5 mm thick;
- pieces of plywood;
- jigsaw or hand saw for wood;
- metal scissors;
- small carnations.
It is made according to the following drawing:
The sequence of actions is as follows:
Gutter-type equipment should be covered with a net, like tray feeders, so that quail cannot scatter valuable feed.
There are different types of feeders that the home DIYer can make. Some options are simpler, while others are more complex, so everyone can choose the right feeder based on their skills. In this case, it is necessary to comply with a number of requirements so that the equipment can be easily maintained in the future and does not pose a threat to birds.
Types of structures
To feed quails, farms use the following types of feeders:
- grooved;
- tray;
- bunkers.
Tray feeders for quails are a regular trough. The advantage of this design is, first of all, ease of manufacture. Grooved feeders are convenient to use when keeping poultry using the cage method. This option is attached directly to the rack. Hopper feeders, like tray feeders, are used for floor or enclosure keeping of quails. The main advantage of such designs is the ability to reduce the frequency of feeding. Hopper feeders are well suited for homestead owners who do not come out of town every day.
How to make quail feeders with your own hands
Breeding quails in cage conditions dictates its own conditions for the proper organization of bird feeding.
For these purposes, you need the right feeders, which will not only provide comfort to the quails, but will also save on feed and ensure cleanliness in the cage.
You can buy equipment in specialized stores, but you can quite successfully make them yourself from scrap materials.
When choosing the type of construction, it is important to remember that quails can scatter a lot of food during feeding, and this not only adds additional financial costs, but also dirt in the cage.
In this regard, it is necessary to choose models taking into account the age of the quail, which will reduce costs and simplify the procedure for maintaining cleanliness.
Types of homemade quail feeders
According to the method of feeding, quail feeders are conventionally divided into:
Based on design features, they can be divided into the following types:
- hanging and floor,
- cellular and grooved,
- buffer and open.
Most often, farmers use hanging models, which are suspended from the outside of the cage. This is convenient because dirt and droppings do not get into them, which means the food will not spoil.
Floor models are optimal for free-keeping quails.
Cellular models are used at the very beginning of the life of chicks in order to limit the space for each of them and avoid crowding around the food. In the future, the cellular feeders are replaced with grooved ones, taking into account the feeding front of 170 mm for each quail.
Bunkers, unlike open models, are filled with food every two to three days.
The dispenser ensures the supply of food in certain portions. To ensure that the quails do not remain hungry, you need to carefully monitor the feeding.
What are the requirements and sizes for quail feeders?
A high-quality and reliable feeder must meet the following requirements:
- contain the amount of feed required by the birds with a small reserve,
- made of safe environmentally friendly material,
- easy to disinfect, wash,
- have a convenient approach for both birds and farmers,
- protect the feed from contamination, such as feathers or droppings (a special protective device is used for this).
When choosing a design, it is important to consider the following factors:
- material of manufacture: stainless steel, plastic are optimal (safe, easy to clean, non-toxic),
- size – when choosing a feeder model, it is necessary to calculate the required amount of feed, and also take into account the size of the cage,
- reliability of the design - the sides should not be too low, otherwise the feed will spill out; the feeder itself must be stable and durable.
Step-by-step instructions for making a bunker feeder
Any bunker-type feeder is a container with a tray. The structure is turned over, and the food begins to pour into the tray itself as the birds eat it. Human participation in the process is not required.
Let's consider two ways:
For a simple and convenient quail feeder, you only need two plastic bottles.
- From the first you need to cut off two thirds and cut out a rectangle.
- Then you need to cut a hole in the bottom of the second bottle; food will flow through it in the future.
- The second bottle is placed in the first so that its neck does not reach the bottom of the first bottle. At this point the feeder can be considered ready.
Read also: How to use Baycox for chickens: instructions for use
VIDEO INSTRUCTIONS » alt=»»> Option 2
To create a feeder you need:
- two chipboards 105x50 mm,
- CD60 profile, matching in size to the width of the future feeder,
- plywood 200x85 mm and 200x105 mm,
- 10 screws,
- sealant.
VIDEO DESCRIPTION » alt=»»> Operating procedure:
How to make a hanging quail feeder with your own hands
Mounted models are attached to the outside of the cage.
For manufacturing, you must adhere to the following algorithm:
- plywood sheet
- Galvanized Iron Sheet
- Nails or screws.
Mounted feeders from a profile for quails and plastic models can also be made
- a properly organized feeder will help reduce the cost of purchasing feed by 20%,
- Copper should not be used for manufacturing,
- in the case of group keeping of quails, it is better to choose a feeder made of sheet metal,
- To avoid crowding, it is necessary to provide a feeding front of 200 mm for each bird.
Thus, using available materials, it is easy to make simple versions of quail feeders and save money on purchasing expensive models in stores.
Types of feeders and their manufacture
The choice of design for feeding chicks at each stage of their development will be different. So the first fourteen days are a tray in the brooder. Next, various groove options are used.
They are installed outside to prevent food from being thrown around. There are four types of feeders:
- Tray. One type of food is poured into a tray with small sides. Usually used for quails in the first days of life.
- Grooved. Used for feeding adult birds. They are secured only from the outside, as a result of which they have a one-sided approach.
- Bunker room. Can be mounted both inside and outside. Intended for dry food only.
- Automatic. It has a timer, which greatly simplifies the process for the quail breeder.
Bunker
Hopper feeders consist of two parts: a container for food and a tray where the food goes. Looks like a boot. It can be made from an ordinary plastic bottle or from other materials.
From a plastic bottle
A very simple option - from a plastic bottle. You need to leave about 10 centimeters from the top and drill holes for feeding food. The bottom is cut, as well as the top of the holes. Place the top part into the tray and secure with self-tapping screws. The bunker bird feeder is ready.
From chipboard
If the population is large, there may not be enough bottles. To adjust the volume, take the necessary materials (sheets of plywood and self-tapping screws) and make a hopper from a regular drywall profile, attaching the side walls to it on four sides. The width of this device corresponds to the size of the gutter, the height is calculated in accordance with the required amount of food. At the top, for attachment to the cage, you need to provide holes for the wire. The side parts are made in the form of a boot.
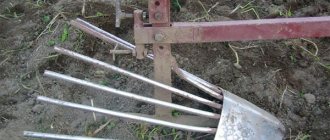
Grooved
This type of feeder is made of metal and plywood. A sheet with a width of 181 mm and the required length with a calculation of 50 mm per bird is marked for bending according to the pattern 50x30x50x40. The side that is adjacent to the birds’ housing is bent 10 millimeters inward to avoid rashes. After making the bends, the wooden sides are fastened to the metal with nails. All sharp elements are bent so as not to injure pets. Food of different consistencies is poured inside the feeder, since the durable design allows it to withstand the load.
Tray
Made from metal or plastic. The sheet is bent on both sides at an angle so that in cross-section the structure looks like a trapezoid. It will be stable if the base to height ratio is 2:1. A net is attached to the top to prevent young birds from scattering all the food. If the tray feeder is made of a pipe with a diameter required for stability, then a slot is made on one side, and holes are cut out at the top at a uniform frequency. Be sure to install plugs at the edges of the pipe.
Automatic
Many summer residents do not have the opportunity to be there or come there often, but they still keep birds. An automatic feeder is provided for them, which is equipped with a food supply timer. They are also effective in large sparrowhawks, since they save feed by about 20%. The automatic feeder requires the manufacturer to have skills in electromechanics. The materials are the same as for the bunker, but you need to install a time relay, an electric drive, a dispenser and wires. The mechanism is simple: the timer works, the curtain opens and food comes in, then the curtain closes. The opening and closing process is done electrically. It’s easier to buy such a device, but you can make it yourself.
Types of do-it-yourself quail feeders
Quails are not very clean animals; while eating, they scatter food, littering the entire cage. A feeder can partially prevent this. There are several different types of bird tank construction; they are selected individually, taking into account the characteristics of the birds.
There are several types of quail feeders.
Let's look at several classifications of feeding devices, they are divided according to the method of loading feed:
Instructions for making feeders
There are many types of feeders, and therefore the materials used. Let's consider the best options for preparing feeders from easily accessible or improvised materials.
A quail feeder can be made from available materials.
Profile bunker feeder
The convenience of a bunker feeder is that food can be poured into it once every few days. Thanks to this design, there is no need to constantly monitor the birds; it is enough to periodically replenish food supplies. Even from a simple tray structure, a bunker can be easily made.
To start working on a profile feeder you will need a few materials:
- A sufficient piece of CD 60 profile (60 mm wide).
- A piece of plywood or board.
- Self-tapping screws.
Calculations of the profile length, number of notches and other parameters are best done at the drawing stage.
The actions themselves have the following algorithm:
Plastic hopper feeder
The simplest and most pliable material for manufacturing is plastic. The design of a plastic bottle feeder is as simple as possible; even a novice breeder can easily handle it. The entire structure consists of a plastic bottle, a long screw, and a tray.
Manufacturing instructions:
The undeniable advantage of the feeder is its ease of manufacture and practicality. Here you also won’t have to constantly add food; it will be served on its own as you eat it.
DIY hanging feeder
The hanging feeder made of galvanized iron is quite convenient to use and prepare. Galvanization is used here, but aluminum can also be used; in general, it is important that sufficient reliability and structural integrity are ensured. Let's consider one of the elementary methods of arranging a cage for feeding birds using a galvanized sheet 0.5 mm thick.
To prepare a hanging feeder you will need:
- Galvanized sheet.
- Small pieces of plywood.
- Jigsaw or hand saw for wood.
- Pliers.
- Metal scissors.
- Small nails for wood.
After the preparation stage, you can begin building the feeder.
The instructions are presented in the form of an algorithm:
- It is necessary to cut the sheet in such a way that there is enough metal to obtain a height of one side of 80 mm, a width of 80 mm, but 50 mm of them are flat, and the remaining 30 mm have a slight upward slope; the other edge is 50 mm long, but it should be slightly bent inward.
- It is necessary to prepare plugs for the end parts from plywood, chipboard or any other convenient material.
Self-production of bunker structure
It is very easy to make a bunker feeder for quails with your own hands. Here you don’t even need to build a complex drawing. We'll start the work right away by cutting off the galvanized profile. It will serve as a tray where food will be supplied. The length of the profile depends on the dimensions of the cage and the number of birds. Each quail should have enough space to freely approach the tray.
The next elements will be the side walls of the hopper and at the same time the plugs for the ends of the profile. Two identical pieces resembling the number seven are cut out of multilayer plywood. If you turn them over, you get a shape that resembles a boot. The top of the blanks is expanded for easy filling of feed. The width of the bottom of the inverted seven should correspond to the distance between the side flanges of the profile.
Both sevens are inserted upside down on the sides of the cut profile and secured with self-tapping screws. Next, two rectangular blanks are cut from a sheet of plywood along the length of the profile. These will be the main walls of the bunker. Both blanks are similarly fastened with self-tapping screws to the profile flanges and boot-shaped sides of the hopper.
At this point the feeder is almost ready. There was a tray at the bottom and a raised V-shaped bunker at the side. The product can be secured inside the cage, but it is better to install it outside. The quails will reach the tray through the mesh, and this makes it more convenient for the owner to pour food into the bin.
Read also: Do-it-yourself brooder for quails, drawings, video
Such a structure does not have to be made of plywood. If you have a welding machine, a quail feeder can be welded from stainless steel.
By the way, we looked at the process of making a feeder, but did not find out what volume of the bunker is needed. Here you will have to make simple calculations. An adult quail eats approximately 30 g of feed in one feeding. You need to feed the bird 3 times a day. If quails are fed for meat, the daily ration is increased up to four times. The amount of food eaten per day must be multiplied by the number of quails living in the cage. This will be the daily food ration for all quails feeding from the bunker feeder. Now all that remains is to calculate the volume of the bunker so that all this feed will fit. It is advisable to add a little margin to the result obtained.
If the availability of material and the dimensions of the cage allow you to make the bunker larger, this will be a big plus. This feeder can be filled with food for several days.
The video shows the feeder from the profile: