Food and water are important for any living organism. Therefore, when breeding chickens, special attention should be paid to the quality of feeders. A properly selected element of maintenance allows you to increase productivity and take care of the health of birds, since pathogens can enter the chickens’ bodies through contaminated food and water.
A good feed device also saves the owner’s time and effort, which is mainly important when keeping a large number of animals. In addition, the thoughtful design of the feeder helps keep food out of unwanted mouths such as mice, rats and sparrows.
Choosing the right one
Poultry feeding installations are divided according to source materials:
- devices made of wood are suitable for dry feed mixtures: grains, feed, minerals, shells;
- plastic or iron feeders are useful for using wet food; they are easy to clean and do not become saturated with food;
- mesh or rods are useful when feeding fresh grass.
You can also distinguish varieties by type of feed supply:
- Tray ones work well as chicken feeders. These are peculiar containers with sides so that the food does not scatter to the sides;
- grooved with an additional limiter. Inside it can be divided into compartments for different types of feed. They are usually placed outside the cages to simplify maintenance;
- bunker feeders are mainly for dry mixtures. They are designed to be filled infrequently so that the chickens can be left for a period of time. The food remains clean and dry and is fed in doses.
The device can be placed either on the floor or suspended. The floor option is convenient if there is a need to move the feeder. The hanging container is attached to the walls from the inside or outside of the cells.
Varieties of homemade wooden feeders
There are various options for wooden feeders, which we suggest you familiarize yourself with in more detail.
Hopper feeder made from pieces of wood
Excellent for those breeders who do not have the opportunity to periodically add grain.
To assemble such a structure, first of all, you need to prepare:
- boards made of durable plywood or wood;
- electric drill, set of drills;
- a couple of loops;
- sandpaper;
- saw;
- screwdriver;
- pencil;
- roulette
The instructions for making a bunker feeder look like this:
- Draw a drawing, which is then transferred to the tree, carefully drawing out the details of the future structure:
- bottom – 29x17 cm;
- two side walls 40 cm high, 29 cm long (you will need to cut a wedge in the side walls, as shown in the diagram below);
- two rectangles for the front wall - 28x29 and 7x29 cm;
- top cover – 26x29 cm;
- back wall – 40x29 cm.
- Cut out all the parts, moving along the drawn marker lines.
- Drill holes for screws in the required places using an electric drill.
- Sand the entire surface so that the feeder is smooth and safe for birds.
- Assemble all elements into a single structure using screws. To achieve maximum density, a clamp should be used. In addition, it is worth considering that the back and front walls must be connected at an angle of 15°.
- Attach the cover to the back of the side walls using hinges.
- Treat the feeders with an antiseptic, remembering that the use of paints and varnish is strictly prohibited.
The assembled feeder will be spacious and convenient, operating in automatic mode.
An example of a bunker feeder assembled from wooden blocks is given in the following video:
Feeder in the form of a trough
It is a simpler design, suitable for those who keep a large number of chickens.
To assemble the structure you will need:
- thick boards or plywood;
- hammer;
- screws or nails;
- saw;
- pencil;
- roulette.
The feeder can be assembled according to the following instructions:
- Draw a diagram of the future feeder, accurately defining all the elements, their dimensions and installation locations for fasteners.
- Transfer the drawing to the tree in compliance with the parameters specified in the drawing above.
- Cut out all the design details along the marker lines. It should be borne in mind that the bottom must be thick and heavy, otherwise the birds will be able to easily turn the feeder over. In addition, the height of the walls should be comfortable for chickens.
- Connect all the parts together, leaving no gaps, since through them the food will get out. There is no need to further process the wood.
This feeder is durable and strong, and is also universal regarding the type of food used, that is, it is suitable for feeding both dry and wet food.
How to assemble a wooden chicken feeder is explained and shown in the following video:
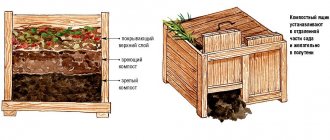
Two-story feeder
This option is primarily used for dry food, although a variety of mash can also be served in it. Such a feeder can be made for a small room, since the second tier allows you to compensate for the lack of free space. It looks like this:
Having prepared the bars and screws, you can begin assembling the feeder:
- Prepare all the details of the future feeder. Among them, the main one is the lower tier, 40 cm long and 50 cm wide. The length can be adjusted according to the number of livestock. The second floor is a small filling bunker - a trough with a front wall height of 10 cm and a back wall of 20 cm.
- Make a flap that will divide the lower tier into 1/3 parts.
- Install the second floor on the ends of the first.
- Attach a lid that will cover the food from debris getting inside.
General requirements
To save feed, the first thing you need to pay attention to is that the chickens cannot climb into the container themselves and scatter the feed. In addition, this is necessary for its safety, so that excrement does not fall into it. You can protect the grain with sides, limiters, or by moving the container itself outside the cage.
It is also necessary to remember that the container will have to be cleaned and filled daily; the design should not create obstacles to this. In general, you need to pay attention to the weight of the container and its volume (it should be enough to feed the entire livestock for a day).
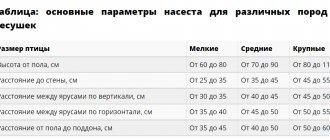
Approximately 15 centimeters of the length of the feeder are allocated per bird, which should be enough for everyone so that weaker individuals do not remain hungry. If the cage contains only chicks, you can reduce this size.
What are the requirements for chicken feeders?
Design requirements:
- Durability, stability, ease of maintenance. Regular cleaning should not be difficult.
- Protects food mixtures from drying out, moisture, debris and chicken droppings.
- Economical feed consumption.
- Ensuring simultaneous feeding of the entire flock.
The feeder doesn't have to fit all the requirements. The main criterion for functionality is compliance with specific conditions.
How to make your own feeders
Nowadays you can buy a variety of types of feeding devices, however, homemade options are quite enough for birds.
It will take very little time to make feeders with your own hands, but in financial terms the costs will decrease noticeably. To create such containers, you can use available materials: buckets, pipes, bottles, plywood and much more. Next, let's look at the possible options.
Cost of materials for making a do-it-yourself feeder
It is possible to make a chicken feeder with your own hands from almost any building material or unnecessary material on the farm. These can be: metal and galvanized containers, wooden boxes, buckets, food bottles, waste cans, polymer pipes and other materials.
Necessary condition: plastic must be food grade, and other materials must be safe for use.
Naturally, the cost of such structures from unused household appliances is low, which is acceptable for small household plots.
Plastic container
The most affordable option would be bottle feeders. If the walls of the container are dense and there is a side handle, then it is quite suitable. All that needs to be done is to make a hole at a distance of about eight centimeters from the bottom so that the bird has access to food, and a slot is placed on the handle of the bottle to hang the bottle on a mesh or grate.
How to do it yourself?
A plastic bottle feeder is the most budget-friendly and easiest to manufacture option . You can do it as follows:
- Select and prepare containers. Use a 5-liter bottle with a shorter narrow part (neck). Take the container, remove dust and other contaminants from it, if any.
- Perform markup. Using a marker, draw holes on the bottle. There will be 5 of them, and the diameter will be 1.5-2 cm. This size is suitable for young birds, but for older birds make rectangular windows 5x7 cm. This is enough for the chicken to stick its head through and peck at the food. They are located in a circle where the stiffeners begin.
- Run dispenser. Cut off the neck with scissors and install it in the second part of the bottle with holes. Installation is carried out with the neck down, but not all the way, but leaving a small space (3-5 mm). To prevent the neck from “walking”, secure it with tape.
- Secure the bottle in the tray using liquid nails.
- Pour feed into the feeder until the container is completely filled.
- Homemade plastic structures are light in weight. Their sizes are quite significant. So chickens can easily turn over such a device. To prevent this from happening, you will need to secure the structure to the wall through the holes made in the plastic bin.
The main problem that takes up a lot of time for chicken owners is feeding them. The products offered by the market, although easy to use, are expensive. On our website you will find tips on how to make automatic feeders yourself, as well as from sewer, polypropylene, and plastic pipes.
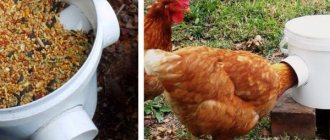
Hopper feeder
Hopper or automatic feeders greatly simplify the process of caring for birds. Their principle is that the feed is supplied in doses as the bird eats the previous one. You will need a bucket (wet building mixtures are usually sold in these) or, again, a large plastic bottle for water and a container, or the bottom from another bucket (the main thing is that their diameter exceeds the size of the first bucket by at least 10 centimeters).
At the bottom of the walls of the first bucket or bottle, holes are made for pouring food into the sections of the menagen. The parts are attached with screws or wire.
Simply put, a smaller diameter container with holes at the bottom is placed in a tray with sides. When the chickens eat up the food, a little more is poured from the container into the tray.
Where to install a chicken feeder?
If chickens graze outside most of the time , the best place to gather birds will be. More often these are enclosures, places near the entrance to the chicken coop. There must be a drinking bowl for chickens nearby. When spending the night in the poultry house, the chickens do not eat or drink, so the feeder there will be superfluous.
If chickens spend more time in the chicken coop , a feeder is installed there. Pipe and groove devices are placed on elevated places or suspended along walls free from perches at a height of up to 20 cm from the floor level.
Tray and bunker feeders for chickens are installed on the floor in the center of the poultry house or aviary. The devices must be accessible to chickens and broilers from all sides.
When keeping cages, plastic trays and nipple drinkers for broilers are mounted on a grid on the outside of the front wall of the cage. The dimensions of the sides of the cell cells are 7-8 cm.
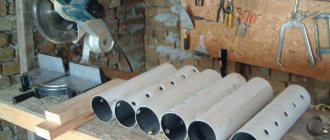
Feeders made from pipes
It will require PVC pipes approximately 15 cm in diameter, plugs and a tee-splitter, the length being whatever is most convenient. Ten- and twenty-centimeter sections are separated from the pipe, and a splitter and plugs are attached to the long part. The short part is attached to the branch (this will be the tray). The structure is suspended in a cage with the long edge up. It will always be possible to temporarily close access to food.
You can arrange several such structures or modify the feeder for a large number of birds. Then the pipe needs to be cut into 2 parts, one of them 30 cm, and connected with a plastic elbow. In a short piece, using a milling attachment, two holes are poured on both sides (diameter about 4 cm), through these places the bird will peck food, the remaining edges are closed with a plug.
From a plastic bottle
This is perhaps the easiest feeder model to make. To make it you will need two plastic bottles, the volume of which can range from 1.5 to 5 liters. You will also need a flat material of a certain hardness.
First, the bottom part of a 1.5 liter bottle is cut off. This must be done to make it convenient to fill the grain. Holes should be made closer to the neck of the bottle. It is through these holes that the feed will move.
Next, you need to take a larger bottle, the bottom of which is also cut off. In this case, the sides remain, the height of which is 10 centimeters.
A hole is created in the central part of the cut container, which is the same size as the neck of the bottle. We take a sheet of plywood with a diameter of 50 by 30 and also create holes with a diameter that matches the bottle.
At the last stage, you need to lower a 1.5 liter plastic bottle into a container whose volume is larger. This must be done in such a way that the neck passes through both holes and comes out directly below relative to the piece of plywood. We fix the cover. The plastic chicken feeder is made in the best possible way.
In the photo of the chicken feeder you can visually see the features of this design.