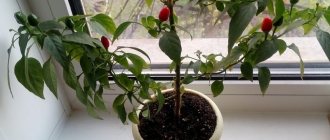
Herbs such as dill, parsley, basil, rosemary are often grown in the garden plot. For the winter they are dried or frozen.
Home gardeners suggest growing greens at home in winter. In this case, no soil is used. The grass will take all its nutrients from a specially prepared solution.
A primitive hydroponics scheme is a bulb, which is placed in a jar of water to force green feathers. What technologies can be used? What rules must be followed when growing herbs?
What does a hydroponic system consist of?
The installation includes the following components:
- a reservoir with a supply of nutrient solution;
- containers with porous filler (substrate) where plant roots are placed;
- system for delivering nutrient solution to the roots. There are several types, they are discussed below. The task of the system is to supply the solution so that the roots have the opportunity to breathe;
- pump. Provides circulation of the nutrient solution;
- compressor. Saturates the nutrient solution with air or delivers it directly to the roots;
- broad spectrum lamps. Plants need light for photosynthesis;
- heater. Maintains optimal temperature if the room where the installation is located is cold;
- thermometer and hygrometer.
The solution contains all the microelements the plant needs, so it can easily do without soil.
Advantages of hydroponics:
- crops grow faster (microelements are supplied in an easily digestible form, plus optimal temperature, humidity and carbon dioxide concentration are ensured);
- the consumption of water and nutrients is reduced;
- labor costs are reduced.
Flaws:
- in terms of taste and vitamin composition, the plants are inferior to those grown in a garden or garden bed: this is confirmed by reviews of users of such installations;
- the system is energy dependent: without electricity, crops will survive only a few hours;
- constant monitoring of the solution composition is required.
The main reason for the intensive development of hydroponics in some regions is the lack of water. Other possible reasons, which have not yet fully emerged, are soil depletion and pollution, as a result of which fruits accumulate substances harmful to health.
Element ratio
Today, there are many combinations of nutrients that can significantly reduce the time from sowing to harvest. Each of the formulas is time-tested and contains an optimal set of elements.
During the preparation of the solution, it is advisable to add all the components included in it separately.
In a properly made mixture there should be no sediment.
One of the most capricious elements in this regard is iron - it provokes a rusty coating. However, if you replace it with iron sulfate, the problem will disappear. The content of micro and macroelements in the liquid may vary depending on the seasonality of growing greens.
In winter
During the frosty season, a specially developed winter solution is used. Its main components are:
- potassium and magnesium sulfate – 314 g;
- calcium – 238 g;
- ferric chloride or ferrous sulfate – 8 g;
- superphosphate – 274 g;
- potassium nitrate – 166 g.
Types of equipment for growing vegetables and flowers
There are many different projects for hydroponics installations, but, in general, they are all divided into groups:
- wick . The substrate is made of a finely porous material and the solution rises into it due to the capillary effect. The roots have the ability to breathe and at the same time have access to nutrition. The advantage is that a pump is not needed (this is why this system is called passive). The disadvantage is that there is no way to supply a significant amount of nutrients to the roots, so vegetables and fruits cannot be grown this way. Using a wick installation you can create an indoor garden or grow ornamental plants;
- periodic flooding system . The solution is pumped on a timer between two containers with plants, as a result, the breathing mode of the roots alternates with nutrition;
- floating platform The installation was created for growing flowers - these plants need a lot of water. The solution is constantly located at the bottom of the device, and it is sprayed by a pump connected to the nozzle. The drops settle on the roots, nourishing them;
- drip. The roots are moistened with the solution using a dropper - a device from which the liquid flows in doses by gravity. The same ones are used for drip irrigation. The solution not absorbed by the roots drains and returns to the reservoir through the drainage holes. Due to their simplicity, these systems are quite popular.
There is another system - aeroponics. The roots of the plant are not immersed in the substrate - it simply hangs on garters. Periodically, a suspension from the nutrient solution is sprayed. Such equipment is characterized by high cost.
Advantages of the method
As you know, it is impossible to grow various plants in the garden during the cold season. To solve this problem, a hydroponic installation was invented, which allows you to build a small garden for growing such plants in your home.
This method involves using a hydroponic solution. The plant develops and performs its vital functions thanks to the substrate in which the roots of the plant are placed. It receives all the nutrients necessary for ripening from this solution.
For each type of plant that will be grown using this installation, it is necessary to select an individual type of solution. This is the only way to achieve maximum process efficiency.
Installation diagram
Do-it-yourself hydroponics is possible in the simplest version, one of the suitable options, understandable without a drawing:
- install the pipe horizontally with a slight slope. The ends of the pipe are plugged;
- Pots with filler are placed inside the pipe through holes in the wall, where plants are planted;
- a vertical or horizontal tank with solution is placed under the pipe. Two tubes are connected to the tank;
- one tube is cut into a plug at the end of the pipe from the bottom side - through it the solution flows by gravity from the pipe into the tank;
- a pump is connected to the second tube, and its outlet pipe is cut into the end of the pipe located above. The solution is pumped here.
The working fluid constantly circulates: it is pumped into the pipe by a pump, moves along it by gravity and flows back into the tank. Along the way, the solution impregnates the filler with the plant roots located in it.
Step-by-step instructions on how to make it yourself
Before you make a hydroponic installation at home, you have to find a place for its location. It is impossible to maintain optimal temperature and humidity conditions outside, so the system is installed in the house.
Next, proceed to installation:
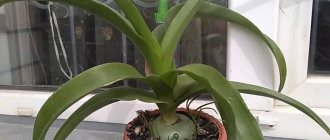
- A large plastic bottle is placed on the floor. Volume - from 1 to 3 liters per plant, depending on the size. Typically a 50 liter bottle is used. The standard packaging of the concentrate is designed just for it. The walls of the container should not allow light to pass through. Otherwise, microalgae will develop in the nutrient solution and it will bloom. If a transparent plastic bottle is used, it is covered with foil. One pipe is cut into the lid and the side wall at the bottom;
- Purchase pots according to the number of plants. The best option is with a mesh bottom. In the absence of such, floral ones with holes in the bottom will do. In blind pots, holes are drilled independently.
Then a porous filler for the pots is selected, options:
- coconut fiber;
- expanded clay;
- mineral wool;
- vermiculite;
- perlite;
- fine crushed stone or gravel;
- polymer materials: foam rubber, nylon, nylon or polypropylene thread.
Coconut fiber
Coconut fiber is the name given to the husk of the coconut and its ground shell. Before use, magnesium and iron salts are washed out of the material.
Coconut fiber has a number of advantages:
- it is lighter than water, therefore it floats and swells in solution, filling with air;
- the fiber structure contains pores and tubules that are filled with solution due to the capillary effect;
- the smooth surface of the fiber allows the germinating root to move freely along it.
Coconut fiber is an ideal filler for hydroponics, created by nature itself. After all, it is this that initially acts as a soil substitute for the germinating palm tree.
Further:
- above the bottle, a PVC sewer pipe with capped ends is fixed horizontally with a slight slope. Nozzles are pre-cut into the upper part of the plugs;
- From the top of the pipe, holes are cut out of such a diameter that the pots placed in them end up in the pipe, but do not fall through. The distance between the holes depends on the type of crop being grown. For lettuce, dill, parsley and other greens – 10 cm. For cucumbers, tomatoes, onions, strawberries and other crops – 15 cm;
- a pump is connected to the nozzle at the bottom of the container to fill an aquarium or for a tabletop fountain;
- connect the pipes at the ends of the pipe with pipes in the lid of the bottle and pump.
A nutrient solution is made, one component is taken ready-made:
- for flowering plants and fruit crops: “Uniflor Bud”;
- other types: “Uniflor Growth” (emphasis is placed on the development of the green part).
Solution "Uniflor Bud"
The dose of the drug is measured with a large medical syringe at the rate of 1.67 ml per 1 liter of water. The second component is a 25% solution of 4-water calcium nitrate, administered in a volume of 2 ml per 1 liter of water.
For fast-growing crops, the solution is made 1.5 times more concentrated. For annual vegetable plants, the indicated concentration is increased by 25% (2.5 ml/l). In winter, the concentration of the solution is reduced by 2-3 times.
The water required is soft and clean; it is best to use bottled or filtered water.
Necessary equipment
Depending on the choice of design, the set of necessary equipment may vary. However, there is a common basis on which any hydroponic design is based:
- Container for nutrient solution. When assembling a capillary multi-level system, you will need two tanks. FOR a medium-sized tidal system, one container is enough. As a reservoir, you can use food-grade plastic canisters, PVC containers, buckets or cans (if the size of the irrigated structure allows). The volume of the tank depends on the size of the installation, but it is not recommended to use containers larger than 50 liters. It is better to distribute the required liquid over several tanks. To keep the solution in the tanks clean and fresh longer, they must be tightly closed with a lid. Choose tanks with opaque walls, or paint them with opaque paint.
- Pump. Dual-channel models are ideal for any hydroponic system. You can purchase a professional pump at a gardening store. But if the installation volume is designed for no more than 100-150 bushes, an aquarium pump will be sufficient. You can do without it only in a multi-level capillary irrigation system. But otherwise, you will have to manually pour the solution from the lower tank to the upper one, which creates additional hassle.
- Aquarium compressor. In addition to the pump, a compressor that pumps oxygen into the system is useful. It is indispensable for tidal irrigation. The solution is additionally enriched with oxygen, which gives a positive effect. In capillary irrigation, where water flows without pressure, additional saturation of the liquid with air will also not hurt. But drip irrigation, in which the roots are exposed to air most of the time and receive nutrition through finely dispersed water dust, can easily do without a compressor.
- Hoses and sprayers. Not a single system can do without this, especially a drip system, in which water must flow to the roots, breaking into microscopic dust.
- Pots. If it is not possible to purchase special hydroponic cups for seedlings, you can make them from any plastic pots intended for home floriculture. To do this, you need to make holes in the bottom and sides with a diameter of at least 8 mm.
- Substrates. Mature plants are secured in pots with guy ropes and ties, but younger bushes and low-growing varieties are held upright with a small amount of substrate. There are special hydroponic soils; in addition, you can use coarse sand, expanded clay or loose peat mixtures.
Depending on the choice of model, gutters, PVC water pipes, seals and corners, and wooden blocks may be useful. The assembly process cannot be done without self-tapping screws, drills, and sealant.
If possible, it is better to immediately purchase a water thermometer and a device for measuring the amount of nutrients in a solution - TDS meters.
Tips for use
The installation is used like this:
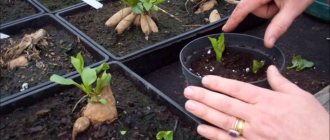
- the seeds are pre-germinated in the ground. Then the young shoot, along with the soil, is removed from the pot and dipped for some time in a bucket of water at room temperature. The soggy soil is carefully removed from the roots and washed under a weak stream of water;
- For planting in an installation, you should choose seedlings with strong, thick roots. Specimens with thin roots may not be viable;
- The roots of the plant are lowered into the pot, the filler is poured into it and the container is placed in the hole made in the pipe. With the correct layout, the pot is immersed 1-2 cm in the nutrient solution during operation of the installation. In this case, the roots do not reach the solution - it rises to them through the capillaries of the filler;
- water the plants with clean water for a week, giving them the opportunity to adapt. Only after this can the solution be applied to the roots;
- the pump is turned on for at least 4 hours every day, and preferably throughout the day;
- the volume of solution in the bottle is maintained at a constant level by adding water daily;
- change the solution every 3 months;
- control the acidity of the solution, maintaining it at the optimal level for a given plant. pH = 5.6 is suitable for most. The most accurate way to determine acidity is a pH meter, but due to the high cost, tests are usually used instead to control water in an aquarium;
- grown plants are tied with twine, since the filler does not allow the roots to hold as firmly as in the ground.
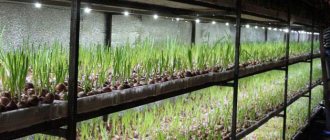
Growing greens hydroponically
In order to automate the process, it is recommended to connect the pump to an electronic timer - a relatively inexpensive device that supplies power according to time.
About the optimal composition of water and filler for a home hydroponic setup
Agronomists recommend using peat, peat or transitional peat, with the addition of perlite, as a substrate for growing garden herbs in hydroponic systems. Peat should consist of large or medium particles (1 - 2 cm), with a small number of small ones. Recommended pH of the substrate is 4.2. Agroperlite is a prepared substrate, which consists of ¾ silicon oxide, also aluminum oxide, phosphorus, sodium and other elements. All of them are contained in perlite in forms that are not absorbed by plants. Before preparing the substrate, peat is mixed with lime and minerals 10 days before planting the greens. Chalk and crushed dolomite are added. Fertilizers are also introduced according to the following scheme:
DIY greens
pH 6.2-6.4; EC - 2.5-3.0 mS/cm, Magnesium 60-80, N-NO3 200-250; Potassium 300-350; Phosphorus (in water-soluble form) 60-70; Calcium 250 mg/l. The prepared peat is mixed with perlite in a 2:1 ratio. As a result, we obtain a substrate mixture moistened by capillary method throughout the entire volume.
What varieties of greens are suitable for growing in home hydroponic systems?
More than 30 varieties of greens are grown industrially in our country. This:
- salad - Grand Rapid Ritsa, Lifli, Revolushion, Lollo rossa, Fanli, Bogemie, Fantaim, Angie, Lokarno;
- dill – Alligator, Early miracle, Grinader, Lesnogorsky,
- parsley - Italian Giant, Curly, Carnival, Leafy,
- sorrel - Gribovsky, Malachite, Belleville.
The growing time for all these species and varieties is from 20 to 30 days. And all of them have proven themselves in home and industrial hydroponic installations.
How to grow hydroponic green food?
Only a high-power multi-tiered industrial installation can provide animals with sufficient food. The harvest from a homemade analogue is only enough to serve as a vitamin supplement.
Another problem is the lack of a disinfection system in the homemade product, as a result of which there is a high risk of colonies of mold and other fungi developing on the crops.
If such food gets into the animal’s body, it can get sick and even die. Therefore, they adhere to the rules:
- the installation is located indoors;
- ensure a high level of cleanliness: do not wear street shoes, wear a robe, etc.;
- seeds are selected according to the number of ungerminated ones: if there are many of them in the batch, the risk of infection is extremely high;
- they use crop treatment methods that prevent the spread of fungus from infected plants to healthy ones (watering at the roots, etc.);
- wash the installation components using antiseptics;
- If mold is detected, immediately destroy the affected plant and thoroughly disinfect the container where it was kept.
Even these measures do not provide a 100% guarantee of safety, therefore for a large farm it is recommended to purchase a factory-made installation.
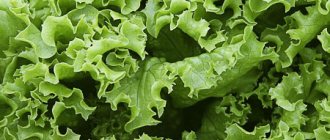
Is it possible to grow lettuce hydroponically?
The short answer to this question is yes. In hydroponic systems, it is possible to grow a wide range of green crops, including many types of lettuce. The product is cultivated both in small quantities on apartment balconies and in large farms. With a properly organized approach, you can achieve excellent results and get a high yield of environmentally friendly greens straight to your home table.
Lettuce is an unpretentious plant suitable for year-round cultivation, especially in temperate climates. It does not need excessive lighting and high temperature, so additional waste and hassle in these matters can be kept to a minimum. A hydroponic system for growing lettuce can be of any type, but flow-through is most often used. You can do it yourself or purchase a ready-made installation.