For what reasons may there be no layering?
The baby appears on the mother plant, and how strong and developed the cuttings will be depends on the care of the adult orchid.
Read more about which parts of the flower a baby can form on and how to understand that it has appeared here.
Let us list the reasons why small plants turn out to be underdeveloped:
- Insufficient lighting. If an orchid has a baby, it needs a lot of light.
It is worth making sure that daylight hours last for at least 12 hours, while the sun's rays should be as diffused as possible. If the baby appears in the fall, after flowering, then you need to organize additional lighting. - Incorrectly selected fertilizers that are not suitable for orchids. But sometimes the cause can be untimely feeding. If a plant has a shoot, it requires a lot of nutrients to nourish it.
- Untimely and poor watering . If the plant does not have enough water, then even small rudiments of roots can simply dry out, since moisture does not reach them.
If you review the rules of care, then perhaps the roots will appear soon.
Naturally
This can be done even if the shoot is not separated from the mother plant. To do this, you need to do the following manipulations:
- Get some moss and soak it in water for about thirty minutes until completely swollen.
- Form a ball of moss and wrap it with thread so that it does not fall apart when attached to the baby.
- Attach a lump of moss with a thread to the base of the peduncle so that it does not fall off, but at the same time so that the thread does not damage the plant.
- A heavy young plant can be attached to a stick-stand with clamps, this will protect the plant from tipping over.
- If the air in the apartment is very dry, then the structure with moss can be wrapped in cling film to create a greenhouse effect. But then the baby orchid must be ventilated every day.
- Moss must be sprayed every day. You can add “Kornevin” to the water (use the stimulant every other time with plain water) to stimulate root formation.
- When young root shoots appear, we plant the young orchid.
On average, in any extension method the process lasts about three months, but sometimes it can take up to six months. All these time frames are the norm, so all you can do during this time is just watch and wait for the “miracle” to happen.
Why is the lack of a root system a problem?
An orchid is not a simple flower, and therefore, as soon as a baby appears, any gardener begins to rejoice - he will be able to get another magnificent plant. But do not forget that without a strong root system, the baby cannot take root and begin its development in the substrate. If you don’t grow the roots of the cuttings, you can simply lose the young plant, but you shouldn’t leave the baby on the mother’s flower either, since over time it will take all the strength from the mother and the plant may die.
Is it necessary to increase
The question is rhetorical. Of course, only you can decide whether this is worth doing or not. Most gardeners look forward to the appearance of orchid babies. They are ready to make all the necessary efforts to root the baby.
However, if you don’t think it’s necessary to do this, then of course it’s not worth wasting your time. You can always buy an adult, healthy, and already flowering plant in the store.
It is also worth knowing that you cannot plant an orchid shoot without roots. How to plant a root, how to save what is planted. Whether to plant in water or moss. You need to know all this before getting down to business.
But if you still decide to take this important step and are ready to spend your time, then below we will talk about ways to grow roots in a baby orchid.
Do you need to take action?
The florist will make the decision independently. Watch the baby, and if 4 months after the appearance of the layer the beginnings of roots have not appeared on it, then it’s time to think about how to help the young plant.
You should not plant the baby in a separate pot without roots, since 80% of the time it will not survive, so before separating the cuttings, try to make sure that roots appear on it.
But if this option seems impracticable, then you can try to grow roots already on a separated plant . At the same time, the process, although labor-intensive, gives very good results. Moreover, there are several ways. Therefore, you need to consider several options and choose the most suitable one.
How to separate a baby
If the main plant is not sick, and the baby is at least 6 months old and has its own roots, then you can disconnect it. First you need to prepare a pot and planting mixture for the seedling. You can buy it in a store, or you can make it yourself. You will need pine bark, sphagnum moss, peat, and fern roots. Additional components: coal, walnut peel, coconut fibers.
Separating tools.
- knife, scissors, pruning shears - only sharp ones;
- cinnamon, crushed coal;
- disinfectant;
- container, substrate.
Peduncle cutting
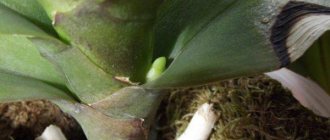
Layers can grow on a flower shoot, from the roots of the main plant, or in the axil of a leaf. How to cut off a baby depends on its location. The growing shoot on the flower branch is cut off along with part of this stem. On each side, cut 3 cm from the place of attachment of the layering. Using pruning shears, carefully cut off part of the peduncle with the baby, dry the sections, sprinkle with charcoal or cinnamon.
The cuttings are cut off when they become really heavy for the peduncle. It has at least two long roots and 3-4 leaves.
Important!
All instruments must be disinfected.
Branch at the root
It is necessary to carefully examine the adult plant, find where the layer is attached at the root, and find all its roots. Carefully remove the roots from the substrate so that during removal the roots are not damaged or torn. They are freed from the soil, then the shoot is separated with pruning shears.
If the root system of the young plant is absent, and the layering was formed a long time ago, then it is cut off along with the root on which the baby grew and 1.5 cm of tissue from the adult plant is captured. With a weak root, the seedling needs good rooting. There is a risk when separating a root shoot - the root on which the shoot grows may be damaged. Therefore, the procedure must be done very carefully.
Removal from the stem (trunk)
The appearance of a baby on an orchid's trunk is often a sign of the death of the orchid. You don’t have to rush to separate the orchid shoot from the stem, but wait until the adult flower dries. If the plant is healthy, then the layer on the trunk must be disconnected as quickly as possible, otherwise the baby will kill the parent.
The shoot is carefully cut into a sector. The sections are dried and sprinkled with cinnamon. Plant the baby in a new pot with the prepared mixture.
Is it necessary to separate from the mother?
Separating the baby from the plant to grow roots does not necessarily mean separating it from the mother.
It is worth trying to help a young flower while it is on the peduncle . If this does not work out, then you will need to use more drastic methods.
So, let's consider what to do if roots do not appear on the baby. We present to your attention the most effective methods of growing the root system.
We invite you to watch a video about how to grow roots for a baby without separating it from its mother:
How to replant a young orchid
The grown samples are transferred to a regular pot and hung in a flowerpot. It will not be possible to grow small plants in a suspended state; they will not yet be able to hold the trunk with leaves due to the root system.
If the baby phalaenopsis was planted for rooting in a peat container, then replanting the flower comes down to transferring the pot along with its contents to a larger container (clay pot). The gaps between the edges of the small peat pot and the outer container are filled with soil mixture for orchids.
An orchid growing in a plastic or clay container is transferred from a small pot very carefully, so as not to damage the roots. The soil mixture is poured gradually. The layer of soil covering the roots cannot be compacted.
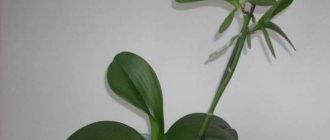
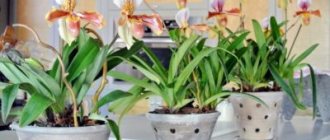
Fig.3 A well-rooted orchid will produce new leaves.
How to properly build up in different ways?
If roots do not grow on the children, you can use both natural and artificial methods of extension .
Artificial
This method involves separating the baby from the mother, and only then growing roots. There are several options for this method; let’s look at the most effective ones, which are used by experienced gardeners at home.
In polystyrene foam
The young plant is supposed to float on water in a piece of foam. The first step is to separate the baby from the mother orchid . It is worth remembering that cutting must be done with a sterile instrument and with a part of the peduncle, approximately 2 cm.
Take a piece of foam plastic of the required size and make a hole in it. Then place the baby in the recess on the material, and it must be secured well. You can do this as follows:
- After the young orchid is inserted into the foam, several skewers are placed around it, which are used to prepare canapés.
- Then stretch any thick thread between them, so that the leaves rest well on it.
Take a small container, pour warm water into it and let out a circle of foam plastic with the baby. In this case , it is important to ensure that the plant does not touch the water , so it is advisable to take polystyrene foam of the proper thickness. The distance from the base of the plant to the water should be at least 3-5 mm.
If you do not comply with this requirement, then the base of the baby may simply rot. There is no effect from the structure; you can plant the plant closer to the water, about 1 mm. Perhaps such close proximity will stimulate the growth of the root system.
We invite you to watch a video about growing roots in water with polystyrene foam:
In the greenhouse
In order for the baby to grow roots faster, it needs to be placed in conditions that match the habitat of this exotic flower - the tropics with high humidity. We'll have to build a mini-greenhouse. To do this you should prepare:
small plastic cup;
- some drainage material;
- sphagnum moss;
- plastic bag;
- plastic bottle.
Once everything is ready, you can proceed:
- make several drainage holes in the cup - excess liquid will drain through them and air will pass through;
- place drainage on the bottom of the cup;
- sprinkle some moss;
- Make two opposite holes at the top of the container for support;
- set the plant so that the baby stands on a support and the leaves rest on the edges of the cup;
- cut the bottom of a plastic bottle and place it on a glass with a plant.
The greenhouse is ready, now you should place it in a well-lit place.
Air the baby daily by raising the bottle for a few minutes . You need to spray the plant 2 times a week, but so that the ox does not get into the area from which the roots should appear. Experienced flower growers advise adding a complex of fertilizers to the water twice a month.
The moss in the cup cannot be compacted - it must be loose and airy.
We invite you to watch a video on how to grow roots for a baby orchid in a greenhouse:
Natural
A method in which a baby’s roots are grown without separating her from her mother. The algorithm of actions is as follows:
- Buy sphagnum moss and soak it in warm water for about half an hour.
- As soon as it swells well, form a small nest out of it.
- Wrap the base of the baby with moss so that it does not fall; you can attach it with a thread. This must be done very carefully, as the baby is very delicate and can be easily damaged.
- Take a stick-stand and secure the peduncle so that the heavy arrow does not fall and break off.
If the air in the apartment is dry, then you need to wrap the moss with the baby in cling film or put a plastic bag on the peduncle to create a greenhouse effect. Don’t forget to remove the bag daily to ventilate the cuttings.
The moss is sprayed every day, with “Kornevin” – a root growth stimulator – added to the water.
As soon as roots 5 cm long appear, you can start planting the baby.
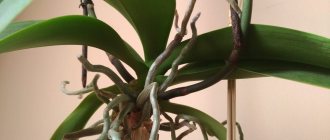
Getting roots from the baby on the mother plant
Young orchids develop on the mother plant at the axil of the leaves, at the root, on faded peduncles. To grow their own roots, the children need to create conditions of high humidity. To solve this problem, sphagnum moss, elastic thread and cling film are suitable.
Sphagnum moss has strong antiseptic properties. If another moss was mistakenly taken instead of sphagnum, then rotting of the young shoot is possible.
The prepared sphagnum is placed in water for about 45 minutes - it should absorb as much water as possible. Then a lump is formed from the moss (to prevent it from unraveling, it can be wrapped with thread). A sphagnum lump is wrapped around the baby (more precisely, around the place where the roots should appear). Secure the moss to the baby using a thread. If the air in the room is dry, wrap the sphagnum moss on top with cling film so that it retains moisture longer.
Every day, the film is opened slightly (for ventilation) for a few minutes, and the dried lump of sphagnum is sprayed with water. To speed up the process, the root growth stimulator Kornevin is added to this water.
On average, after 4 months you can get roots. Only when the child’s root system has formed do we plant it on the ground.
Orchids should not be grown on soil, but on a mixture of pieces of tree bark, because in nature orchids parasitize on the tissues of woody plants. The main components of the soil are pine and oak bark, dried fern rhizomes, sphagnum, coal and wood ash. It is a good idea to add a drainage element to the substrate - expanded clay.
The appearance of roots can be expected no earlier than three months. An orchid does not grow roots quickly. All this time you need to carefully care for the plant. Monitor the light regime, temperature (should not fall below 24 degrees), and fertilizing. A healthy flower has a better chance of growing roots.
Care in progress
Often the root growth process does not cause any complications. But experienced flower growers advise:
- In the first place is to provide the child with growing roots - a large amount of light and the use of a growth stimulant instead of fertilizer.
- The baby needs to be constantly monitored and as soon as the condition of the offspring worsens, immediately reconsider the conditions of detention and care.
- If root growth is carried out on polystyrene foam, then it is worth periodically checking the quality of the water in the container, as it tends to sour and evaporate, so it needs to be changed and topped up.
- Provide the plant in the greenhouse with timely spraying and ventilation.
How to root a baby
To root the cuttings, prepare cups - small holes are made at the bottom to drain liquid. Make a double glass (insert one into one) in one there are many holes at the bottom and on the walls, lay out the substrate in it. The second glass is filled with ¼ volume of expanded clay. All tools, containers and soil must be disinfected.
It is better that the roots do not come into contact with the wet substrate. The root collar is suspended above it at a height of 0.5 cm. This method will prevent the lower part of the shoot from rotting, and the roots will develop successfully. The soil must be constantly moistened. If the roots grow to the side, they are carefully bent and lowered down. Children are planted from cups into pots with planting mixture. Under no circumstances should the soil be compacted. First, expanded clay is poured, and then a shoot is placed and the substrate is slowly added.
Sprouting roots
There is another method of rooting a baby. It is separated from an adult plant and placed in a nutrient solution for root growth.
- The shoot is cut off from the peduncle so that there remains on both sides of it
2 cm of stem.
- Place in a warm and dark place to dry the sections.
- Prepare a rooting agent solution. The most commonly used is Kornevin. To treat a young plant, prepare a solution in the ratio of 1 g of powder per 1 liter of water . The shoot is placed in the solution so that only the base of the leaves and the cut stem are in the liquid. Leave for 20 – 25 minutes.
- Warm boiled water +220 - +250 is poured into a small container, for example, a disposable cup made of transparent plastic. The shoot is lowered into it. It needs to be set to the same level as when soaking in the stimulator.
Important! Only the base of the leaves should be in the water. If the leaf blades get wet, they will rot .