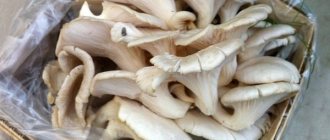
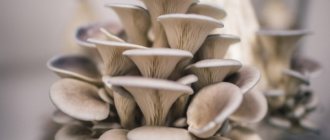
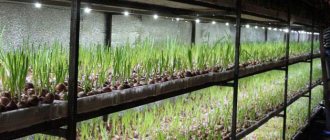
Foods like mushrooms are valuable and nutritious foods. At home, growing oyster mushrooms and champignons has become widespread. Such cultivation guarantees the absence of carcinogenic substances and nitrates, which are easily absorbed by mushrooms.
Oyster mushrooms are recommended for use by patients with hypertension, cancer and some others. They slow down the aging process and help rejuvenate.
The article tells you how to grow mushrooms and make oyster mushroom mycelium with your own hands.
What is oyster mushroom mycelium, history of breeding
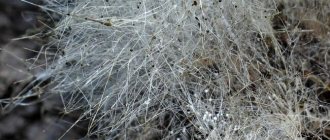
The mycelium of any mushroom, including oyster mushrooms, is called its vegetative body, in other words, the mycelium, consisting of the finest branched root-threads. The development of mycelium occurs inside the substrate and on its surface. This extensive network can be obtained both at home and using laboratory methods.
In their natural habitat, mushrooms reproduce mainly by spores. In order to answer the question of how to make oyster mushroom mycelium within the walls of the laboratory, scientists tried several different methods.
At first, fragments of mycelium for propagation in greenhouses specially adapted for this purpose were taken from the forest, in places where mushrooms accumulated, and then planted in prepared soil. After it was completely intertwined with mushroom threads, the substrate was dried and ready for breeding. The qualitative characteristics of such material were weak, the mycelium degenerated and produced meager yields.
Later in France they found a way to remove mycelium from mushroom spores under artificial conditions, which was very limited in application and also did not take root.
The latest and generally accepted patented method was the cultivation of oyster mushroom mycelium on the grain of almost any grain crop, sawdust, and straw.
Preparation of substrate for growing oyster mushrooms in a tunnel
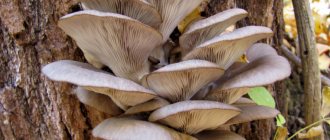
In nature, oyster mushrooms grow on stumps and tree trunks. To cultivate this mushroom at home, you can use wood or specially prepared soil.
For development, the fungus can use soil containing cellulose and lignin, but for high yields it also requires proteins and fats. As a rule, the main component is cereal straw, which is harvested in dry weather in environmentally friendly areas.
Note: Usually material is stocked for a year, but it will be better if stocks are prepared two years in advance. During storage, the nitrogen content increases and hygroscopicity increases.
Figure 6. Types of substrate for oyster mushrooms: 1 - from straw, 2 - from sawdust, 3 - from sunflower husks
The second required component is sunflower husks. It should contain more than 15% moisture, fat - a maximum of 3%, and dust - no more than 5%. As a rule, high-quality husks can be obtained at the beginning of the processing season. In addition, flax is used for cooking, but it is quite difficult to assess the quality of this material.
Additionally, sawdust is added to the compost. But you need to make sure that they do not contain fractions of coniferous species, since they require lengthy preliminary preparation. Sometimes cotton lint is added to the compost, but this element is too expensive for use in small household plots (Figure 6).
Note: Each of the listed elements can serve as the basis for compost. However, it is important to take into account that each material has its own humidity, rate of saturation with water and retention times, so the remaining components of the compost should be selected individually, focusing on the characteristics of the base.
The following are used as additional elements (Figure 7):
- Nutrient additives that optimize the nitrogen content of finished raw materials. As a rule, dry additives make up 1-10% of the total mass. As a supplement for compost, you can take hay, malt sprouts, brewer's grains, soy or feather flour, wheat bran, etc.
- Mineral supplements improve the structure of the nutritional mixture and maintain its acidity level. To improve the structure, gypsum or alabaster is added to it, and slaked lime or soda ash is added to normalize acidity.
- Water : only drinking water is suitable for cooking, but in no case liquid from open water bodies. You will find more useful information about the necessary components of a quality substrate for oyster mushrooms in the video.
Figure 7. Additives for nutrient substrate: 1 - soy flour, 2 - gypsum or alabaster, 3 - slaked lime, 4 - soda ash
Preparation of the substrate includes several stages :
- Chopping helps make the soil more compact. The smaller the particles included in the composition, the easier it will be for the mycelium to fill it. This step is especially important if fresh straw is used as the base. It must be crushed.
- Mixing is used if mushrooms will be grown on complex compost consisting of several elements. It is important that all components must have a uniform structure.
- Humidification plays an extremely important role, since the yield will depend on the water content in the nutrient mixture. The mixed compost is soaked in water until it has absorbed enough moisture to last the entire growing period. The method of moistening depends on the method of preparing the soil (for example, when pasteurizing in tunnels, the nutrient mixture is soaked in a pool or on a concrete platform for two days). During the humidification process, washing is also carried out to remove dust and large particles that were not previously crushed.
In addition, the finished mixture is squeezed out to remove excess liquid. The optimal humidity level is 70%. Only with this indicator can a good harvest be grown.
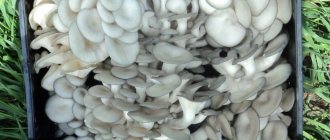
Methods of growing mushrooms
Oyster mushrooms are very unpretentious mushrooms that quickly produce crops. Already a month and a half after disembarkation, you can make the first collection. From a square meter of plot you usually get about ten kilograms of mushrooms per month.
Several methods can be used to grow this product:
- Extensive. This method imitates natural growth and requires certain areas. Tree stumps are prepared for it, cuts are made in them and first the oyster mushroom caps and then parts of the mycelium are placed in them. The method depends on weather conditions: under unfavorable circumstances, mushroom growth can take three months.
- Intensive. Mushrooms are grown this way, for example, in plastic bags. It is very effective, does not require much labor and is inexpensive.
To grow mushrooms at home, you can get mycelium in two ways: buy oyster mushroom mycelium, the price of which is currently about 150 rubles. per kilo, or make it yourself.
Preparation
Of course, to grow oyster mushrooms at home, you need to create the right conditions. The highest quality product can be grown in a special laboratory. But if you do everything according to the instructions, then you can get pretty good mycelium at home. Few people have a specially equipped laboratory at home. But its presence is not at all necessary. The main thing is that the premises have gas, electricity and running water.
Then you will need the necessary equipment and devices. Be sure to purchase a thermometer, several pipettes, glass test tubes, agar and tweezers. As you can see, most devices will serve you for a long time. So you will need to make a one-time investment, and then simply buy materials as needed.
Important! To grow mycelium, it is necessary to create sterile conditions.
It’s hard to imagine, but there are at least 5,000 microorganisms per square meter of room. Often this number can rise to 20,000. Therefore, it is very important to take care of sterility and disinfection. The workplace must simply sparkle, otherwise all efforts may go down the drain.
There are 2 options for growing oyster mushroom mycelium at home:
- Full growth cycle. The first method involves following all the steps described above. To begin with, take spores or a piece of the body of the mushroom. Then a mother culture is removed from it, from which intermediate and then seed material is subsequently obtained.
- Shortcut. In this case, you purchase ready-made mycelium and grow your own mushrooms.
Making mycelium
Oyster mushroom mycelium - mycelium - is planted in the substrate, where it will germinate. At home, you can grow oyster mushroom mycelium on wood or grain with your own hands. Cultivation occurs in three stages as follows:
- Obtaining royal mycelium. It is made in the laboratory from spores and stored in test tubes, or the material is propagated from pieces of mushroom tissue.
- Preparation of intermediate mycelium. At this stage, the mother culture is transferred from the test tubes where it was stored into a nutrient medium, where the basis for the seed mycelium begins to develop.
- Obtaining seed mycelium. The intermediate material is sown into the substrate, where it grows. Parts of this substrate are used to sow the area where the mushrooms will be directly grown.
How to make a substrate using hydrothermal technology
Processing the nutrient mixture is an important step, since during this process spores of competing molds are removed. As a rule, high temperatures are used for this, and less often chemical, radiation or microwave irradiation is used. Below we will talk about the main processing methods (Figure 8).
- Chemical
There are many products that can disinfect soil and remove all harmful components from it. At large industrial enterprises, hydrogen peroxide or sodium hypochloride is used for these purposes. Regardless of the type of product, its use must be coordinated with the SES.
- Radiation
In this case, gamma radiation is used to prevent the growth of pathogenic microorganisms. Such compost is sterile, therefore, at further stages of cultivation it is necessary to ensure complete sterility of the premises.
- Microwave radiation
This processing method is still rarely used, but it is still used at some industrial enterprises. However, this method is successfully replaced by others, for example, exposure to high temperatures.
Figure 8. Fermentation chamber (left) and compost pasteurization chamber (right): 1 - supply ventilation, 2 - air filters, 3 and 4 - control valves, 5 - air duct, 6 - fan, 7 - dispensing channel, 8 - substrate, 9 — exhaust ventilation channel
But the most common is hydrothermal treatment. This technology is widely used in small farms. The soil is placed in metal containers with heating elements installed below or hot steam is supplied. In addition, you can use a feed steamer for this. You can place a wet substrate in it and turn on the heating, or pour in a dry nutrient mixture and pour hot boiling water over it. Processing time is only 3-4 hours.
At home, you can simply pour boiling water over the substrate and let it cool for 4-5 hours. After this, the excess water is drained and the mycelium is added.
But the most effective way is to prepare the substrate in tunnels. This technology allows us to obtain high-quality raw materials that are completely free of microorganisms and pest larvae.
Note: On large mushroom farms, water left over from the production of compost for champignons is used to prepare the substrate in the tunnels. At home, such compost can be reproduced by adding manure to straw (at the rate of 10 kg per ton).
Step-by-step instructions will tell you how to prepare a substrate for oyster mushrooms in a tunnel.:
- The straw is crushed in such a way that its particle size does not exceed 8 cm. This will make it easier to put the raw materials into bags.
- The chopped straw is laid out on a concrete platform and moistened for several days until the moisture level of the raw material reaches 78%.
- The straw is laid out in the tunnel so that the surface of the future substrate is smooth.
- The tunnel is closed and recirculation ventilation is turned on so that the temperature inside the substrate is equalized. Gradually they begin to add fresh air, moving from 1 percent to five. This allows you to increase the microbiological activity in the mixture and ensures its heating.
When the temperature inside the substrate reaches 65 degrees, the pasteurization process begins. Full high temperature treatment takes 12 hours in summer and 24 hours in winter. After this, the fresh air supply is increased to 30% so that the mixture is cooled to 50 degrees. Subsequently, fermentation is carried out by supplying up to 20% fresh air for 8-10 hours, the resulting mass is cooled and the formation of mushroom blocks begins.
How to prepare the base for planting
To obtain a good harvest, it is necessary to properly prepare the soil for planting. The manufacturing technology requires that for this you need to grind dry and clean husks, straw and husks (barley or wheat), and then heat treat them. These actions will remove from the composition the insects that got into it during collection.
In order to thermally treat the substrate, it is placed in a large metal basin, filled with hot water (70 ° C) and boiled for a couple of hours, after which the liquid is drained and the mass is cooled to room temperature. To check moisture saturation, a small amount of the mixture is squeezed in a fist: for normal humidity (about 70%), little moisture or nothing at all should come out; overmoistening is not allowed.
For growing, both a greenhouse with stumps installed in it and large plastic bags on the balcony at home are suitable. Below we will discuss how to prepare oyster mushroom mycelium at home, plant and grow a mushroom crop. Oyster mushroom is the only mushroom that is easy to grow if all the necessary conditions are met.
How to grow oyster mushrooms in sawdust
Growing oyster mushrooms in bags with sawdust is a more complex method, but also more effective. The freshness of sawdust is of great importance, since pathogenic microorganisms can develop in old sawdust.
Sawdust from coniferous trees is not suitable for oyster mushroom substrate.
The sawdust must be dried to a moisture level of 7 - 10%, and it must be light, free-flowing and dry to the touch. There are few nutrients in sawdust; it is recommended to increase their content by adding beer wort. You can purchase it from a brewery or make it yourself.
Substrate preparation
Wheat or barley grains, washed in running water, are filled into some kind of dish such as a baking tray with a layer no thicker than two centimeters. This layer is covered with cold water and left for one and a half days. After this, the liquid is drained, and the swollen grain is covered with cotton cloth. The fabric is kept moist by periodically watering. After two days, the grain will germinate. When the sprouts reach a length of up to 8 mm, the grains are dried in the oven at 60°C. You can dry it simply by spreading the grains over the surface of the table at normal temperature.
The dried malt is ground to the consistency of ground coffee. Dilute with water at the rate of one part of powder to five parts of water. This mixture is steamed in a water bath for an hour and a half, stirring occasionally. After steaming, the mixture is filtered through cheesecloth. The resulting wort contains a lot of sugar and is rich in vitamins and amino acids.
Let's start the process
Before filling the bags with sawdust, they must be pasteurized. It is carried out as follows:
- The sawdust is placed in a bowl and poured with boiling water and wort at the rate of 200 g per 1 liter of water. There should be three times more liquid than sawdust.
- The dishes are carefully covered and left for 8 – 10 hours. Then the excess liquid is drained.
The cooled substrate and mycelium are compacted layer by layer into bags.
The substrate and mycelium must have the same temperature to prevent steaming of the mycelium.
After 45 days, the bag is opened and cross-shaped slits are made on the sides. After the germs of the mushrooms appear, watering begins and the lighting is turned on for 8 hours a day.
Mushrooms that are ripe for picking are twisted out, leaving stumps. The slits should be sealed with tape so that the moisture in the bags does not evaporate, and wait for the mycelium to appear. Then comes the second, and then the third wave of fruiting.
Growing oyster mushrooms at home may seem like a difficult task at first glance. But by carefully studying all the recommendations and carrying out this procedure for the first time, taking them into account, you will gain valuable experience. In the future, all actions will become familiar and will not cause difficulties. The resulting harvest will not only benefit and save the family budget, but will also provide an opportunity to be deservedly proud of your work.
Oyster mushroom mycelium at home: stage one
To obtain royal mycelium, parts of the fruiting body of fresh mushrooms are taken. The oyster mushroom needs to be divided in half and a small piece cut out from the stem. Then it must be dipped in a solution of hydrogen peroxide for disinfection - the material is ready for planting in a nutrient medium.
Then the treated piece is placed in a container with a nutrient substance and closed with a stopper disinfected by fire. Such home production of oyster mushroom mycelium requires mandatory sterility, therefore, after processing, the material should not be touched with hands, but taken with auxiliary tools; the room must also be kept clean.
A closed container with seedling material placed inside in an inclined position is left in the dark for a couple of weeks.
The nutrient medium in this production can be agar from wort, carrots, oatmeal, potatoes or glucose. After preparation, it is sterilized, poured into containers and waited for it to harden, after which a piece of mushroom is added.
Growing royal mycelium
Uterine mycelium, in other words - spores - is the basis for the development of mycelium. It is produced using a crushed mushroom cap, since it is under it that the spore sac is located. During the preparation process, fresh fruit bodies are used, the surface of which is free of damage and disease.
During the creation of uterine planting material, it is important to ensure sterility. Therefore, it should not be allowed to interact with air. Use only sterile instruments to avoid the development of bacteria.
Stage two: obtaining intermediate mycelium
The second stage is the direct cultivation of oyster mushroom mycelium. The technology for producing intermediate mycelium of the oyster mushroom requires the use of cereal grains. For these purposes, healthy, high-quality grains are used, which are boiled for fifteen minutes in a ratio of material and water of one to two. Then the boiled grains must be thoroughly dried and mixed with calcium carbonate and gypsum.
Next, the mixture is placed in glass containers, filling them two-thirds, and sterilized. After processing, pieces of the nutrient medium prepared earlier are placed into the resulting substance. After two to three weeks, when the mycelium has grown, it can be stored, having first been placed in plastic bags. The mycelium can be stored for three months at temperatures from zero to twenty degrees.
Properly prepared intermediate oyster mushroom mycelium with your own hands, which is developed and viable, looks like a lush white coating that has a pleasant mushroom smell.
To plant seed mycelium, perform similar actions, sowing larger containers. To do this, add one spoon of intermediate mycelium to liter jars. This prepares the substrate for further growing mushrooms on it.
Microclimate for growing oyster mushrooms
Growing mushrooms in bags requires compliance with all the necessary conditions for the proper development and growth of the mycelium, and any deviation from the required parameters leads to a decrease in the mushroom yield, and in some cases to its death. The main parameters that must be strictly observed are:
- Humidity - since mushrooms should not be in direct contact with water, they receive the necessary moisture from the surrounding air, and the mass of the mycelium at the same volume directly depends on the humidity of the air in which it grew.
- CO2 content - during growth, the mushroom emits carbon dioxide, which envelops the mycelium, and to remove carbon dioxide from it, a certain air flow speed is required, which should be 0.05-0.1 m/sec with a total CO2 content in the surrounding air of no more than 700 ppm (0.07%).
- Temperature – maintaining the temperature regime ensures optimal growth rate and presentation of mushroom bodies.
- Lighting – lack of lighting significantly slows down the growth of mushrooms and affects their appearance.
- Sanitary standards - dust, pollen, mold, insects, spores of foreign substances can cause infection, disease and death of the entire crop.
Humidity when growing mushrooms
Humidity when growing mushrooms is the main indicator that requires constant monitoring - a lack of humidity, as well as its excess, negatively affects the yield. While it is easy to get rid of excess humidity, achieving the minimum required level of 80-85% sometimes requires a lot of effort.
I’ve racked my brains a lot about how to organize the so-called process of “watering” mushrooms, and I’m sure that my research on this issue will make life easier for many beginning mushroom growers. If you have sufficient financial resources, this issue can be easily resolved - an industrial humidifier of the required performance with a humidity control system is integrated into the supply ventilation, and the issue is closed.
In my case, for a total volume of the growing room of 100 cubic meters, it was necessary to spend 60,000 rubles - that’s how much a ready-made industrial humidifier cost, with the performance I needed, but something told me that I could save money.
A positive aspect of my searches is information about what the minimum performance of a humidifier should be for the volume of my farm, which was 1.5-2 liters of water per hour. This is how the idea of creating an air conditioning unit arose, which combined heating and humidification of air simultaneously in automatic mode.
I studied the structure of an ordinary household humidifier, and it was not difficult for me to order a dozen ultrasonic water evaporators on AliExpress with a capacity of 200-250 grams of water per hour each and make an evaporator from eight pieces, leaving two evaporator elements in stock. I also ordered a couple of floats to maintain the required water level.
I bought a transparent container for storing vegetables at a hardware store and inserted a plastic panel into it with eight evaporators installed in it. The float was installed in the container in order to maintain a water level of 1.5-2 cm above the membrane of the ultrasonic evaporator element. The installed float provides precise adjustment of the water level.
Ultrasonic evaporators require 24 volt power supply - a ready-made power supply with 24 volt DC voltage and a maximum load current of 10 amperes, purchased on the radio market, with a power reserve ensured reliable operation of the manufactured ultrasonic air humidifier.
When one evaporator burned out, the others continued to work; a short circuit of the evaporator led to an emergency shutdown of the power supply. After replacing the faulty evaporator, the functionality of the power supply was restored.
Each ultrasonic evaporator has a water presence sensor, and if for some reason the water runs out, the evaporator turns off. The service life of evaporators is affected by water quality. The ideal option is to use distilled water, but with a flow rate of up to 40 liters of water per day in weather with low air humidity, this is expensive.
In wet weather, water consumption was reduced to 20 liters per day. The use of the three-component “Geyser” filter almost completely solved the problem with water quality, but you should always have several ultrasonic evaporators in stock, since 5-6 of them failed during the season.
Ventilation when growing oyster mushrooms
A good harvest when growing mushrooms is guaranteed only with full compliance with the technology, one of the factors of which is ventilation. When calculating ventilation, the main parameters are the volume of the growing room and the fan performance. Axial fans are not used for ventilation of the growing room.
Effective ventilation is considered when the entire volume of air changes completely 8-10 times in one hour. In my opinion, the optimal design for use in ventilation is duct fans due to their compactness, performance, low noise, energy consumption and ease of installation.
Having selected a duct fan, I found out the required diameter of the air ducts for ventilation. To achieve normal air pressure at the end of ventilation, the diameter of the air ducts must gradually decrease, thereby achieving uniform air distribution throughout the room.
We must not forget about the rules when installing a duct fan - from the point of air intake to the duct fan there must be a distance of no less than the diameter of the air duct, and to the first bend of the ventilation no less than three diameters.
In my case, with a workshop volume of 100 m3, I used a fan with a capacity of 800 m3/hour with a diameter of 200 mm for exhaust ventilation, and for supply ventilation - 1200 m3/hour with a diameter of 250 mm. To adjust the performance of the supply ventilation, I used a triac speed controller, corresponding to the adjustment of the current consumed by the fan.
To monitor the carbon dioxide content in the growing room and, if necessary, to force forced ventilation, I installed a gas analyzer, which had the highest priority in ventilation control.
Oyster mushrooms are afraid of drafts, so turning on supply and exhaust ventilation at the same time is strictly prohibited! The ventilation control was arranged and programmed so that the exhaust ventilation was turned on for a certain time only when there was no need for the supply ventilation to operate.
In order to optimize the operation of the supply ventilation in the absence of mushroom bags in the basement, the air supply was blocked using an air damper built into the ventilation duct.
To exhaust the heated and humidified air, I used plastic air ducts with a diameter of 100 mm with holes with a diameter of 16 mm, located on opposite sides at a distance of 200 mm in a checkerboard pattern parallel to the ceiling. The air ducts were located above three passages between the rows of mushroom bags. I installed plugs at the ends of the air ducts.
For the experiment, I deployed several air ducts and directed the air outlet downwards, but the very next day all the mushrooms located in the upper part of the bags died, which confirmed the correctness of the initial decision - to direct the air flow parallel to the ceiling. (photo below)
There are recommendations: when directing the air flow downward, use plastic medical cups as a nozzle in the air duct. I placed the exhaust ventilation ducts around the perimeter of the garage and basement floors with holes located on the sides at a distance of 200 mm from each other. In the basement, the air ducts were looped for uniform ventilation around the entire perimeter.
In the germination room, in one of the two ventilation holes, I installed an axial fan, suitable in size to the ventilation hole. Since the carbon dioxide content does not play a big role during inoculation, the exhaust fan turned on automatically if the maximum permissible temperature was exceeded, and the heat fan, if necessary, increased it, which will be discussed below.
Temperature and sanitary standards for growing oyster mushrooms
For breeding oyster mushrooms of different strains of mycelium (seed material), the necessary microclimate for growth is different both in the growing room and in the germination room, therefore the use of different strains of mycelium is not provided. I used the most common strain of AK (Chinese, Black Prince).
The temperature in the germination room during inoculation (overgrowing of mushroom bags) is selected depending on the temperature inside the mushroom blocks, which should be from 24C° to 28C°. Exceeding the maximum permissible temperature leads to the death of the mycelium. Air humidity was maintained at 60-65%.
Sanitary and safety regulations must be strictly observed. Before the start of the season or at least once a year, it is necessary to carry out disinfection. Of all the variety of methods for disinfecting premises, the use of sulfur bombs is the most effective and least labor-intensive process.
When using sulfur bombs, fire safety regulations must be observed. Electronic temperature and humidity sensors are hermetically sealed.
Metal mesh is installed at ventilation inlets and outlets to prevent rodents from entering. Air filters must be installed at the intake ventilation inputs. To be on the safe side, mousetraps are installed.
Sticky insect tapes are hung evenly throughout the premises. In the germination room, you can additionally install a long LED lamp covered with white paper coated with rodent glue. Chemical treatment during growth is not permitted.
It is necessary to stay and carry out work in clean clothes that completely cover open areas of the body, in a headdress, shoe covers and disposable sterile gloves. It is necessary to use a respirator or gauze bandage.
If fungal spores enter the respiratory tract within a year, it causes severe and incurable lung disease.
When using phytolamps for lighting, it is necessary to have additional, standard lighting. Observe safety precautions when using a quartz lamp. Any violation of sanitary standards when growing mushrooms will negatively affect the results of work and health.
Conditions for planting mycelium
You can grow oyster mushrooms in an old barn, stone garage or other suitable room. The criterion for its selection can be considered:
- the ability to create high air humidity, which should be maintained at 85-90%;
- maintaining the ambient temperature around 15-20 degrees - at higher temperatures, the mushrooms stop bearing fruit;
- creating a good ventilation system - the accumulation of carbon dioxide is unacceptable due to the high sensitivity of fungi to it;
- the possibility of sufficient lighting - sunlight without direct rays or fluorescent lamps for nine hours a day.
Anaerobic fermentation of substrate
It involves the use of both warm and fresh air (Figure 8). To do this, the temperature is raised to 60-70 degrees, held for 8-12 hours, after which it is gradually (over two to three days) cooled to 45 degrees. It is important to maintain humidity at 70-80%. Such conditions are destructive for pathogens, but are excellent for the development of oyster mushrooms. Steam and filtered air are used for regulation. When fermentation is over, the soil is cooled with air to 25-28 degrees. Natural cooling cannot be used, as it promotes the development of pathogenic microflora.
It is important that each type of nutrient mixture requires its own fermentation regime and duration. For example, straw-based compost is heated to +60 Celsius for 48 hours. At home, fermentation is carried out in containers that will later be used for cultivation, and in industrial settings special chambers are built for these purposes.
Mushroom growing technology
After you have grown oyster mushroom mycelium with your own hands, you can begin planting it, which is done as follows. One kilogram of substrate is laid out at the bottom of a plastic bag, and a layer of mycelium is placed on top of it, and so on layer by layer until the very top. The weight ratio of the substrate and mycelium in the bag should be 1:0.05. The mycelium should be placed closer to the walls of the bag, in which slits should be made to allow air to enter. The weight of the finished block is 13-15 kg.
After filling, the polyethylene blocks are left in the dark at a temperature of about plus twenty Celsius - a higher temperature can lead to the death of the mycelium, since inside the block it can be ten to fifteen degrees hotter.
After two weeks, the block looks like a white monolith. Before the appearance of primordia, the block is sprayed from time to time to maintain humidity and temperature conditions are strictly observed. After the appearance of primordia, after a couple of days they become full-fledged adult mushrooms. There is no need to water them during growth, but it is important to ventilate the room well. When the edges of the caps are aligned, the crop is ready to harvest.
Second fruiting
After harvesting the first harvest, bags with mycelium should not be thrown away. The fact is that oyster mushrooms produce a repeat harvest over time. However, the mushrooms begin to grow only a week and a half after the first fruiting.
You need to grow oyster mushrooms in the same conditions as during the first fruiting. There is no need to change anything, since any temperature fluctuation or change in air humidity can negatively affect fruiting and yield. If the planted mushrooms are grown in optimal conditions, the fruiting period can last for 4-5 months.
You need to be prepared for the fact that each repeated fruiting is not so abundant. Therefore, you should not be surprised that each time you have to collect fewer ripe mushrooms.
Conditions for the preservation of mycelium
In industrial conditions, the mycelium is stored in low-temperature conditions or in liquid nitrogen. This content allows you to maximally preserve the properties of the material and its germination without loss of quality. The process of freezing and subsequent defrosting for disembarkation is carried out slowly under the supervision of specialists.
For home production, it is best to store mycelium in types of refrigerators that allow the freezer temperature to be set within minus twenty degrees Celsius. This will allow the material not to deteriorate and lose its qualities.
After defrosting for a short time, the mycelium restores its vegetative functions.
It is important to avoid repeated sudden changes in temperature conditions, that is, defrosting and re-freezing. This can significantly deteriorate the quality of the mycelium, which, accordingly, will negatively affect the yield of the mycelium.
Storing oyster mushroom mycelium
At a temperature of +1...+5 degrees, oyster mushroom mycelium remains viable for a year. It can also be cooled to a temperature of -20 degrees, that is, put in the freezer. Just do not allow the material to be defrosted and frozen again, otherwise it will lose quality.
The mycelium also fits well in vacuum bags. But first they are subjected to heat treatment in boiling water for 15 minutes. Then the grain mycelium is packaged in them. If you accidentally open and tear the package, the mycelium must be planted immediately so that it does not spoil.
Useful tips for mushroom pickers
To successfully grow mycelium and mushroom harvest, the following rules must be observed:
- The ideal substrate is sawdust from deciduous trees.
- The color of the sawdust used should be white or yellow, this will guarantee its freshness.
- The substrate should have a fresh smell, without any rot.
- When transporting mycelium, the required humidity should be maintained within 30-45%. The same conditions must be observed inside the plastic bag in which oyster mushrooms are grown.
- One block bag measuring 35 x 75 cm will require about 300 grams of mycelium; you need to know this in order to accurately calculate the required amount of material. Buying for future use or thawing excess amounts of mycelium is extremely undesirable due to short shelf life and loss of seed quality.
- When producing mycelium and planting it in the substrate, it is necessary to follow strict sanitation rules to avoid infection by pests: containers, tools and hands must be disinfected.
In general, if you follow the rules and technology for growing oyster mushroom mycelium, and then the mushroom itself, you can achieve good results with not a very large investment of money and effort. With careful attention to the process, even a beginner can handle it.
Buying mushroom mycelium - choosing a quality product
The choice of the vegetative body (mushroom mycelium) should be approached very carefully. It is worth studying the label and markings in detail, determining the strain, percentage and rate of germination, shelf life and resistance to fungal infections.
It is better to use grain mycelium: when fresh, it should not have a characteristic ammonia odor or black or gray spots on the surface. The presence of these signs indicates fungal deposits. A high-quality vegetative product has a yellowish-orange hue, which differs depending on the variety.
The purchased material must be stored at a temperature of 3-4 degrees, on clean shelves in the cellar or in the refrigerator. In such conditions it can be stored for 6 to 9 months.
Before planting, the bags with mycelium are carefully laid out on shelves for 1-2 days so that they rest and reach room temperature. Then they are lowered into the basement for a day, in the same place where the prepared substrate is stored. This is necessary so that the vegetative bodies do not experience thermal shock due to a sharp change.
The bags should not be adjacent to each other for better air circulation, and the hood should work in the room. After this, it is unpacked, crushed and planted.
Features of mycelium
Oyster mushroom mycelium, or mycelium, is, like all cap mushrooms, the vegetative part of the mushroom body. It is formed by thread-like processes that envelop the substrate and provide it with nutrition. The appearance of the familiar mushroom is the final stage of mycelium development. It itself occupies a larger area than the fruiting body visible to the eye.
Oyster mushroom mycelium grown by yourself is practically no different from that which produces mushrooms in the wild on stumps. The only difference is an improvement in the quality of the starting material and an increase in the survival rate of the fungus. In Russia, the practice of growing oyster mushrooms at home with minimal support for the developing mycelium is widespread.
Harvest and storage
The fruiting period of oyster mushrooms is 6-7 days from the moment the buds appear from the upper layers of the substrate. This time is enough for the small embryos to transform into ripe, edible fruiting bodies. The culture develops in so-called clumps, each of which consists of already mature and still young mushrooms.
When picking, it is customary to twist all the fruits at the same time - there is no point in waiting until the babies reach large sizes, since already mature representatives will begin to deteriorate. If you leave tiny mushrooms on the clump, collecting only the large ones, their growth will stop due to damage to the “base”.
As we noted earlier, oyster mushrooms can bear fruit in several waves, but only the first two can be considered productive. The first stream of ripening brings the agronomist approximately 65-70 percent of the harvest, the second - 20-25. There is no point in waiting for the third one; its percentage does not exceed 10 units.
From the above we can conclude that one technological cycle in production lasts no longer than 2.5 months. Ripe mushrooms are carefully cut from the soil, freed from debris, and then placed in boxes/boxes/baskets. To ensure that the product does not lose its presentation, it is necessary to minimize the number of movements of mushroom fruits from container to container.
To preserve the weight of oyster mushrooms, avoiding the natural drying process, polyethylene is used. The harvest is wrapped in film and transported to the place of sale.
As for storing fresh mushrooms, its period should not exceed 6-7 days at an air temperature of no higher than 6 degrees Celsius. If the room is hot, the product will spoil within 24 hours. The exception is freezers, in which the shelf life increases to 1.5 - 2 months.
Every agronomist who grows oyster mushrooms for sale must follow the written standards. A quality product is distinguished by the following indicators:
- The body of the mushroom should have a pleasant smell, dense pulp and clean skin.
- The optimal size of the fruit cap of the 1st grade is from 5 to 12 centimeters, the legs – up to 10.
It is strictly forbidden to distribute or consume damaged, watery, loose or musty fruit bodies.
Lifehack! If you do not have your own premises, you can read the article - Growing oyster mushrooms on stumps on the site.