Features of a chicken coop for 5 chickens
Setting up a chicken coop is the initial stage of poultry breeding. The minimum number of chickens allows you to choose a mini chicken coop with an optimal location for walking. The compact size of the poultry house makes it easy to change its location, taking into account the seasonal characteristics of the site (shading, protection from the wind).
Thus, the chickens’ walking area can be adjusted in accordance with external conditions. The advantages of small poultry houses include the ease of insulating the premises during the cold season: arranging a chicken coop for winter living of chickens will not require unnecessary material and physical costs.
There is a wide range of ready-made structures of this type on the market, however, in order to purchase a ready-made mini chicken coop for 5 chickens, significant financial investments will be required, while self-construction of such a small building will not only save money, but also take into account the personal preferences of the breeder.
We build a chicken coop ourselves
First of all, you should understand that you won’t be able to build a high-quality chicken coop with your own hands, even with a mini attachment, using improvised means. You will have to take care of reliable insulation so that your chickens do not freeze in winter, but continue to lay eggs properly. On the other hand, a small chicken coop can be an excellent element of landscape design that can be skillfully used. After looking at the various options in the photo and choosing the appropriate drawing, you can go get the materials and safely begin construction at the dacha. The size of such a chicken coop will be insignificant, so building it at the dacha with your own hands will not take much of your time.
We suggest you build a mini chicken coop in the form of a spacious cage with your own hands. This option has several advantages, the main one of which is its mobility. The size of the cage is 1x2 m, and if necessary, it will not be difficult for you to move it around the dacha, having first dismantled the paddock. Thanks to its simple design, you can quickly draw up a drawing and begin construction. In addition, such a mini chicken coop in the country will not disturb the landscape, because it does not require a foundation. The area under the cage can be planted with grass or filled with fine gravel.
Tools and materials
First of all, you need to make a list of the necessary materials. You may already have some at your dacha, so don’t blindly go to the store. For example, the wooden beam that will be needed for the chicken coop racks may be at hand from some preliminary construction work. In general, the complete list of materials is as follows:
- timber 50x50;
- wooden slats 2x3 cm;
- plywood or OSB board;
- Rabitz;
- metal fittings or pipe;
- slate or tiles;
- polystyrene foam, mineral wool or other insulation;
- small door hinges;
- nails and screws.
Wooden beam
Plywood sheets
Mineral wool insulation
Tools you will need:
- saw;
- hammer;
- drill or screwdriver.
Don’t forget to first make a drawing or at least outline a construction plan in an approximate drawing. It is very important to think about which side the entrance and windows will be on in order to plan the location of nests and perches. The nests should be installed in the farthest corner. We suggest looking at how this might look in practice in our approximate photo drawing. You can select the sizes individually, based on your area capabilities.
Mini-poultry house arrangement drawing
Step-by-step instruction
Although our drawing is quite simple, let’s not forget that you are building a house for chickens at your dacha with your own hands, so step-by-step instructions are necessary. Let's start in order.
- We cut blanks from timber and plywood (length 1 m, width 2 m, height 0.7 m). It is important to accurately observe the size, because the frame and walls of the chicken coop will be made from these blanks.
- We assemble a frame from timber. For greater reliability, you can cut grooves and connect the parts together using bolts. On the left side we make a small door for the chickens to exit, and in front there is a larger door for access to the nests and cleaning.
- We cover the inside of the frame with plywood or OSB. We use screws for installation.
- We fix the insulation to the walls and sheathe the frame from the outside. Subsequently, it will have to be painted to protect it from the negative effects of atmospheric phenomena.
- We make legs 50-70 cm high (8 pieces at a distance of 0.5 m). It is better to mark the places of their attachment in the drawing, so that during the assembly process with your own hands you do not have any confusion.
- We stuff cross slats onto the roof, fasten the insulation and cover it with a roofing sheet. We line the roof from the inside with plywood.
- Now we have to build a paddock. Its size should be at least twice as large as the chicken coop itself. It’s very simple to make: we drive in the rods, stretch the mesh and secure it.
- The edges of the mesh should be tightly adjacent to the chicken coop so that the chickens cannot escape from the fence. To ensure that caring for them does not create problems, you can make a small door from the same mesh and wooden frame.
The small size of the chicken coop allows you to quickly build it at the dacha with your own hands. Using the photos and videos from our article, you will immediately figure out which chicken house will best fit into the landscape of your dacha. Don’t delay construction and soon you will be able to always have delicious chicken eggs on your table.
Loading …
The area and location of the chicken coop
According to sanitary standards (up to 3 laying hens per 1 sq. m), the area of a small poultry house can be only 2 sq. m. On the Internet you can find many photographs and drawings of miniature, almost toy houses for chickens.
You should not make your choice based only on aesthetic preferences: any room for keeping animals requires regular maintenance, which is often difficult in overly small outbuildings. It is recommended to make the ceiling height in the chicken coop such that an adult can stand in it at full height. In this case, servicing the premises will be as convenient as possible.
A room for keeping a small number of chickens may be small in size, but it must have space for the birds to walk. In the summer, chickens spend almost all their time walking, so you should think in advance about the location of the area where the animals will be located.
The place should be protected from the wind, from the open sun and have shady areas where the birds can hide from the heat. If the territory does not allow organizing a full-fledged walking area, it can be arranged under the poultry house, which will be located on the second floor of the outbuilding.
The main requirement for a walking area is the presence of a protective fence that protects chickens from attack by other animals, as well as restricting the movement of the bird itself.
Preparation
When planning the location of the building, you should take into account not only the level of insolation and protection of the site from the wind, but also the possibility of supplying electricity for lighting and possible heating of the room in severe frosts. You should also decide on the mobility of the poultry house: will a small chicken coop for 5 chickens move around the site depending on external conditions or will it be installed permanently.
Drawings and measurements
If you decide to build a poultry house yourself, you can use one of the many schemes presented on the Internet. If necessary, finished drawings can be modified and finalized in accordance with the characteristics of the surrounding buildings and the site as a whole.
Attention should be paid to the compliance of the building with the climatic conditions of the region: the room must be provided with both ventilation and heating if necessary. Before starting the construction of the chicken coop, you can mark the proposed building site using pegs with rope or sand. You should observe whether the selected area is sufficiently illuminated during the day, and whether the location of the proposed building complies with sanitary standards for keeping animals on the site.
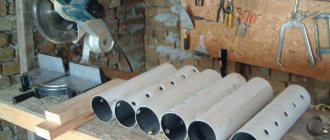
Required materials and tools
The materials from which you plan to build a mini chicken coop must be in excellent condition. The use of old boards is not allowed, since microorganisms contained in such building materials can lead to illness and even death of birds. For construction you will need the following materials:
- timber (4*4) for making the frame;
- timber (10*10) for making the lower frame;
- OSB boards for cladding the structure;
- boards;
- glazed window frame of a suitable size (but not less than 10% of the wall area);
- door furniture;
- roofing materials (metal tiles, corrugated sheets, slate);
- heat and waterproofing materials;
- material for fencing the walking area (metal lattice or mesh).
Also, when building a poultry house, you will need tools used when working with the above building materials: a screwdriver or screwdriver, a hammer and a saw.
Selection of materials and tools
- To fill the base - concrete mortar. Materials should be selected based on the type of foundation.
- For the frame - beams. For wall cladding - boards.
- For the inner lining and nests - plywood sheets.
- For the roof - roofing material, slate or tin. 2 layers of roofing felt are also laid on the foundation (protection from rotting).
- For the enclosure - mesh and iron clamps.
- Screws and nails.
To make a chicken coop, you do not need to prepare any special tools - you only need standard tools that are often used in the country
The set of tools may vary depending on the dimensions of the structure being manufactured, but a basic set is required:
- Master OK;
- plane;
- roulette;
- building level;
- axe;
- mallet.
After complete preparation, we move on to construction.
Construction
The construction of a compact room for keeping birds can be carried out either on a foundation or on a leveled gravel area, slightly raised to prevent moisture stagnation. If there is an aviary under the chicken coop, the leveled and raised area should be sown with a mixture of lawn grasses recommended for use for such purposes.
Construction of the foundation
If a chicken coop for 5 chickens or less is being built on a foundation, preference should be given to the cheapest and least labor-intensive pillar one. Posts can be made from treated hardwood, brick, or cemented pipes. A room of this kind is very light, so a columnar foundation is the most suitable option in this case.
Floor and walls
Usually, in order to build a compact poultry house, frame technology is used. Work progress step by step:
Assemble a frame of the required dimensions from 10*10 timber.
- Attach the vertical elements of the frame to the frame of the lower trim using mounting angles and self-tapping screws, connecting them with an upper trim made of timber of the appropriate section.
- The inner surface of the walls is covered with OSB boards. When finishing the external surface of the walls, the same finishing materials can be used as for the rest of the buildings on the site. If necessary, a layer of thermal insulation materials should be laid between the inner and outer surfaces.
- The floor of the room is made of boards or OSB (when building a two-story building with a platform on the ground floor). If the walking area is located under the poultry house, a hole is made in the floor through which the chickens can go outside and come back up the stairs. The staircase is made in the form of a board with slats packed across it to prevent birds from sliding.
- If the site is located next to a building, a hole is made in the side wall.
- Door and window openings can be made in any wall of the chicken coop.
It is recommended to make the floor in the room from several layers:
- rough floor;
- retractable tray;
- mesh with cells 1.5*1.5 cm.
This design will greatly facilitate maintenance - cleaning can be done by removing the tray and removing the droppings that have accumulated there.
There should be no gaps in the walls. The inner surface of the walls must be treated with special antifungal agents to prevent the formation of mold and the appearance of insects.
Roof
If the room is planned to be used in winter, then 2 ventilation pipes should be made, located at different heights - this way fresh air will enter the room through the lower hole, and the upper one will serve as an exhaust hood.
Chicken coops used in winter differ from summer ones in the arrangement of the roof: in order to prevent heat loss, the ceiling is hemmed in the room, which is laid with thermal insulation, and only then the rafters are erected. A sheathing is nailed onto the timber rafters, onto which a layer of waterproofing and roofing material is laid.
How to create a foundation for a chicken coop
After creating a detailed drawing of the structure, you can begin creating the foundation. Some site owners create buildings without a foundation, but it is not recommended to follow their example, as this can lead to the gradual destruction of the structure.
Most often, a strip and column foundation is made for a chicken coop. The advantages of the first option include the low cost of materials and ease of construction. If you properly create a ventilation system under the floor, this will protect the wood from rotting.
The creation of a columnar foundation occurs in several stages:
- First, in the area where the chicken coop will be located, pegs are installed, between which a rope is stretched. It is important to check the diagonals between the corners of the resulting rectangle. If they do not match, then the markup is placed incorrectly. In addition, you should check the accuracy of the markings using a tape measure.
- At the next stage, the fertile soil is removed. The layer thickness is approximately 20 cm.
- After this, you need to dig holes. The distance between them should be about 1 meter. They should be about 70 cm deep and 50 cm wide. Using a rope and a hydraulic level, mark a distance of about 25 cm above the ground. It is to this height that the pillars will be erected.
- Then sand is poured into the pits. The thickness of the layer should be approximately 10 cm. After this, bricks are laid on the bottom, on top of which cement mortar is placed. 2 more bricks are laid across the top. Such work continues until the pillars reach a pre-marked height.
- In order for the created pillars to gain sufficient strength, they are left for about a week.
After the work has been completed, the brick pillars must be treated with bitumen or mastic. The space around the pillars is filled with coarse gravel.
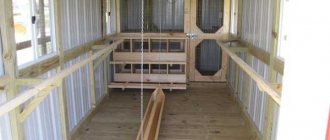
Arrangement inside
The interior space of the poultry house should consist of several zones:
- nests;
- perch;
- feeders and drinkers.
When calculating the length of the perch, it is taken into account that 25-30 cm of space is needed per individual. In order to accommodate 5 heads, you will need a perch about one and a half meters long.
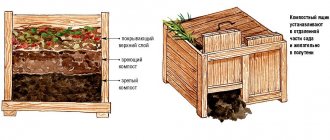
It is better to place nests measuring 40*40*40 cm in the place where it will be most convenient to pick up the laid eggs. For 5 laying hens, 3 nests will be enough. Often, nests are arranged in the form of add-on boxes outside the chicken coop.
The opening back wall of the box provides easy access to the nest. In order for laying hens to lay eggs well, the room must be illuminated. For a mini poultry house, a 40 W lamp will be enough.
Chickens should have constant access to water. For 5 individuals you will need 1.5 liters of water per day. It is advisable to prepare a nipple drinker for laying hens - this will protect the floor from spilled water and subsequent rotting.
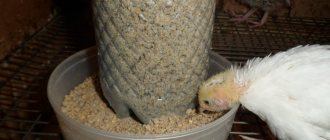
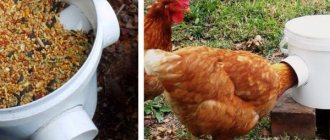
The design of the feeders should be such that the birds cannot scoop out the food with their paws: for this, a small rail at the top and bottom is enough. Additional containers with food and water should be placed in the enclosure.
When setting up a chicken coop, it is important to provide a place for birds to bathe and install a container with ash and/or sand where the birds can clean their feathers.
Installation of roof and walls
The standard technique used when installing walls in a chicken coop is easy to implement even without much experience.
The most popular material that provides good insulation is roofing felt. Two layers of this material are laid in the initial crown - from the foundation. The beams are fastened at the ends in half a tree. All other crowns are connected according to the tongue-and-groove principle (at the corners). To make the interlocking connections more dense, flax-jute fiber is used.
If the timber is well moistened, the crowns are planted firmly and securely using wooden dowels, under which special holes are made in the corners of the chicken coop. They are placed in a checkerboard pattern with a distance of about 1.5 meters from each other and a depth of 2.5 beams. Thus, the log houses will not warp. The dowels must be driven 7 cm into the wood. The walls of the poultry house should be 1.8 - this is the optimal height.
At the next stage, the ceiling beams are attached, the rafters are placed and the canvas is laid out. Spare no effort to build a gable roof. Its advantage over a lean-to roof is that you also get a kind of “attic” for storing grain and working tools. In addition, a gable roof will protect the chicken coop from dampness - water and snow roll off it better.
The roof is constructed from any boards and insulation. The latter can be rolled material, but it is quite expensive. If you want to save money, use expanded clay or other cheap materials: coal slag, mineral wool, sawdust, straw or gravel.
For ventilation, you need to supply two wooden boxes, which are fixed on two opposite sides of the chicken coop. The first end of the ventilation system is located at the same level with the ceiling, and the other is 40 cm lower. The air temperature in the poultry house is well controlled using tin dampers.
Insulation and arrangement of the chicken coop in winter
The floor of the poultry house should be covered with a layer of straw, since chickens love to rake the straw with their paws. If in summer the thickness of the layer may be small, then a chicken coop built for all-season use for the winter should be lined with a 20-centimeter layer of straw, peat or sawdust.
The air in the room should be heated to +14. During severe frosts, the room may require additional heating, for which an outlet should be installed during construction. It is recommended to line the floor of a winter chicken coop for 5 chickens with thermal insulation material, covering it with a rough board on top. Thermal insulation on the walls and roof is installed during construction.
Keeping a small number of chickens does not have any significant disadvantages. Moreover, the possibility of building a compact chicken coop, which allows you to keep poultry taking into account all sanitary standards and requirements, but remains mobile and easy to install, makes keeping chickens affordable.
Photo gallery
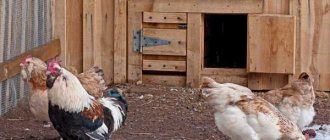
Photo 1. Finished house for 5 chickens
Photo 2. Original mini-poultry house in the yard
Photo 3. Small chicken coop with a flower bed on the roof