The process of preparing a bed for garlic in the fall is an important agrotechnical stage in the cultivation of this vegetable crop. How well and quickly the vegetable will sprout and whether it will freeze over the winter or get sick depends on how correctly it is carried out. As practice shows, autumn planting, with a minimum of costs, gives the best results when cultivating garlic; the main thing is to comply with all the rules and conditions for pre-planting treatment of seed and beds.
By cultivating winter garlic, gardeners have the opportunity to get an early harvest of large heads, spending less time and effort, since the main agrotechnical work on planting it is carried out at the end of the season.
Pre-planting treatment of the site where it is planned to grow garlic includes several key points: selecting a site, digging it up and disinfecting it, filling it with fertilizers, watering, and forming ridges. Each of these operations is discussed in more detail below.
Landing dates
The choice of time for planting winter varieties of garlic depends on the climatic characteristics of the growing area.
In central Russia it is planted from September 25 to October 20. In the southern regions, this period may shift 1-2 weeks later. It takes about 40-60 days for garlic cloves planted in the ground to take root. During this time, their roots grow 5-10 cm, and leaves begin to grow. Having taken root, the vegetable quietly overwinters in the ground, and with the onset of spring, as soon as the soil thaws, it quickly begins to grow.
Attention! When choosing the timing, you should take into account that garlic that has begun to grow due to planting too early loses its winter hardiness. Being late is dangerous because the planted garlic cloves do not have time to take root and, with the onset of severe frosts, freeze out.
The lunar calendar will help you more accurately navigate the best time for autumn sowing of garlic, since this bulbous vegetable, being planted in its waning phase, receives a maximum of biological substances from the soil.
Planting winter garlic
The time for planting garlic depends on the depth to which the cloves are placed in the soil . The deadlines are quite flexible, the main thing is to have time to do everything 40 days before the onset of the first frost. This period is quite enough for the garlic to take root and then successfully withstand the winter cold. If you plant a crop earlier, it may germinate before frost and the future harvest will be spoiled.
First, prepare a bed for garlic for winter . Planting locations for crops are marked on the site. Furrows are made, the depth of which depends on the planting of the crop. This is approximately 5-6 or 13-15 cm. The distance between the furrows should not exceed 20 cm, and from the sides of the bed - 5 cm. A small layer of a mixture of ash, potassium salt and superphosphate with coarse sand is poured into the furrows. Then the bed is watered with a slightly pink solution of potassium permanganate.
More about garlic:
Disease-resistant garlic "Lyubasha"
We protect the future harvest from pests and diseases
Planting winter garlic to a depth of 10-15 cm
In the middle zone, where winter conditions are more severe, garlic is planted to a depth of 10-15 cm . This depth allows the crop to grow a good root system in order to safely withstand the cold. The cloves are placed in the ground with the sharp part at the top at a distance of 10-15 cm from each other, slightly deeper into the ground.
Advice. When planting, you can lay the teeth on the side. There is an opinion that garlic will overwinter better this way.
1-2 weeks after planting, humus or peat no more than 2 cm thick is added to the garden bed.
Planting garlic before winter to a depth of 3-5 cm
This method is practiced in the southern regions of the country . This depth will be enough for the garlic to take root and survive the winter cold. Planting material is placed in the grooves with the bottom down, slightly deepening each clove. The distance between the cloves is 12-15 cm.
Further steps for both landing options are identical . Bury the beds with rotted compost. The peculiarity is that simply filling in the furrows and leveling the bed is not enough. It is necessary to create a dense layer of soil, since loose soil will quickly be washed away by precipitation. Buried beds should be compacted slightly.
In the northern regions and middle zone, mulching of beds is mandatory . This procedure is necessary to warm the crop and further fertilize the soil. The mulch layer is approximately 10 cm. Ideal for this purpose are pine needles, peat, leaves, humus, wood ash, a mixture of soil with sawdust or dry manure, in general, any plant debris.
Reference. In the southern regions it is not necessary to mulch the beds.
The last stage is warming winter garlic . This is done at sub-zero temperatures. Snow is considered the best “blanket” for winter crops. If the area is well-ventilated, you can put temporary fences around the perimeter of the bed to prevent the snow from being blown away by the wind. Cover the beds with spruce branches, spunbond or dry branches.
Selecting a location
Preparing a bed for winter garlic in the fall begins with choosing a place for them. This bulbous crop does not take root in shaded areas and in lowlands with close groundwater.
The most suitable place for planting winter varieties of garlic will be the southern part of the plot with fertile substrate, open to the sun's rays. It is advisable that there is a source of water nearby, as it will need good watering. Mulching of plantings will help reduce its amount and at the same time maintain soil moisture at the required level.
Features of bed preparation
Not all beginning gardeners know how to prepare a bed for winter garlic, and as a result, they make a number of mistakes and are left without a proper harvest. To achieve good results, you must adhere to certain recommendations regarding:
- compliance with crop rotation rules;
- temperature conditions;
- soil composition;
- preparatory activities.
If the preparation of the bed for planting garlic before winter was done with deviations from these parameters, then the quality of the mature heads will decrease and productivity indicators will decrease significantly.
Selecting a location
Before winter, a bed for garlic should be located in a well-lit area; it is not advisable to plan it along fences or plantings. It is better to give preference to higher elevations, since moisture often accumulates in the lowlands after the snow melts, which can only harm the plantings. It is more rational to divide the site from north to south.
Also, when choosing a place for garlic, you should take into account the composition of the soil; the best option would be loamy soil with weak or neutral acidity. If the soil is excessively acidic, the spicy crop will not be able to fully absorb nutrients. Also, you should not expect the desired effect from using fertilizer mixtures in such places. As a result, all growth processes in the planted plants will be slowed down, which will negatively affect the quality and quantity of the harvest.
You can determine the acidity level in the soil using an acid meter or one of the time-tested methods:
- If horsetail, buttercup, and plantain predominate in a weedy area, then the acidity is increased. If there is a large amount of field bindweed, nettle, clover, coltsfoot, then the soil is slightly acidic or neutral.
- With regular loosening, it is sometimes difficult to identify which weed is abundant; in such cases, use ordinary table vinegar. They pour it on the ground and look at the reaction: the presence of hissing bubbles indicates a normal level of acidity; in such soil there is an optimal percentage of lime. Lack of reaction indicates excessive acidity. It can be reduced by adding ash, chalk, and limestone. Such soil requires deoxidation.
- Another interesting way is to use a solution based on blackcurrant leaves. You need to throw some earth into it to see the reaction. If the liquid has turned pink, the soil is moderately acidic; if it is red, it is acidic. The alkaline nature of the earth will be indicated by the color of the solution in blue, and the neutral nature - green.
Having decided on the acidity of the soil, you can move on to the question of how to prepare a bed for winter garlic in the fall.
The best predecessors of garlic
The health and productivity of future garlic plantings is directly influenced by the crops that grew in this bed before it. Plants such as zucchini, cucumbers, peppers, tomatoes, and eggplants contribute to fertility, and, consequently, to obtaining a bountiful harvest. They saturate the earth with organic matter. But it is not advisable to prepare a bed for planting garlic before winter, where carrots, turnips, potatoes or radishes were previously planted. Because in the process of their growth and development they “take” all useful components from the soil. It is also not advisable to grow a spicy crop several times in the same place. This is due to the proliferation of fungal spores and parasitic individuals in the soil, which infect new plantings and jeopardize the future harvest.
Preparatory activities
The question of how to prepare a bed for garlic before winter is especially relevant in regions with a variable climate, when frosts can begin much earlier than they should. In such cases, work can begin in late August, one month before the cold snap. When growing garlic in central Russia, planting is recommended in the second half of September - early October, and in the southern regions - in early November.
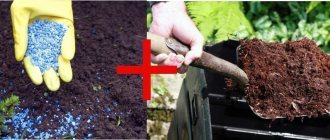
When preparing the soil for planting garlic, special attention should be paid to the composition of the soil. The bed is fertilized with rotted vegetation (1 bucket), wood ash (2 cups), chalk (250 g), and superphosphate (in accordance with the manufacturer's instructions). This amount of useful components is calculated for 1 sq.m. land. The digging depth should be 20 cm in order to maximally saturate the soil with nutrients.
Considering the many nuances of cultivating a spicy crop, it is especially difficult for novice gardeners who do not know how to prepare a bed for winter garlic. It is ideal to form a bed of the following dimensions: height 25 cm, width 100 cm. It is not advisable to plant garlic immediately after digging the soil. Because after it settles, the cloves will be too deep, which will have an extremely negative impact on their growth and development. You can speed up the process of land subsidence by irrigation, performing the procedure 2-3 times.
Preparing the land for planting garlic before winter also involves disinfecting the beds using special means:
- fungicides such as Topsin - M, Fitosporin, which are highly effective against fungal infections;
- antiseptic insecticides (Ridomil Gold, Acrobat), distinguished by excellent disinfecting properties and the ability to work together with other agrochemicals.
Beginners often have the question of how to prepare a bed for garlic before winter using potassium permanganate, copper sulfate and Bordeaux mixture. The process of preparing the working fluid is quite simple; you need to know the dosage of the product used:
- A solution of potassium permanganate consists of 1 g of powder and 1 liter of warm water. The liquid should have a bright crimson color.
- Copper sulfate is diluted at the rate of 40 g per 10 liters of water.
- A mixture of potassium permanganate (1 g), copper sulfate (1 g) and boric acid (1 g) is dissolved in 1 liter of water.
- Bordeaux mixture is used taking into account 100 g of the drug per 10 liters of water.
Such thorough preparation of the soil for winter garlic will protect the plants throughout the entire growing season.
Organization of an irrigation system
Preparing the soil for garlic in the fall also involves irrigating the bed with herbal remedies. For preventative purposes, against fungal diseases, it is effective to use an infusion based on calendula and yarrow. After watering, the soil should be covered with polyethylene material and left until the spice crop is planted.
Application of fertilizer mixtures
In order for the plants to grow and develop normally, you also need to know how to fertilize the garlic bed. The following nutritional composition options have proven themselves to be effective:
- potassium salt (25 g), granulated superphosphate (30 g), rotted vegetation (5 kg);
- simple superphosphate (20 g), potassium salt (15 g), slaked lime (1 glass), organic fertilizer (1 bucket);
- slaked lime (1 cup), horse manure (1 bucket), superphosphate (1 tbsp), nitrophoska (12 g).
This amount of ingredients is calculated for 1 sq.m. processed area. When preparing a bed for garlic, you should pay attention to the type of soil. If the soil for garlic is loamy or sandy, then the addition of nitrophoska, superphosphate, and dolomite flour will be required (dosage according to the instructions). If the site has clay soil, then you need to add peat, and in peat soil you need to add loamy soil.
Crop rotation rules
Compliance with the rules of crop rotation will prevent not only soil depletion, but also the likelihood of garden crops being damaged by fungal diseases, so it is not recommended to grow garlic in one area for more than 2 years in a row. You can plant it again in the same area after 4 years.
| Best predecessor crops | Acceptable predecessor cultures | Unfavorable previous crops | Vegetables to plant after garlic |
| Early ripening cabbage varieties | Late-ripening cabbage varieties | Garlic | Brassicas |
| cucumbers | Solanaceae | Oats | Solanaceae |
| Zucchini and other squash | Garden strawberries and strawberries | Greenery | Legumes |
| Beans and legumes | Barley | Pumpkin | |
| Melons | Spinach | Rape | |
| Wheat | Roots | Rye | |
| Rye | Phacelia | ||
| Forage grasses |
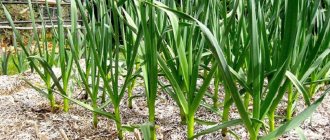
Growing and caring for garlic
The beds are marked in advance, maintaining a distance between rows of at least 35 cm, and between holes of 10 cm.
Many gardeners practice planting green manure plants (peas, oats, mustard) between rows. Such auxiliary sowing is needed to retain snow during the winter months, and during the season, rotted tops can be used as fertilizer. When the sown seeds germinate to a height of 30 cm, the actual planting of garlic begins.
Boarding order:
- the holes in the row are spaced at a distance of 10 cm;
- Place a clove in each, deepening it a little;
- The holes are covered with rotted compost, then mulched with pine needles, sawdust, dry peat or leaves, spruce branches with a layer of at least 10 cm.
Immediately before planting, it is recommended to fertilize the soil with urea (10-15 g per square meter).
How to grow large garlic?
If the correct planting time is observed, immediately after the snow melts, the first young shoots appear in the garden bed. They should be immediately loosened and fertilized, and then watered well.
A good garlic harvest depends on several factors:
- To prevent the planted cloves from freezing, the beds should be well covered with snow;
- during the growth period, which occurs in spring-summer, plant care consists of timely watering and fertilizing;
- When shoots form, they must be removed so that the nutrients remain in the head.
Why does garlic rot in the garden?
The main reason for bulb rot is that the beds are too low. In such a situation, the heads are affected by various fungal diseases, begin to rot and become unsuitable for food.
Causes of garlic rotting:
- fusarium - a disease on the roots develops at high soil moisture, gradually rising along the stem, so it becomes obvious only after premature yellowing of the leaves;
- white rot of the bottom - develops when the soil is waterlogged even at low air temperatures in early spring, from which the stems and leaves begin to sharply turn yellow, dry out and fall off;
- penicillosis, or green mold - manifests itself in the formation of watery brown spots on the bottom and husk, due to which individual cloves begin to fade, becoming covered with a green coating; development occurs at high temperatures and humidity.
Soil acidity
When preparing a bed for planting garlic in the fall, you should pay special attention to the pH of the soil. For good growth and development, this crop requires organic-rich, light sandy loam soil with an acidity of at least 5.6. When cultivating bulbs on soils with high acidity, preparing the land for garlic in the fall involves carrying out additional work to deoxidize them by adding one of the alkaline components to the soil:
- fluffies;
- calcium nitrate;
- ash;
- chalk;
- dolomite flour;
- calcareous tuff.
Deoxidation of loamy soil should be carried out every 7 years, sandy loam - every 5 years.
Green bed
This method allows you to get an excellent harvest without dressing the soil; it is suitable for regions where vegetables are planted in September-October. To properly prepare a bed for garlic for planting in the fall using this method, you must:
- choose a location and form a site in early August;
- apply organic and mineral fertilizers after 7-10 days according to the usual scheme;
- mark the soil for planting after 5-7 days, sow a mixture of peas and oats parallel to the furrows so that the distance between the rows does not exceed 30 cm;
- plant cloves or single cloves in the inter-row spaces in due time.
During the planting period, formed shoots of green manure will be visible. They will protect the rooted plant at the beginning of winter, and in the spring the green mass will become an additional fertilizer for the sprouts of the spicy vegetable. With this technology for forming a planting area, additional disinfection is not required.
Tillage
When preparing land for garlic in the fall, you should clear it of weeds in advance, digging it to a depth of 25 cm. Then level it with a rake and lightly compact it. In addition, the area should be decontaminated and fertilized by introducing organic residues that can rot over the winter. Immediately before preparing to plant garlic in the fall, the soil should be watered and covered with film to retain moisture, especially in cases where drought persists for a long time.
Disinfection
When preparing the soil for planting garlic in the fall, you should treat it to remove fungal spores by watering it with a fungicide, for example:
- "Fitosporin";
- infusion of yarrow and calendula;
- boric acid, etc.
Vegetable grower Galina Ganichkina, sharing her secrets on preparing the soil for garlic for planting in the fall, recommends diluting 1 tbsp. copper sulfate in a liter of hot water. In parallel, dissolve 1 tbsp in a liter of cold water. soda and ammonia. Mix both infusions, dilute them with water, bringing the volume to 10 liters and treat the area.
To prevent typical pests, beds can be treated with insecticidal preparations “Acrobat”, “Enzhio”, “Radomil Gold”.
Fertilizer
Before planting, it would be a good idea to increase the fertility of the area by preparing one of the nutrient mixtures.
- In horse manure - 1 bucket, add 2 teaspoons. l. nitrophoska, 1 tbsp. l. double superphosphate, 1 cup. slaked lime.
- For a bucket of chicken manure – 1 cup. slaked lime, 1 tbsp. superphosphate and potassium salt.
- For ½ bucket of humus - 1 tbsp. potassium salt and double superphosphate, 1/2 cup. chalk and 1 stack. ash.
Attention! The proposed dosage is designed to fertilize an area of 1 m2. It should be topped up with nutritional supplements at the end of summer.
Distribute the prepared fertilizer mixture over the area and dig in, after which you can proceed to forming the beds themselves.
Often among the recommendations for preparing beds and planting garlic you can find advice on adding urea a week before planting. This is due to the fact that winter garlic that has emerged in the spring may turn yellow due to a lack of nitrogen. However, experienced vegetable growers recommend applying nitrogen-containing fertilizers in early spring, since, when applied in the fall, they are completely washed out of the soil over the winter.
How to prepare garlic for planting
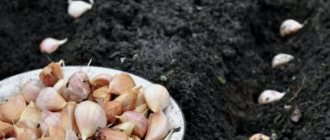
For autumn planting of winter garlic, cloves are used, which the next year will form large heads by mid-summer.
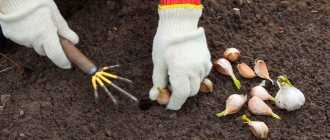
Step-by-step preparation of planting material:
- Calibration Choose large, high-quality dried garlic heads without signs of disease, rot, mold, or insect damage.
- Selection of teeth. The heads are divided into separate slices, selecting the largest and healthiest ones for planting. If the quantity is limited, the cloves are sorted by size. They are planted in groups of the same size, which ensures uniform germination. Bulbs with fewer than 4 teeth are not taken for planting, since such a sign serves as evidence of the degeneration of the variety.
- Preparing teeth. Immediately before the next stage, carefully remove the bottom from each tooth without damaging the shell.
- Disinfection of planting material. Before planting, garlic cloves are kept for 10 hours in a slightly pink solution of potassium permanganate to protect against fungal infection.
You can use ash lye. It is prepared from a glass of sifted wood ash, which is heated in 1 liter of water until boiling. After cooling, pour the settled liquid into a jar and place the garlic cloves for 1.5-2 hours.
A one percent solution of copper sulfate is used for disinfection. Keep your teeth in it for 10 minutes.
You can dissolve 3 tbsp. l. fine table salt in 5 liters of cool water. Soak the garlic cloves for 2.5-3 minutes.
After the disinfection procedure, the planting material is laid out on thick paper to dry.
Ridge formation
As a rule, garlic is grown using the strip method, planted in 5 rows with a 20 cm distance between rows. However, recently the Mittleider method has become especially popular. This technology involves the formation of narrow raised ridges - 10-20 cm in height and 30-45 cm in width. They are well warmed up by the spring sun, protected from gusts of wind and soil erosion due to the presence of high sides, and are less susceptible to overgrowing by weeds.
There are two ways to prepare a Mitlider bed for garlic.
- Using boxes-beds. To do this, boxes are assembled from boards, which are then installed on the site and filled with fertile substrate.
- Using earthen ramparts. To do this, mark the beds and walkways directly on the site - 40 and 100 cm wide, respectively. Form mounds between them, check the beds for no height differences.
Attention! Having prepared the ridges, you should leave them for a while so that the soil settles and only then plant anything.
Disinfection of soil for planting garlic in the fall
To prevent infection of vegetable crops with various infections, soil disinfection is carried out. You can prepare a solution based on several components.
35 grams of copper sulfate powder should be diluted in 10 liters of water. Spray the bed with the prepared solution and cover it with film.
You can dissolve 100 milliliters of Bordeaux mixture and a strong solution of potassium permanganate in a bucket of water.
A mixture of boric acid, potassium permanganate and copper sulfate is suitable. For two liters of water take 2 grams of each component.
It is useful to keep the seeds in a solution of potassium permanganate before planting.
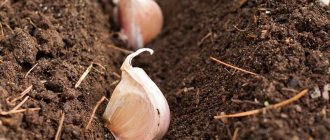
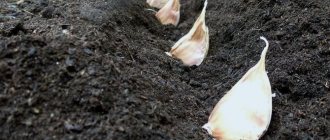
Landing
Garlic is planted in a garden bed in moist soil, the distance between the holes is 5-8 cm, the depth is 4-12 cm. When planting the cloves, they are placed bottom down and sprinkled with fertile soil mixture on top. Water again and cover with mulch - pine needles, sawdust, peat or straw, which should not be removed even in the spring, since it allows you to retain moisture in the soil and protect the seedlings from return frosts. In winter, garlic ridges are additionally covered with snow.
Attention! Deep planting prevents garlic from freezing, promoting rooting.
Common mistakes when planting garlic
Growing garlic, like other crops, has its difficulties. Let's look at what errors may occur:
- Premature planting of winter garlic.
- Shallow planting can lead to freezing.
- Adding fresh manure to the soil will provoke fungus.
- Planting cloves with rot and dark spots.
- Growing garlic after other bulbous crops.
- Planting a winter species in the spring.
- Planting spring crops when the average daily temperature does not exceed +5 °C.
Alternative methods
In addition to growing with cloves, experienced vegetable growers also practice planting garlic bulbs - bulbs formed at the ends of flower stalks. To do this, the bulbs released from the inflorescences are calibrated and the largest ones are sown. By July, one-toothed garlic grows from them, which, when planted again before winter, forms full-fledged heads.
Differences between spring garlic and winter garlic
Before planting garlic, you need to know which variety is suitable for spring and which for autumn. Most often, to obtain a generous harvest, planting is done before winter.
Winter frost-resistant varieties are suitable for this. This is convenient - the harvest ripens early, and the head of garlic grows large.
How to correctly recognize varieties
The winter variety can be easily distinguished from the spring variety by its external characteristics.
| Winter garlic | Spring garlic |
| Forms small large cloves, 5-10 pieces in one head | Only the Gulliver variety shoots |
| The cloves evenly surround the stem and have an even number | The lobules are small and arranged randomly. The number of cloves can be from 8 to 20 pieces |
| Release an arrow on which bulbs form | Low winter hardiness |
| High winter hardiness, withstands frosts down to -25 degrees | Prefers light loamy soil |
| Grows on sandy loam soil | The taste is softer |
| Has a burning taste | Planting is carried out only with cloves, since the variety does not form air bulbs |
| Can be planted with cloves, single cloves and aerial bulbs | Keeps well until spring |
| High yield | |
| Eaten in autumn, suitable for preparations. Not stored in winter |
Tips for gardeners
The qualitative and quantitative indicators of the harvest largely depend on the quality of the seed. For pre-winter sowing, only winter varieties are suitable, which are easily recognized by their appearance - they consist of a rod and 4-10 cloves located around it. Preparing garlic for planting in the fall involves:
- calibration – selection of large and undamaged cloves;
- their etching with highly diluted potassium permanganate;
- removing their dried bottom.
By putting into practice the instructions on how to prepare a bed for winter garlic in the fall, even an inexperienced vegetable grower will reap a good harvest.
Selection of planting material
Before you begin preparing the soil for planting garlic in the fall, you need to decide on the type of planting material. Both winter and spring garlic are suitable for cultivation at home. The main difference between winter garlic is the presence of 4-12 large cloves with a pinkish-purple shell. They are located in one row. Their taste is quite pungent and is used both for food and as seed material. But spring garlic does not have a hard core, the number of small cloves is 25, they are placed in several rows. It tastes milder than winter and can be stored until spring.
How can you tell if garlic is winter?
First, the gardener must decide what kind of garlic he wants to grow. The fact is that this culture is divided into several types:
• spring garlic;
• winter garlic.
These species differ from each other in appearance by the number and shape of teeth.
1. Winter garlic cloves are large and equal in size. They are evenly distributed around the base in one row.
2. Varieties of winter garlic produce flower shoots that form bulbs.
Winter garlic is dug up early and used for summer consumption or for harvesting. For longer storage, varieties of spring garlic are grown. This article will focus on growing winter garlic.
How to properly remove garlic and storage rules?
After drying, the roots on each bulb are cut to 2-3 cm in length, and the stems are left 10 cm. Before storing for winter, it is necessary to sort the heads by size. Damaged or badly decayed specimens should be discarded. Heads with 3 covering scales have the highest shelf life. One effective way to prepare for storage is to pre-rinse the heads in a solution of table salt and then dry them.
Garlic storage rules:
- spring - at a temperature of +16...+20°C;
- winter crops should be stored in the cold at +2...+4°C, however, due to disease damage and drying out, such varieties cannot be stored for a long time;
- The humidity in the storage room should be maintained at 50-80%.
Methods for storing garlic:
- in braids that are woven from false stems and bulbs, removing the leaves (for strength, twine is woven with a loop at the end) - the finished braids are hung in a dark and cool room (basement, pantry or closet);
- in bunches (brooms) - the stems are tied, forming a panicle, and then suspended from the ceiling;
- in grids - this method requires periodic checking and rejection of damaged heads;
- in wicker baskets in a cool room;
- in sterilized glass jars, and the heads should be sprinkled with salt;
- in a shallow wooden container, sprinkled with coarse salt;
- in fabric bags, where the heads can be sprinkled with onion peels.
What kind of manure to apply under garlic
Can fresh manure be used as fertilizer for garlic? Definitely not. The amount of nitrogen substances in the fresh fraction is extremely high, so the cloves may not germinate because they will be loose. The root system of a newly rooted vegetable is delicate; a large amount of ammonia will simply burn them.
Under the crop, you can add compost with the addition of ash, phosphorites, and humus that is two years old. Even in this case, you need to be careful not to exceed the dosage. The substance is dissolved in a bucket of water - 1 liter and the soil is watered with this solution in the fall.
Selection of predecessors
For healthy garlic development, it is important to choose a site with suitable predecessors. Therefore, landing must be planned according to all the rules.
The ideal place for growing garlic is considered to be a bed from which vegetables such as tomatoes, cucumbers, pumpkins, cabbage, zucchini, and legumes have been harvested. Garlic grows well next to berries, grapes, and raspberries.
It is better not to plant garlic after potatoes, onions, radishes, turnips and carrots. These crops are infected with the same diseases. Therefore, immunity decreases and the risk of developing diseases increases.
Before planting, the soil should not be fertilized with manure, chicken droppings and rotted compost. If you do not follow this rule, then it is not the head of garlic that will grow, but the tops. The cloves will be loose and not juicy. The harvested crop is poorly stored and quickly rots.