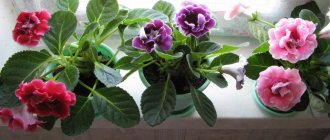
Proper autumn care to preserve gloxinia until spring
Adult indoor gloxinia needs a long rest in winter. If the plant has already bloomed at least once and formed tubers, it goes dormant. Moreover, the larger the tuber, the more successfully it is preserved. Young gloxinias that live only the first year may not go to sleep for the winter. The tuber of such plants is less than 2 cm in diameter, so without creating the necessary conditions they dry out and die.
Time of onset of the rest period
Gloxinia is native to South America. Therefore, in its development the plant adheres to the seasonality of this region. The dormant time, when gloxinia is harvested for storage for the winter, usually occurs in September or October. Then a drought begins in her homeland.
If this does not happen on time, the flowering periods shift. According to the rules, they should occur in spring and summer. To avoid this, care is carried out in early autumn to prepare for winter. In case of late flowering, they wait until it is completed, and then carry out special preparatory measures.
Preparing for winter
Caring for gloxinia in winter at home involves creating a special microclimate to preserve the viability of the tubers. The plant requires preliminary preparation for winter. In September or October, after the plant has flowered, the light intensity is reduced. To do this, move the flower pot to a window facing the north side. The temperature is maintained no more than +15 degrees. Potash fertilizer is applied once. Watering is gradually reduced, moistening the soil with a small portion of water once every 7 days.
When the leaves begin to die, stop watering completely. During this period, the upper part of the gloxinia does not yet need to be cut off so that the beneficial substances descend from the green mass into the tuber. If this rule is not followed, vegetation processes will resume. When the green part of the gloxinia completely dies off on its own, it is cut off, leaving a stump 1 cm high.
Detailed description
To maintain the viability of adult tubers, gloxinia must be properly prepared for winter rest:
- In September-October, after flowering, place gloxinia in a less lit place, for example, on a northern windowsill. Provide temperature +15°C. Feed once with potassium fertilizer. Gradually reduce watering. Moisten the soil with small portions of water no more than once a week.
- When the leaves begin to dry, stop moistening the substrate. You cannot immediately cut off the above-ground part of the plant. You need to allow the nutrients to gradually move into the tuber from the stem and leaves. If you cut off green foliage, vegetation processes may resume.
- After the upper part has completely died off on its own, cut it off, leaving a small stump one to one and a half centimeters high.
Tuber storage
After completing the preparatory measures, the tubers of adult gloxinia are removed from the soil for subsequent storage. It is convenient to do this using the transshipment method:
- Transfer the earthen lump from the pot into a large, wide container.
- Use your fingers to gently knead the soil and divide it into several parts.
- Remove the tuber and remove any remaining soil from it.
Important!
Then the tuber is washed well under running cool water and dried. You cannot send it for storage wet. This leads to the formation of rot.
Methods and conditions for storing tubers
Different methods are used to overwinter gloxinia at home. A plastic bag with a mixture of wet sawdust and washed and heated river sand in the oven is suitable for storing the developed root. The mixture is slightly moistened. Otherwise, the tubers will turn sour due to lack of air and too much water.
The prepared mass is poured into the lower part of a thick bag. Then the prepared tuber is placed in it and covered with the remains so that it is completely hidden from view. After this, the bag is put away in a place suitable for wintering.
The premises for successful preservation of tubers in winter must meet the following requirements:
- lack of intense lighting;
- air temperature not lower than +3 degrees and not higher than +15 degrees;
- humidity from 60 to 90%.
These conditions are closest to the natural ones under which gloxinia overwinters in its homeland. The easiest way to create the necessary microclimate is to place bags of bulbs in the bottom drawer of the refrigerator intended for vegetables. This option for storing gloxinia is suitable if there are few plants.
Important!
The disadvantage of this method is that the air in the refrigerator becomes very dry. Therefore, you should regularly check the condition of the soil in the bag and, if necessary, moisten it.
Another suitable option is to place bags of tubers on a glazed but not heated loggia or balcony. In this case, the air should not warm up above +20 degrees. Otherwise, the tubers will leave the resting stage ahead of time.
You may be interested in:
Storing calla lilies in winter at home after digging in the fall How to store calla lilies in the winter at home after digging in the fall should be studied in detail by those who are…Read more…
If the house has a cellar with considerable depth, where the temperature is maintained in winter at +5 degrees, gloxinia roots are placed in it. It is ideal if in such a room there is no fungus or mold on the walls and constant humidity is maintained. In such conditions, there is no need to additionally moisten the soil in the bag. It will always be in optimal condition.
If there is no space in the refrigerator, a suitable balcony or cellar, bags of tubers are placed under the bathtub. In this case, the conditions for humidity and light are met, only the temperature remains high.
The tubers are periodically inspected during storage to avoid the formation of rot. If traces of damage by putrefactive processes appear, the damaged areas are cut off to a normal tuber and the sections are sprinkled with ash or crushed activated carbon.
Important!
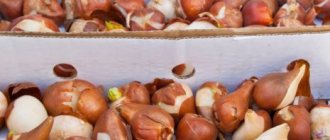
If the bulbs were purchased in the fall, they are immediately sent for storage. First place for a quarter of an hour in a pinkish solution of potassium permanganate for disinfection and dry.
Storage in soil
It is much easier to care for a flower in winter if you do not remove the roots from the soil. Preliminary preparation in this case is carried out in the usual way. Then the container with the root system in it is moved to a colder room. You can put it on the floor near the balcony door, but there should be no heating devices nearby. This ensures the optimal temperature.
Another option is to take the pots out to an unheated glassed-in loggia or move them to the cellar. Any room where the temperature will be significantly lower than that created during the growing season is suitable.
The top layer of soil is sometimes moistened with water. You should not water the soil too much, but you should not allow the soil to dry out completely. This is a good way to store tubers in the bathroom. For additional cooling, it is recommended to occasionally place pieces of ice on the surface of the soil.
Advantages and disadvantages of storage methods
The proposed methods for preserving the viability of tubers are used in accordance with the age and condition of the plant. They have their pros and cons:
- young gloxinia is left in the ground for the winter, this is more likely to prevent the tuber from drying out;
- if there is no suitable place to place pots or there are a lot of flowers, then the off-ground method is more suitable;
- when placing tubers in bags, the risk of rot formation increases, so they are often checked;
- It is most convenient to keep bags of gloxinia in the refrigerator in winter;
- if there is no suitable room or large refrigerator, it is optimal to store the roots in the bathroom;
- Gloxinia purchased in the fall can be preserved using a soilless method with mandatory preliminary disinfection.
How does a flower behave at home in winter?
Gloxinia is a houseplant that, after flowering, needs a period of rest in order to restore strength for subsequent flowering.
If gloxinia begins to turn yellow, do not worry , as this simply indicates that a state of dormancy has set in. At the same time, the flower sheds its foliage, and the stems and even roots dry out.
If you properly care for the plant before the dormant period and during dormancy, then after wintering gloxinia will again delight you with good flowering and its beauty.
Before wintering, the leaves of the flower turn yellow, dry out, and fall off.
When the flower sheds all its foliage, you need to trim the trunk so that its height remains within one to two centimeters.
Then, for a month, you need to continue to care for the flower, but gradually reduce watering and do not feed it with fertilizers. Only after this you need to carefully dig the roots out of the ground.
If you do not remove the gloxinia tuber from the pot, then during the dormant period, watering should be done once or twice a month. If watering is abundant, the roots will rot and the plant may die.
Winter care for young gloxinias
For young plants, the winter dormancy period proceeds differently. In flowers of the first year of life, a very small tuber is formed. Therefore, without additional moisture in winter, it will die. Such specimens do not hibernate. Since the daylight hours at this time of year are short, the plants are provided with additional lighting, extending it to 12 hours.
It is important to maintain the air temperature at an optimal level. If the room is hot, the plant will develop an aerial part and stretch the stem instead of growing a mass of roots. Therefore, the temperature should be maintained at +20 degrees. Water the flower rarely, so as not to provoke rotting of the tubers.
For gloxinias that have already bloomed once, a special approach is required. They have already formed a medium-sized tuber. Therefore, conditions are created for the flower to be in a half-asleep state. To do this, the pots are placed on the north side and sometimes watered with a small amount of water. When the daylight hours lengthen, the rested gloxinia will begin to grow again.
When to retire gloxinia. How to prepare gloxinia for the dormant period
- How to prepare gloxinia for the dormant period In September - November, gloxinia tubers begin a dormant period.
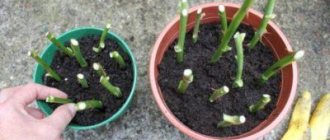
The tubers of some gloxinia fall asleep on their own, while others can grow leaves and even flowers in the autumn and winter months. If you do not force such gloxinia to sleep, then they can grow all winter, but fall asleep in the spring and sleep all summer. Forcibly putting gloxinia to sleep is when a person cuts off the stem and leaves of gloxinia, and not the gloxinia itself dries them. In any case, it is necessary to prepare the gloxinia tuber for the dormant period. How can I do that? 1. Reduce watering. With the onset of September, watering of gloxinias is reduced. Water less often and when watering you can pour a little less water into the pot with the plant. 2. Reduce the amount of light. It is advisable to move the gloxinia to a less bright place. You can even put it on the floor. 3. Do not feed with fertilizers. Gloxinias that we are preparing for the dormant period do not need to be fed with fertilizers. Starting in September, I do not feed gloxinias with fertilizer, so that in October some gloxinias will already fall asleep. 4. Cool air. Cool conditions of +14 - +18 degrees have a beneficial effect on gloxinia, which must be prepared for the dormant period. In such conditions, the tubers fall asleep faster. When gloxinia gets ready to go to sleep, the lower leaves usually turn yellow and dry out first, and then the upper ones. It is advisable to allow the leaves and stem to dry out, and only then cut them off. The photo shows gloxinia, the tuber of which is about to fall asleep.
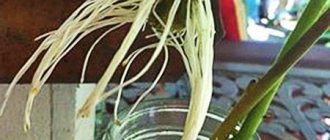
Awakening of Gloxinia
With the end of winter, young shoots hatch on the tubers. This indicates that the plant is coming out of sleep. Then prepare fresh soil, water it a little and plant the tubers in it. There is no need to deepen them; it is better to leave the top on the surface. Watering begins 7 days after planting. Do not overwater the plant so as not to provoke fungal diseases.
During the initial growing season, weak shoots are removed, leaving only a few of the strongest ones. This is necessary for better tuber formation. How beautifully and magnificently the gloxinia will bloom depends on its strength.
Important!
Broken off shoots are not thrown away; they will become excellent material for growing new flowers. They are buried in fresh soil, lightly watered and covered with plastic bottles with several holes for ventilation.
Useful video
We recommend watching a video about the features of the gloxinia dormant period and preparing it for winter:
We also recommend that you familiarize yourself with our materials about the rules and subtleties of the gloxinia reproduction process:
- seeds;
- leaf;
- cuttings.
Possible problems
If the tubers were stored in unsuitable conditions, they wake up ahead of schedule. There are several solutions to solve this problem:
- If very small sprouts appear on the tuber, then they are left and the amount and volume of moisture are reduced.
- Large shoots are cut off and the root is returned to its storage location. In the spring, it is transplanted into prepared soil.
- Immediately plant the tuber in a container and illuminate it with fluorescent lamps. Then the plant grows weak and very thin. At the end of winter, the top of such a flower is cut off and rooted in another pot. After a short time, gloxinia produces young shoots.
- Keep awakened tubers in cooler conditions to slow down development. At the same time, they create high-quality natural lighting.
You may be interested in:
When to dig up dahlias in the fall and how to store them Dahlias are a decoration for a flower bed; when to dig them up and how to store them is of interest to many summer residents. Autumn period…Read more…
When a flower does not awaken in due time, its vitality is restored as follows:
- Place 2-3 tbsp at the bottom of a plastic bag. l. light soil, moistening it with water.
- Place the bulb on the ground and seal the bag.
- The bag is placed in a well-lit place so that the temperature in it is from +24 to +28 degrees.
- Every 3 days the bulb is ventilated.
After 15 days, the tuber sprouts. Their number depends on the quality of lighting. The better it is, the more sprouts are formed. The awakened plant is transplanted into a pot, leaving 2 shoots on the tuber. Unnecessary ones are cut off and used as a means of propagation.
While in a greenhouse, the tuber may turn green. This is normal, after planting in the ground it will become a normal shade. Sometimes, when you wake up, the roots appear first, not the green mass. Then it is also transplanted into a pot, sprouts appear in a few days.
How to store gloxinia in winter at home
There are two ways to store gloxinia tubers: in a pot or outside the ground. The first method is the most common. For a gardener, this method is distinguished by its simplicity, since the pot with prepared tubers is moved from the window to a cool and dark place. The space under the bathroom, under the bed, or any other space is suitable for this. However, no matter what location you choose, it is very important to monitor humidity and temperature indicators. The optimal temperature for such storage is from +16 to +18 degrees, and the humidity should be 60–90%.
During the wintering period, the plant must be watered periodically (1-2 times every 30 days, depending on air humidity). This method is most often used for young plants, and the risk of flower drought is significantly reduced. However, not everyone can find a suitable place to store gloxinia in a pot, especially if they have a large collection or bulky pots, so they choose an off-ground storage method.
To do this, the bulb must be carefully removed from the soil:
- Take a large container, such as a basin or baking sheet.
- Transfer the soil from the pot or flowerpot into this container.
- After this, using gentle movements, breaking up lumps of earth, free the gloxinia bulb from soil and excess roots.
- When the tuber is cleaned, it must be washed under running water and dried.
After the bulb has dried, it can be placed in a bag on damp peat soil or sand. The tuber is also sprinkled to hide it from exposure to light. River sand is preferable for storage, but before use it must first be washed, dried in the oven and moistened. Such actions will protect gloxinia from various harmful microorganisms or infections. Now the plant can be located in a pre-selected location. If there are a large number of bulbs, they are placed on the bottom of the box in one row.
You can store gloxinia simply in bags, but such storage changes the temperature requirements. For this storage method, bags with a zip-lock fastener or the most ordinary plastic bags, which can be bought at any store, can be used. The tubers are placed in a bag, leaving a small hole for air circulation.
Packages with gloxinia are placed in a box and placed in a dark place with a temperature range from +12 to +16 ºС. Gloxinia can also be stored in the refrigerator; for this, bags of tubers are placed in the vegetable compartment. However, it is necessary to set the temperature within +11…+12 ºС. Gloxinia can spend up to 3 months in such conditions.
Care during the rest period
During the dormant period, gloxinia tubers need to be watered periodically (1–2 times every 30 days, depending on the ambient temperature and humidity). In this case, fertilizing and additional lighting are not required. Twice a month the tubers are checked for rot or sprouting. When the first shoots appear, it is better to prune them, especially if they appeared in December or January. Tubers can only be planted in early spring. However, this applies to the dormant period of tubers, but we will also consider what to do with a flower that has not gone into hibernation.
In such plants, the upper part begins to stretch and becomes unattractive. Unfortunately, such a plant will not bloom, since gloxinia gains strength during the dormant period, which can last up to several months. Most often, young cuttings that take root in spring or summer do not go to rest. This is normal for such plants. Therefore, to prevent the shoots from stretching, they are placed under a fluorescent lamp.
Thus, the plant's daylight hours last for 14 hours. If this is not done in a timely manner, you can cut off the sprout, but only if the tuber is strong enough (3 cm in diameter). Such plants need to be watered in the same way as tubers, and they also do not need fertilizer, as this will become a kind of stimulus for the growth of the flower. If gloxinia does not want to “sleep”, then you can cut off the adrenal part of the plant and place the pot with the tuber in a dark place.
Awakening of tubers
Tubers can begin to awaken in February-March. Those bulbs where shoots have already appeared must be transplanted into a pot or cache-pot with a nutrient substrate. When planting, the tuber is buried so that it is barely visible. Since gloxinia is a light-loving plant, it is placed in a well-lit place. If necessary, you can use a fluorescent lamp.
In the first 7 days, the plant is not watered to eliminate the possibility of putrefactive processes. After some time, the flower begins to be watered as needed. Increased watering stimulates growth, but do not over-moisten the soil.
Wintering without rest
When gloxinia does not fall into a state of rest, it loses its attractiveness and becomes very elongated. Lack of rest leads to few flowers appearing. To avoid this, the plant is forced to rest.
To do this, cut off the upper part of the flower in October without waiting for it to fade on its own. The containers are moved to a dark, cold room.
Important!
Dutch gloxinia obtained from seeds cannot be forced to rest. Such a flower has not formed tubers, so it dies.
When the flowering of such a plant ends, cut off the upper part, leaving a couple of lower leaves. Soon new leaves grow from the axils. Caring for such gloxinia continues in the usual way.
Reproduction of gloxinia from seeds
Growing gloxinia from seeds is probably the most difficult and time-consuming way. To plant seeds you will need soil:
- Peat.
- Dernova.
- Sheet.
A little sand is added. Before direct planting, the resulting mixture is steamed. The easiest way is to put it in a bag with holes and steam it in the microwave at high temperature for about 10 minutes. Seeds are planted in a plastic container, evenly distributed over the entire surface. Then cover with film. If everything is done correctly, the sprouts will hatch in one and a half to two weeks. The flower needs to be ventilated for half an hour every day. It does not need frequent watering, thanks to the moisture in the greenhouse. Each time the ventilation period is slightly extended. After 1.5-2 months the first leaves will appear, which means you can start picking. Replant carefully (without damaging the root system) in plastic cups. It is recommended to take the sprout with a small amount of soil on the roots.
Average universal parameters
As a result
We simulate weather factors that are familiar to a plant in its natural habitat.
Proposed storage locations for tubers
Refrigerator , the department with the lowest temperature, where vegetables and herbs are usually stored. There is a danger of drying out the tubers, so you need to regularly check the substrate for moisture.
- Insulated balcony or loggia , where the temperature does not rise above twenty degrees, since the plant can wake up from the heat.
- The cellar is deep and warm, where the temperature drop does not go beyond +3-5 degrees. Storage in the cellar is possible only with moderate humidity, when the walls and shelves are not affected by mold. Here you can safely leave the tubers and not worry that they may dry out.
- Under the bathroom. Humidity and light parameters are ideal, but the temperature may not correspond and may be higher than expected.
- On the mezzanine in the hallway. The main thing here is not to forget about hydration.
Secrets of wintering gloxinia: how to properly preserve tubers
One of the important points in growing beautiful Sinningia is the winter dormant period.
A fully rested plant will be healthy, beautiful and will delight you with gorgeous flowering. Let's “see” how gloxinias winter in different collections, because each gardener has his own conditions and preferences. IN POTS UNDER THE BATH In October-November, I reduce watering of gloxinias and, when the leaves die, I send the tubers to winter without digging them out of the pots. I don’t leave them on the windowsill, since there is a battery under it, but I move them to a dark, cool place. For example, under a bathtub or in an unheated storage room, where the temperature is comfortable for overwintering the plant. I water the soil a little along the edge of the pot once every 3-4 weeks so that the tubers do not dry out. Dryness is especially dangerous for small nodules. ON AN INSULATED BALCONY My gloxinias live all year round on a cool northern balcony and winter here, which suits them quite well. In the fall, I wait until the leaves of the plants turn yellow, then I cut off the stems. From the experience of collectors I know, I know that gloxinia tubers at rest can withstand temperatures down to +4 degrees. My balcony is insulated, only in severe frosts can the temperature drop to less than + 10 degrees. I don’t dig up the tubers for the winter, I leave them in pots. They sleep soundly until spring. IN THE PANTRY After the above-ground part of the gloxinia dies, I don’t dig it out of the pots, but cover it with a ceramic saucer and place it on a shelf in the pantry. It is relatively cool there (about + 18 degrees) and dark, which allows the plants to rest. Periodically I lift the tray, feel the tuber (usually it is “in good shape”, there is no need to water it) and check if it has woken up. IN THE REFRIGERATOR DOOR I wrap the gloxinia tubers, dug up and cleaned (with a soft brush) from the ground, each in newspaper, put them in a common plastic bag and store them all winter in the refrigerator door. There they are perfectly preserved, do not dry out, do not mold (I periodically unwrap and inspect them, and at the same time ventilate them) and do not wake up ahead of time.
Source
How to wake up a plant
If the flower tubers are healthy, they will wake up on their own
. But if for some reason this does not happen and the flower continues to rest, then you can wake up the sleeping plant as follows:
- Prepare a plastic bag.
- Place two tablespoons of soil based on peat at the bottom of the bag.
- Moisten the soil a little with cold water.
- Remove the tuber, rinse it well with cold running water and carefully check for rot. If everything is fine, then it needs to be dried and placed in a plastic bag.
- Tie the bag well and place it in a place where it is light and warm, perhaps under a lamp.
After two weeks, condensation will begin to appear on the walls inside the bag, and green sprouts will begin to appear from the plant tuber. The gloxinia root has already woken up and needs to be planted in a flower pot.
The brighter the light that falls on the gloxinia bulb, the more new and young shoots are formed on it.
Features of care
Illumination
Gloxinia is a light-loving plant for which the length of daylight hours is of great importance. Optimal lighting is diffused sunlight. The location of the plant in partial shade is allowed, but with such lighting it will stretch. If the leaves in the rosette are located horizontally and have a dark green color, the stem is short, then the lighting is chosen correctly. When there is a lack of lighting, the leaves rise up. Excessive lighting, especially in the summer months, when daylight hours are 14 or more hours, depresses the plant, the leaves seem to hug the edge of the pot, and the flower stalks are shortened. The duration of flower blooming is reduced. Yellowed leaves with curled edges are a sign of excessive lighting, in which case the plant should be shaded.
Temperature
The optimal temperature for cultivating an adult plant is 1820 0C. If the leaves of the plant rise upward, it means that the gloxinia is overheating. If the leaves are down, the plant is cold or needs watering.
Watering
Water regularly, from a tray or by overhead watering. When watering, we try to prevent water from getting on the leaves. Frequency of watering - with light drying of the earthen clod between waterings. From the end of October, to introduce the plant into a dormant state, the intervals between waterings increase. Excessive soil moisture is the main cause of gloxinia rotting. If there is excess moisture, the root system is inhibited, then the tuber rots, the leaves of the plant wither and sag at the edges of the pot. Overdrying the earthen coma is also unacceptable. Gloxinia should absolutely not be watered with cold water. The water temperature should be one degree higher than room temperature.
The soil
Optimal soil acidity pH 5.96.9. Soil composition: 1 part turf soil + 2 parts leaf soil + 1 part humus + 1 part sand (coarse-grained).
The soil mixture should:
- contain easily digestible nutrients;
- do not retain water after watering;
- pass air to the roots of the plant;
- Before planting, plants must be sterilized.
Gloxinia fertilizer
During the period of active growth, gloxinia is fed once a decade with a complete complex fertilizer for ornamental flowering plants. In mid-August, feeding is stopped. If you neglect the application of fertilizers, problems may arise with both growth and flowering: growth slows down, the buds become smaller, the color of the flowers fades, causing the decorative appearance of the plant to suffer, and the flowering period becomes much shorter. Sometimes the plant suffers from a lack of boron. This becomes noticeable in the summer with maximum daylight: deep notches appear along the edge of the leaf blade. In this case, you need to foliar feed gloxinia with a two percent borax solution. And let me remind you that excess fertilizer is much more dangerous for the plant than its lack, so try to observe moderation in this matter.
Mineral fertilizer for tuberous flowers (take 10 liters of water):
- 10 g simple superphosphate
- 10 g potassium chloride
- 4 g ammonium nitrate
- 5 g magnesium sulfate
- 0.1 g ferric chloride
- 0.07 g boric acid
- 0.004 g copper sulfate
- 0.05 g manganese sulfate
- 0.008 g of zinc sulfate.
How and when does this happen?
Wintering adult plants
In autumn, the flowering of mature syningias is no longer so active and gradually stops altogether. In order not to disrupt the natural process, gloxinias stop feeding and minimize watering. Enough time must pass before gloxinia can be sent into hibernation.
You can cut off the drying leaves right at the root, or you can leave arrows of 2-3 cm each. A semi-dark zone with a temperature of +10°C to +13°C is ideal for the winter. During sleep, gloxinias are watered very sparingly, once or twice a day. month. Pour water strictly along the edge of the pots so as not to wet the surface of the tuber. When watering, use lukewarm water.
The second option for hibernation is storing tubers in a sandy type substrate , or in peat, or in sphagnum moss. The tubers are removed from the pot and dropped into the selected substrate, storing there until the end of the winter period. Every month, the lump in which the tuber is stored is sprayed with warm water once.
The temperature needed is the same as in the first option, 10-13 degrees. More experienced flower growers, knowing the nature and habits of the plant, having studied them subtly, focus on other indicators, using a labile resting time schedule, where in each case the period is calculated individually.
Young plants
Gloxinia in the first year of life, which has not yet entered the flowering period and has not grown a tuber of about a couple of centimeters, spends the winter without sleep. But it is necessary to take into account the peculiarities of the normal conditions of her life for this specific period. For twelve to fourteen hours every day, the plant should be provided with full lighting. The temperature in the room where the gloxinia is located is required to be somewhere around +18-19 degrees. Such conditions in winter will ensure healthy development of gloxinia; it will not drag on and will devote all its energy to developing and enlarging the tuber.
- If the young gloxinia has already tried to bloom and grown a small tuber, then wintering occurs differently. In autumn, active watering is switched to moderate mode and the pot is removed to a less lit place. The plant remains half asleep during winter (you can find out how to properly water and feed gloxinia at home here).
They usually choose the brightest position; this stage occurs in early February.
- Young gloxinia grown from seeds are not initially sent to winter sleep until they have grown to the required size of the tuber.