The bulbous gladiolus flower is a tall plant with voluminous large inflorescences. In the flower garden they are always the center of attention because they have an exotic appearance and bright colors.
Growing gladioli is not a difficult task, because they are unpretentious and only need watering, tying, and fertilizing.
Difficulties can only begin at the end of summer, after the flowers have faded. At this time, the questions of how to collect and how to store gladioli in winter become relevant.
Bulb digging period
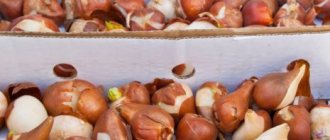
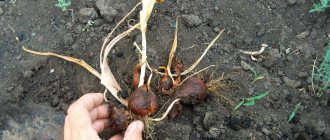
Gladioli are dug up in the fall, starting in the second half of September, 35-45 days after the end of flowering. Corms that are ripe for digging are covered with root scales. The babies, which are loosely attached to the mother's bulb, are also covered with dense scales.
Digging should be done in good dry weather. First, bulbs of early varieties are dug up, then later ones. At the end, children and small bulbs are dug out. If brown or black spots are found on the corms, then digging should be done earlier to protect them from infection with other diseases.
Before starting work, the stems should be mowed or trimmed with pruning shears.
Where should gladioli be planted?
The homeland of gladioli is distant Africa, and this flower prefers to grow in the sun. Gladiolus loves warmth and light. These flowers should not be planted in shady areas, nor on the north side, nor in windy places; they will feel unwell, get sick and bloom poorly. The sun is of great importance for gladioli.
Gladiolus is not a fastidious plant, but it is quite demanding of the soil in which it grows - heavy clay soils that do not drain water well, are damp and heavy, are not suitable for it. It is better to choose loose soil for planting. If the soil on your site is heavy, add coarse river sand to it.
Also, you need to add organic fertilizer and ash to the soil where you will plant the bulbs in advance. These components also give the soil the necessary looseness.
If you did not have time to do this in the fall, then carry out the work in early spring and leave the plot of land for several days. After waiting for warm days, the prepared bulbs can be planted.
You shouldn’t delay planting too much either; gladioli need moisture, which is contained in the spring soil. Aim for around mid to late April.
At this time it is already quite warm, the soil has time to warm up, but the ground is still quite wet after the recent melting of the snow cover.
Technology for digging bulbs
The bulbs need to be dug up in dry weather to free yourself from the work of freeing them from adhering soil. In addition, if the soil is dense, then there is a risk of injury to the corms and loss of children. A digging tool can be a pitchfork.
There are simple rules for digging up and storing gladioli for the winter:
- The distance between the forks and the stem, which is important to hold when digging by hand, should be 15-20 cm.
- To pull out the stem, you should not use force, because if it is pulled out before it dries, the injured corm may die.
- The stems and leaves are not completely removed, but cut to a third of their length.
- You need to find a dry, ventilated place and lay the bulbs there in one layer. You can leave them in direct sunlight so that the soil on them dries completely.
Stage No. 4 Selecting a storage location
After harvesting and processing the garden crop, you should begin drying.
To begin with, they are laid out indoors for a period of a little more than a month at room temperature. For example, if this is a small amount, you should use a hairdryer. How and where to store gladioli at home in winter will be described below. In a refrigerator
The most favorable for wintering will be the bottom shelf. There you can monitor the condition of the bulbs, and in extreme cold you can reduce the temperature so as not to freeze them. Some gardeners can wrap them in newspaper or a canvas bag.
Important! Before putting the onions in the refrigerator, they should be dried.
If someone practices the method of storing crops in a package, then holes are made in it so that there is ventilation.
Throughout the entire storage period, you need to check the bulbs once a month for the presence of disease. If any of them begin to rot, it is better to throw them away.
It should be remembered that the culture is not stored in the freezer if you do not want it to become unusable.
In the cellar
An equally successful room where the bulbs will be stored is a cellar with ventilation.
Important! While storing the bulbs in the cellar, you should not keep vegetables and fruits, because they release a lot of moisture, which leads to the formation of mold.
By maintaining a temperature in the cellar of about 5 degrees Celsius, the storage period will be optimal. It is also worth checking the humidity in the room, which should not exceed 80%. If there is a mesh, good ventilation will be provided for flower tubers, and then rotting will not form. In the cellar, the bulbs can be poured into boxes filled with sand and wood shavings and placed on wooden pallets to allow air flow from below. Using this storage method, the culture will remain healthy and will not decrease in volume.
In the trench
This option is more suitable for cities where the climate is warm and there is no groundwater. The trench should be approximately one meter deep and 70 centimeters wide. It is better that the soil is loose. The final stage of the trench will be covering it for the winter. Flower tubers are placed in wooden boxes, and the bulbs are covered with dry sand and sawdust and insulating material is stretched.
Plants will be stored from frost and precipitation. The method is suitable for those summer residents who do not have basements.
Advice! To grow these plants in a container, the bulbs are placed in a box and covered with wood shavings and leaves. Then cover with polyethylene with access to ventilation. Thus, they will not be afraid of rain and melt water.
In the attic
Anyone who has an insulated attic in a private home can store anything there. Flower bulbs are wrapped in newspaper and placed in a wooden box with holes.
The main thing is to maintain temperature and humidity conditions.
In the apartment
Storing gladioli in the apartment in winter. This method is problematic. Despite the fact that not everyone has a summer cottage, people have to somehow store crops in their apartment. The owner will need to find a place where there will be no temperature changes. In that place, a temperature of up to 10 degrees Celsius and a humidity of 70% are required. These readings may be optimal in a room without a battery present.
Openings between window frames, hallway, toilet, loggia, vestibule or pantry are suitable for storing bulbs at home. Of these places, the best is the loggia. The bulbs themselves should be in an insulated box, but not on the floor or pallet, otherwise they may freeze due to frost. They are wrapped in newsprint, where several holes of about 1 centimeter are made. Cover them with a blanket and leave room for air ventilation.
If rot has appeared, it is better to dry the tubers, and if spots appear, it is worth cutting them off and pouring a solution of potassium permanganate. Some summer residents even recommend treating them with the “Maxim” preparation and putting them in a clean bag.
During drying, the main thing is that the planting material is in a ventilated room, with a certain humidity and without access to sunlight.
Advice! To prevent the bulbs from becoming sluggish, they need to be soaked in a solution that stimulates the growth of the crop.
A special storage option involves digging up the bulbs with the remaining soil. The plant is placed in a plastic bag without cutting off the leaves, and there it continues to grow or ripen, taking useful elements from the stem. By the beginning of winter, withered leaves are removed, and the bulbs are treated with pest control agents and stored in a ventilated room until spring. This method is suitable for gardeners who grow flowers in cold climates.
How to properly dry gladioli bulbs
After removing the bulbs from the ground, the roots need to be trimmed. Then, shaking off the soil, you need to separate the children. Corms should be placed in boxes with a lattice bottom, each variety separately.
After washing them with running water, it is necessary to disinfect them by placing the bulbs in a solution of foundationazole (1%). After about half an hour, they are washed again, treated with a solution of potassium permanganate (3%) and left to dry for 3 days.
Then the bulbs are placed in boxes, previously covered with paper, and left to be stored, turning them over periodically. It is important that the air temperature is not lower than 25-30 °C.
After about two weeks, the temperature should be reduced to 19-22°C. After a month, the corms are cleaned and sorted, separating the children from them, which are also sorted by size and variety.
Babies with a diameter of more than 0.8 cm are considered large, and if the diameter is about 0.6 cm, they are considered medium. They are stored in paper bags at a temperature not exceeding 5-6 °C. A higher temperature is dangerous for them, as it threatens the loss of germination. The best option is to place them in the refrigerator.
Why dig up gladioli?
It is recommended to dig up gladioli for the winter due to the fact that they may die. A sharp drop in ground temperature is detrimental to them. It is important to properly dig up the plant in the fall and process it, and then put it away for winter storage. If there is a basement or cellar, the problem of storing planting material does not become acute. It is simply placed in boxes with sand and sent for the winter. It must be borne in mind that not every cellar is suitable for storing bulbs. For example, the temperature in it should be no lower than -3 degrees, in conditions of low humidity, otherwise the plant will rot and die.
An equally important reason for the need to dig up tubers in winter is their sensitivity to various diseases. If wintering is provided in the ground (this is indeed possible in the south of Russia), the bulbs may not germinate due to fungal or viral infection. To prevent the development of these problems, gardeners not only dig up the material, but also process it before sending it for the winter.
When to dig
The recommended period for digging up the material is 1 month after the flower shoot has set. It is recommended to wait this time if the soil and ambient temperatures are moderate and there is no risk of frost. During this time, the bulb will receive a maximum of nutritional components from the peduncle, which will ensure its lush flowering and successful reproduction in the next season. The optimal temperature for extracting material from the ground is not lower than 10 degrees plus.
Advice! It is not always possible to wait for the natural completion of flowering due to the approaching cold weather. In this case, you need to cut off the flower shoot in advance and dig up the bulb after 15 days. The planting material will not suffer from this.
Recommended timing for digging up gladioli depending on the region:
- middle zone of the Russian Federation - mid or late September;
- Leningrad region. - beginning of September;
- Siberia - August.
Features of storing gladioli bulbs
After all the preparatory work for storage has been done, you need to decide where and how to store gladioli bulbs in winter. To do this, choose a cool, dry place.
Another important storage condition is that the room should be dark, the air temperature in it should be within 4-6 °C, and the humidity should be 60-80%. There are several options for creating such conditions.
Cellar or basement for storing bulbs
A ventilated basement or cellar is often used to store flowers, including gladioli. It is easy to create optimal conditions there with an air temperature in the range of 4-7 °C and humidity not exceeding 80%.
Plastic containers or wooden boxes are used to store bulbs in the cellar. It is important that their bottom is lattice or mesh. It is advisable to sprinkle the bulbs with dry sawdust. If the basement is flooded with melt water, the boxes should be moved to another room
How to store gladioli in a trench
In regions where winters are mild, the bulbs can be stored in special trenches. To do this, you need to choose a place, having first made sure that groundwater and melt water in the future will not be able to harm the planting material.
The depth of the dug trench should be 80 cm and the width should be 70 cm. The bulbs should be placed in wooden containers, then sawdust should be poured on top and placed in the trench.
The next stage is to fill the boxes with straw or dry leaves and cover them with film. It is important that the work is completed before the first frost.
Storing tubers on the balcony and in the refrigerator
Flower growers often store bulbs in the refrigerator. The advantages of this method are that monitoring the condition of the bulbs in this case is very simple. If necessary, they can be dried or moved to another place.
When storing in the refrigerator, tubers should be wrapped in thick paper with holes for ventilation. Additionally, the packages are placed in a bag, having also made holes there first.
The bulbs are inspected once a month. If rotten or moldy specimens are found, they are thrown away to prevent contamination of healthy bulbs. If there is not enough space in the refrigerator, you can use a glass loggia for storage. To do this, the packages are placed in cardboard boxes with ventilation holes.
Features of storing tubers in an apartment
Flower growers are often interested in how to store gladioli in an apartment in winter. After all, if you dry them well, they can be preserved until spring even in an apartment. However, the room temperature in this case should not exceed 20 °C. And although almost half of the volume is lost during such storage, the viability of the bulbs is maintained.
Tubers should not touch each other. This must be taken into account when placing them in cardboard boxes. You should choose a cool area in the apartment - this could be an unheated storage room, a place next to the balcony door or window.
If you correctly follow the technology for digging and storing gladioli, you can be sure that they will definitely survive until spring.
Results
Based on the information presented, we can conclude that storing gladioli in the refrigerator can be quite simple. The main condition is the presence of a spacious box. Designed for storing vegetables. If there is no such thing. It is worth considering other options that allow you to preserve planting material in an apartment. Gladioli can be kept on the balcony or directly indoors, but there is a risk of their premature germination, so such methods are not often used.
When sending planting material for storage, you need to remember that all bulbs need to be isolated from each other. Otherwise. If one element is affected by rot, all specimens may be lost. Also during storage you need to monitor the condition of the bulbs. They should be dense, without traces of bacterial damage. If any signs of spoilage are detected, the onion should be isolated.
Do not forget that the bulbs need to be prepared in a timely manner for planting in the ground. To do this, they need to be removed from the refrigerator 3-4 weeks before the intended planting. The material must be cleaned and treated with a fungicide. If all of the above conditions are met, the gardener will be able to achieve exuberant flowering of gladioli, which occurs at the end of summer.
Video: preparing gladioli bulbs for planting
Digging and preparing gladioli for storage
Video: how and where to store gladioli in winter
How and where to store gladioli in winter
I recommend to read:
- How to keep lemons fresh at home - Thanks to the piquant taste of lemon and the presence of many beneficial micronutrients in its composition, it is a common ingredient in various dishes and drinks. Many even grow...
- Rules for long-term storage of cranberries in the refrigerator and without it - Cranberries are a storehouse of useful substances that need to be preserved throughout the winter. It is important that cranberries do not lose their beneficial properties when frozen and long-term storage at home...
- Is it possible to keep garlic in the refrigerator: 10 ways to store vegetables - Garlic is a crop characterized by a high degree of lightness. However, for its long-term storage it is necessary to create certain conditions: suitable temperature and humidity,…
- How to properly store red caviar in the refrigerator and freezer - Red caviar can decorate any holiday table. Experienced housewives prefer to purchase it in advance, before the upcoming celebration and price increases. So that after long-term storage...
- How to store dried mushrooms at home - Drying is one of the most popular options for stocking up on dried mushrooms for future use. Rules and methods for storing homemade preparations, terms and options for use in cooking...
- How to prepare beets for the winter at home - Freezing is perhaps the most rewarding way to prepare vegetables for the winter. Firstly, it is very simple and quick (as opposed to conservation, which involves standing at the stove for a long time)….
- Storing chicken eggs - The period during which eggs remain fresh depends on the density of the shell and storage conditions. The tightly formed shell prevents the penetration of oxygen and…
Ways to protect bulbs from pests
Dampness and cold are not the only factors that can damage gladioli tubers in winter. It is important to protect plants from pests. Of the most dangerous pests of bulbs, the gladiolus thrips should be highlighted first.
This small insect, which lives in flowers in the summer, is easily recognized by its elongated body. In autumn, when cold weather arrives, adult pests and their larvae penetrate the soil and settle in the bottom of the tubers.
This can happen when the autumn harvesting of gladioli is done too late. After all, thrips usually hide in the ground when cold weather sets in and the temperature drops to 10°C.
Having discovered signs of pest activity on corms, it is necessary to immediately take measures to destroy them:
- Infected specimens should be placed in a plastic bag and then treated with an aerosol insecticide. Pickling time is 60 minutes.
- To kill thrips, you can use heating the bulbs. The method involves placing them in water at a temperature of 50°C. Processing time – 5 minutes. At the end of this heating, the bulbs are well dried.
- In order to prevent infection of gladioli by thrips during storage, mothballs or garlic cloves should be placed in the box with the bulbs. Some gardeners sprinkle tubers with karbofos.
Preparing bulbs for spring planting
The bulbs are prepared a month before the planned planting in open ground. Preparatory activities begin with cleaning the top husk. Dead scales serve as an obstacle to breathing, warming and moisturizing the bulbs, so their removal speeds up germination by almost a week
When cleaning, you must be careful, as you can damage the hatched sprouts. You should not clean off the scales with your fingernails; any scratch serves as a window for infection.
On peeled bulbs it is easier to notice signs of diseases (dark spots, sores, etc.), so sorting is carried out immediately.
For rare varieties, it is allowed to cut out damaged tissues if their area is small (for example, when affected by scab or sclerotinia). In such cases, after removing the infected tissue, the bulb is treated with potassium permanganate or crushed coal.
After cleaning, the bulbs are laid out on cardboard in one row on the bottom so that the sprouts can develop freely. The bulbs are kept in a dry, sufficiently lit room at a temperature of about 25 °C. Within 25 days, in conditions of access to sunlight and low air humidity, the bulb develops only a shoot without root growth. However, on the bottom you can see white tubercles with the naked eye - the rudiments of roots. There is no point in planting bulbs without such tubercles. For earlier flowering, heat treatment can be carried out before planting, which will allow you to admire the beautiful inflorescences 10–12 days earlier.
To prevent the development of fungal diseases and protect against pests, the surface of the bulbs is treated with fungicides and insecticides before planting. Apply treatment for 30 minutes or 1 hour with 0.5% captan solution, hourly treatment with 0.15% topsin solution or 0.3% foundation, treatment for 1–2 hours with 0.3% potassium permanganate .
Dusting with foundationazole is carried out at the rate of 6 g per 1 kg of bulbs or 2 g per 1 kg of children. This dry treatment can also be carried out after lowering the bulbs into the furrows.
Good results are obtained when using growth process regulators: heteroauxin, succinic acid and sodium humate. The use of regulators increases the yield of commercial bulbs by almost 10% when pre-planting soaking is combined with leaf treatments during the growing season.
To prevent the appearance of thrips, it is advisable to treat the bulbs for 2–3 hours with garlic juice, previously diluted with water (the juice from 1 kg of heads is dissolved in 10 liters of water). To protect against pathogens, the bulbs can be treated with copper sulfate with the addition of potassium permanganate. The bulbs are kept in this mixture for 9 hours, and for unpeeled bulbs the treatment is extended by 3 hours.
Children also need treatment before planting. The most accessible and widespread method of prevention is treatment for 10–12 hours with a 0.05% solution of potassium permanganate. You can use a 1% solution of tea soda, but this procedure will take up to two days. During such treatments, the dense scales swell and ensure vigorous and early shoots. The smaller the diameter of the children, the more necessary pre-planting treatment is.
Children with the slightest signs of disease are discarded, leaving only healthy and clean ones. When treated with chemicals, the concentration is left unchanged, reducing only the soaking time by a third.
If there are a limited number of children, it is worthwhile to carefully clean them and treat them with a solution of potassium permanganate, after placing the children of the same type in a separate gauze bag.
After treatment, the children are immediately planted in the ground, preventing them from drying out. For adult bulbs, treatment with microelements and chemicals can be carried out not on the day of planting. After soaking, they can be dried and kept indoors for some time.
Gladioli bulbs are soaked for 14 hours in a solution of microelements consisting of copper sulfate, boric acid, potassium permanganate, zinc sulfate and cobalt nitrate. In this case, there is no need to delay planting. Immediately after treatment, the bulbs are planted in the prepared area. Treatment with microelements is carried out every two years to prevent toxic effects on the bulbs.
Measures to prevent bulb diseases during the growing season will help to obtain high-quality and healthy planting material, which will be easier to preserve during winter dormancy.
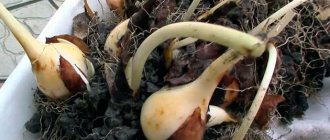
Gladiolus bulbs ready for planting
Large gladiolus bulb with sprout and children
Features of caring for gladioli in the fall and preparing for winter
Gladioli are harvested during the period of full ripening of the corms. Preparations begin during the flowering period:
In autumn, comprehensive flower care consists of proper watering, fertilizing and pruning.
- Peduncles are cut off after the flowers have withered. Otherwise, the peduncle will absorb the plant’s nutrients, which are needed for the ripening of the bulb. The cut should be made at a height of 3-4 cm from the ground, in the evening after 18 hours. The coolness of the night will make the cut better closed.
- A week before harvesting, you need to stop watering and fertilizing the plants.
- Leaves should not be cut along with flowers for bouquets.
Harvesting gladioli is possible only after the corms are fully formed, which continues for the next 45-50 days after flowering.
Storing diseased and thrips-infected corms
In winter, flower bulbs are regularly inspected to detect pests and diseases in time. The main problem with gladioli is thrips - it is well camouflaged. During sorting of planting material, pest-infected specimens may appear healthy. But, if traces of the presence of thrips have been identified - small dotted black marks - you can still try to save such corms. You can cure damaged copies in the following ways:
- Decis solution - in 10 liters of water heated to +30...+37˚ C, dissolve 2 ampoules of the drug. The bulbs are immersed in the solution for 30-40 minutes. Then they are dried at a temperature of +20...+25˚ C for 3-4 days.
- Alcohol - soak a cotton pad in the liquid and place it in a glass jar filled with damaged corms. This container is tightly closed and left - after a few hours, insects will begin to appear from under the husks of the bulbs and quickly die. If necessary, the manipulation is repeated.
- Actellik solution - diluted at the rate of 2 g of the drug per 1 liter of water. The corms are dipped in this solution for 5 minutes. Then they are dried at a temperature of +20...+25˚ C for 3-4 days.
Attention! If damaged bulbs are not treated and stored separately from the general mass, then by spring all planting material may be destroyed by the pest.
Cleaning rules
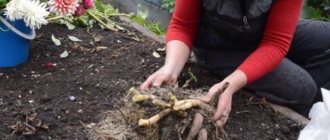
You should start harvesting gladioli in the fall when the night temperature is below +100C. The removal of corms begins with the removal of pegs and binding material. To do this you will need a shovel or a pitchfork. The tool should be inserted into the ground vertically. With inclined input there is a greater risk of tuber damage.
It is necessary to remove the plant from the ground along with its green foliage.
Where does cleaning begin:
- Using a shovel or pitchfork, carefully lift the layer of soil at a distance of about 7 cm from the plant.
- Grasp the stem with your hand and carefully pull it out of the ground. Place in prepared place. Do not forcefully pull out the plant, so as not to harm the seed material.
- Check to see if there are any small onions left in the hole.
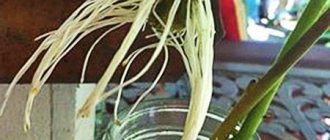
The stems should be removed immediately after harvesting. Because the moisture accumulated in the tuber will evaporate through the leaves. During the growing season, useful substances have accumulated in the bulb, which will evaporate with moisture. By spring, such planting material will be lethargic and become unusable.
There are two ways to remove the stem:
- Carefully break off the stem with your hands.
- Trim with garden shears.
The stem should be cut at a distance of approximately 1.5-2 cm from the tuber.
After removal, the corms are cleaned of adhering soil, washed in water, and dried.
The mother bulb should be carefully removed so as not to damage it. You need to trim the roots through which moisture will evaporate. Specimens that are damaged or have a wide bottom are not left for storage.
For bulbs grown from buds, there is no need to completely remove the roots, just trim them a little. The largest ones are selected for storage. They are better preserved and bloom earlier.
How to protect tubers from diseases and pests
Thrips and other harmful microorganisms cause serious damage to gladiolus tubers. Thrips penetrate under the husk and drink all the juice from the flower bulb. After this, the gladiolus corm dies. Regular garlic and the special disinfectant Zineb help save gladiolus planting material from pests and diseases.
Garlic is placed in boxes where the corms will lie until spring, along with planting material. Use chopped slices. During each check of the condition of the flower bulbs, the dried pieces of garlic are replaced with fresh ones. When pests are already present, the bulbs are treated with Zineb. They are immersed in its solution for half an hour, then dried well for 2-3 days. The room where planting material dries must be well ventilated. After drying, the corms are again stored.
Timing for digging up gladioli in different regions
The gladiolus bulb does not tolerate sub-zero temperatures at all. Even at -2°C it will die , which means it must be dug up before frost. Since the weather is changeable from year to year, you can watch for the right time and be left without flowers. Therefore, it is better to do this a little in advance, so that there is time to prepare the gladioli bulbs for long-term storage in the winter.
When should you dig up flower tubers to save them for next year? The ideal period for digging up bulbs is autumn ; literally a month after the end of the gladiolus flowering, you can cut the stem and dig up the bulb. In the south of Russia this can be done in October; in the northern regions, preparations for winter begin at the end of August. Usually by this time the leaves and stems of the plant dry out.
Digging up gladioli
If you plant late varieties in the northern regions, frost may occur by the time the bulbs are harvested. You should not wait until the greens begin to fade; such varieties can be cut with a knife as soon as the buds begin to bloom. Gladiolus lasts a long time when cut, so the flowers will fully open in the vase. In the meantime, the bulbs need to be left in the ground for another couple of weeks to ripen. After this time, you can dig.
On a note! In gladiolus with a cut peduncle, the ripening of the bulb occurs faster.
Different varieties of this plant bloom at different times. Therefore, the timing of digging varieties varies. First of all, the early varieties are extracted from the soil, then the mid-flowering varieties, and the last ones are the late ones. If last year's plants are planted in the ground, they may not bloom this year. They need more time for the bulbs to ripen, so they are dug up last.
Bulbs are not left in the ground for a long time because they can become infected with various fungal and bacterial diseases. The varieties that are most susceptible to disease are red, burgundy and other dark colored varieties. Therefore, they need to be dug out first. Late digging is also bad because the babies begin to separate from the mother tuber on their own and are difficult to find in the ground.