12/16/2018 Irina Malinina
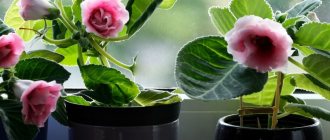
Delicate leaves and large flowers resembling bells are why flower growers love gloxinia. However, the plant does not always reciprocate, blooms little and sparsely, and sometimes simply dies. That is why caring for gloxinia must take into account a number of conditions and characteristics of the beautiful southern guest.
Our tips will help you design a living environment that is as close to natural conditions as possible. You can also learn how to properly care for this beauty so that it delights you with its lush, velvety foliage and clusters of bright inflorescences, and also outshines your other neighbors on the windowsill.
Caring for Sinningia after purchase
It is necessary to make a transplant immediately. The transport substrate is not suitable for permanent cultivation of the plant. Instead, you need more nutritious soil. Otherwise, the root system may rot.
Gloxinia in a pot
When transplanting, you should inspect the tuber. If damage is found, repair it. Cover the wound with ash or cover it with brilliant green.
Rules and recommendations for transplantation
Gloxinia Brocada - description of the red and blue varieties of the flower
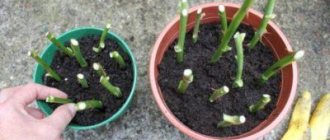
Gloxinia is transplanted in several cases:
- after a long period of dormancy, a small sprout has formed, but leaves do not develop;
- when purchasing tubers in a small tank or not planted in the soil;
- in cases of damage by fungal diseases and pests.
If the plant requires emergency help, transplantation is carried out at any time of the year. Healthy crops are moved to a new location after dormancy, in February-March.
Growing gloxinia on a windowsill
Growing conditions
Proper care creates comfortable conditions for growing beautiful gloxinia. It is necessary to provide the necessary: temperature, air humidity, location, lighting.
Temperature
Tuber rooting - at a temperature of 23-24 degrees. When the first leaves appear, the temperature is reduced to +21. When growth and flowering increase, the optimal temperature is +20. Otherwise, the potted crop may die.
Air humidity
Optimal: 65-80%. If there is not enough moisture, the leaf blades will droop. To humidify the air, you can place a vessel with water nearby, spray it around the flower (without splashing onto the leaf plates), or place the pot in a tray with a humidifier.
Lighting
This is a light-loving plant, but does not tolerate direct ultraviolet rays. If there is enough light, the leaves are dark green and located horizontally to the stem. If there is a deficiency, they are pulled upward.
Gloxinia - a light-loving plant
Choosing a location
The location is chosen depending on the season. In spring, Sinningia grows and blooms remarkably on southern windowsills. In summer - on east and west windows. If the windows are located on the north side, growth slows down and there may be no buds at all. Illumination with special lamps is required.
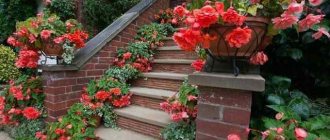
What it looks like in the interior
Sinningia with the splendor of flowers can create coziness in the house, enliven and enrich any interior.
It purifies the air at home and removes harmful impurities. Completely harmless. Can be placed in a children's room.
Possible difficulties
With proper care, the tropical beauty Gloxinia can live up to 10 years, delighting its owners with colorful blooms. Moreover, the older and more developed the plant, the more flowers it will have. Sometimes their number reaches 50 pieces!
- There are brown spots on the leaves of gloxinia - this indicates that water has come into contact with them, as well as the use of too cold water for irrigation.
- Gloxinia leaves turn yellow - a sign of dry or too humid air, exposure to direct sunlight or excess fertilizer.
- Gloxinia leaves curl - this happens with excessive feeding and when exposed to drafts.
- Elongated, pale leaves are a sign of lack of lighting.
- A gray coating on flowers and leaves indicates that the plant is infected with gray rot.
- The flowers remain hidden under the leaves - this happens when the daylight hours are short or the temperature is too low.
THE MOST BEAUTIFUL varieties of GLOXINIA
Features of care at different times
In winter conditions
Minimal care.
IMPORTANT . Prepare for winter.
September, October - the container with the flower is moved to a place where there is less light.
Watering is gradually stopped. You can feed it once with potassium fertilizer.
Once the stems dry out, do not water them.
Necessary:
- Place in a room where the temperature is +12 degrees.
- Moisten once a month to prevent the tubers from drying out.
Watering should be very moderate.
If Sinningia is young, it cannot be hibernated. It is necessary to provide twelve-hour lighting, temperature - +20. Water occasionally.
in spring
To wake up from winter rest, the flower can be covered with cellophane.
Before planting, you need to check the tuber for damage. If detected, they should be eliminated, the wounds should be treated with brilliant green and ash.
In spring you need to inspect gloxinia tubers
For better disinfection, tubers are treated with a solution of potassium permanganate. The potato is cut into two parts to check its condition.
If the cut is yellowish or pinkish, it is treated with crushed activated carbon. Each part is planted in separate containers for further cultivation.
A brown or black cut indicates the death of the plant.
In the spring they begin to fertilize. To increase green mass, nitrogen is added first. The next step is complex fertilizers with a low proportion of nitrogen.
In summer
When good conditions are created, the splendor of bluebells delights all summer. Starting from May.
The necessary conditions:
- During this period, gloxinias provide good lighting, protecting them from the bright rays of the sun.
- Proper watering is required. The soil in the container should be kept moist, not wet. Otherwise the roots will rot.
- Moisten with warm, settled water.
- To maintain air humidity, spray around the plants. Avoid getting them wet.
- Avoid drafts. Otherwise the buds will fall off.
- Regular (weekly) feeding is required. Special flower complexes are used that contain the necessary, balanced microelements.
in autumn
Sinningia completely fades by the beginning of autumn.
Care during this period:
- Feed with a fertilizer mixture without nitrogen. After this, stop feeding until spring.
- Reduce watering. Wait until the leaves turn completely yellow and dry. Their death should occur spontaneously. The tuber will gain strength for winter dormancy. Preparations for winter holidays end by mid-October.
- Afterwards, the above-ground parts of the gloxinia are cut off. Leave a stump of 1.5 cm above the potato.
- The stump is watered for another two weeks. Then the potted crop is left completely alone until spring.
Main life cycles of gloxinia
Since gloxinia is a tuberous plant, it has a special life cycle. There are three main periods in the life of this flower during the year:
- Rest period
- Period of active growth
- Flowering period
Dormant period (gloxinia hibernation)
In indoor gloxinia, the dormant period is pronounced. Unfortunately, it is not able to bloom all year round and delight us with its magnificent flowers and even leaves. As we already wrote above, by mid-autumn, after the next flowering, gloxinia stops drinking water, the stems and leaves turn yellow and dry, and the roots die. The plant begins a dormant period. The stem is cut to a height of one to two cm above the soil. It is worth watering the stump moderately for another two to three weeks, without feeding it. Let gloxinia sleep. Only the tubers of this flower remain alive, which, if properly stored, are preserved until the next season.
Gloxinia tubers
Ways to preserve gloxinia in winter:
- The tuber is carefully dug up, cleared of soil, treated with an antiseptic, placed in a plastic container with slightly damp sand and put away for the winter in a dark, cool place, such as a garage or basement with a temperature of 10-12°C.
- The tubers are stored in a plastic bag with a zipper along with vermiculite mixed with the substrate 1:1. The bag is zipped and placed in the refrigerator in the vegetable compartment. This way you will have peace of mind that the tubers will not dry out.
- The tubers are not dug out of the soil and are left to overwinter in a pot, which is filled to the top with dry sand and taken to a dark, cool room - a garage or basement. As a last resort, go to the bathroom, where they are stored under the bathtub, covered with a dark film. During the dormant period, gloxinia should be watered very rarely - 1 - 2 times a month, just so that the tuber does not dry out. Flooding it is even worse than drying it out - it will begin to rot and may die. Gloxinia will remain in this dormant state for one to three months. It is not advisable to allow the plant to germinate prematurely, as it will grow weak and incapable of flowering.
This may be interesting: Spathiphyllum or Women's happiness: description, types and varieties
If gloxinia has not formed a tuber sufficient for storage, what should you do?
If gloxinia is still small, just grown from seeds, then its tuber is still very small, and such a plant simply will not survive the dormant period. To understand whether your flower can survive the winter, count its leaves. If there are less than six pairs, such a flower cannot be sent to rest, it may die. Let gloxinia continue its growth in winter. If you provide it with moderate watering and nutrition, humidity and long hours of daylight with the help of lighting - next year, when your flower grows at least six pairs of leaves and begins to form buds - it will enter a normal life cycle, like all gloxinias, it will bloom and will retire in the fall.
Also, a tuber may not form when growing gloxinia from a leaf or cutting, especially when the cutting is deeply buried in the soil.
The period of the active cycle in gloxinia
By the beginning of a new active cycle, with proper care of the dormant tubers of the plant, new roots and sprouts will begin to appear on them. Typically, gloxinia begins to grow in February or early March. The tubers are taken out of an old pot or from a container with sand - depending on where they were stored, they are cleaned of soil, and old roots are removed.
Every spring, gloxinia is transplanted into new, healthy soil in all respects!
Each tuber is inspected, rotten or dried areas are cut off with a clean, sharp knife or scalpel. Immerse in a dark pink solution of potassium permanganate for 30 minutes. The cut areas are sprinkled with crushed activated carbon. Sometimes gardeners treat tubers with growth stimulants. Then try not to immerse the plant deeply in the solution so that the growing point is not exposed to the drug. After all treatments, give the tubers time to dry thoroughly - within a day is enough. Sick and wrinkled - throw away. This is a guarantee that the remaining tubers will give us healthy and strong plants capable of blooming with lush, beautiful flowers for a long time and repeatedly.
The pot for gloxinia is selected depending on the size of the nodule. It can be ceramic or plastic. For a small young plant, a pot up to 10 cm in diameter is suitable; for a long-flowering plant with a large tuber, choose a pot up to 15 cm in diameter. The height is usually taken the same as the width. You should not buy a growing pot for gloxinia - the plant will fatten in it, only dense foliage and tubers will grow, and our beauty may forget about the need to form buds. In addition, too much moisture may accumulate in a large pot, which can cause the tuber to rot.
So, the tuber is planted in the ground at two-thirds of its height. We have already written above that a special soil mixture for flowering plants - “Saintpaulia”, “Begonia” - is suitable for the soil. At the stage of transplantation and subsequent rooting of gloxinia, there is a risk of losing tubers due to their rotting.
Therefore, do not forget about drainage, 2-3 cm of expanded clay or other material at the bottom of the pot - a prerequisite for healthy roots!
The soil is slightly moistened. The pot with the tuber is placed in a bright, warm place under a film until the first pair of leaves appears. Don't forget to ventilate it morning and evening. When the leaves grow up, remove the film completely. The nodules are covered with soil no more than one cm, just to cover it. It is better to water through a tray or carefully along the edge of the pot so as not to flood the middle of the flower with its growing point.
This may be interesting: Indoor Hibiscus (Chinese rose) - home care
Sometimes, seemingly healthy, strong tubers do not show signs of life along with others. Wait a little, perhaps these tubers need a little more time to begin an active life. If you place them in the ground and start watering them, they will most likely rot, because they will have nothing to absorb food and water. Wait for the natural awakening of gloxinia.
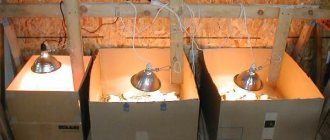
If, however, you need to wake up the sleeping beauty, try to artificially activate the growth of the above-ground part of the plant. To do this, well-processed dormant tubers, prepared for planting, are placed in a bag with a slightly moistened peat substrate. The bag is tightly closed and placed in bright but diffused sunlight. If this is a problem, put it under a phyto lamp for 12-14 hours. The germination temperature should be high – 24-26°C. Keep the tubers in such a bag without ventilation until they begin to sprout. After a week or two, you will see drops of moisture on the inner surface of the bag - these are the tubers that have begun to breathe, and a growing point has hatched on them. This means the tuber is ready for planting. It is possible that this flower will catch up with the others in growth and will bloom beautifully no worse than them.
Gloxinia did not wake up after winter dormancy, what should I do?
Sometimes it happens that gloxinia does not wake up after wintering . The first aid for awakening it is to wrap the flower pot in a large plastic bag and moisten the soil. It is quite possible that the winter was too dry and the tuber dried out. Then, in a package from the artificially created greenhouse effect, the flower can wake up and begin to grow.
Sometimes gloxinia, which is too young, is sent to winter because it did not have time to form a sufficient tuber in the first year. Such gloxinia will never wake up.
If a gloxinia tuber was purchased last year in a store, but after last year’s flowering it did not survive hibernation, it may be due to the poor quality of the planting material. The tubers looked decent and healthy, but in reality it could turn out that the tuber was already old, or infected with an infection, or affected by pests. Or perhaps he was simply overfed with growth stimulants. Such tubers were strong enough to bloom once, and during winter dormancy, they most likely died.
Dig the tuber out of the ground and inspect it. A shriveled tuber can most likely be thrown away. If there is hope that the tuber is still alive, cut it in half. If it is all brown inside, it needs to be thrown away. If only part of the tuber is brown, you need to cut off all the rot and treat the remaining parts of the tuber with brilliant green. You can soak it briefly in Epin or Zircon to increase the vitality of the tuber.
Gloxinias usually live no longer than four to five years. If you value your gloxinia variety, think in advance about its propagation - after all, the plant may not emerge from hibernation simply because the tuber is already old and has simply died.
Bloom
Gloxinia usually begins to bloom in late spring. Sometimes, the plant awakens a little earlier, at the beginning of February, then at the end of March it can bloom. Although, for this you will need to create the most comfortable conditions for the plant - sufficient lighting with the help of lights, moderate watering, temperature within 22-24°C, high air humidity. Then it will delight you with its vigorous flowering, perhaps more than once during the season.
Typically, the period of the first rapid flowering occurs at the end of May - beginning of June. Until the end of summer, gloxinia will delight you with its amazing flowers.
Read more about gloxinia flowering and what to do afterward in this article.
Flowering conditions
It begins to bloom in March. With good care it can smell fragrant until mid-autumn.
Gloxinia flowering
The conditions created are favorable for this.
- The plant is light-loving. Should be placed on a sunny windowsill. But provide diffused light.
- From the moment of awakening until the beginning of flowering, watering is moderate. With the appearance of buds, hydration is more intense.
- The entire period requires regular (every ten days) feeding. Fertilizer mixtures are purchased in specialized stores. They are used according to the instructions supplied with them.
- Air humidity plays an important role. It should be 75%.
- The entire flowering period in the room should be +22 degrees. Otherwise, development will stop and the buds will begin to fall off.
Problems during cultivation
The plant's immunity can be considered average. Owners may encounter difficulties:
- pale plates – nutritional deficiency;
- buds fall off from dry air, drafts, temperature changes;
- no flowers – the plant is too young, violation of the rules for storing tubers, gloxinia “missed” the dormant period;
- spots on the leaves remain from water;
- large whitish marks on the plates – sunburn;
- Gloxinia tubers rot during wintering due to an excessively wet substrate;
- dry out due to lack or too little watering;
- The leaves of the plant rise from the heat, and fall when the temperature is low.
The owners should be alarmed by the fact that deep notches have appeared on the edges of the sheet plates. Gloxinia lacks boron, which is especially dangerous for the bulb. Make a 2% borax solution and water once.
Transfer
Carried out after the end of winter rest. From February, shoots begin to appear on the potato. The time has come to transplant the nodule. It is better to buy the substrate in a specialized store. To prepare it yourself, you need to mix humus (1 part) with leaf soil (2 parts).
Fill a container for potted culture (4 cm in diameter larger than the previous one) with drainage (at the bottom) and prepared soil. Then transfer the gloxinia along with the earthen lump into the prepared pot. Sprinkle the potatoes halfway with the substrate and compact. Finally sprinkle the top after the sprouts appear.
Gloxinia - brief characteristics of the plant
The homeland of the perennial Gesneriev family is South and Central American territories. In the wild, the plant lives on rocks, along river banks, and in damp deciduous forests. In general, where it is warm, humid and very light.
The flower was named in honor of Benjamin Gloksin, a famous German botanist. In the scientific literature you can find another name for the plant - Sinningia - named after the American breeder Wilhelm Sinning, to whom we owe the variety of varieties of domestic flowers.
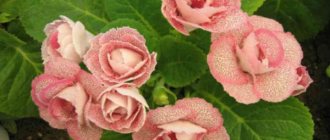
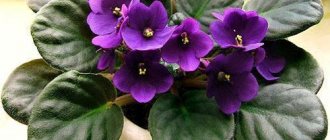
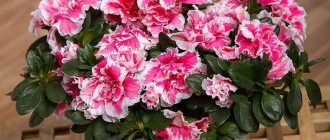
The indoor plant has small shoots, a tuberous root, and velvety leaves of a rich green color. The flowers are shaped like bells, grow singly or in bunches, and can be regular or double. The color is varied: from white to purple. Some varieties have speckles, others have a noticeable edging of the petals.
The buds themselves are quite large - up to 5 cm in length, up to 7 cm in diameter. The number of flowers on one small shrub can reach 40 pieces. That is, a real bouquet in one pot! Currently, there are about 25 varieties of gloxinia, but gardeners most often work with two species.
Gloxinia regal
The small bush has thickened 10-centimeter shoots. The leaves are dark green, with an edge, at the top they are dotted with silver veins, at the bottom - light red. The leaves are oval-shaped, large (up to 200 mm in length), arranged oppositely in four to six pieces.
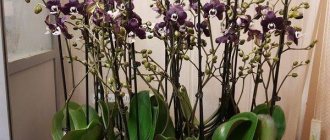
Bell flowers are also impressive in size (diameter up to 7 cm). Their color is usually dark purple, although there are hybrid varieties with inflorescences of other shades.
Gloxinia is beautiful
This variety is distinguished by a dense, scaly rhizome, very small shoots (which makes the plant look squat), and wide, oval-shaped leaves that begin to taper towards the base. The leaf blades are usually light green in color.
However, the most important thing is, of course, the flowers. They can be different - large and small, drooping and sticking up, bell-shaped and funnel-shaped... The riot of colors is also amazing: red, white, purple, lilac, etc.
The flower has a huge number of hybrid forms, differing, among other things, in the color of the buds. Thus, Gloxinia Scarlet enchants with scarlet flowers, Red Storm amazes with dark red buds reminiscent of roses. There is also Zephyr with soft pink petals and Southern Night with almost black inflorescences.
Landing
For this procedure, soil specifically for tubers is purchased in the store. Add some hydrogel. Fill the pot and place the nodule there.
It is checked for damage before landing. If any exist, they should be eliminated. Treat damaged areas with ash, brilliant green, and Fundazol.
REFERENCE . Hydrogel is useful because it is saturated with moisture. As the soil dries, it releases it, decreasing in size. Thus, the flowers do not become flooded and do not dry out.
To prevent diseases, treat healthy potatoes with a weak solution of potassium permanganate (7 minutes).
ATTENTION . The container for a potted plant should not be much larger than a potato. Otherwise there will be no flowering. Due to the growth of roots by the plant.
Selection rules
Collectible plants are not found in retail chains, unless the owner or seller of a small shop is engaged in growing flowers himself. There you can usually buy Dutch or greenhouse-grown stamping.
Industrial gloxinia is much easier to care for at home than collectible gloxinia, and is often no less beautiful. Beginners are recommended to choose this one.
When purchasing, you should inspect the bush. The leaves must be fresh and elastic, without damage, stains, plaque, or other marks that may remain from careless handling, diseases or pests.
The next obligatory sign is that the plant has many buds that have not had time to bloom. When potential owners need a specific color, it is better to take a gloxinia that has at least one flower open.
It is better to refuse to buy a plant you like if the tuber is not visible. It was planted incorrectly or did not have time to develop the underground part in a volume sufficient for the gloxinia to survive in the winter.
A good sign is that the tuber is buried no more than 2/3 into the ground, the rest is on the surface, elastic, without signs of spoilage.
Author's varieties or hybrids are purchased by:
- at exhibitions;
- via the Internet on professional websites.
If you purchase a gloxinia tuber, you need to make sure that it is not wrinkled, cracked, coated with any color, rotten or spotted. It is better to take it at the end of winter or beginning of spring - just before planting.
Reproduction
Propagates easily: by cuttings, seeds, shoots, leaves, tuber division.
Reproduction of Gloxinia
- The cuttings can be rooted directly in the soil. To do this, make a hole with sand in the center of the pot filled with soil mixture. The cutting is placed there and covered with polyethylene. After a month, nodules form.
- Seeds for propagation that are 2 years old are sown in November-February. Use a wide, shallow container. The seeds are not sprinkled with soil on top. Cover with transparent film. Keep at +22 degrees, good lighting.
- The shoots appear in the spring. They take root while in water.
- The leaf blade is cut along the veins. Place it on the ground, press it in, and cover it with polyethylene.
- In the spring, the tuber is cut into lobes with shoots. Each cut is sprinkled with ash and treated with Fundazol. Next - cultivation as after a dormant period.
Read more about gloxinia propagation
Reproduction of Gloxinia
Growing from seeds
In flower shops, if you wish, you can purchase seeds of various varieties of gloxinia and try to grow a flower from them with your own hands. But you should be prepared for the fact that this event may not give the expected results.
The first thing you should do is buy the seeds of this flower, and experienced flower growers recommend choosing granulated seeds. As a rule, a germination period of 4 to 6 months, and sometimes 9 or 10 months, is written on a packet of seeds, but this is only the case when sowing is done in autumn or winter. In order for seedlings to appear as quickly as possible, sowing should be done in March. For sowing, you will need a mini-greenhouse, which you can buy in a store or make with your own hands: for this, in a deep plastic container with a lid, you need to place peat tablets that need to be soaked. Then granules with seeds are laid out on these tablets; there is no need to bury them in the substrate. To prevent air from stagnating in the greenhouse you have built, you need to make several holes in the lid for ventilation. The mini-greenhouse should be placed in a well-lit and warm (22 to 23 degrees) place. Over the course of 10–15 days, the substrate must be very carefully moistened if necessary. After which all that remains is to wait until the seedlings appear.
After the seedlings appear and grow, they should be planted in individual disposable cups along with peat tablets. And after a while they are planted in permanent pots.
Growing GLOXINIA from seeds. The whole process from sowing to germination
How to propagate with leaf blades
Propagation of gloxinia by leaf cuttings is a much more reliable method compared to generative ones. Therefore, if there is such an opportunity, then it is better to opt for this method of reproduction. Since the leaf blades of this plant are quite large, you should find either the smallest leaf, or the large blade should be divided into parts. The leaf must be cut across parallel to the transverse veins. The petiole of the plate needs to be shortened to 20 mm, no more. Please note that cutting the plate must be done with a very sharp tool, otherwise the uneven edges may begin to rot over time.
Parts of the leaf blade should be planted in individual pots filled with slightly moistened light soil mixture. They are placed in a small greenhouse or covered with a plastic bag on top. There is no need to ventilate or water the leaf cuttings for four weeks. After the specified time, parts of the leaf plate should take root, and they must begin to gradually be accustomed to life in indoor conditions; for this, the shelter must be opened slightly for a while. The greenhouse with rooting leaf cuttings should be placed in a warm and bright place.