Gloxinia has faded, what to do next?
The 21st century is a time of high technology and constant movement, so everyone, from the average clerk to the desperate housewife, experiences stress. Some people remain in this state permanently, while others experience it in places, and psychologists advise both of them on ways to get out of it. Sports, interest groups or having a pet. But what should those who do not have the time and energy for all of the above do? An excellent solution is a houseplant. Spathiphyllum, violets, ficus, or maybe exotic gloxinia?! It will delight its owner not only with beautiful, unusual flowers, but also with an incomparable aroma. It is not surprising that after gloxinia has faded, what to do next is perhaps the most popular question, both among beginners and among already experienced gardeners.
Possible problems during cultivation
Sheet plates can curl:
- when the air in the room is excessively dry. Gloxinia is sprayed and placed in a tray with water;
- at high or low air temperatures. The optimal temperature range for the plant is +18…+22°C;
- due to a sharp temperature change when moving to another room;
- as a result of insufficient or excessive lighting. Conditions of detention should be adjusted;
- due to damage by insect pests. In this case, the flowerpot is treated with a solution of insecticides.
The situation when the buds turn black and die can be triggered by the following factors:
- too cold winter. The tuber is treated with an anti-stress drug;
- deficiency of nutrients in the substrate. It should be replaced with a fresh one;
- dry indoor air and dry soil. Place a container of water near the plant, fill the tray with water;
- excessive moisture of the earthen coma. It is recommended to adjust the watering schedule.
Gloxinia description, photo
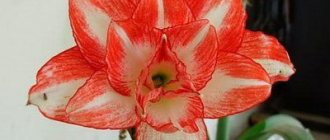
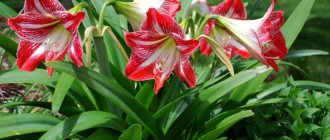
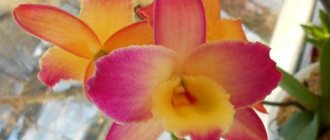
Gloxinia flowers can be very unusual, velvety or, on the contrary, simple and smooth. The palette of this beautiful plant is varied, from small white buds to huge purple ones. This perennial herbaceous plant either has no stem at all or is very short. It can have many large flowers (the number can reach up to 50), with bright perianths, or a single beautiful flower.
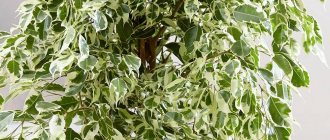
Gloxinia leaves are green, bizarrely shaped, as if created to emphasize the unique shape of the “bells”. This is a tuberous plant that loves the sun's rays.
Attention! Despite the fact that gloxinia is photophilous, it is afraid of direct sunlight. If you place a flower in the southern part of the house, under the “open sun,” the plant risks getting burned and dying.
The homeland of this miracle plant is Brazil, although it can often be found in South America. Garden gloxinia (genus Sinningia) is popular among us, as it requires no less, although diametrically opposed, care than its domestic counterparts.
Why the plant may not bloom and what to do
Old plants usually bloom poorly. To correct the situation, that is, to achieve flowering, you need to water them more abundantly.
Is it too hot and dark in the room where the flower stands? The best temperature is 18–20 degrees Celsius. In addition, if there is insufficient humidity (in addition to watering, it is advisable to humidify the air with a spray bottle of warm water), it blooms quite late.
Its leaves can “tell” how favorable the conditions are for a plant. Are you reaching for the light? This means that he is clearly missing. Are they located horizontally? Everything is fine. If the leaves are drooping, it means the flower is frozen. Strongly raised ones indicate overheating.
A pot that is too spacious also does not contribute to lush flowering. In this case, only the root feels great.
A lack or, conversely, an abundance of fertilizers has a bad effect on the development of the plant. And, of course, the appearance of pests or the presence of diseases can also be the reason for the lack of flowering. In this case, a transplant will be required.
In summer, gloxinias feel great on an open balcony or loggia. But only if there is no strong temperature difference. And, of course, you need to make sure that they are not exposed to direct sunlight.
Types of Gloxinia
In general, there are more than 25 species of this flower, and each of them has its own characteristics and requires individual, careful care. It just so happens that terry gloxinias are especially popular in our country. A distinctive feature of this type of plant is the large number of petals. Today, more than 70 varieties of this particular type of flower are known.
Terry gloxinia, depending on color, can be divided into the following subspecies:
- calico;
- brindle;
- plain.
Calicos owe their name to the presence of various dots and specks on their surface; plain ones, as you might guess, do not have this feature; their buds are painted exclusively in one color. And tiger ones are decorated not only with all kinds of small spots, but also with rims around the edge of the flower. There is a direct relationship between the “fastidiousness of a flower” (demandingness in care) and its color. Gloxinia flowers have either the shape of a bell (they are more common) or tidea (popularly a slipper).
Important to remember! Plant care and its life cycle may vary depending on the type and variety of the plant.
The most popular and favorite varieties of gloxinia include the following:
- Winter cherry;
- Yesenia;
- Gloxinia tiny;
- gloxinia perennis;
- gloxinia regal;
- gloxinia beautiful;
- South night;
- Cleopatra;
- Triumph Tender;
- Kristin Ireland;
- Pink Flamingo.
Winter cherry - there are suggestions that this variety was bred from Purple beads, hence the similarity in color, white flowers, as if deliberately strewn with burgundy peas. It is considered semi-miniature, has medium-sized buds and medium-sized green leaves with a fleecy surface.
Yesenia - the petioles of this gloxinia are medium, it grows as a small bush, the bud shape is gramophone. Legends can be made about the rich color and size of the flowers of this plant, especially since they are ready to please the owner with their flowers for a long time.
Gloxinia is tiny - this decorative representative of the species barely reaches 2.5 cm in length. On small pedicels there is one miniature flower, which contrasts quite strongly with the velvet leaves, oval in shape. The color of the petals is from light lilac to blue-violet, the throat is white.
Gloxinia perennis (Speckled Gloxinia) is quite large, compared to others, it can reach up to 70 cm in length. During the flowering period, it blooms beautiful pale blue bell flowers (several on one stem) and pampers with the intoxicating aroma of mint. The leaves also have a rather unusual color, with a glossy green top and red bottom.
Gloxinia royal - grows as a bush, the height can reach up to 30 cm. A silver pattern is visible on the dark green heart-shaped leaf. The flowers are bell-shaped, dark purple, large, up to 7 cm in diameter. With proper care it blooms profusely and for a long time.
Gloxinia is beautiful - the color scheme of this queen is truly diverse, from small white or scarlet flowers to bright two-color or purple. The leaves are heart-shaped at the base and diverge into a beautiful oval towards the end. The length of the bell-shaped flower can reach up to 5 cm, the bud seems to stretch towards the sun (pointed upward). Depending on the variety, size and color may vary.
Southern Night - This species has gained popularity due to its rich purple color. Large velvet petals are covered with barely noticeable specks.
Cleopatra - due to the fact that this is an artificially bred plant, caring for this gloxinia should be especially careful. The beautiful wavy petals are notable not only for their shape, but also for their semolina colors (they can be white, light pink, and some representatives of the species have small, pronounced dots that turn into stripes closer to the edge). Despite the straight flower stalks, Cleopatra resembles a bouquet. With proper care it blooms vigorously and for a long time.
Triumph Tender - this gloxinia is sometimes compared to an apple tree flower, it’s all white (marshmallow color), with a soft pink tint; if you look closely, you can see small veins on the petals and dark specks. Flower growers compare its bud to cotton wool and do not call it anything other than “delicate.” A very heat-loving plant, changes in temperature are fraught with sticking of the petals and poor opening of the bud.
Kristin Irish - if you manage to cope with the vagaries of this gloxinia, then the gardener will be rewarded with white, densely double flowers, with a bright crimson border. The plant has a shortened peduncle, making the bush look compact. Can reach up to 25 cm in height.
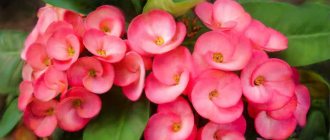
Pink Flamingo - the name speaks for itself, this is a stunning flower of deep pink color, sometimes has a purple tint, it all depends on the care and conditions in which the plant is located, it has long flower stalks - so you need to take care of support for them. The leaves are green, dense and medium in size.
Interesting fact! In the 18th century, a gift of gloxinia meant a declaration of love at first sight.
Features of this period
When the number of leaves on gloxinia reaches three to four pairs, buds appear. Their number depends on the age of the plant, the mass of the tuber and the conditions of detention. The formation of buds occurs only with proper care. A striking feature of gloxinia is its cap flowering. Up to a dozen buds can form on one peduncle.
The flowers are large, oblong, and can sometimes have an irregular shape and be drooping. Based on the shape of the inflorescences, gloxinias are classified as bells and shoes. The second name for shoes is tidei. They look like bells, but are more elongated at the base. Depending on the type of gloxinia, flowers can be simple or double. Simple petals are arranged in one row, while double petals have several rows of petals.
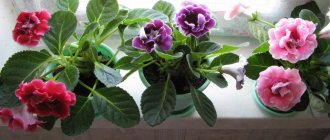
Coloring is characterized by diversity. There are white, pink, red, blue and purple flowers. There are not only varieties with single-color buds, but also multi-colored varieties. Some gloxinias have small specks on the petals, and there may also be an additional contrasting border around the edges.
Features of the flower life cycle
Any gloxinia annually experiences several mandatory stages of its development:
- dormant period (usually in the winter months);
- stage of growth and development;
- flowering period.
Sometimes, gloxinia surprises a novice gardener by the fact that in winter it grows and develops very actively. This is how a young plant behaves; it can be recognized by its small tuber. In order for this flower to form correctly in the future, it needs special conditions: artificial lighting (morning and evening) and a temperature not higher than 22 ° C. If everything is done correctly, the first flowers will appear in the summer. When it comes to adult gloxinia, it should rest for 3-4 months.
Gloxinia flowering dates
Gloxinia begins to bloom in May-June and ends in July-August. But if ideal conditions have been created indoors, gloxinia can leave the dormant phase already in early February, then at the beginning of March it will enter the flowering phase and exit it in June. On average, the phase lasts 2 months, under favorable conditions - all summer.
Did you know? In the language of flowers, introduced by Charles II in the 18th century, gloxinia means “love at first sight.”
When does gloxinia bloom?
The flowers of this plant are so unusual that they immediately attract the eye, but to see this beauty you will have to make a lot of effort. After all, with proper care, it can usually bloom from May - July, and until October. Despite the fact that gloxinia is photophilous, during the flowering period its exposure to sunlight should be minimized. This is the time when the flower is placed on the north side. But the absence of buds and the elongation of the flower are sure signs that it needs more light. If measures are not taken in time, the buds and leaves of the plant will become paler. If all care rules are followed, flowers appear after the 3-4th pair of leaves. After flowering, a stem (about 2 cm) is left.
It should be noted! Repeated flowering, which, by the way, is not inherent in all gloxinia varieties, will no longer be as bright as the primary one. The flowers will become smaller, and their number will decrease.
Care after flowering
When the long-awaited flowers have faded, the beautiful gloxinia still needs care. First of all, you need to carefully examine the stem, if there are new shoots on it - most likely these are places for new flowers to appear. In this case, the plant needs to be pruned: cut off the leaves and stem, and leave a cutting about 2 cm high. Thanks to this simple manipulation, several new shoots appear on the stem, and buds are formed from them. It is necessary to preserve the strongest shoots, otherwise it will have a detrimental effect on the growth and appearance of the plant. Typically, flowering for gloxinia is an energy-consuming process; it needs to be fed especially carefully, and the first buds should be removed along with the stem.
Attention! Despite the fact that Gloxinia loves humidity of 60-80%, it does not tolerate spraying.
Rest period
In September or October, the plant will slowly begin to bloom, the buds will fall off, the leaves will dry out - this means that the flower has begun a dormant period, and it is time to reduce watering, and then stop it altogether. This should be done only when the gloxinia has completely faded and its leaves have withered and turned yellow. Another indicator that the plant needs rest is its “age” (more than a year) and the size of the tuber (more than 2 cm).
At this stage, the flower is not fed, with the only exception being potash fertilizers. When the above-ground part of the plant has completely withered, it is cut off, leaving 1-2 cm. And the tuber is prepared for wintering.
It should be remembered that cutting off all the upper leaves of the plant is prohibited, because They contain all the necessary vitamins and minerals that the flower needs to survive the winter.
How to water gloxinia
For irrigation, use filtered or settled water at a temperature a couple of degrees above room temperature. Add to the tray or top of the pot. Make sure that moisture does not get on the leaves and flowers.
Try to water along the edge of the pot and not get it on the plant / YouTube channel “Tatyana Bashmakova - Your Dacha”
From spring to the second half of August, water gloxinia every two to three days or less often so that the top layer of soil in the pot has time to dry out. Remove excess water from the pan. Do not allow the soil to dry out completely or become waterlogged.
From late summer, gradually increase the intervals between waterings by a day or two. And when the leaves dry out completely, stop moisturizing the gloxinia.
Start watering the tuber when you plant it back in the ground. First, moisturize moderately, pour only a little water. And gradually move on to the usual regime for the warm season.
Awakened gloxinia tuber / YouTube channel Gardening at 58 North
From spring to autumn, high air humidity is beneficial for gloxinia. But you shouldn’t spray the flower. It’s better to surround it with containers of water or spray moisture from a spray bottle a little away from the plant every couple of days.
Storing gloxinia during dormancy
After the beauty fades, you need to take care of the tuber. After all, proper storage guarantees that the plant will overwinter well, gain strength and delight its owner with beautiful flowers for many years.
There are several ways to store tubers during the dormant period:
- in pots;
- in packages;
- in pots and bags;
- in a refrigerator;
- in cool places.
In method 1, gloxinias are stored in the same pots in which they grew, while the plants are not removed from the soil; containers with tubers are placed in boxes. Since the air in the room is dry and warm in the autumn-winter period, the tubers need moderate watering, 2-3 times a month, otherwise the flower will simply die. Even if it is possible to reduce the temperature to 18 ° C, soil moisture remains relevant.
Storage in bags: regular plastic bags or special zip-lock bags are suitable for this method. Place some peat soil on the bottom and put them in a cool, dark place. If the temperature is above 16 ° C or they are exposed to sunlight, the tubers begin to germinate.
The absence of light and heat is also required for the third method. With it, gloxinia is stored in the same soil in which it grew. The bag is tied and removed until spring, and the flower does not need watering.
Some people store flowers in the refrigerator, at a temperature of +11... +12 ° C, in a closed plastic bag with soil (2-3 months), and then place them in a warm and bright place so that they wake up.
In a cool place: this method is similar to the previous one. Such suitable places could be: a pantry, a cellar, etc.; you can also store gloxinia not in the ground, but in the sand. Here the main conditions are temperature from +11 to +18 and the absence of light, and it is also necessary to monitor soil moisture.
Reminder! Comfortable temperature, lack of light, moderate humidity guarantee a healthy tuber in the future.
Caring for gloxinia at home
Like any other plant, gloxinia “puts forward” a number of requirements for living conditions. In order for the bush to please you with bright inflorescences and lush greenery, you need to pay attention to many details, for example, lighting, watering, feeding with special fertilizers, etc.
Illumination
When growing gloxinia indoors, you need to choose a spacious place for it, which should be very well lit, and the light needs to be bright, but diffused. The optimal length of daylight for such a flower is 12–14 hours. In this regard, it will need lighting, especially during long nights. Finding out whether a plant has enough light is very simple: if the stem is short and the dark green leaf blades are placed horizontally, then this means that everything is fine. If there is a lack of light, the stem and foliage will stretch upward. It is very important to remember that such a flower should not be exposed to direct rays of the sun, because they can destroy the plant. It should also be remembered that gloxinia reacts extremely negatively to drafts; therefore, the window where it stands should not be opened under any circumstances.
Humidity and temperature
The South American subshrub loves high air humidity, but at the same time is afraid of moisture getting on the leaves and buds. A way out of the situation may be to irrigate the air using a spray bottle next to the pot or place the plant on a tray with moistened expanded clay.
The optimal temperature for the plant is approximately 20-22 °C. In late autumn and winter months, the indoor air should be cooler (about 10 degrees). But it is important to exclude drafts and temperature changes, otherwise the flower will get sick or die.
Watering
The growing season is the time when the flower needs frequent and abundant watering. Flower growers advise following several rules for conducting “water procedures”.
- Water should be collected in advance and left for several hours/days to get rid of chlorine and other compounds and impurities.
- Cold watering is taboo. The plant prefers water whose temperature is 24-26 °C.
- If the surface of the earth is dry, it is not necessary to water the flower itself, but only the soil. Another option is to pour water into the pan, and after a couple of hours, pour out the remaining liquid.
Frequent watering continues until the end of August. Then “water procedures” become more rare, since by November the plant will gradually enter a dormant period.
Top dressing
Caring for gloxinia at home involves the use of special fertilizers. But if, of course, you want to see your green pet blooming and healthy. By the way, a plant that feels good blooms from April until the end of summer.
But this is ideal if the owner additionally supports the growing season with a vitamin-mineral mixture. Gloxinia needs to be fed twice a month, and the procedure is carried out in the evening or in inclement weather, so that the sun's rays do not burn the growth area and leaves.
This is interesting: Bobovnik (Laburnum) - planting and care in open ground at a summer cottage
Before budding, the flower is provided with nitrogenous compounds that stimulate foliage growth. As soon as buds begin to form, nitrogen is abandoned and preference is given to fertilizers containing phosphorus and potassium. These elements actively support flowering.
They stop feeding the plant by the end of August, when you can already forget about the buds. Reducing the amount of minerals in the soil will allow gloxinia to prepare for hibernation and spend the winter months in a calm state.
Transfer
As soon as the dormant period ends (usually February-March), the flower must be transplanted into new soil. At the same time, it is important to comply with the important conditions and requirements that apply to the soil and the planting pot. Let's consider the basic rules and advice from flower growers.
Choosing soil and pot
Preference should be given to the finished substrate. The most suitable soil is that suitable for violets or begonias. But before planting, it needs to be brought closer to the needs of gloxinia by adding a little baking powder. Its role is played by marsh moss, vermiculite or perlite.
An alternative step is to make your own potting soil. This will require several ingredients.
- Earth (3 parts). This essential element of the substrate can be taken from the vegetable garden, garden plot or from under any tree.
- Sand mixture (2 parts). This component will promote better water absorption and prevent soil petrification.
- Peat components (3 parts). This sedimentary rock loosens the substrate and promotes a better supply of vitamins and minerals to the roots.
- Humus (2 handfuls per 2 liters of substrate). This element will become the initial fertilizer for the transplanted tuber. If you refuse rotted manure, then you need to feed the flower literally immediately after replanting.
- Drainage. Required component. Its volume will depend on the size of the pot.
The planting container itself should be selected taking into account the characteristics of the plant, which grows in a wide bush. Consequently, the pot should not be too deep, but wide enough. The optimal distance from the edges of the nodule to the walls of the container is 5 cm.
If the old pot is the right size, you can keep it. It is only important to rinse it under running water and wash it with a saturated soda solution with a small amount of potassium permanganate. That's it, it's time to move on to the transplant.
Planting process
By the end of winter, the tuber acquires shoots. This is a signal that it is time to replant the plant. The process itself is quite simple and ordinary, but it also has important nuances.
- Wait for the buds to appear. If shoots do not appear, the tuber is placed in a warm, lit room. Then the rhizome is taken out of the ground, shaken off, dead shoots are removed and washed under the tap.
- Cut out rotten and dried areas using a sharp knife. Treat the cut areas with charcoal powder. If the tuber is completely covered with rot, then it is better to get rid of it.
- Prepare a weak solution of potassium permanganate. It should be warm. Place the prepared rhizomes in it for 30 minutes to disinfect.
- Pour drainage into the planting container. The height of the layer is no more than 2 centimeters. Fill in the soil substrate (approximately 2/3 of the pot's volume). Bury the tuber so that the emerging shoots stick out, and water the soil around the rhizome.
- Cover the flower with film. Remove it every day for 60 minutes so that the tuber can breathe.
- Add primer and remove the film completely. This should be done when the sprouts are in full force and 2 leaves appear. The soil is added so that the nodule is completely covered.
This algorithm is relevant for an overwintered plant. If you purchased gloxinia with flowers, then you should not replant it. Wait until September, prepare the bush for wintering, and in the spring begin the above steps.
Reproduction
One of the features of gloxinia is that there are several options for obtaining new plants. The flower reproduces with the help of leaves, seeds, cuttings, stepsons and nodules. All these methods differ in labor intensity and final result, but you can choose the most comfortable and effective option.
Gloxinia from seeds
The rich assortment of gloxinia seeds in specialized stores inspires optimism for those who want to test themselves as a breeder. But don't expect too much from this experiment. Growing gloxinia from seeds begins with purchasing seed material - thank God, this is not a problem today - and it is better to purchase granulated seeds. The packaging usually indicates a germination period of 4-6 months, or even 9-10, but this is only if you sow in winter or autumn. If you do this in March, the process will go much faster.
You can use purchased greenhouses for sowing, or you can make a greenhouse yourself: loosely place and soak peat tablets in a deep plastic container with a lid, and spread the granules onto them without embedding them in the soil. Make several holes in the lid for ventilation. Place the greenhouse with the seeds in a bright, warm place with a temperature of approximately 22-23 ºC and for one and a half to two weeks, carefully moisten the soil as necessary and wait for the emergence of seedlings. When the sprouts sprout and get stronger, plant them together with peat tablets in disposable cups, and after a while in permanent pots.
Leaf cuttings
This method of reproduction is considered simpler and more reliable than the previous option. It is only important to choose a small and strong leaf during the growing season. If the leaf plate is large, then it is divided into several parts.
In any case, the leaf is cut across the lines of the veins. It is important to use a sharp knife, otherwise the uneven edges will begin to rot over time. Consequently, such planting material will already be considered spoiled.
Parts of the leaf are planted in separate containers filled with moistened soil mixture. They need to be covered with polyethylene and left for a month in a warm place, but these shoots do not need ventilation or watering. As soon as the leaves take root, the film is removed and the plants are accustomed to indoor conditions.
Stem cutting
This propagation option involves using the top of the flower stem. It is cut off with a sharp knife and immersed in a moistened soil substrate. After this, the process should be covered with polyethylene and wait approximately 2 weeks.
Some gardeners first place the cut stem with leaves in water and wait for the roots to appear. Only after this is the seedling sprinkled with soil, making sure that only the stem with roots is in the ground, and that the leaves do not touch the surface of the soil.
Gloxinia propagation by tuber division
This method of propagation is very painful for the plant itself. After dividing the tuber, gloxinia take a long time to take root and get sick. But sometimes there are situations where there is simply no other way out.
The illustration for the article is used under the standard license ©delniesoveti.ru
Before dividing the root, you need to carefully examine it; for this, choose strong and healthy tubers. If you see rot, then it needs to be cut off to healthy tissue.
You can start dividing the tuber after sprouts of about 2 cm appear on it.
The tuber must be cut with a sharp knife, which is pre-disinfected.
When dividing the tuber, make sure that there is at least 1 sprout on each piece. Dry the cut areas and sprinkle with crushed coal. Place the separated tubers in a pot of soil and always monitor the soil moisture, it should always be slightly damp. Try not to overwater, as this may cause the nodules to rot.
In general, it is recommended to water gloxinia in a tray, but you can also water it with a syringe by placing a needle in the ground.
The separated nodules can be immediately planted in transparent cups to observe their development.
- If the roots are white, then everything goes well.
- When the roots fill the cup, the plant can be transplanted into a new container.
This is interesting: Growing Lychee fruit at home: how to care for the tree, how it blooms
But in fact, not everything is as scary as it might seem at first glance. In life, gloxinia is not so capricious, therefore, caring for it at home is quite simple. I hope that in this article you found all the answers to your questions. To understand whether this is true or not, I would like to read your comments. Therefore, if you liked the article, or you think that I missed something, just write your opinion in the comments. Well, that's all for today. Good luck
Awakening and leaving after a period of rest
Waking up and further caring for gloxinia often depends on which plant the gardener chooses.
Young flowers are planted in new soil. If the size of the tuber reaches at least 5 cm, then it is recommended to extend the dormant period; to do this, you need to break off the sprouts and then plant them.
On a note! At this stage, shoots may appear in some varieties; it is recommended to remove them, but this can only be done if the plant is mature and strong.
Since gloxinia usually blooms in summer, it may require replanting during the dormant period. The ideal time for this is considered to be March-April, but if the tuber is stored in old soil and grows strongly, then the procedure can be done even in February.
Caring for gloxinia in autumn-winter
After flowering ends, another question arises - how to care for gloxinia during the dormant period. This stage begins in September and continues until the end of winter. As soon as the leaves turn yellow, watering is reduced, and after the stems and foliage dry out, stop. All that remains is to send the tubers for the winter. And here one of two options is possible - in a container and with digging.
Table 1. Wintering options for the plant.
| Wintering method | Algorithm of actions |
| In a pot |
|
| With digging |
|
Time of onset of the rest period
Gloxinia is native to South America. Therefore, in its development the plant adheres to the seasonality of this region. The dormant time, when gloxinia is harvested for storage for the winter, usually occurs in September or October. Then a drought begins in her homeland.
If this does not happen on time, the flowering periods shift. According to the rules, they should occur in spring and summer. To avoid this, care is carried out in early autumn to prepare for winter. In case of late flowering, they wait until it is completed, and then carry out special preparatory measures.
Preparing for winter
Caring for gloxinia in winter at home involves creating a special microclimate to preserve the viability of the tubers. The plant requires preliminary preparation for winter. In September or October, after the plant has flowered, the light intensity is reduced. To do this, move the flower pot to a window facing the north side. The temperature is maintained no more than +15 degrees. Potash fertilizer is applied once. Watering is gradually reduced, moistening the soil with a small portion of water once every 7 days.
When the leaves begin to die, stop watering completely. During this period, the upper part of the gloxinia does not yet need to be cut off so that the beneficial substances descend from the green mass into the tuber. If this rule is not followed, vegetation processes will resume. When the green part of the gloxinia completely dies off on its own, it is cut off, leaving a stump 1 cm high.
Tuber storage
After completing the preparatory measures, the tubers of adult gloxinia are removed from the soil for subsequent storage. It is convenient to do this using the transshipment method:
- Transfer the earthen lump from the pot into a large, wide container.
- Use your fingers to gently knead the soil and divide it into several parts.
- Remove the tuber and remove any remaining soil from it.
Important! Then the tuber is washed well under running cool water and dried. You cannot send it for storage wet. This leads to the formation of rot.
Methods and conditions for storing tubers
Different methods are used to overwinter gloxinia at home. A plastic bag with a mixture of wet sawdust and washed and heated river sand in the oven is suitable for storing the developed root. The mixture is slightly moistened. Otherwise, the tubers will turn sour due to lack of air and too much water.
The prepared mass is poured into the lower part of a thick bag. Then the prepared tuber is placed in it and covered with the remains so that it is completely hidden from view. After this, the bag is put away in a place suitable for wintering.
The premises for successful preservation of tubers in winter must meet the following requirements:
- lack of intense lighting;
- air temperature not lower than +3 degrees and not higher than +15 degrees;
- humidity from 60 to 90%.
These conditions are closest to the natural ones under which gloxinia overwinters in its homeland. The easiest way to create the necessary microclimate is to place bags of bulbs in the bottom drawer of the refrigerator intended for vegetables. This option for storing gloxinia is suitable if there are few plants.
Important! The disadvantage of this method is that the air in the refrigerator becomes very dry.
Therefore, you should regularly check the condition of the soil in the bag and, if necessary, moisten it. Another suitable option is to place bags of tubers on a glazed but not heated loggia or balcony. In this case, the air should not warm up above +20 degrees. Otherwise, the tubers will leave the resting stage ahead of time.
You may be interested in: How to store calla lilies in the winter at home after digging in the fall should be studied in detail by those who are...
Storing calla lilies in the winter at home after digging in the fall Read more...
If the house has a cellar with significant depth, where the temperature is maintained in winter at +5 degrees, gloxinia roots are placed in it. It is ideal if in such a room there is no fungus or mold on the walls and constant humidity is maintained. In such conditions, there is no need to additionally moisten the soil in the bag. It will always be in optimal condition.
If there is no space in the refrigerator, a suitable balcony or cellar, bags of tubers are placed under the bathtub. In this case, the conditions for humidity and light are met, only the temperature remains high.
The tubers are periodically inspected during storage to avoid the formation of rot. If traces of damage by putrefactive processes appear, the damaged areas are cut off to a normal tuber and the sections are sprinkled with ash or crushed activated carbon.
Important! If the bulbs were purchased in the fall, they are immediately sent for storage. First place for a quarter of an hour in a pinkish solution of potassium permanganate for disinfection and dry.
Storage in soil
It is much easier to care for a flower in winter if you do not remove the roots from the soil. Preliminary preparation in this case is carried out in the usual way. Then the container with the root system in it is moved to a colder room. You can put it on the floor near the balcony door, but there should be no heating devices nearby. This ensures the optimal temperature.
Another option is to take the pots out to an unheated glassed-in loggia or move them to the cellar. Any room where the temperature will be significantly lower than that created during the growing season is suitable.
The top layer of soil is sometimes moistened with water. You should not water the soil too much, but you should not allow the soil to dry out completely. This is a good way to store tubers in the bathroom. For additional cooling, it is recommended to occasionally place pieces of ice on the surface of the soil.
This is interesting: Ginger: beneficial properties and contraindications of the root
Advantages and disadvantages of storage methods
The proposed methods for preserving the viability of tubers are used in accordance with the age and condition of the plant. They have their pros and cons:
- young gloxinia is left in the ground for the winter, this is more likely to prevent the tuber from drying out;
- if there is no suitable place to place pots or there are a lot of flowers, then the off-ground method is more suitable;
- when placing tubers in bags, the risk of rot formation increases, so they are often checked;
- It is most convenient to keep bags of gloxinia in the refrigerator in winter;
- if there is no suitable room or large refrigerator, it is optimal to store the roots in the bathroom;
- Gloxinia purchased in the fall can be preserved using a soilless method with mandatory preliminary disinfection.
Winter care for young gloxinias
For young plants, the winter dormancy period proceeds differently. In flowers of the first year of life, a very small tuber is formed. Therefore, without additional moisture in winter, it will die. Such specimens do not hibernate. Since the daylight hours at this time of year are short, the plants are provided with additional lighting, extending it to 12 hours.
It is important to maintain the air temperature at an optimal level. If the room is hot, the plant will develop an aerial part and stretch the stem instead of growing a mass of roots. Therefore, the temperature should be maintained at +20 degrees. Water the flower rarely, so as not to provoke rotting of the tubers.
For gloxinias that have already bloomed once, a special approach is required. They have already formed a medium-sized tuber. Therefore, conditions are created for the flower to be in a half-asleep state. To do this, the pots are placed on the north side and sometimes watered with a small amount of water. When the daylight hours lengthen, the rested gloxinia will begin to grow again.
Wintering without rest
When gloxinia does not fall into a state of rest, it loses its attractiveness and becomes very elongated. Lack of rest leads to few flowers appearing. To avoid this, the plant is forced to rest.
To do this, cut off the upper part of the flower in October without waiting for it to fade on its own. The containers are moved to a dark, cold room.
Important! Dutch gloxinia obtained from seeds cannot be forced to rest. Such a flower has not formed tubers, so it dies.
When the flowering of such a plant ends, cut off the upper part, leaving a couple of lower leaves. Soon new leaves grow from the axils. Caring for such gloxinia continues in the usual way.
Landing in the ground
When a healthy stem appears on a beautiful gloxinia, the plant is ready for replanting, but in order to achieve gorgeous flowering, you need to check the tuber. It should be damp, but not wet, without damage or cracks, and without signs of pest damage.
What to do if the tuber looks unhealthy:
- wet – dry at a comfortable temperature no higher than 24° C;
- remove dead parts (with a knife);
- process with crushed coal;
- place in a weak solution of potassium permanganate;
- wrap in a damp cloth and leave for several days.
Remember! Only healthy tubers can be planted in the ground.
As for the soil itself, the main conditions here are its moisture permeability and not too high density. Ready-made peat mixtures perfectly correspond to these parameters. The pot should be 4-6 cm wider than the planting material.
The tuber should be planted in sterile soil, having previously created a drainage layer of up to 3 cm. You should not fill the gloxinia completely; the top of the tuber with the stem should be on the surface; if the plant has managed to take root, depressions are made for them. When moistening, water should not get on the tuber, as this can lead to the death of the plant.
What to do if gloxinia does not bloom
To resolve the issue of gloxinia flowering, you must first understand the reasons for its absence; there may be several of them:
- tuber age;
- landing errors;
- overfeeding or infection of the tuber;
- contaminated soil;
- low humidity;
- quality of fertilizers;
- processing errors;
- violation of light and temperature conditions.
If the pet has stopped blooming, and proper watering, expensive fertilizing and changing the care system have led to nothing, the plant is at rest. If gloxinia recently rewarded its owner with a stormy color, and now it suddenly stops, it makes sense to cut off the stem and leave only the strongest leaves on it. Then you need to feed the flower and within a month the long-awaited buds will appear on it again.
Interesting fact! Gloxinia is recognized as the best plant that saturates the air with oxygen, compared to 20 other flowers.
Diseases and pests
Due to improper care, the plant weakens and is more susceptible to diseases and pests. The most common disease is gray rot, which appears as spots of brown light. During illness, with excessive watering, the roots of the plant also begin to rot. Powdery mildew and blackleg may also appear. When purchasing a plant in a store or brought from friends, for preventive purposes, rinse the tubers with potassium permanganate or a fungicide.
In addition to diseases, gloxinia can be bothered by pests. Commonly annoying mites include cyclamen and spider mites. During wintering, tubers can be attacked by thrips and mealybugs. Treatment with alcohol or cognac during this period will drive away pests. Preparations such as Confitor and Fitoverm protect the plant in both winter and summer.
We suggest reading about diseases of gloxinia leaves in this article.
Possible problems after flowering, wintering and when storing tubers
Difficulties after flowering:
- Wilting of buds and leaves - in this case, you need to treat the plant tubers or remove the draft.
- Insects: only replanting will help get rid of this scourge.
- If a plant doesn’t bloom well, it either doesn’t have enough light or lacks nutrients.
Tubers should be stored very carefully in the autumn-winter period, as mentioned above. Otherwise it will freeze or die. Another outcome is also possible: gloxinia will awaken ahead of schedule, and emergency measures will have to be taken to resuscitate the flower.
It may seem to some that gloxinia is a very whimsical flower; it needs special conditions in order to grow, bloom and develop. But these problems are compensated a hundredfold by the fabulous beauty of the plant. Moreover, in the literature and on various floriculture forums there is quite a lot of information and recommendations about caring for it, how it overwinters, behaves during the dormant period and what to do when gloxinia has faded. With proper care, the flower will delight its owner for many years.
What to do and how to care for a flower after flowering?
Watering mode
Gloxinia is considered an exotic large-flowered plant. Flower diameter 15cm. The culture of varieties goes deep into the thickets of the Amazon. The habitat is rocky slopes; sometimes a plant is held on a steep slope only by its roots. Therefore, when caring for gloxinia at home, be sure to lay out at least 3–4 cm of drainage at the bottom of the pot, and sprinkle the tuber itself with no more than 1 cm of soil.
The pot for gloxinia is selected based on the size of the tuber. For a young specimen, a container 7–9 cm in diameter is sufficient, and an old flowering tuber will take root in a pot up to 15 cm wide.
We suggest you read: Why urine is colored after eating beets
Gloxinia does not tolerate drafts. The flower needs mineral fertilizing, which is carried out 2 times a month (you can find out how to fertilize gloxinia here). In specialized stores, the seller will tell you which one is best to take for your variety. After reading the instructions, apply the solution and water along the edge onto the moist soil. It is recommended to do this in cloudy weather in the afternoon, or better in the evening, so that the sun does not damage the growth zone and foliage of the plant.
Before flowering begins, organic fertilizers alternate with nitrogen fertilizers (potassium nitrate, ammonium nitrate). After using phosphorus (superphosphate, potassium phosphate), if this is not done, the sleeping buds will awaken, this will stop normal development.
Like any object in the apartment, dust also settles on flowers, which is much worse than spraying. Due to the large layer of dust, it is difficult for the plant to breathe.
Now about the main thing, it is strictly forbidden to spray gloxinia, as wet leaves will quickly rot. But there is still a way out. We need to give the flower a shower. Gently, using a cotton swab, rinse the leaves with lukewarm water and immediately dry with a hairdryer, or arrange a bath in the kitchen with the gas burners on. In this case, the leaves of the plant will dry out quickly. This will benefit the plant, and it will thank you for your efforts with lush and bright flowering.
Important! Rinse only the leaves, the tuber should not be wet under any circumstances. After bathing, you need to let the flower dry thoroughly in a dark and warm place before returning it to a sunny place. Otherwise, the plant will receive severe burns and die.