According to a beautiful legend, gladioli grew from the swords of two best friends who refused to fight against each other in gladiator fights. The sharp and long leaves of these flowers really look like blades, which is probably why gladioli are also called swords.
Many gardeners are afraid to get involved with these flowers, believing that they are difficult to grow.
But, as practice shows, you don’t need to know any special tricks to get beautiful flowers on your site. The most important thing is to properly prepare the corms for spring planting.
What is the treatment of gladiolus bulbs, how to properly store planting material, and what rules should be followed during planting - this is what the article is about.
Learning to choose
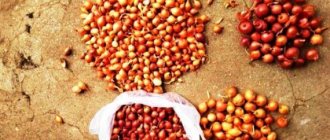
There are two options for the appearance of gladiolus bulbs in the house. First: neighbors in the country shared it or a friend brought it, second: purchased at a gardening store. Beginners should be warned against purchasing expensive, elite planting material; they are very demanding when it comes to agricultural technology.
It’s easier to start with unpretentious varieties of gladiolus. A good choice would be: Amber Baltic, Donna Maria, Sounds of a saxophone.
Bookmark for storage
Then the corms are laid out for winter storage:
- in cardboard boxes;
- paper or fabric bags;
- drawers;
- vegetable nets.
Well-prepared gladioli bulbs can be stored for winter storage.
You can keep the bulbs in the winter in the refrigerator, in apartment conditions, as well as in the cellar or basement.
We reject the bulbs
An experienced florist, when briefly examining the bulbs, easily selects specimens that are unsuitable for planting. Old corms that have been used for 4 years are rejected.
They can be identified by their diameter (5 cm), flattened shape, and large bottom (8 mm). They can be used for planting by dividing them into parts, each with a living bud. There is no guarantee of good flowering.
It is easy to discard diseased gladiolus bulbs, treatment of which will not help, external signs of the disease:
- mold;
- rot (wet);
- collapsed bottom;
- loss of elasticity (dryness).
Gladiolus specimens with signs of dry rot can be set aside and subjected to special treatment.
Fungal diseases of gladioli and their treatment
Disease-causing fungi are easily preserved in the soil, their spores are carried by wind and drops of water, and the damage from infection of gladiolus is noticeable on all parts of the plant.
One of the most dangerous and incredibly common problems is fusarium or dry rot. As can be seen in the photo, without treatment, gladiolus disease leads to the appearance of brownish-red concave putrefactive spots on the bulbs. If such a plant is planted, even with a small degree of infection, the leaves that appear turn yellow and dry out. And this is a sure sign of rotting and death of the root system.
Depending on the stage and time of damage by fusarium, the gladiolus dies before flowering or still forms an inflorescence. But when a bulb infected with Fusarium is stored, the fungal spores disperse and land on healthy planting material.
Therefore, it is so important to carefully select bulbs for storage. However, the spread of dry rot is facilitated not only by the gardener’s oversight, but also by the use of fresh manure or low-quality humus as fertilizer. If bulbs with signs of fusarium are detected in the fall, the area becomes unsuitable for growing this flower crop for 3–4 years.
Another dangerous disease of gladiolus, the treatment and prevention of which requires special attention, is gray, brown rot or botrythiosis. The spread of the pathogen is facilitated by cool, humid weather, when fungal spores are carried by wind and rain from the soil and diseased plants to healthy ones.
Within a couple of weeks, reddish spots appear en masse on the leaves of blooming gladioli. The disease affects flowers, which quickly lose their shape and decorativeness. If the rains do not stop, the stems rot, from which the rot will spread to the corms. When digging, it is noticeable that the bottom of the diseased bulb softens or completely collapses.
The photo showing gladiolus disease shows a bulb that cannot be treated, with a through lesion of the core. It is important to destroy spoiled planting material by first collecting children from the bulbs without signs of disease.
Sclerotinia, also called black rot, is more common in dense, acidic soils and spreads with cold rain. First, signs of the disease become noticeable on the browning foliage, then the rotting stem softens and falls. Black areas infested with fungi are visible on the affected tissue. Rotting covers the corm, its roots turn from white to brown, soften and rot.
On the surface of the gladiolus bulb itself, the disease, for which, like all fungal diseases, there is no treatment, makes itself felt by the formation of brown or dark brown spots growing around the circumference.
As a result, the planting material suffering from sclerotinia dries out, and the infection spreads to the resulting daughter corms. Therefore, diseased plants are completely destroyed, including children.
Septoria blight is similar in appearance to other fungal diseases of gladioli, as in the photo, but there is no treatment other than prevention and complete destruction of damaged bulbs and stems and leaves containing fungal spores.
Spring work
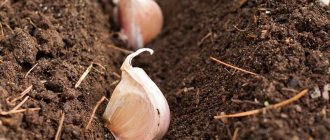
In order to have time to process all the gladioli bulbs before planting, it is necessary to remove them from the cellar (another storage place) in the south in March, and in the northern regions of the Russian Federation in early May. The difference in timing is large, but the climate in these regions is also different; in some gladioli are planted on April 15–20, in others from June 1 to 10.
Advice! In regions with short summers, frosts arrive early. To receive your planting material, plant the bulbs early, organizing a mini-greenhouse for them.
Experienced gardeners determine the correct planting time for gladioli based on temperature statistics over several years. Gladioli bulbs for processing before planting are taken out 2 weeks before the expected date. First, each corm is completely peeled. Cleaned planting material is inspected for diseases, infected with fungus, covered with mold is disposed of, and those with symptoms of scab and dry rot are treated.
You will need a sharp knife and brilliant green:
- disinfect the instrument;
- cut out the affected areas to healthy tissue;
- Lubricate the wounds thickly with brilliant green.
Instead of brilliant green, you can use wood ash. In order for the wounds to heal, it will take at least 3 days after processing the gladioli.
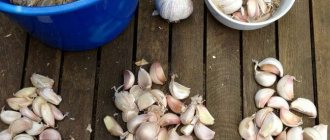
Bulb division
Gladiolus bulbs with several (3-4) buds that have hatched can be divided. Such measures are resorted to when elite varieties are propagated. The wait for children is long, but this way you can quickly increase your collection. As when processing diseased specimens, you will need a sharp knife, brilliant green or ash. Divide so that each division has a living bud and a full-fledged part of the bottom.
All sections are carefully processed: dipped in ash, or thickly lubricated with brilliant green. After that they lie for two days, and after that they can be planted in a flowerbed.
Advice! The knife is disinfected by heating it over a fire and cutting when cooled.
How to choose planting material?
When growing gladiolus (skewer) as an annual crop, the grower needs to dig up the bulbs in the autumn season .
After being removed from the ground, they are dried, cleaned, sorted, and stored. The need to dig up root tubers is explained by the fact that gladiolus is not a frost-resistant crop. A bulb left in the soil for the winter dies when it freezes.
The dug up tuber can be planted in a flower garden for 4 years . After which it gradually loses its ability to germinate.
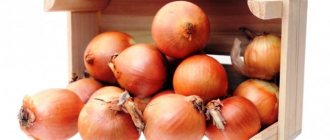
High-quality planting material must meet a number of requirements:
- To be healthy . The gardener needs to evaluate the appearance of the bulbs. Their surface should be shiny and not dry. The presence of stains and signs of rotting is unacceptable. A healthy tuber is hard to the touch, contains eyes in the upper part, and the rudiments of the root system in the lower part.
- Can be stored for no more than 4 years . Flower growers prefer two-year and three-year-old bulbs, which are distinguished by their elongated shape and large size. They are characterized by the presence of a small bottom with 1–2 eyes. From bulbs older than 4 years, plants develop that are prone to disease in dry summer weather or cold, rainy autumn.
- Characterized by an elongated shape . It is inherent in young root tubers. Old bulbs are characterized by a flattened shape and a large bottom. Sometimes gardeners propagate gladiolus by dividing such tubers into several parts. However, such manipulation does not give good results.
- Have at least one eye . The presence of eyes is a guarantee that the gladiolus will bloom this year.
- Be large in size . A high-quality bulb is characterized by a diameter exceeding 3.5 cm.
Important! The so-called girl bulbs are not suitable for growing gladioli.
We are talking about incorrectly formed tubers formed in densely growing flowers. They do not produce flower stalks.
Experienced gardeners do not recommend that beginners in floriculture start with growing elite varietal gladioli. Such plants are more prone to disease compared to flowers of ordinary varieties. They are more capricious and demanding of care.
Juvenile root tubers are considered the most valuable planting material . We are talking about large, healthy bulbs that have not yet produced flowers. They are distinguished by a diameter of 3.5–4.5 cm, a rounded-cylindrical shape, and the presence of a terminal bud. Such bulbs have no traces of a peduncle that has died. A powerful and healthy plant grows from a juvenile tuber, pleasing the eye with a large inflorescence.
Different processing methods
The goals pursued by gardeners when processing gladioli in the spring are different: prevention of fungal and bacterial infections, stimulation of growth and flowering, protection from pests. The most common and dangerous diseases of flower and bulbous crops:
- fusarium;
- septoria;
- scab.
Symptoms of fusarium: the surface of the corm is covered with dark spots, blackened vessels are visible on the cut. Signs of fusarium after planting: slow growth, yellow leaves, dead roots. Septoria blight affects all parts of the plant, leading to its death. Symptoms are spots of different sizes and colors. The disease is caused by fungi. Signs of scab are dark-colored ulcers on the surface of the corms.
To avoid the death of a flower, you need to know how to treat gladioli bulbs in the fall after harvesting and in the spring before planting:
- In autumn, planting material should be immersed in hot water (55 °C) for 5 minutes, removed, dried, and stored.
- In the spring, use Fundozol, its concentration in the working solution is 0.2%.
Pathogens can be present in the soil, so after you have treated the gladioli bulbs before planting, you need to know how to treat the soil in the flower bed in the spring before planting and in the fall after the corms are harvested.
Comment! An annual change of planting site is the best prevention of any diseases. Clearing the soil of infection occurs within 4–5 years.
In the spring, the soil can be treated with Fitosporin, and in the fall, the drug “Carbation” (3%) can be applied. Product consumption per square meter of flower bed is 5 liters. The effect of use occurs after 5 days.
Pest Control
Thrips are small, black insects up to 1.5 mm long. The likelihood of thrips infection is higher if the bulbs are stored in a room with a temperature of 10 °C or higher.
The bulbs are spoiled by thrips larvae, they suck out their juice. Symptoms indicating infection:
- first phase - silvery spots on tubers;
- later a plaque (sticky) appears;
- Closer to spring, the bulbs darken and wrinkle.
How to treat gladioli against thrips in the fall to save planting material:
- keep in hot water (50 °C);
- spray with karbofos (0.4% solution);
- dry, sprinkle with chalk, and store.
After treating gladioli for thrips, they should be inspected regularly. Place those bulbs on which thrips have nevertheless appeared in a paper bag, and put naphthalene tablets in there - 15 tablets per 1 kg of planting material. In the spring, before planting, destroy the bulbs with obvious signs of infection, treat healthy ones with a mixture of karbofos and foundationol (0.2% solution).
Another dangerous pest is the onion mite. The insect size is 1 mm, the color is pale yellow. The pest penetrates into the bulb through the bottom. Plants infected with onion mites are retarded in development, most of the leaves turn yellow and wither.
Bulbs affected by mites rot and dry out over time. In autumn, the tubers are kept in hot water for 5 minutes, dried, and sprayed with the prepared solution of karbofos (10%).
Popular preparations for treating gladioli in spring:
- Fundazol;
- Fundazim;
- Maksim;
- Fitosporin.
These are systemic fungicides with a broad spectrum of action. They can be used to treat seeds before planting, disinfect the soil, and spray vegetative plants. In the absence of these drugs, the bulbs can be treated with a solution of potassium permanganate. Soak them for at least an hour.
Improving germination
How best to treat gladioli bulbs before planting to speed up germination is not an idle question. The sooner the bulbs sprout, the faster the gladioli will bloom, the better the quality of the planting material dug up in the fall.
Soaking in water at room temperature is considered a good stimulus. The best results are achieved by using growth stimulants:
- soak gladioli corms for 2 hours in a container with 0.2% sodium humate solution;
- soak for 5 hours in Epin solution, consumption 2.5 ml of the drug per 5 liters of water;
- keep for 9 hours in a solution of copper sulfate (5 g/l).
After any of these treatments, gladiolus corms need to be kept in a solution of potassium permanganate, the optimal time is 30 minutes.
Recommendations for planting gladioli
What a novice gardener needs to know:
- The preparation of gladioli bulbs in the southern regions begins in early March, in the central regions - in the first ten days of April, in the North-Western District, Siberia and the Urals - at the end of April.
- Planting of flower crops is carried out in soil heated to a temperature of +10 ° C, in sunny places protected from cold winds.
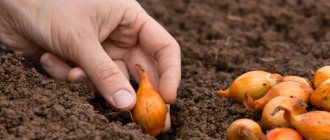
- The distance between corms is 10 - 15 cm, between rows - 25 - 30 cm. For children, a distance of 4 - 5 cm is recommended; between rows - 20 - 25.
- The planting depth depends on the size of the bulb: the larger it is, the more deepening is required. For small and medium tubers this will be 2 - 3 cm, for large ones the optimal depth is 4 - 6 cm.
- Under no circumstances should fresh organic fertilizers be added to the soil under gladioli.
- The soil should be loose, moisture-permeable, loamy or sandy loam, with a slightly acidic reaction. Flowers cannot tolerate even short-term stagnation of moisture, so they need a drainage layer of coarse river sand.
- It is best to prepare the soil in the fall. At high acidity, add dolomite flour or lime, add 100 g of superphosphate and 40 g of sodium sulfate per 1 square meter. m plot. In spring, 30 g of urea, 50 g of wood ash, 40 g of superphosphate are added to the soil per square meter. m.
- It is recommended to change the planting location of the flower crop annually.
- Gladioli can be treated against thrips with garlic infusion - 100 g of garlic juice per 1 liter of water, soaking for 2 - 3 hours.
- You can also disinfect tubers using an infusion of wood ash (2 tablespoons of ash per 1 liter of water). They are soaked for a day, which further stimulates the growth of flowers.
- After each treatment, the corms are thoroughly dried in air.
- It is good to spill the soil with garlic infusion before planting gladioli. In addition, garlic can be planted along the edges of a flower bed: it will perfectly protect gladioli from pests.
- To protect exquisite flowers from rot and fusarium, it is effective to plant marigolds, calendula, and nasturtium in close proximity.
Important! All solutions for treatment in spring should be at a warm temperature (30 - 35 ° C), which enhances the effect.
Gladioli babies
Children of gladioli are a special topic. You need to know how to treat gladioli babies before planting in order to prevent possible diseases. Preparing them for planting begins with cleaning them from hard scales. They serve as an obstacle to germination. The size of gladiolus babies suitable for planting is 6-8 mm.
Important! When selecting planting material, you need to take into account that there are varieties whose children are always small.
Upon visual inspection, the gladiolus bulbs should have several root tubercles. To speed up the labor-intensive process of removing scales, the babies can be treated: soak in a solution of manganese for 12 hours or for a day in a solution of baking soda. After treatment, clearing gladioli from scales can be done faster; potassium permanganate accelerates germination.
Potassium permanganate is a proven remedy for most diseases of gladioli. After cleaning, treat the children, like gladioli bulbs, with any fungicide; the better the treatment, the healthier the plants.
Preparing the landing site
Gladioli have their own little secrets. Knowing them and following some recommendations for planting and care, growing gladioli will turn into an easy task that pleases the soul.
- A carefully thought out landing site will provide half the success. Tall plants do not like sharp gusts of wind that break their stems, knocking buds and blossoming flowers to the ground. It is better to allocate an area for planting on the leeward side, under the protection of a building or fence.
- Gladiolus does not like to grow twice in the same place.
- The composition of the soil is very important. In an alkaline environment, the bulbs die. (We talked about how to correctly determine soil acidity in this article How to determine soil acidity)
- The planting site must receive enough sunlight, otherwise the flowers will be small and inconspicuous.
- Excess moisture provokes rotting. Watering should be moderate, and the bed should be on a slight elevation.
When planting gladioli prepared for planting in the spring, you should immediately think about the convenience of autumn digging. To do this, the soil must be fairly light and crumbly. It is recommended to add sand, wood ash or a little sawdust to the holes; this will loosen and lighten the soil. If there is a goal to collect daughter bulbs of gladioli in the fall, then planting should be done in special planting grids. These mesh plastic structures make it easier to dig up underground parts of plants without damaging them.
Sprouting bulbs
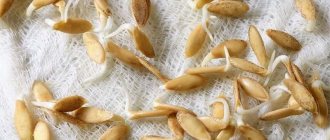
Gladioli bulbs are germinated at a temperature of 15 °C. Take out the seeds 2 weeks before planting in the ground. Auxiliary materials that can be used:
- sphagnum moss;
- sawdust (dry);
- thick paper.
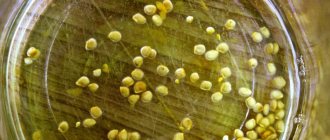
Seeds are placed on moistened material, buds up, in one or two rows. The bulbs are first cleaned, disinfected, and immediately before germination they are treated with microelements.
Processing time for gladioli is 12 hours. Consumption of microelements per 10 liters of solution:
- manganese crystals (2 g);
- boric acid (3 g);
- zinc sulfate (0.5 g);
- magnesium sulfate (2.5 g);
- cobalt nitrate (0.8 g);
- copper sulfate (3 g).
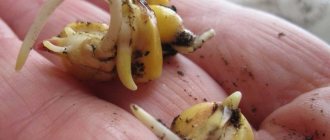
You cannot change the dosage; an overdose does not accelerate, but slows down the growth processes in gladioli. The buds should hatch and within one to two weeks turn from small green tubercles into small sprouts (1–3 cm). By this time, the tubercles should swell in the root area.
Advice! The appearance of long roots on a gladiolus bulb is not desirable; they can be damaged during planting, this impairs adaptation and delays flowering.
Such corms can be planted in a flower bed. Right before planting, prepare a solution of the “Maxim” preparation and soak them for 2 hours.
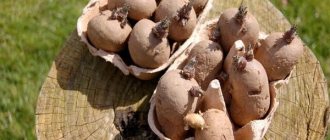
Inspection of gladioli bulbs after winter storage
There are many varieties of gladioli, but the rules for storage, preparation, processing of bulbs and planting are the same. When starting to inspect the bulbs, you need to clearly understand which ones are suitable for planting, and which ones need to pay close attention. The procedure for preparing for planting in the spring must be followed step by step.
Gladiolus variety "Krispy Raffle"
Winter lasts a long time and it is impossible to say with certainty how well the planting material was preserved during storage. Gladioli are not considered a capricious plant, but violation of storage conditions can negate last year's efforts. The most common mistake is storing in a cold room, unprotected from frost. Such storage will lead to the fact that in the spring you will end up with empty skins on your hands, and the bulb will wrinkle and dry out. The entire stock will have to be sent to the trash heap.
You shouldn't overheat the bulbs either. This will provoke premature germination of the arrow, and where should it go in the middle of winter? The best option would be a dark corner in the cellar, away from vegetables and fruits. Or in an apartment between the frames, on a glassed-in loggia. The optimal storage temperature is 8 - 10 degrees Celsius.
If the storage conditions are met and the seed material is properly dried and processed, then the bulbs will easily survive the harsh winter. Inspection should begin 2-3 weeks before planting. The time to prepare gladioli for planting is calculated based on the timing of planting them in the ground. In mid-latitudes, the optimal time is early May.
It is necessary to clean the bulbs from exfoliated husks and carefully examine them from all sides in good lighting. If decaying stains or mechanical damage are detected, you need to remove them with a sharp knife, and sprinkle the cut area with activated carbon powder or treat it with a solution of brilliant green. Bulbs that are soft to the touch and have large areas of rotting on them will have to be thrown away.
The surface of a healthy bulb is shiny, with glossy highlights. The buds are clearly visible at the top, and the tubercles of future roots protrude from below.
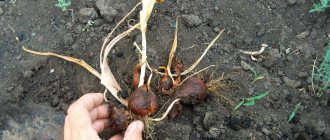
Harvesting bulbs
We figured out how to treat the gladioli bulbs before planting, the summer has passed, and the flowers have pleased us with abundant blooms. New questions arise: when to dig, how to store planting material until spring. Dry stems and leaves are signs that the bulbs can be dug.
Gladioli are harvested while the average daily temperature is above zero. It is advisable that the soil be dry. In rainy weather, the flowers can be covered so that the soil does not get wet and the gladiolus bulbs are dry when digging. PVC film is used to protect against rain, and spunbond to protect against cold air. All irrigation work is completed 2 weeks before harvesting.
Important! A week before digging, cut the stem at a height of 15 cm. This technique accelerates the ripening of the corms.
They dig around the bush and pull the gladiolus by the rest of the stem. If the plant comes out of the ground easily, it means that the gladiolus is ready for harvesting and the corms are ripe; if the roots are firmly in the ground, put off the digging for two days until the corms are completely ripe.
When to dig up diseased gladioli
The leaves of gladioli are often affected by spots, especially if the summer was rainy and not very warm. This indicates that the plant is suffering from a fungal disease and looks like this:
If the lesion is quite large-scale, and not two or three spots on the entire plant, it makes sense to dig up the corms earlier than usual so that they, too, are not affected by the disease.
Treatment
If necessary, treat the dug up gladioli - rinse in a bucket of water to remove soil. Remove stems that are easily separated completely; cut off those that are firmly in place, leaving stumps 1 cm high. Gladiolus bulbs are inspected to identify and reject diseased and pest-affected specimens. The rotten and infected are destroyed.
Advice! Process the peeled corms. Soak in manganese solution for 20 minutes. Dry in a draft.
After processing, all onions are laid out by variety and size, dried in apartment conditions (25 °C) for at least 3 weeks. You can dry gladioli next to the radiator.
How to prepare gladioli corms for storage
Treated gladioli are placed on a dry, clean litter and dried for 10-15 days at a temperature of +25 - +30 degrees in the open air or indoors with good ventilation.
GALE
I keep it at the top of the kitchen cabinet near the hood.
After this, we carefully separate the replacement, young corm from the old one and the remnants of the roots. If we have properly cared for our gladioli, the bulb will be wrinkled, small, almost hidden in the roots. We separate the children. Many people do not like to tinker with them, however, it is better to spend time on them if you want to preserve the variety for a long time.
Sveta2609 Member of FORUMHOUSE
It's not difficult to collect children. I choose the largest ones, the size of a pea, and store them in a nylon stocking in the refrigerator. If you save only large bulbs, then after 3-4 years you can lose half of the varieties, because Gladioli bulbs degenerate over time. And the large children will begin to bloom in a year.
We send the young corms for further drying for another three weeks to a month at +18-+22 degrees. Children dry in less time; they cannot be allowed to dry out. And corms need a minimum amount of moisture for successful storage.