Is it necessary to germinate potatoes before planting and why?
Well-prepared planting material will demonstrate rapid germination , the absence of empty nests and a bountiful harvest. Unprepared seed material will germinate slowly, grow poorly, and produce a meager harvest.
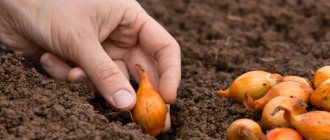
Sprouted planting material guarantees better germination
When and how long to germinate potatoes?
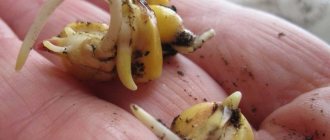
Weak, rotten, damaged seeds are rejected. Tubers with very large, fragile shoots are also not suitable for planting. During transportation, the thin long roots will easily break and the potatoes will not germinate.
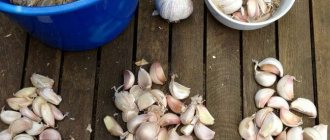
What tubers should I take?
to prepare planting material in the fall . Suitable for planting are medium-sized, slightly larger than an egg. This is the most optimal size. A small variety will be weak, will not produce a viable root, and will not provide the shoots with sufficient nutrition.
It would be correct to cut a large tuber into pieces, making sure that each one has eyes.
Why do potatoes degenerate?
If the preparation of planting material is approached irresponsibly, the crop begins to degenerate and loses its positive varietal qualities. This happens because weak, non-standard options are accepted for landing.
Choosing low-quality potatoes for planting will logically lead to negative results.
Large planting potatoes are also not suitable . It will be difficult to “wake him up.” Such seeds are sluggish, inactive, “lazy”.
How to germinate potatoes for planting
The preparation looks like this:
- The tubers are removed from the vegetable storage , sorted again, and seeds with signs of disease and rotten seeds are rejected. It is recommended to wash the selected specimens thoroughly. Pathogenic bacteria that are dangerous to root crops can persist in the soil for a long time.
- Then, dressing is recommended to protect the planting material as much as possible from harmful spores and bacteria. For this you can use boric acid (10 g per liter of water).
- At the next stage, the tubers are dried . It is better to do this in the shade, in a shed or attic.
- After the potatoes have dried, they need to be heated at room temperature for several days .
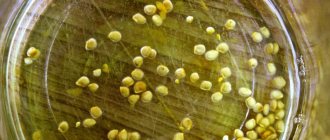
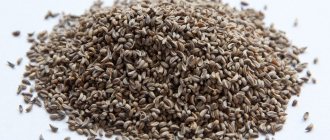
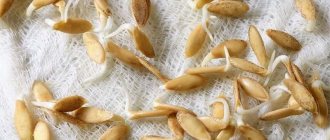
How to obtain planting material from seeds
Immediately after digging, the potatoes must be subjected to the first preparation procedure for storage. It needs to be “greened”. To do this, the tubers must be laid out in the sun. To ensure even exposure to sunlight, they need to be turned regularly. How much green do you need? About 3 weeks.
treated in this way become hard, the skin becomes woody , which significantly improves its storage. In addition, it becomes inedible for rodents (green potatoes contain poisonous solanine).
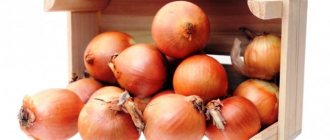
Next, the tubers are stored in a dark, cool room (basement, cellar, especially vegetable storage). The optimal storage temperature is +5°. If the temperature is higher, the seeds will begin to germinate. If the temperature drops to 0°, the potatoes will freeze.
Potatoes turn green due to the presence of solanine, which protects them from pests
How to quickly germinate potatoes for planting
Thanks to these types of processing, potato sprouts will appear in record time : in a week, in two. You can also recommend the use of plant growth stimulants and fertilizers. They stimulate intensive root growth.
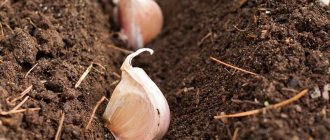
Planting sprouted potatoes
When planting sprouted potatoes, it is necessary to take into account the region, type of planting, ripening time and soil characteristics.
The “flat” type of landing is the most common. Suitable for good, sunny areas. Potatoes are planted in holes and covered with soil without a hill.
The “comb” method is intended for the territory of Siberia. Potatoes are planted on high ground, in shallow holes. Fertilizer is applied immediately. As the bush grows, it is hilled up and covered with earth .
Planting a crop in Siberia requires a certain method due to climatic conditions
This protects the plant from temperature changes and adverse weather conditions. The risk of potatoes freezing is reduced.
The “trench” method is used on light peat and sandy soils. In such soil, plants lack moisture. For this type of planting, a ditch of about 10 cm is dug and fertilizers are applied.
The hole is spilled and filled with soil. You can cover the top with mulch to retain moisture.
Planting sprouted potatoes
Once the tubers have sprouted, they are ready to plant. The ground is plowed or dug up, peat and manure are distributed, holes are made 20-30 centimeters deep and with the same spacing. Place one sprouted fruit with the sprout down in each hole, add a glass of ash and fill the hole with earth. Potatoes are planted in rows.
When the entire area is planted, the soil is spilled with water. After a few days, the potatoes will begin to emerge from the ground. After 2 weeks, they begin to weed the potatoes to remove weeds and grass. By mid-summer, potato bushes hill up the soil. Weeding and hilling have a positive effect on the growth of fruits, as well as on their health and taste.
Potatoes grow by the end of summer. The first fruits can be tasted already in early August. Subsequently, the potatoes are dug out of the ground before frost and dried, and then stored for storage.
Potatoes must be sprouted, as this guarantees their rapid germination and tuber growth. Sprouted potatoes grow well and do not require much care and attention.
Germination methods
There are several germination options . They all help prepare the seeds before planting. Which option to choose is a personal matter for each gardener. The most popular methods are the following:
This method is quite simple and effective. In the dark, germination is slow and the shoots are thin. It is worth periodically monitoring the length of the sprouts. To slow down their growth, you need to lower the room temperature.
The recommended germination period is about 20 days. A necessary condition for this type of germination is maintaining a constant level of humidity. Tubers must be sprayed regularly.
A prerequisite is the presence of sunlight. It can also germinate without light. But such seedlings will be weak and inactive.
If the sun's rays are too intense in the room, the tubers must be shaded by covering them with newspapers. The germination rate depends on the room temperature. The warmer it is, the faster the sprouts will hatch.
If the place chosen for germination does not have natural light, fluorescent lamps are suitable.
- At the very beginning, it is recommended to disinfect and feed the tubers. Disinfection can be carried out with a solution of potassium permanganate (about 2 g per bucket of water).
- After a week, treat the tubers with a complex of mineral fertilizers.
- Then it is advisable to lower the temperature at the storage location to 20° , and after a week to 15°. This can be achieved by opening all the windows and doors.
- A couple of days before planting, potatoes need to be hardened off. To do this, the seeds are covered with light and the room temperature is reduced to +10°. After this procedure, germination increases significantly.
Mineral fertilizer for potatoes
The fastest and most effective method of germination. The tubers are laid out in one or two layers in peat, hay or sawdust. A prerequisite is that the substrate should not dry out, otherwise the tender sprouts will dry out. Typically, sprouts form within 20 days.
The boxes should not be sealed , water should not stagnate. A constant supply of air is also important. The room must be heated, with a temperature not lower than +12°.
It is better not to water the soil in the boxes, but to spray it with water with fertilizers dissolved in it (potatoes love potassium salt and superphosphate).
- First, the seeds must be treated with fertilizer or an EM preparation. This will nourish the tuber with vitamins and start the mechanism of growth and development.
- Place the tubers in prepared boxes or boxes.
- The sawdust is filled with water, then lightly squeezed out and distributed over the potatoes, completely covering them .
- The boxes can be stacked one on top of the other. The main thing is to make sure that the sawdust does not dry out.
- If it is not possible to place the boxes indoors, you can arrange planting material for germination directly in the garden. To do this, you need to use a manure “cushion” with a height of at least 30 cm. The process of laying seeds is the same: lay out the tubers and sprinkle with a damp substrate.
Related article: Azofoska for potatoes: instructions and fertilizer rates
Sprouting potatoes in a box
It is necessary to ensure that the length of the sprouts does not exceed the diameter of the tuber itself . Such seeds are not viable. They will be severely damaged during planting.
Pre-drying
In a couple of weeks the potatoes will be ripe for planting. Heat and light will start the process of seed germination. The higher the temperature, the faster the sprouts will appear.
In polyethylene
effectively germinate potatoes in your own apartment . For this purpose, durable plastic bags will come to the rescue. It is necessary to make several small holes in them for ventilation.
Each bag can contain about 10 tubers. Then the bag is tied and hung in the apartment on the sunny side.
Periodically, it is necessary to turn the bag over so that the sun's rays evenly affect the tubers. Excessive sunlight should be avoided.
Ready seeds can be transported directly in bags , but very carefully so as not to damage the sprouts.
Germination in boxes with fertilizers
Planting material prepared in this way is of high quality and strong.
- To do this, you will need boxes lined with cellophane. Potatoes are laid out in several layers, which are covered with peat, humus or sawdust. You can make several layers.
- When everything is packed, you need to spill the boxes with water . A week later, when the sprouts hatch, they need to be watered with a nutritious mineral mixture. To do this, take 10 g of potassium chloride and nitrate and combine with 50 g of superphosphate. Stir the mixture in a bucket of clean water and pour over the tubers. Fertilizers can be replaced with a glass of wood ash per 10 liters of water.
- After a couple of days, repeat the vitamin watering.
- After a week, the tubers will be ready for planting.
This germination method is convenient for small quantities of planting material and if germination is planned to be carried out in an apartment. To do this, the tubers are first placed for a week in a box with wet sawdust . After this, the seeds are distributed into clay pots with nutritious soil.
Regular feeding of tubers with mineral fertilizers is recommended. At night, it is better to take the pots out onto the balcony to prepare the tubers for possible temperature changes. Hardening at temperatures below +10° is not recommended.
Dressing potatoes
The process of preparing seeds before planting should include a procedure for dressing the tubers. It includes treating seeds with insecticides, growth stimulants and fertilizers.
Biostimulants for root formation are also . The list of them on the market is huge. The drugs “Poteitin” and “Mikom” are widely known. To increase the resistance of tubers to diseases, copper sulfate, superphosphate, and microelements are used. More information about spraying options can be found in specialized stores.
Germination outdoors
A very convenient and simple way, in case of lack of suitable premises. Germination in the garden can begin when the snow melts and the air temperature warms up to +10°. A layer of dry straw, sawdust or peat is laid on the ground.
Dry potatoes are laid out in 1 - 2 layers . The resulting ridge is covered with a film that will protect against night frosts and create a greenhouse effect favorable for germination. The process will take from 1 to 3 weeks.
If you put a layer of manure under the dry bedding, the germination time will be significantly reduced.
Potato seedlings
It is necessary to ensure that a comfortable temperature and humidity are maintained. You can plant ready-made green seedlings in open ground when the soil has warmed up enough and the danger of frost has passed.
Dressing potatoes
Before you learn how to plant sprouted potatoes, you need to learn more about dressing them. This is a mandatory process that helps minimize possible crop losses due to pest attacks or the spread of diseases.
Not only insecticides are used, but also various drugs that stimulate plant growth. Treatment can also be carried out with fertilizers, which guarantee a protective barrier for the tubers. To prevent your potatoes from being threatened by wireworms, mole crickets or other parasites, you can purchase “Cruiser” or the popular “Prestige” preparations. A product called “Maxim” is no less popular.
Advice! You must strictly follow the instructions that accompany each package of dressing product.
“Mikom” has proven itself well as an excellent biostimulator for the formation of the root system. Many gardeners alternatively buy Poteytin, which has a similar operating principle.
Secrets to improve your harvest
To increase the quantity and quality of the harvest, you need to take into account the following tips from experienced gardeners:
- Treatment with a mineral complex is recommended on the day of planting. The tubers are soaked in fertilizer for several hours, dried and immediately planted.
- It is easier to fertilize large quantities of planting potatoes . The procedure must be performed every week for a month.
- A day before planting, it is recommended to treat the tubers with a growth stimulator. This will activate germination, speed up metabolism and increase yield.
- If there is no special planting material, you can prepare the seed yourself from ordinary potatoes. To do this, large tubers are cut into several parts so that each has eyes. Such manipulation is carried out not only for reasons of economy. In a cut tuber, stress hormones are produced , and the process of accelerated regeneration and root formation begins.
- Mulch will help retain moisture and nutrition in the soil for a long time.
Mulching potatoes
Don’t be lazy when preparing seed potatoes for planting. There are many ways to process planting material. This can be done with minimal financial and time costs: in the basement, in the garden, and even in your own apartment.
Well-sprouted tubers can produce an early, abundant harvest. And applying all the secrets and recommendations proposed in this article will help increase your potato yield significantly .
Selection of tubers for germination
Planting material must be of high quality. The following requirements apply to it:
- healthy tubers; You should not take sick or infected rotten tubers for germination;
- medium-sized tubers; there is no need to use potatoes weighing less than 30 grams for planting;
- Tubers have a regular and even shape; curved tubers produce an uneven bush.
Attention! The optimal weight of one tuber for planting is in the range of 50-60 grams. Excessively large fruits weighing 100 grams or more are cut in half.
Why germinate potatoes before planting?
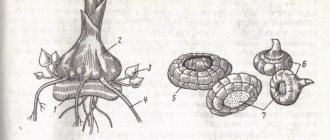
What do potatoes sprout from? The process begins with the upper eyes. As a rule, one bud grows. Breaking off seedlings inhibits the development and growth of the plant and weakens the growth processes of tubers.
Correct and timely preparation triggers the biological processes of sprout formation and root development. After germination, the planting material is sorted - rotten, unproductive tubers with weak or without seedlings are removed. As a result, after planting, friendly, strong and healthy seedlings appear.
Potato seedlings
Potato seedlings begin to be grown several weeks before planting in the ground. Pre-prepared root crops are planted in pots or boxes with soil. Then they are placed in a greenhouse or greenhouse. Seedlings should be planted after the soil and air have completely warmed up. The seedling method will allow you to dig up early young potatoes.
Selection of tubers and preparation of potatoes
In the fall, seed material is selected and subjected to landscaping - a procedure that increases the safety of tubers. The potatoes are left for a week in a lighted place, turning them over periodically. The tubers become hard, do not lose moisture, mice do not touch them in storage, and the wounds heal faster. They are stored at a temperature of +4°C and air humidity of 60-65%. An increase in indicators leads to the premature appearance of sprouts, and a decrease leads to freezing of the material.
20-40 days before the intended planting, the harvested potatoes are taken out of the cellar and taken out into the sunlight. Then they are re-sorted, those unsuitable for planting are discarded, calibrated and washed under running water to remove residual soil and pathogenic bacteria.
Before germinating potatoes, planting material is treated with disinfecting solutions:
- 10 g of boric acid per 10 liters of water;
- 10 g of copper sulfate, 2 g of potassium permanganate, 10 g of boric acid per 10 liters of water;
- wood ash for dusting;
- "Fitosporin-M", "Prestige" according to the instructions on the package.
Additional processing increases the plant’s immunity to fungal diseases and insect attacks.
Healthy tubers with hatched eyes are suitable for germination. Practice shows that the best results can be achieved when planting tubers weighing 100 g.
Large potatoes have a greater supply of nutritional components than small ones. After planting, the tops quickly grow until they exhaust the reserves contained in the tubers. The development of the rhizome is noticeably delayed. After the tuber gives up its reserves, the underground part will not be able to fully satisfy the needs of the green mass. The situation will return to normal once balance is restored.
Experienced farmers recommend cutting large potatoes into pieces 3-4 days before planting, leaving at least three eyes on each piece. During this period, the cut will have time to cork, blocking access to pathogenic fungi and bacteria.
Planting small tubers will not provide you with a rich harvest. You will have to put 2-3 potatoes in the holes to make the most of the space. Digging such nests will be inconvenient due to the risk of damaging the tubers with a shovel.
Reference. Some certified elite varieties have small planting tubers that produce a full-fledged bush of selected potatoes.
Selection and calibration of potatoes
After the harvest is harvested, care must be taken to select the highest quality tubers for seed. They must be sorted by weight and size. For planting, you need to choose tubers whose size does not exceed the size of a chicken egg. Try to avoid specimens that are infested with pests, show signs of disease, or are injured during digging. Thus, it is necessary to select potatoes for planting that are free from any defects. Otherwise it will not be stored. Before planting, the tubers need another careful review. At the same time, those that have signs of frostbite, are spoiled by pests, suffocated during storage, are affected by rot, or are ugly are rejected. Only healthy tubers can ensure an increase in yield of up to thirty-six percent and reduce the time from planting to digging potatoes by ten to fourteen days.
Germination methods
Many methods are used to germinate potatoes before planting, each of them is effective. The difference lies in the time and labor involved.
Germination in the light is a classic method that allows you to get the expected result . Any room with the ability to maintain an air temperature of +12...+16°C and diffused light is suitable for this purpose.
Article on the topic: Caring for potato seedlings: feeding and processing of bushes
The prepared tubers are placed in ventilated boxes, with a thin white cloth and filter paper placed on top. In such conditions, seedlings appear in 30-40 days. They “sit” firmly on the tubers and do not break off during transportation. To plant potatoes in early May, the seeds are taken out of storage in late March - early April.
Advice. If it is not possible to create the right conditions, use fluorescent lamps for illumination. The lighting time for tubers is 8-10 hours.
Sprouting potatoes in the dark is the easiest and most commonly used method. The prepared tubers are placed in containers and left in a dark, ventilated room. Optimum air temperature +14…+16°С. The disadvantage of this method is that the seedlings grow white, long and brittle. Planting is carried out extremely carefully, trying not to break them off.
Wet germination
The essence of this method is to place the tubers in a humid environment, which accelerates the formation of seedlings and roots. The prepared material is placed in boxes filled with a breathable substrate: peat, humus, sawdust.
A layer of wet substrate is placed at the bottom of the box, the potatoes are laid out in one layer and covered with sawdust or peat. Form no more than four layers, otherwise air circulation will be difficult. The gap between tubers is 1-2 cm. The height of the layer of sawdust or peat is 3 cm.
The planting material is periodically moistened using a sprayer. The optimal air temperature is not lower than +12°C and not higher than +25°C. Germination time is 12-15 days.
Important! During the germination process, make sure that the sprouts do not exceed the size of the tubers, otherwise they will break off during transportation.
In polyethylene film
This method is suitable for germinating potatoes in a city apartment. Processed potatoes are placed in a thick plastic bag - 12 pcs. in each. Holes are made in the bags for air circulation and hung on hooks near the window. The bags are rotated regularly so that the tubers are illuminated from all sides. Sprouts appear after 3 weeks.
In pots
This method is not particularly popular among gardeners due to the labor-intensive process. 30 days before planting, the seed material is placed in wet sawdust, and 7-10 days later - in clay pots filled with a mixture of light substrate and humus.
The containers are placed near the window. The optimal room temperature is +12…+14°C. After the seedlings appear, the pots are taken outside during the day for hardening, and put away indoors at night. The seedlings grow strong and produce a large harvest.
In boxes with fertilizers
This method is identical to germinating potatoes in the light, with the difference that nutritional supplements are added to the container. Prepared tubers are placed in boxes with holes, the bottom is lined with peat mixed with humus. Place 2-3 cm of nutrient mixture on top of the tubers. This is how 6-8 layers are formed.
Next, the box is spilled with water using a watering can and placed in a room with a temperature of +15...+17°C . After the sprouts appear, the tubers are watered with a mineral solution - 10 g of potassium chloride, 10 g of ammonium nitrate, 10 g of superphosphate, 2 g of boron and copper per 10 liters of water, sprinkled with wood ash - 200 g per 10 liters of water. After 2-3 days, the boxes are re-watered with clean water.
After 7 days of such feeding, roots form on the tubers, which indicate the readiness of the material for planting.
On open air
For germination, choose a flat area in the yard and lay out straw or dry peat. The tubers are laid out in rows 1.5 m wide, in 2-3 layers, with a layer of soil on top. A gap of 1 m is left between the rows. At night, the potatoes are covered with film to protect them from frost. Seedlings and roots appear within a month.
Drying and heating
These methods are used if it was not possible to get the tubers out of storage in time. For drying, the tubers are laid out in one layer in a dry room at an air temperature of +18...+25°C, and left for 10-14 days. During this time, enzymes and nutritional components accumulate in the tubers, promoting the pecking of the eyes. Such potatoes will sprout vigorously after planting.
Warming up the seed material in order to awaken the tubers is carried out 3-4 days before planting. The temperature is increased gradually, starting from +10°C for 3-4 days, and up to +25°C.
Combined method
This technique allows you to get early potatoes. The preparation of tubers for germination begins 35-40 days before planting. First, they are germinated in the light until strong, thick shoots appear. Then they are placed in boxes with a humid environment. The first layer of tubers is placed in a damp layer of substrate 5 cm thick. The soil is spilled with a nutrient solution: 60 g of superphosphate, 30 g of potassium chloride per 10 liters of water.
The boxes are kept indoors at a temperature of +20…+22°C. In such conditions, potatoes germinate in 2-3 days. To prevent root overgrowth, the temperature is reduced to +12…+14°C.
Brief answers to popular questions about sprouting potatoes
When should I plant tubers for germination?
A month to a month and a half before planting, depending on the method of germination and the required length of the sprouts.
Is it possible to germinate tubers in special solutions for their processing?
No, this procedure is not recommended. The fact is that tubers can be kept in such solutions for no more than a day (and preferably about 5-10 minutes, maximum 20-30 minutes), but germination takes a much longer time.
What is the best way to germinate potato tubers - in the light or in the dark?
Everyone comes to the answer to this question independently (the arguments for each method are described in separate paragraphs).
If the tubers are healthy, then in essence there is no big difference - to germinate in the light or in the dark. Light germination does not rid the tuber of all, of course, but of some diseases and pests. However, it is in the dark that diseases manifest themselves better, and diseased tubers can be immediately discarded.
Is there a compromise?
Yes, this is the initial germination in the dark and subsequent germination in the light (described in detail in the corresponding paragraph).
Which germination method has the best yield?
There is no statistically reliable information, but there is some information on disease resistance: those sprouted in the light are noticeably better at resisting diseases and pests.
The tips of the sprouts turned black during germination, what should I do?
If the sprouts begin to turn black , then this may be a manifestation of some disease or the presence of a virus. Often, potatoes with black sprouts end up with late blight .
By the way! Be sure to wash the nodules well before germination. Sometimes, even at this stage, you can also detect an infection with rhizoctonia (also called “black scab” ) - it looks like stuck dirt that cannot be cleaned off. You can't plant such potatoes!
Thus, there is a fairly widespread opinion that the formation of black sprouts (their blackening during the germination process) is a sure indicator that the tuber is 100% infected with some kind of disease (infection, possibly viral).
However, it is not at all necessary that this is a disease. A dense corky layer can form in the black sprout (its tip), which helps the sprout break through the soil. For example, this could be a specific varietal trait.
By the way! Rejected potatoes (with blackened sprout tips) can be used for food .
In any case, you need to look at the general condition of the tuber and sprout. A healthy tuber has vigorous sprouts.
Is it possible to break off overgrown sprouts?
Under no circumstances should the sprouts be broken off: each such breakage will reduce the yield of the tubers.
So what to do?
Promptly remove tubers with overgrown sprouts into the light to slow down their growth, or into a cooler room (lower the temperature).
Well, you have received all the information about sprouting potatoes, now it’s up to you! Try it, experiment! Find your way!
Advice! After germination, do not forget to treat the potatoes by treating them in one of the fungicidal and/or insecticidal solutions.
How to quickly germinate potatoes
Express methods are used to quickly germinate potatoes before planting - stimulating cuts, soaking in nutrient solutions, growth stimulants.
Stimulating incisions
How to stimulate the germination of potato tubers? Applying stimulating ring cuts 1 cm deep accelerates the formation of stems and stolons. The manipulation is carried out with a sharp knife, wetting it each time in a solution of potassium permanganate. The cuts are made diagonally, without touching the eyes.
A transverse cut is made perpendicular to the axis so that only 1 cm of the tuber remains uncut. This ensures an even distribution of nutrients between the eyes. As a result, bushes with a large number of stems are formed. The yield increase is 17%.
The prepared tubers are rolled in wood ash, placed in boxes, sprinkled with sawdust and left in a dry, cool cellar.
Using Nutrient Solutions
Seed potatoes are treated with nutrient solutions 48 hours before germination. This accelerates germination and tuberization, increases yield by 10–13%.
Recipes for solutions:
- 40 g of superphosphate, 40 g of potassium salt per 10 liters of water;
- 1 kg of wood ash, 2 g of copper, 2 g of bromine per 10 liters of water;
- 30 g of potassium sulfate, 15 g of boric acid, 40 g of urea, 1 g of copper sulfate, 0.5 g of potassium permanganate;
- 40 g of urea, 60 g of superphosphate, 10 g of boric acid, 5 g of copper sulfate, 1 g of potassium permanganate per 10 liters of hot water.
Processing sprouted potatoes before planting
1-2 days before planting, sprouted tubers are treated with growth stimulants, which activate the plant’s defenses, accelerate the formation of seedlings, and increase the plant’s immunity. For this purpose, the following drugs are used: Poteytin, Mikon, Epin, Bioglobin, GUM, Planriz, Potassium Humate, Fitosporin.
To protect potatoes from insect pests, tubers are sprayed with chemicals: “Matador”, “Prestige”, “Maxim”, “Quadris”. As an alternative, folk remedies are used: wood ash, Bordeaux mixture, potassium permanganate, copper sulfate.
Treatment of potato tubers during germination before planting
Today there are many preparations on sale that can be used to treat potatoes before germinating them. They protect the crop from a whole range of diseases and pests, and the methods of use are indicated in the instructions or on the labels. But are they so harmless? How can supporters of organic farming treat tubers before planting?
When germinating in the shade or in the light, potatoes are sprayed once a week with humate, phytosporin, zircon or epin. With the wet method, these drugs are added to water to water the substrate.
Important! When drying tubers, you cannot spray them!
Tips and tricks
Advice from gardeners on how to properly sprout potatoes:
- Before placing the tubers in the sprouting boxes, rinse them thoroughly under the tap to remove any remaining soil and bacteria that cause rotting.
- Leave containers with seed potatoes in a ventilated area with humidity up to 85%. At low humidity, tubers quickly wither and sprouts develop at an accelerated pace. To prevent moisture loss, spray the potatoes with a spray bottle.
- To germinate in the light, lay out the potatoes in 1-2 layers.
- To obtain early new potatoes, use a comprehensive method that involves greening and germination in a humid environment.
- Do not forget to disinfect tubers before germination. This will protect the plantings from fungal infections and insect attacks.
- The appearance of green roots on the tubers is the main sign that it is time to plant.
- This method will help speed up the appearance of roots that sprout on potato tubers - immediately after the seedlings form, place the tubers in the dark for 3-4 days.
- When transporting sprouted tubers, try not to break off the sprouts.
- If the seedlings have grown large, carefully break them out without damaging the eyes and use them to obtain potato seedlings.
How to treat potatoes during germination
To process and moisten the nutrient medium during germination, fertilizers containing potassium, phosphorus and nitrogen are used.
For this purpose, you can use a solution of the following fertilizers in water:
- ammonium nitrate (0.3%);
- potassium salt (0.3%);
- superphosphate (0.2%).
For pre-treatment of tubers, a 0.1% solution of potassium permanganate or boric acid of the same concentration is used, and a solution of “Fitosporin” is also used. Immediately before placing the tubers in a nutrient medium for germination, they can be treated with ash.
Find out also what is best to plant after potatoes.
Why sprout potatoes?
Sprouting potatoes is a useful procedure because it allows you to awaken the eyes on the tubers in advance. This ensures better survival rate, uniform shoots and an increase in yield by 30–40%. As a result of germination, strong dark green shoots 3–5 cm long should appear on the tubers.
By the end of winter, white and pink shoots often appear on potatoes that have been stored for a long time. These are the so-called shadow (etiolated) sprouts. Using them, you can determine whether the tuber is affected by late blight (by the black tips), and discard damaged planting material in advance. Lateral shoots appear on them, on which tubers are formed.
How to prepare potatoes for planting?
There are three different ways to prepare potatoes for planting:
- vernalization in the light;
- germination;
- simple heating.
But no matter what option is used, in any case, you first need to select healthy tubers, calibrating them by size. Potatoes the size of a chicken egg are considered the optimal planting material. Larger tubers, weighing 90–120 g, should already be cut into halves. You can germinate both early and late varieties - in any case, you will reap the harvest faster.
Germination timing and seed preparation
You need to start germinating tubers in advance. The timing depends on the region where you plan to grow potatoes.
Table: timing of potato germination
Having decided on the timing, you need to prepare the seed for germination. For this:
- Manually sort and remove tubers that are too small and diseased (rotten, softened, have holes, etc.).
Only healthy, undamaged small tubers are suitable as planting material.
If there is a lot of seed material and the gardener stored it correctly (which almost always guarantees good immunity), you can not soak the potatoes in a solution of potassium permanganate, but simply spray the tubers
If stored incorrectly (in a too warm and humid room), the tubers can germinate on their own ahead of time, which is usually discovered quite late. In this case, lower the temperature to +1–2 o C and provide the tubers with complete darkness. It is not advisable to remove or shorten processes if their length is less than 20 cm.
Overgrown potatoes should be stored in a cool, dark place until planting.
When to take out potatoes for germination and how long to germinate?
One of the important aspects of cultivating an agricultural crop is determining the timing of germination. You need to know exactly when to take out the potatoes so that they are already prepared for the planting season. This mainly depends on the timing of the emergence of sprouts and the ripening of the crop.
30–35 days before planting in the ground, potato seed tubers are taken out of the basement and germination begins. Early potatoes are obtained in early March. For the main plantings, the optimal time is considered to be the beginning of April.
Some gardeners are of the opinion that you need to get seeds 1.5–2 months before planting. After the sprouts reach a length of 4–6 cm, they are carefully cut off at the very base and planted in a box or greenhouse with good soil.
Basic methods of sprouting potatoes
Potatoes are sprouted in different ways.
This method can be done this way:
- Prepare the required number of transparent plastic bags and make 10–12 holes in each of them so that the tubers can be ventilated. The diameter of such holes is 1 cm, and the distance between them is 8–10 cm.
- Place 8-10 tubers in each bag and tie it.
- Hang the workpiece to the window, and if this is not possible, then place the bags on a dry windowsill in one row. Since it is usually cold near the window, it is better to place wool, cardboard or a piece of foam under the bags for warmth. Also try to place the bags in diffused light rather than in direct sunlight.
You need to make holes in the bags so that the tubers don’t suffocate
It can take 25–30 days to germinate potatoes this way. Gardeners who use this method praise it for the convenience of transporting tubers to the garden, but advise them to carefully monitor the safety of the sprouts.
In a moist substrate
This method is suitable if you want not only sprouts to form on the tubers, but also roots - for example, when germinating seeds or belatedly planting tubers in the ground. Stock up on boxes and a sufficient amount of substrate (it should hold water well and allow air to pass through). Rotted sawdust, peat, humus, perlite, and vermiculite are quite suitable.
To get the best results, you need to choose the right substrate for germinating tubers
Germination is done like this:
- A layer (3–5 cm) of wet substrate is placed at the bottom of the box.
- The tubers are laid out loosely on it.
There should be no more than 4 layers of potatoes in the sprouting box
It is not recommended to put more, as the tubers in the lower layers may suffocate. The boxes must be kept in a bright room at a temperature not lower than +12–15 o C. Do not allow the substrate to dry out and moisten it in a timely manner.
After the first roots appear, pour the nutrient mixture over the workpiece: potassium chloride (10 g) + ammonium nitrate (10 g) + superphosphate (50 g) + water (10 l). The next watering can be “fertilized” with ash at the rate of 1 cup of powder/10 liters of water. Please note that during the first watering, a bucket (10 l) of the nutrient mixture is designed for 50 kg of potatoes, and during the second - for 80 kg.
In a moist substrate, potatoes form roots and sprouts well
This method of sprouting potatoes is the fastest, since sprouts and roots form in just 10–12 days.
On open air
You can start this procedure at the end of April - beginning of May, when the snow melts and the air temperature reaches +10 o C. The procedure is as follows:
- Choose a location. It should be dry, level, free of debris and well lit.
- If possible, sprinkle a layer (5–7 cm) of dry manure on the ground. Experienced gardeners believe that this promotes faster germination of tubers.
- Place a layer (7–10 cm) of dry bedding material (straw, sawdust, peat are suitable).
It will take 15–20 days to germinate potatoes in straw in the fresh air.
It will take 15–20 days to germinate potatoes this way. During this time, try to ventilate the seed at least once every 2 days for 2–3 hours, but only in dry and warm (at least +10 o C) weather.
This is one of the simplest and most accessible ways to germinate tubers:
- Place the potatoes in the boxes in one or two layers.
- Place the workpieces in a bright room with a temperature of +18–20 o C. If direct sunlight hits the potatoes, try to make the lighting more diffuse or shade the seed with newspapers (but do not forget to remove them when the rays are elsewhere).
- After 10–12 days, the temperature in the room should be lowered to +10–14 o C to avoid stretching of the sprouts. It is advisable to maintain this temperature before moving the tubers to the garden bed.
The room where potatoes are germinated should have soft, diffused lighting.
It will take you 25–28 days to germinate tubers this way.
Germination in transparent bags
This method of germination can be used even in an apartment. You can even use regular T-shirt bags. Small holes with a diameter of no more than 1 cm must be made in the bags at a distance of 10 cm from each other. This is necessary so that the planting material has the opportunity to breathe.
Potatoes are placed in the prepared bags, then the bag is tied and hung in a dry and bright room. Thus, the potatoes are in conditions reminiscent of a greenhouse, and sprouts appear on the tubers quite quickly. But you should remember not to hang bags of potatoes in a place where the sun's rays may fall on the potatoes. In addition, the room must be well ventilated.
Periodically, bags of potatoes must be turned over so that the light falls on them equally from all sides. When removing potatoes from the bag, be careful not to break the sprouts.
Soil preparation
Preparing the soil for planting potatoes is important to ensure the yield and quality of the tubers. This process consists of a combination of the following types of work:
- Decide on the choice of place to plant potatoes . It should be well lit and moisturized. If groundwater comes close to the soil surface, ensure drainage. If planted in a shady area of the site, this will lead to loss of yield due to a lack of photosynthesis.
- Consider the soil type on your site . The vegetable loves slightly acidic soil and prepared black soil. Heavy clay and sandy soils require preliminary preparation and improvement.
- Plowing . This is the most important factor in ensuring a loose and well-ventilated layer of soil while retaining moisture, as well as the destruction of weeds and pests. When plowing, apply fertilizers to a greater depth. If plowing is manual, then its recommended depth is exactly the bayonet of a shovel.
- Crop rotation . We talked about the principles of crop rotation above (Predecessors of potatoes). It is not recommended to plant potatoes annually in the same place every year. It is highly undesirable to plant after tomatoes, peppers and eggplants. Because nightshades have the same pests and diseases. It is best to plant potatoes after legumes, carrots, beets, onions, cucumbers, and zucchini.
- Fertilizers . Relevant in areas without crop rotation, since the soil is depleted and is little restored. Ash, rich in microelements, will be an excellent fertilizer; it can be applied to any soil. For one hundred square meters it is recommended from five to ten kilograms of ash.
Fertilizers such as superphosphates and compost are best applied in the spring, before plowing.