Growing Lithops from Seeds
It is quite easy to grow lithops from seeds at home;
all you need to do is follow some recommendations and tips.
It is better to sow in March; the substrate for planting “living stones” should be poor in mineral composition, but include several main components: brick chips, turf or leaf soil, quartz sand, peat or clay. It should be dominated by sand and broken bricks, and the remaining components should be taken in equal proportions.
After preparing the substrate, it is steamed (filled with boiling water), mixed thoroughly and loosened again. When pouring into a pot, first of all, a drainage layer is formed from fine gravel or pebbles, and only after that the substrate is placed in it.
Immediately before planting, the seeds need to be soaked in water for 6-8 hours. During this time, the seed is saturated with moisture and opens, which significantly increases germination and growth rate. Seeds should be sown wet, without drying.
Lithops, which are propagated without preliminary soaking of planting material, as a rule, demonstrate lower germination.
Lithops should be sown on the surface, without sprinkling or mulching the seeds. Immediately after this, the container with the seedlings is tightly covered with glass or garden film and placed in a warm, well-lit place, thus creating greenhouse conditions close to the natural habitat of the “flowering stones.”
After this, the success of growing and developing young lithops at home depends entirely on proper care.
Temperature conditions are very important for seedlings. Thus, the temperature of +25...+30 °C, required by lithops during the day, should be replaced by a lower and softer temperature at night - +15...+18 °C. In this case, every day the container should be opened for 5-10 minutes.
It is necessary to moisten the soil with seedlings only if it is completely dry and only with the help of a sprayer,
since a regular stream will “clog” the seeds, which will slow down their growth.
Seed germination and the first appearance of seedlings can be expected within 7-10 days after planting.
With the emergence of seedlings, you should increase the frequency and time of airing the pot (4-5 times a day for 10-15 minutes). At the same time, you need to make sure that the container with the sprouts is not in a draft. Greenhouse conditions for the germination of “living stones” must be maintained, but the air in the greenhouse must not be overheated above +40 °C. Lithops should also be protected from direct sunlight.
When the size of the seedlings of “flowering stones” reaches 1 cm in height, the surface of the planting soil should be carefully mulched with small pebbles. At this time, it is permissible to treat the soil with a weak solution of potassium permanganate as a preventative measure to protect the plant from moss and mold.
Despite the possible difference in the growth rates of individual lithops, with proper home care and the creation of the required conditions, the plant begins to change leaves within six months after planting. During this period, it is necessary to sharply reduce or completely stop watering, which can only be restored after the old leaves die off.
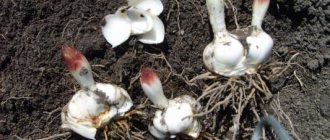
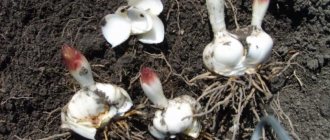
It is advisable to plant “flowering stones” for the first time no earlier than a year after sowing
In this case, it is very important that the composition of the soil in the new place does not differ much from the one in which the plant was originally located, and that the volume of the pot is sufficient for the growth of the root system. It is best to survive lithops in families, because in this case they develop faster and bloom better
Important! The root system of the plant is extremely susceptible to various kinds of manipulation, therefore, any damage to small or large roots can be detrimental to lithops. During the process of care and replanting, it is strongly recommended to treat the roots with trepidation and accuracy. Lithops is a stunning exotic plant that is increasingly grown at home, just like the usual indoor flowers
The large number of people who choose to grow lithops is easily explained by the originality of the plant and its appearance.
Lithops is a stunning exotic plant that is increasingly grown at home, just like the usual indoor flowers. The large number of people who choose to grow lithops is easily explained by the originality of the plant and its appearance.
Creating optimal conditions for a plant is quite simple - you just need to correctly place the pot with “living flowering stones” and provide them with proper care (watering and fertilizing). These simple steps will help lovers of unusual beauty quickly and easily grow lithops at home.
Seedling method
With this method, at home, you first need to grow seedlings, which are later transplanted into open ground.
Preparing for sowing
The material that is collected for planting or purchased in a store must be properly prepared for sowing, that is, placed for a couple of months in a cool, dry place with a temperature of 2 - 4 ° C. If this is not done, sprouts will still appear, but there will be fewer of them and the viability of the plants will deteriorate.
Sowing begins in February - March. At first there will not be enough light for the February seedlings, so they will not survive without additional lighting with a phytolamp and will die.
Pre-sowing treatment
Before planting, the material is processed in one of the following ways:
- treatment with 1 – 2% hydrogen peroxide solution;
- treatment with 1% bleach solution;
- treatment with 0.04% zinc sulfate solution.
Pre-soaking for 12-15 hours helps speed up germination and prevents the development of bacteria and fungi.
Soil preparation
In order to grow healthy lily seedlings, a special soil mixture is needed. It is easy to prepare from the following ingredients:
- turf land;
- leaf soil;
- coarse sand.
All components are thoroughly mixed in equal proportions, after which the mixture is calcined in the oven. Some gardeners replace half of the leaf soil with mature humus, but it should be remembered that this increases the risk of bacteria developing in the substrate.
Standard soil for seeds and seedlings purchased in stores is also suitable.
Sowing
First of all, you need to prepare pots or planting boxes for lilies. At the bottom you need to lay out a drainage layer of expanded clay or broken clay shards, covered with a layer of crushed charcoal. The drainage must be at least 2 cm thick, because a thin layer will not be able to properly remove excess moisture and provide good air exchange, which can lead to rotting of the seeds.
The pots are filled with prepared soil mixture, after which it is well moistened. After waiting for the soil to settle, add another layer and re-moisten it. After this, the seeds are evenly distributed on the surface at a distance of 1 - 1.5 cm from each other and carefully pressed into a depth of 0.5 cm. A layer of sand no more than 1 cm is poured on top.
After this, the soil is watered again, excess moisture is allowed to drain, and the planting is covered with cling film or glass.
Growing seedlings
Caring for seedlings differs at different stages of germination.
Care before sprouts appear
- The container with the crops is placed in a dark place with a temperature of 20 - 25°C.
- It is impossible to water the soil with direct streams of water from a watering can, so as not to damage the first fragile vegetative parts that may already appear underground. For watering use a fine spray. Crops should not be over-watered so as not to cause the growth of pathogenic microorganisms.
The time until the first sprouts emerge from seeds can vary greatly. You should focus on the data indicated on the bag. There are varieties with a ground type of germination, which hatch within 10 - 30 days, and there are varieties with underground germination, first forming a rhizome, and only after that forming leaves. The second type produces the first sprouts much later - from 2 months to six months, after which they need coolness. Sometimes sprouts do not appear in the year in which the seeds were sown - this is not uncommon. You shouldn’t throw them away; you just have to wait until next spring, and they will probably hatch.
Care after sprouting
Immediately after the appearance of the first seedlings, the conditions of detention change. The temperature should drop to 15 °C. Boxes or pots must be moved to a bright place with diffused light (not in direct sunlight!), because otherwise the sprouts will stretch and thin, losing their potential for normal development.
Planting lilies in the garden
Preparing the soil for lilies
First you need to dig the soil to a depth of 40 cm, and do not forget about drainage. Also add special fertilizers. If the soil is sandy, it needs to be diluted with peat, and if it is clay, it needs to be diluted with sand. Acidic soil is detrimental to lilies. Good land is one on which other plants have not yet been grown. The soil needs to be moistened throughout the season.
How and when to plant lilies in open ground
Lilies in the garden should not be replanted too often, at least once every four years. It is better to plant in groups of the same variety; it is not recommended to plant one bulb of each type together. The best time to plant lilies in the fall is September. During this period, roots actively grow. A sunny place is suitable, but it is best to shade the base of the flower. If the sun hits the plant, they can take on different shades. The landing process itself has the following stages:
- the depth of planting lilies is approximately the same as the height of two bulbs;
- a distance of about 20 cm between them;
- Before planting lily bulbs, you need to fill the hole with gravel and a little soil on top;
- put the onion in the hole and sprinkle it with earth, carefully cover it with earth, and lightly compact it;
- make small indentations and fill with fertilizer.
There are varieties of lilies that do not need to be insulated.
If you need to insulate for the winter, you can use hay, leaves or old raspberry branches in a layer of up to 30 cm. As soon as the snow melts, the shelter can be removed. It is dangerous to plant bulbs in the spring; such lilies will bloom only the next year. There is a need for good watering. It is better to plant separately from autumn ones. Summer planting should be excluded altogether - these lilies are highly susceptible to disease and do not take root well.
Obtaining lily bulbs from scales
You can get many daughter bulbs by separating the scales. This is an economical and effective method of propagation, which is suitable for varieties that produce a small number of children - Asiatic and trumpet lilies. Reproduction by scales can be carried out at any time of the year. There are two methods for preparing scales:
- Removing the bulb from the ground and subsequent manipulations:
- first wash the onions and treat them with crushed coal;
- dip them in a manganese solution, and then treat them with a growth regulator;
- place the scales in a plastic bag filled with substrate, moss or sawdust;
- close the bag and place it in a warm, dark place;
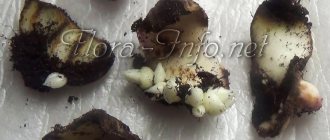
- The first bulbs appear after a month and a half at the base of the scales; they are separated and planted either in a suitable container for growing in the fall, or in open soil in the spring and summer.
Propagation of lilies by bulb scales
then you should break off no more than 1/3 of all scales from the base of the bulb;
- It is necessary to remove the soil from the plant without damaging the roots;
carefully separate the required number of scales;
Reproduction of scales in this case is completely identical to the first method. Bulbs propagated by scales should be planted to a depth of 2.5 cm, at a distance of 20 cm from each other. In this case, it is necessary that the tip protrudes slightly above the surface of the earth. Then the plants need to be sprinkled with sand, watered moderately, fertilized with peat and covered with dry leaves or film.
It will also be interesting: How to feed lilies after flowering - in August and autumn ⚜
Which seeds are suitable?
The quality of planting material is one of the main factors responsible for the success of the business. There are 2 types of seeds suitable for this:
- self-assembled;
- purchased in specialized flower shops.
Both types produce more viable plants compared to lilies grown from bulbs. They demonstrate increased disease resistance and produce lush, long-lasting blooms.
Homemade
Seeds for propagation at home are obtained only from early-flowering varieties, since the seed pods have time to fully develop and ripen in mid-summer. Any cold snap delays this process and has a bad effect on germination.
Collection should begin when the boxes stop increasing in size and shrink from drying out. They are carefully cut off and placed in a bright place, scattered in a thin layer to prevent the development of mold.
When the boxes begin to open on their own, the seeds are carefully removed from them.
You can sort normal seeds from empty ones in this way: place plexiglass over them and run your palm over it several times. Due to the fact that the plexiglass is electrified, empty lily seeds will be attracted to it. This marriage should be thrown away. The process is repeated 2–3 times. The remaining material will be complete and will have a germination rate of about 90% when planted.
Purchased
You can buy lilies for planting in bags in gardening stores or by ordering them online. Recently, a very large assortment of hybrids has been offered by Chinese websites, where you can find any colors and shapes of inflorescences. Often the cheapest lily seeds are ordered from China, resulting in seedlings of cheaper plants or weeds, so it is necessary to purchase planting material only from trusted sites.
When purchasing, you should pay attention to the expiration date: it is better if the seed was packaged last year, in extreme cases - a year earlier, since germination greatly deteriorates with each season. In recent years, the abundance of shades and tones of lily petals has increased several times; you cannot find only blue among them
Peculiarities
The seed propagation method requires effort and time. If you want to see lush and colorful flowers in the first year after planting, this growing method will not work. In this case, the plants can begin to produce buds after 2 years. In some cases, the first flowers appear only after several years. It depends on the variety, climatic conditions and other factors.
Despite all the difficulties of this option, the seed method has its advantages. As a result, you get high-quality seedlings that were grown taking into account all the rules. When purchasing seedlings on the market, there is a risk of buying the wrong variety or spending money on a low-quality product. Propagation using seeds is mainly used by professional flower growers, but with due diligence, even a novice gardener can cope with the task.
During the germination process, you must adhere to certain rules and recommendations.
What is a baby and what is it for?
First of all, it is necessary to consider the size of gladiolus corms. Beginners have the most questions when it comes to an incomprehensible word - parsing corms. This term usually denotes the size and the resulting flowering possibilities of the bulb.
- So, if the corm has a diameter of 3.2 cm or more, it is said to be of the 1st variety. This means that when planted, it will most likely produce several powerful peduncles, the coloring will be as intense as possible, and the corrugation will reveal itself in all its strength.
- If the corm has a size from 2.5 to 3.1 cm, then it is called a second-parsing bulb and its flowering will also be quite impressive.
- When a corm is classified as a size from 1.5 to 2.4 cm, it can be called a third-parsing bulb. In this case, flowering will most likely occur with a delay of several weeks; the maximum number of buds on the peduncle will not form and fewer of them will open.
- If the size of the corm is from 1 to 1.4 cm, then it is called a bulb of the 4th parsing. They usually bloom much later and show half the potential of those inherent in the characteristics of the variety. Although a lot depends on care, and even from such small bulbs you can achieve quite decent flowers.
If smaller nodules form at the base of the gladiolus corm, they are usually called corms or simply babies. Gladioli babies, in turn, come in two sizes.
- Children of the 1st category grow from 5 to 10 mm, which can easily produce corms of the first or second selection.
- From 3 to 5 mm is the size of very small children, which usually produce only third-harvest corms in the first year after planting.
That is, the baby is the organ of vegetative reproduction of the gladiolus, which appears at the base of the corm at the end of the growing season. It is usually covered with a dense and dry shell that protects it from all external influences.
Important! Children of gladioli, unlike mature corms, are remarkably stored in winter, their safety and germination often reach 100%. https://www.youtube.com/watch?v=uKKGO4VN8Fg
https://www.youtube.com/watch?v=uKKGO4VN8Fg
So, gladioli babies have three main and very important functions:
- Preserve and update the existing collection of gladioli.
- If you want to significantly increase the number of plants grown (for example, for sale), propagate them with the help of children.
- Adapt newly acquired varieties of gladioli to the conditions of your garden, since it is the cultivation of gladioli from children that allows you to obtain plants that are most resistant to various diseases and best adapt to a new place.
The second method is with baby bulbs
At the base of the lily stem, baby bulbs are formed, the number of which depends on how deep the bulb itself is planted. It goes without saying that the deeper the planting, the greater the number of children formed.
Most lily varieties can be easily propagated from baby stem bulbs.
In order to increase the reproduction rate with this method, I recommend using decapitation or, in other words, removal of buds. Decapitation will lead to an increase in the bulb itself and the formation of children.
Or you can do something even more radical: after decapitation, carefully separate the stem with the supra-bulb roots from the bulb, plant it in the shade and water it abundantly. And on the underground part of the stem, by autumn we have a very large baby.
Preparing seeds for stratification
Now you need to extract the seeds themselves from the fruits. In magnolias, the seeds are surrounded by a red oily shell (scientifically called sarcotesta). This shell protects the seeds from drying out. Dried magnolia seeds lose their viability. That’s why don’t buy dry seeds, they should either be in their natural shell or packed in something wet.
The next step, perhaps, is not entirely pleasant - we clean the seeds from this very juicy shell (sarcotesta). The easiest way to do this is with your fingernails.
Cleaned magnolia seeds should be washed in water with added liquid dishwashing detergent. This is necessary in order to wash away the remaining oily liquid that protects the seeds (it prevents their germination).
Magnolia fruits. Igor BilevichPeeling magnolia fruits. Igor Bilevich We wash the peeled seeds. Igor Bilevich
How to preserve lilies in winter
But if you have very cold winters or varieties that do not like cold at all (candidum, royal lily), then they need to be dug up and stored in a place with fresh air, moderately humid, but also moderately dry, the storage temperature should be cool, but not below zero.
Before storage, remove the substrate from the bulbs and dry them. Peat is poured into the storage container, and the bulbs are placed on top of it, then covered with peat again. So the container is filled 2/3 with balls.
Another option is to place the bulbs in a bag of raw peat. The bag is tied so that air remains and placed in a dark, warm place. The babies should be born in a couple of months. After their formation, the bulbs are planted in peat pots, so that the top of the scales is above the peat.
Varieties for home cultivation
If you are going to plant a lily at home and grow it in a pot, it is recommended to opt for short plants. Asian and oriental hybrids are presented in the form of low and compact shrubs that are ideal for growing in apartments. The maximum height of such lilies is 80 centimeters.
Despite their small stature, the above varieties are characterized by large flowers. Their sizes vary from 12 to 20 centimeters in diameter and even more. The buyer has a wide variety of colors to choose from, from bright and rich to dark and light shades. In addition to the buds of amazing beauty, you get a pleasant aroma.
Asian varieties look attractive. The sizes of flowers of these species range from 7.5 to 10 centimeters in diameter. These types of lilies are devoid of aroma, which is a significant advantage for many gardeners. The choice of colors is also varied.
Let's look at the most popular varieties.
Spring Romance. Strong flowers, the maximum diameter of which can reach more than 20 centimeters. The height of the hybrid species is from 50 to 60 centimeters. The petals are single-colored and covered with small dark red spots. In the center of the flower is decorated with a pattern in the shape of a yellow star.
Dark Romance
The variety attracts attention with the rich, dark pink color of the petals. Closer to the throat of the bud, a burgundy spot is noticeable.
The height of the plant is the same as that of the previous species. The size of flowers can vary from 12 to 25 centimeters.
Fine Romance. Delicate lilies with soft colors, combining powdery pink and white. The middle of the flower is decorated with yellow lines. The diameter of the flowers varies from 18 to 22 centimeters. The height ranges from 40 to 50 centimeters.
White Joy. Asian species with large and snow-white flowers. The growth of the plant is compact - from 30 to 40 centimeters. The size of the opened bud is about 15 centimeters. The plant has virtually no odor.
Sunny Joy. This type of lily is sure to attract the attention of gardeners choosing colorful varieties. The petals of this variety are colored rich yellow with a slight red tint in the center. The maximum height of the plant is 50 centimeters. The diameter of the flower reaches 16 centimeters.
Precious Joy. A bright red lily with double flowers will be a wonderful home decoration. The maximum height of the Asian species is 60 centimeters. The diameter of the bloomed bud is approximately 16 centimeters.
For information on how to germinate lilies from seeds, see below.
https://youtube.com/watch?v=6Q8Rjv9nKIU
All rights reserved, 14+
The use of any materials without our prior written consent is prohibited.
Growing hibiscus from seeds
Propagation by seeds can be done immediately by sowing in open ground. Before this, it is advisable to prepare the soil in the selected area, taking into account the preferences and growth conditions of the plant.
We suggest you read How to stretch boots at home
Soil composition
Seeds are collected in late spring. Ripe pods should be dry and firm to the touch. Planting material is released from the plant box. In order for the seeds to germinate faster, they should be properly prepared before sowing:
- on one side, scrape with sandpaper or rub with a nail file;
- pierce the other side with a pin or make a small incision with a knife;
- soak for 2-3 hours in a glass of warm water with 1 teaspoon of aloe juice;
- dry on paper or towel.
Sowing in open ground is carried out as soon as the danger of frost has passed. If you don’t want to take risks, you can first grow the seedling in a pot indoors, and then transplant it to a permanent place in the garden. For this:
- the seeds are planted to a depth of 0.5-0.7 cm and sprinkled with earth;
- crops are watered with a small amount of water;
- The pot with seeds is covered with polyethylene or a sheet of glass and left in a well-lit, warm place.
The seedlings will hatch in 2 weeks. The soil is kept moist by watering the crops and emerging seedlings every day. Two-month-old seedlings need hardening. To do this, they are taken out into the fresh air every day.
Hibiscus transplant
The flower, together with a lump of earth, is placed in the hole and the empty space is filled with nutritious soil. After planting, the soil is compacted and watered abundantly. During this period, the young plant especially needs water and the soil should remain moist.
As it grows, the bush may bend. To help it, drive a stake on the opposite side of the angle of inclination and loosely tie the plant to it. The support should not interfere with growth and free movement on a windy day.
Tatyana Pronina, expert
You can grow hibiscus from seeds at home in a relatively short time. When starting the procedure, prepare the soil mixture. If there is no desire or opportunity to buy store-bought soil, soil from the garden is taken as a basis, which is “diluted” with peat or humus.
If the seedlings are already prepared by this time, feel free to start planting. If not, you need to germinate it, following the step-by-step instructions:
- The seeds are calibrated by shape and size and soaked in water for 1 - 2 days;
- The soaked grains are placed on damp cotton wool and germinated in a warm, shaded place;
- After green sprouts appear, the seeds are planted in small cups filled with prepared soil. They are poured into small grooves in a thin layer;
- The planting is covered with earth. The container is placed in a place with a fairly high temperature. If you plant seedlings in winter, you can place them right next to the radiator.
To prevent the earthen ball from drying out, it is sprayed twice a day with a spray bottle. A protective film will help retain moisture. It is removed after the shoots have pecked through the soil. After strengthening and gaining sufficient height, the seedlings are transplanted into separate pots. Keep only the strongest ones. To prevent the seedling from dying, the first bud is cut off.
Care and watering
Since the plant develops actively and quite quickly, replanting is carried out every 12 to 18 months. Each time, take a larger pot, but do not forget to create a thick layer of drainage at the bottom. Before transshipment, the branches are pruned, and in young bushes they are shortened by half. The standard time for pruning is autumn. It is better not to replant flowering hibiscus.
We suggest you read: How to choose a suitable flea collar for your cat
In spring and until early autumn, the flower is fed with specialized mineral complexes. Organic fertilizer based on liquid mullein is occasionally applied. The essential components for hibiscus are copper and iron chelate. Fertilizer can also be applied by spraying, that is, by foliar method.
By scales, bulbs, children or seeds - what is the best way to propagate lilies?
Similar articles
Useful tips
When propagated in this way, more than half of the plants bloom in the second year.
See you soon, dear readers!
When lilies are propagated by scales, already in the 2nd year after planting, about 50% of the plants begin to bloom.
- This is the method with the highest reproduction coefficient, since from 1 to 3-4 bulbs are formed on each scale, which means that from 1 adult bulb it is possible to get 15-150 new plants.
- Lily propagation
- Lily propagation by scales
- - one of the cutting methods. Small bulbs form at the base of the separated scales. Sometimes this phenomenon is observed when purchasing bulbs that have been stored in peat. This method is the most effective and applicable to all bulbs, although it requires some effort. You can separate the scales at any time of the year, even in winter. Most often this is done during autumn transplantation. A large healthy onion should be washed and a few of the top scales should be removed, and the places where they are separated from the onion should be sprinkled with crushed coal. You can remove 3-5 scales from one bulb without damaging next year’s flowering. The separated scales are washed and disinfected for 15-20 minutes in a solution
- Lily is a flower that can be propagated in a variety of ways; one of the simplest and most universal is propagation using children (daughter bulbs). Saffron lily, long-flowered, golden, white, umbrella and some other varieties of lilies form a large number of daughter bulbs. When replanting lilies to a new place, you can carefully separate the formed babies and plant them in the soil for growing, just like the bulbs. The children will produce full-fledged bulbs suitable for growing new lilies.
Basic rules for growing lilies from seeds:In healthy lily bulbs, the scales are separated by lightly pressing your fingers at the very base;
Reproduction method by scales
Not everyone can afford to buy bulbs of different varieties of lilies in the store every year. Therefore, fans of these beautiful flowers are faced with the main question: how to propagate lilies without spending too much?
- Absolutely all modern varieties of lilies are propagated by bulbs. This is a simple and popular method. Its only drawback is its low performance. In the fourth year after planting, the bulb becomes overgrown with numerous twins, forming a whole nest. In order for the lily to develop further, they are dug up, separated and planted separately. It is advisable to carry out all this work simultaneously, in the fall, when digging up the site. The combination of these processes is also optimal because there is no need to store the bulbs. If it is not immediately possible to plant them in a permanent place, it is recommended to bury them in slightly moist soil or store them in a cool, dry room, sprinkled with a damp substrate, usually peat or sand. You must first sort out healthy bulbs and periodically monitor their condition during long-term storage.
- Another good propagation material is the aerial bulblets that develop in the leaf axils of some lilies (especially Asian hybrids).
- This takes 2-3 years - this is the period from the moment the scales separate until the development of an adult plant. You can propagate lilies this way throughout the year, but still the best time for this is spring (the beginning of the growing season) and autumn - the period of digging and replanting and even later, before the soil freezes.
- seeds are more complex and troublesome; they are usually used by breeders when breeding new varieties.
- (separation of bulbous scales and placing them in a bag with a damp substrate)
- potassium permanganate, then lightly dried. After this, the scales are placed in plastic bags with a wet substrate, the bags are inflated and sealed (don’t forget to sign the name of the variety or species).
If you really like lilies, caring for and propagating these flowers will only be a pleasure for you, because there is nothing better than watching new beautiful lilies grow from the bulbs, scales or seeds you planted yourself. Choose the method you like best and propagate your favorite varieties of lilies!
for lily seeds to germinate, room temperature is required;
Method of propagation by bulbs
Damaged scales are immediately discarded, the rest are washed in water and immersed in a solution of potassium permanganate for half an hour;
For those gardeners whose hearts have been captured by exquisite lilies, it can be difficult to resist the temptation to decorate the entire plot with these flowers. Indeed, in addition to the well-known red and white lilies, there are a huge number of varieties of lilies of the most amazing colors - from soft pink and golden to dark burgundy and purple, of different sizes and shapes.
In the axils of the leaves of some varieties of lilies, aerial bulbs, or so-called bulbs, are formed. They are a convenient material for quickly obtaining bulbs. The number and size, as well as the effectiveness of this method of reproduction depends on many factors. Size is determined mainly by varietal characteristics. The quantity depends on the age - the younger the plant, the more actively it forms planting material, as well as on the intensity of flowering, climatic conditions during the growing period, so wet damp weather, especially long-term, guarantees the formation of the maximum number of bulbs. Modern methods of agricultural technology make it possible, using decapitation, to achieve the appearance of aerial bulbs even in non-bulb-bearing species, as well as to increase their size and number, especially with early removal of buds at the start of their formation. They promote the appearance of roots directly on the stem.
Large bulbs will produce flowers already in the year of planting, because buds have formed inside them in the fall, small ones will form flowers only after a year.
Method of propagation by seeds
The efficiency of reproduction by buds (bulbs), as well as their number and size, depend on a number of conditions, such as:
So what are our actions with this method of reproduction:
- And among amateur flower growers, vegetative methods of propagation are more common. Let's look at them.
- Tied plastic bag with sufficient air volume
- As a substrate, it is best to use white moss (sphagnum), perlite, fine peat (but only for Asian hybrids and LA hybrids). The bags are placed in a dark place at room temperature. After a few weeks, bulbs form. They can be planted together with the scales in any containers 15-20 cm high (so as not to interfere with root growth), the soil should be very loose. After 2-3 months, the bulbs are carefully removed and placed in disposable cups, 1-2 pieces each. A small plant has 6-10 scales, 1-3 leaves, 3-7 roots. After another 2 months, the resulting specimens can be transplanted into the ground or kept in a shaded place until autumn. Within a year you can get flowering plants.
- We wrote about creating conditions for growing lilies here: Growing lilies - creating the right conditions for lilies, now we’ll talk about their propagation.
- Crops in a greenhouse should be covered with film;
- The scales extracted from potassium permanganate, after drying, are placed in a bag filled with damp sphagnum moss or a mixture of peat and perlite;
To get new lilies from the specimens you like, propagation can be done using one of the well-known methods:
As a rule, bulblets are formed at the end of flowering, after which they are easily separated and fall to the ground, where they need to be collected as planting material. They are sealed in a bag and placed in the refrigerator for about two weeks. When the first roots appear, they must be immediately planted in the soil for growing. They can be sown in planting containers or directly into permanent soil. When planting in a container, the planting substrate is placed in the container and compacted to a level slightly below the upper border of the container, lightly press the bulbs into the substrate and sprinkle with sand to this border. The distance between the bulbs should be a couple of centimeters. The soil should be light but nutritious. In open ground, bulbs are planted in prepared furrows several centimeters deep.
Other ways to propagate lilies
If necessary, you can divide the bulbs and plant them in the spring, but you need to take plants no higher than 10 cm, otherwise the seed will not take root well.
features of a particular lily variety, for example, the varieties Aelita, Kalinka, Rozovaya Dymka can form a large number of large bulbs, and the varieties Sea Foam, Osennyaya Pesnya, Polyushko produce a very small number of small bulbs; Wash the dug out bulb and separate it at the base of the scales by pressing your fingers . For propagation, we take from 1/3 to ½ of the bulb, since the outer scales are more productive. The remaining central part of the bulb can be planted in the ground.
This method is the simplest and can be used to propagate all types and varieties of lilies. Its only drawback is its low reproduction rate.
Formation of bulbs at the base of the scales and their rooting in the substrate
Types and varieties of lilies with supra-bulbous roots
orchardo.ru
How to plant lilies in a pot at home?
Before choosing a pot for planting and growing a lily, you need to choose a flower variety. Some of them grow up to 1.5 m. You can choose a variety that grows as a small bush. Depending on the size of the flower, you need to choose a pot.
For a lily, the height of which is about 1.5 m, select a pot with a diameter of 18-20 cm and a height of up to 40 cm. 2-3 bulbs can be planted in such a container. If one bulb is planted in a pot, it will not bloom for a long time. This happens due to free space. Until this space is filled with children, the plant will not bloom.
Before planting, the pot is disinfected. It should be doused with boiling water with the addition of manganese.
For good growth and development, you need to choose the right soil for planting lilies. The simplest choice is a ready-made earthen mixture purchased in a store. When making your own soil, take turf soil, coarse sand and humus in equal parts. Mineral fertilizers must be added to this mixture. Add 25 g of nitrogen-potassium and magnesium-phosphorus fertilizer per 1 kg of prepared soil mixture.
Description and preparation of seed material
The ripe seed pod is brown. Lily seeds can be brown or black, depending on the variety. You can collect up to 200 grains from one box. The shape is oval, slightly elongated. Thickness – 1 millimeter, length – approximately 5 millimeters.
Seeds can be planted almost immediately after collection or purchase. However, before starting work, it is recommended to carry out hardening. To do this, the material is placed in the refrigerator for several days, maintaining a temperature of 2 to 4 degrees Celsius with a plus sign.
Don't forget to prepare the soil for planting seeds in advance. The best option is to buy a ready-made soil mixture designed specifically for lilies. You can also cook it yourself. To do this, mix leaf, turf soil and coarse sand in equal proportions, add a little charcoal.
Difficulties in propagating Paulownia
There are certain difficulties with the propagation of this plant. But, as experience shows, a little patience and everything will work out.
Paulownia can be propagated vegetatively. For example, seating offspring. But they form extremely rarely and in small numbers on the tree. You can try to root green cuttings, but this method is not very productive.
Reproduction by seeds remains. The problem is that there are regions where paulownia grows and produces seeds, but these seeds do not have time to ripen and, naturally, do not sprout.
You should know that paulownia seeds quickly lose their viability, so they need to be sown within a year. This is why paulownia seeds bought at home, in China, often do not sprout - they have simply been stored for a long time. For this reason, the very first thing you need to start with is to get seeds that have germination. Next, I will describe the method of how I actually propagate and grow paulownia seedlings.
Requirements for dishes and soil
Under natural conditions, clivia grows in fertile, humus-rich soil. Accordingly, a drainage layer is placed in the pot and a cushion of substrate is poured:
- peat – 1 part;
- humus - 1 part;
- turf soil – 2 parts.
Additionally, perlite, or vermiculite and sand are added to the soil for clivia. Granulated superphosphate poured onto the bottom of the pot will ensure better root development and abundant flowering.
The pot for replanting needs to be selected only slightly larger than the previous one. The choice of ceramic or plastic dishes determines how easily and without injury the plant can be removed. Smooth inner plastic surfaces are preferred for this plant. The conical shape of the vessel will make it easy to remove the plant. Drainage holes should ensure good drainage of irrigation water.
How to grow lilies at home in a pot
Among the huge number of varieties, those that are adapted for growing indoors have been bred (Figure 4). These include Asian and Oriental hybrids, which form a small number of children and therefore can grow in one pot for several years.
By growing indoor varieties, you have the opportunity to regulate the flowering period. To do this, it is enough to correctly determine the time of planting and provide the necessary conditions.
Choosing a pot
If you are interested in the question of how to grow lilies at home in a pot, you should know that such plants have some features.
Figure 4. Features of growing flowers in pots at home
One of the necessary conditions for the full growth of indoor varieties is the correct choice of flower pot. To do this, you should know well the characteristics of the variety being grown, because the taller the flower, the taller the pot should be. For example, with a stem height of one and a half meters, the planting container should have a height of about 40 cm.
This fact should also be taken into account when planting a crop in a flower pot, since excess free space provokes the plant to produce children before the entire container is filled. For this reason, it is not recommended to carry out single plantings, but to plant several bulbs.
Caring for a lily in a pot
After planting the bulbs in a pot and before germination, it is necessary to provide the plant with a low temperature and water it as the soil dries. With the emergence of seedlings, the first fertilizing of the soil with liquid organic fertilizer is carried out. A week later, a second one is carried out, but now using mineral fertilizer saturated with potassium and phosphorus.
Figure 5. Planting and caring for indoor varieties in a pot
It is recommended to spray the sprouts with a growth stimulator twice a week to encourage the development of large, bright flowers. When the sprouts reach a height of 10 cm, it is necessary to add soil to the edge of the container. Next, the soil is regularly loosened, watered daily, and flowering plants are fed every week. While the crop has not bloomed, its leaves can be sprayed for rapid growth and development, carefully ensuring that wet leaves are not exposed to direct sunlight (Figure 5).
Flowering plants need to be sprayed very carefully, trying to avoid moisture getting into the petals, as this leads to a shortening of the flowering period itself. Starting from the age of one month, the plant begins to be hardened, gradually accustoming it to being in the open air. However, at night the crop can be left outside without loss if the air temperature does not drop below +10. If there is abundant flowering in the pot, additional supports are installed to support the stem and peduncles.
Pineapple lily: cultivation and photos
The pineapple lily variety is grown mainly in open ground, since in indoor conditions the plant blooms only at good ambient temperatures and sufficient lighting, which can be difficult to organize. Therefore, it is left in flower pots only for wintering, and in the spring it is transplanted into open ground (Figure 6).
Note: As a rule, eucomis are grown from bulbs - babies that are separated from the mother bulb. The bulbs are planted in separate containers using light, fertile soil with adequate drainage from the beginning of March until the end of April. In this case, they should be placed so that the top remains flush with the ground.
While waiting for sprouts, gentle watering is carried out as needed, and after flower stalks appear, irrigation is made more frequent and more abundant. Before transplanting eucomis into open ground, it is recommended to carry out hardening by taking pots with young plants into the open air.
Figure 6. External features of pineapple lilies
You can transfer the plant from the pot to the flowerbed only when the soil has warmed up sufficiently, that is, approximately in mid-May. In the southern regions of our country, eucomis bulbs can be immediately planted in open ground without prior germination. It is important to know that the pineapple lily is a prominent representative of light- and heat-loving plants. Therefore, for planting, select an area that is well lit by the sun. This variety is completely frost-resistant, so its bulbs must be dug up every year and stored.
Planted eucomis must be watered sparingly until the first leaves appear. Then watering is gradually increased, taking into account that during the flowering period the plant needs a lot of moisture. After the plants fade, the application of moisture begins to be reduced, and after the leaves turn yellow, they stop altogether. It is also necessary to regularly fertilize with complex fertilizers that do not contain nitrogen, since this element causes plant diseases. Unlike other varieties, eucomis, when grown indoors, requires annual replanting into a new container with a complete replacement of the substrate. Bulbs from open ground are dug up, disinfected and stored in a cool, dry room.
Sowing in open ground
The most frost-resistant varieties and hybrids are sown immediately in open ground. This growing method produces very resilient and healthy bushes. It is recommended to sow seeds using this method in late October-November.
The planting material is sown sparsely, so that later the seedlings do not have to be picked several times. Row spacing should be 20 cm. For the winter, plantings are covered with spruce branches, dry leaves or bark, and in winter they are covered with snow.
In the spring, when above-zero temperatures are established, the plantings are opened, and already in early or mid-April the first seedlings appear from the ground, from which adult plants gradually form.
For the most decorative and large-flowered varieties, flowering, as a rule, occurs in 5–7 years, and for medium varieties – in 2–4 years. It’s worth waiting for this time to get a lot of beautiful lilies, with which you can create an original and bright composition in the garden or flower beds.
https://stroy-podskazka.ru/lilii/iz-semyan/
https://tsvety-bukety.ru/kak-mozhno-vyrastit-lilii-iz-semyan
The fourth method is with bulbs
If the bulbs have sprouts at the time of sale in the spring, this is normal. Lilies with sprouts, purchased in the fall, will certainly continue to grow when planted in the garden and die at the first frost.
Propagation by stem bulbs
- Stem bulbs appear during budding (from the beginning of June), ripen and fall off at the end of summer. Their formation can be stimulated by pinching the buds. They are always colored (from olive, cherry to almost black shades), often have small roots and green leaves. The size of the bulbs depends on the type or variety, age of the plant, air humidity, and the number is 60-80 (up to 100) pieces per plant. Stem bulbs are separated from the stem and finely, 3-4 cm, “sown” in a shaded place, covering them a little for the winter. Flowering plants are obtained in the second or third year.
- Propagation by leaves
- Lilies are propagated by bulblets in August-September, when the lilies have faded and the buds themselves begin to separate from the stem. For each variety, the bulbs are collected separately and planted in a bed for growing to a depth of two centimeters, the soil is thoroughly moistened. Already in the spring you will see shoots of young lilies - they will need to be regularly watered, fed and weeds removed in a timely manner. When the lilies grow, plant them. Flowers on the plants will appear only in the third year after you planted the bulbs.
- It’s difficult to choose the best option - they are all good in their own way and suitable for different occasions. Using any of the above methods, you will not only be able to grow new lily flowers - propagation will give you the opportunity to preserve your favorite varieties unchanged, save money and at the same time give you useful experience, which will come in handy more than once in floriculture, especially if growing lilies you are seriously fascinated.
- Many varieties of lilies are propagated by seeds in order to preserve their species characteristics. Lilies from seeds grow maximally adapted to local conditions and climate, compared to the vegetative method of propagation. Seed propagation is the best way to obtain healthy plants and new hybrid varieties. With this method, labor costs are significantly reduced, and the amount of planting material obtained is significant.
Planting technique for propagation by scales
The distance between planted buds should be about 2-3 cm. Bulbs planted in this way must be transferred to a cold greenhouse until next autumn.
The scales with small bulbs appearing at the base are now ready for planting. If it is not possible to plant them immediately, then until planting we store them at a temperature of 4°C.
In order to increase the reproduction rate with this method, I recommend using decapitation or, in other words, removal of buds. Decapitation will lead to an increase in the bulb itself and the formation of children.
As I promised, in this article I want to invite you to familiarize yourself with several of the most common methods
(rooted stem bulbs and placement of bulbs (bulbs) on the stem)
syperdacha.ru
If the presence of stem bulbs is considered a disadvantage of industrial varieties, then the formation of many root bulbs is, on the contrary, a desirable feature. Every year LA hybrids produce many large bulbs; Asian hybrids produce smaller bulbs, but are still numerous. Bulbs of royal, beautiful, golden, oriental, tubular hybrids and OT hybrids do not appear every year, 1-3 pieces at a time, growing slowly. Henry lily, trumpet and Orleans hybrids with turban-shaped flowers are more productive. Martagon hybrids form very few root bulbs, and their development lasts several years. Snow-white lilies, leopard lilies and their varieties do not form such bulbs at all.
If, due to a lack of planting material, propagating lilies by seeds is not suitable for you, you can try to propagate such varieties of lilies as regale, long-flowered, tiger, white or sulphurous with leaves. To do this, at the end of July, cut off the leaves from the top of the lily stems, plant them at an angle in boxes filled with 5 cm of fertile mixture and 3 cm of sand. Water the plantings or spray with water. On hot days, the boxes will need to be shaded and the soil should not be allowed to dry out or become waterlogged. At the base of the lily leaves, one or two bulbs will soon form and roots with leaves will develop. For the winter, you will need to bury the boxes with plants in the beds and insulate them.
Photo of lily propagation by bulbs
Video about propagation of garden lilies
The seeds spill out of the lily's seed pods when they are finally ripe, or in damp weather they germinate directly into them. To avoid this, you need to collect the boxes as soon as they turn brown. The seeds remain in a state of germination for quite a long time, but it is better to sow them freshly harvested.
For germination, outer scales in the size of up to half of the bulb are separated, as they are more productive. The largest, healthiest, lightest without spots are selected. The scales must be washed and kept for half an hour in a solution of any fungicide; in addition, they can be kept in a solution of phytohormones for up to 15 hours, in order to increase the reproduction rate. Dried scales are placed in a substrate of perlite, moss and sand, or simply in plastic bags. The bags are stored for up to two months, tightly tied, in the dark, at a temperature above 20°C; over the next month, the storage temperature is reduced to 17°C. Before planting, the material is stored at a temperature of 4°C.
In open ground, bulblets should be sown at a distance of 5-6 cm from each other in grooves 2-3 cm deep. The optimal distance between grooves is about 20-25 cm.
Scales
Those scales that we removed in the fall will be ready for planting in boxes in a greenhouse or in another bright room in February-March.
And then we plant the seedlings in the ground in May-June. Or And by the fall we have a very large baby on the underground part of the stem.
propagation of lilies Propagation
When transplanting lilies in autumn, the root bulbs are carefully separated from the stem and planted for growing, while the plants bloom in the second or third year. The formation of bulbs is promoted by loose, moist soil, deep planting and mulching.
Video about propagation of lilies by scales
Bulbs
The advantages of propagation by bulbs are that this method is effective, quite simple, non-traumatic for the plant, and in addition, it allows you to heal and rejuvenate lilies. This method has
from one mother bulb you can get from 20 to 150 new lilies. Plants can be propagated by scales throughout the year, but results will be best in spring. Both purchased bulbs and those you dug up in the fall are suitable. Don’t forget to wash the dug up bulbs well from the ground, dry them and put them in damp sand for storage.
Seeds of frost-resistant species can be sown in open ground at row spacing of 20 cm in mid-spring or autumn. Seedlings remain for 1-2 years without transplantation, then in the fall they are transplanted to a permanent place.
The scales prepared in the fall can be planted in planting containers in greenhouse conditions in early spring or even in February, and the seedlings are transferred to the ground in early summer. If the propagation of lilies in spring by scales began at the very beginning of the growing season, they can be planted immediately in permanent soil.
There are several other ways to propagate lilies (by stem and leaf cuttings), but these four methods are the most common and, it seems to me, the easiest and most accessible to us amateur gardeners.
If we were engaged in propagation in the spring, then the bulbs along with the scales can be immediately planted in open ground.
Each scale of a lily bulb is capable of forming new bulbs at its base. The third method of propagating lilies is based on these properties.
. Lilies can be propagated both by seeds and vegetatively.
Stages of reproduction
The process of growing fuchsia from seeds includes several stages, each of which requires the grower to follow a number of important recommendations.
Collecting seeds
Collection and preparation of seed material is a very responsible procedure, since the success of the entire event depends on the quality of the seeds. So, fuchsia seeds can be purchased at a specialized store, or you can collect them yourself. To do this, as soon as the flower buds begin to bloom, use a cotton swab to collect pollen from the male flower and carefully transfer it to the female flower, lubricating the pistil. In this case, the mother flower is freed from the anthers, carefully removing them with tweezers.
If there is only one bush available, then artificial pollination is performed on one plant. To do this, pollen from flowers of one shade is transferred to the pistils of flowers with other shades. To avoid cross-pollination of flowers by insects, cover the fuchsia with gauze and wait for the fruit to appear. After they are formed, remove the gauze and observe the change in color of the fruit.
At the first stage they will have a red tint, then they will turn purple, and at the final stage of ripening they will turn purple.
At this point, they are carefully cut off and placed in a warm, dry place to dry. A few days later, the fruits are cut and small light brown seeds are removed, which look like garlic cloves, only flat.
Substrate preparation
The next important stage in growing fuchsia from seeds is preparing a nutritious soil mixture. You can buy it in the store ready-made or prepare it yourself. To do this, take 3 parts of turf, mix it with two parts of peat and one part of sand, and then calcinate it in the oven at a temperature of 200 degrees for 20 minutes. If there is no oven available, then pour boiling water or a warm solution of pink potassium permanganate onto the prepared substrate.
This allows you to rid the soil of pathogenic microflora and prevents the risk of fungal infections. Then the substrate is allowed to cool, after which it is scattered into low and fairly wide containers with a drained bottom.
Landing
Once the substrate is prepared, you can begin sowing the seeds. To do this, the seeds are mixed with dry sand and scattered over the surface of the soil mixture. Then the planting is irrigated with a spray bottle, covered with plastic film or glass and placed in a bright place. The planting is ventilated daily for 15 minutes and moistened if necessary. Germination of fuchsia seeds occurs quite quickly, and after 3 weeks the first shoots appear.
Good results are obtained by planting seeds in peat tablets, previously soaked in warm water. After they swell well, they are laid out in prepared containers and one seed is placed in each of them. You can use egg cells as a container. The container with tablets is also covered with film, periodically ventilated and moistened.
Creating conditions
In order for fuchsia seeds to germinate quickly and amicably, it is necessary to create a number of conditions for them. So, the air temperature in the room where the boxes with seedlings are located should be from 18 to 25 degrees. In this case, the soil should be kept moist, but stagnation of liquid is unacceptable. If water accumulates in the seed germination zone, the substrate will become moldy and the seed will rot before it has time to germinate.
In order not to oversaturate the soil with moisture, watering is carried out by spraying from a spray bottle or by placing containers in a tray with water. At the same time, the soil absorbs only the necessary amount of moisture for seed germination. If everything is done correctly, seedlings will appear in 20-30 days.
Picking
After 2 full-fledged leaves appear on the young fuchsias, the sprouts are planted in separate containers - pricked. For containers, use 200 ml plastic cups with a hole in the bottom. A nutrient substrate is poured into them, not forgetting to put a little expanded clay on the bottom, after which the sprouts are planted, trying to preserve the earthen lump as much as possible. First, the soil of the common container in which the seedlings grew is moistened. The procedure is performed during the waxing moon.
After picking, fuchsia is periodically sprayed with a spray bottle and fed twice a month with mineral fertilizers. If the seedling grows too much, it must be pinched, cutting off the top and forming a lush and beautiful flower.
Reproduction of lilies, methods and selection of planting material
How to propagate lily flowers correctly
There is hardly another flower with so many methods of reproduction. Lily flowers are propagated by seeds, as well as using a variety of natural (dividing “nests” of bulbs, root and stem bulbs) and artificial (cuttings by scales, stem segments, whole shoots, tissue culture) methods of vegetative propagation.
as soon as the seeds germinate, you need to reduce the temperature to +15 degrees, and with the growth of the first leaf, increase it to +20;
The bag is placed in a dark place until young bulbs appear at the base of the scales (after 6 weeks);
Photo of lily Photo Photo: Lily
age of the plant, the younger the plant, the more buds are formed;
For propagation, we choose healthy, large scales without spots.
3-4 years after planting, a whole “nest” of 4-6 bulbs forms underground, which we dig up, divide and plant each bulb separately. The number of bulbs formed can be easily determined by the number of stems.
So we choose planting material for propagating lilies.
Can be propagated by a whole shoot. To do this, in the second half of May, the stems are carefully twisted from the bottom along with the supra-bulb roots, which are just beginning to form, and planted (preferably at an angle) in loose, moist, nutritious soil. Shallow longitudinal cuts are made on the underground part of the stem. The bulb can be planted back - it will not bloom this season, but it will not die, you can remove the scales from it and use them for propagation. By autumn, numerous baby bulbs are formed, which are planted separately. This method is suitable for all lilies, especially those that under normal conditions form few bulbs. The easiest
Picking seedlings into boxes 10 cm deep is carried out when the first true leaf appears on the seedlings;
The bag is moved to the refrigerator for a month to stratify the bulbs;
onion scales,
abundance of flowering;
Then the scales are thoroughly washed in water and kept in a dark pink solution of potassium permanganate or a solution of any fungicide for 20-30 minutes.
- The most optimal time for propagation by bulbs is autumn. But if necessary, it is possible to carry out division and transplantation in the spring. Just pay attention to the fact that the height of the plants should be no more than 5-10 cm, otherwise they will not take root well.
- After reading the entry about popular hybrid groups (you can read more about lily varieties here), you can choose the lilies that are most suitable for you. Buy planting material only in specialized stores, and from well-known companies. All lily planting material available on the Ukrainian market is of Dutch origin. “Polish” lilies are the same Dutch ones, grown in the fields of Poland or repackaged there. They are cheaper, but often do not correspond to the name, but there is a chance to purchase an exclusive variety that is not in any directory. Seed
- Most often, lilies are used for propagation The soil must not
- Young bulbs are separated from the scales and planted in a flower bed or in a box with soil (depending on the time of year). seeds
- Propagation by stem cuttings is used when propagating especially valuable varieties, when the starting material is not enough, and any planting material is of a certain value. All parts of the stem, including leaves, are used for cuttings.
- Most varieties of lilies can be propagated from stem bulbs. They originate at the base of the stem, their number depends on the depth of planting of the mother bulb. To increase the reproduction rate, and, accordingly, the number of children produced, it is recommended to use decapitation, or removal of buds, which stimulates the growth of the bulb itself.
Which lilies (which varieties) to choose for planting
climatic conditions during cultivation, for example, more bulbs are formed in damp summer, and in some varieties of lilies they are formed only if the wet weather lasts for quite a long time;
In order to increase the multiplication rate, you can additionally soak the scales in a solution of zircon, epin or succinic acid for 12-16 hours.
Planted large bulbs will bloom already in the year of transplantation, since they have flower buds already in the fall. Small bulbs - only for next year.
When purchasing, choose bulbs without external damage to the scales, roots and bottom. Affected and dried roots, scales and part of the bottom are removed to healthy tissue; the cut area should be sprinkled with charcoal or crushed activated carbon and dried. Bulbs purchased from suppliers in Holland are always treated with chemicals that leave whitish stains on them and do not require additional pickling. Before planting, bulbs purchased elsewhere are washed in running water and pickled for 20-30 minutes in a solution of potassium permanganate (5 g per 10 liters of water) or garlic water. You can hold them for 30-40 minutes in a solution of the drug Fundazol to prevent fungal diseases; it is advisable to treat them with any insecticide, for example, 10% Karbofos (5 ml/liter).
makes it possible to obtain a large number of offspring free from fungal and viral diseases. This method is applicable to all species of lilies, since the characteristics of the variety are not transmitted. But by sowing seeds collected from varieties, you can get your own, unique hybrids. Royal lilies and tubular hybrids reproduce especially well by seeds; many of them are formed, with mass flowering in the fourth or fifth year after sowing.
propagation by bulbs
vsaduidoma.com