How to propagate viburnum from cuttings. Propagation by cuttings
This is the most effective, but at the same time quite complex method. Agronomists know that this procedure can be carried out in two ways: “fast” and more measured.
The first one is simpler. Preparations begin in winter, and the progress of work looks like this:
- In winter, annual shoots of 15-20 cm in length are cut off.
- They are dipped in water for 2-3 hours, after which they are placed in a regular bag, tied and stored until spring at low temperatures. To do this, the workpiece is taken to a dry basement.
- Planting is done when the soil warms up to at least +10°C to a depth of 10 cm.
- This scheme involves planting in a row, with an interval of 10-15 cm between cuttings. At the same time, they try to place them at an angle: one bud is above the ground, the second is exactly at the ground level.
Important! They try to plant viburnum away from our usual fruit and berry crops. This is due to the specific effect of its rhizomes on the soil. The bush is especially in conflict with walnuts and pears.
- The soil is watered abundantly and compacted. Next is the “classic” - watering and weeding.
- In the fall, the seedlings are transferred to a permanent place.
Propagation of viburnum by cuttings with further planting in the spring can be done in another way. It is conventionally called “green” or scientific. Looking ahead, we note that after such work the bushes grow better:
- During flowering (June - early July), green cuttings are harvested. You can also take those that have already begun to grow woody. The main thing is that they must be elastic. If, when bent, they spring back and do not break, you made the right choice.
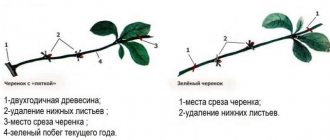
- The shoot is cut off with the first two buds (this is approximately 7-12 cm) and divided into cuttings. The lower oblique cut is 1-1.5 cm from the base of the cutting above the bud (cut at an angle of 45°), and the upper one is made already above the next pair, cutting straight.
- Then the lower leaves are removed from the cuttings. The top ones can be cut in half.
- The blanks are placed in a “root” stimulator. The tips are immersed by 1.5-2 cm. The liquid should not get on the leaves, so be careful. The best drug remains “Heteroauxin” (100 mg/1 l of water);
- Such “baths” are placed in a dark place for 10-16 hours.
- For planting, small greenhouses are prepared in a shady corner of the site. Direct sunlight is undesirable for such plantings. Optimum temperature +27°С…+30°С.
- Lay a light substrate. The bottom layer of 10 cm is a mixture of turf soil, peat and coarse sand (in a ratio of 3:1:1). Peat can be replaced with humus. The top layer of 3-5 cm consists of equal parts of peat and sand (here without “organics”).
- Planting is done according to the following scheme: 7 cm row spacing and 5 cm between cuttings. They are placed obliquely, to a depth of 1.5-2 cm and covered with film or a greenhouse frame.
- Rooting takes place over the next 3 weeks: during this time, the plant is sprayed with water 3-4 times a day. After this time, the greenhouse is opened on one side, and after another couple of weeks the covering is removed completely.
Important! Instead of Heteroauxin, you can use a solution of IBA (indolylbutyric acid). 50 mg of the substance is added to 1 liter of water and the roots are immersed for half a day.
- The cuttings overwinter in the same place, they are covered with spruce branches or dense lutrasil. If there are no such materials, dry leaves will do.
- In the spring, after removing the mulch, they can be moved to a permanent place. But some leave it for another season. This is how the seedlings finally become stronger.
- Dig deep holes, leaving a small mound at the bottom.
- A seedling is placed on it, the roots are spread to the sides. The root collar deepens by a maximum of 7 cm. The general planting pattern is 50 x 15 cm. In a couple of years there will be young, strong bushes here.
Despite all its labor intensity, this method has one undeniable advantage - thanks to it, you can get a large number of plants, and the cuttings are better accepted.
Did you know? Viburnum is one of the main symbols of folk culture. There are many songs and legends about her. In the old days, the cycle of work was also determined by this plant: for example, they tried to sow barley while it was still blooming.
Reproduction by vertical layering
This is a simple method that does not require extra effort:
- In autumn, the lower branches of young plants are pruned, leaving 3-4 buds on them. The “trunk” is spud higher.
- In spring, new shoots grow from these same buds. When they reach 8-10 cm, they are hilled to a height of 4-5 cm.
- The shoots that have reached 25–30 cm are “grabbed” at the base with copper or aluminum wire and again cut to 1/3 of the height.
- After 10-14 days, hilling is repeated.
- Until autumn, the shoots will have time to take root, then they are dug up, separated from the mother bush and planted in a designated place. It is not advisable to treat the division site: garden pitch or other compounds form a film on the cut that almost does not allow air to pass through.
- The landing is traditional. A hole is dug, moistened, the seedling is first planted at a slightly angle, digging the root collar 5-7 cm.
- Closer to frost, make a mulch shelter.
A biological relative of viburnum is elderberry: both plants belong to the same family - Adoxaceae.
As you can see, everything is simple here, no greenhouses or solutions. They are not needed for the next method on our list.
Cuttings. Basic principles of rooting stem cuttings
All gardeners are faced, and quite often, with the issue of propagating their favorite crops. And it is not always possible to do this with seeds. Many plant varieties retain their characteristics only through vegetative propagation: part of the shoot, root, leaves, bulbs, tubers, tendrils, layering, etc.
Some plants cannot be propagated by seeds at all, for example, double forms. How to correctly draw a favorite culture can be learned from literature and Internet sources; the specific features of a particular culture are usually indicated there. To root a cutting for sure and avoid common mistakes, you should know the basic principles of rooting.
What is cutting?..
Cuttings are a method of propagating plants using cuttings. Cutting - part of a shoot, leaf or root separated from a plant to produce a new plant. From one cutting, depending on the type of plant and method of propagation, you can get one or even several dozen new plants.
Overgrown cuttings taken for rooting, if all conditions are met, are quickly accepted and transformed into new independent plants that repeat all the characteristics of the mother plant. This is very important when propagating valuable varieties. After all, you really want, and quite often, to purchase a specific variety. But for some reason it is not always possible to root seemingly unpretentious species. What do you need to know for success?..
Features of planting and caring for viburnum bushes
Viburnum is usually placed on a well-lit area of fertile soil; for good development of the root system, the depth of the planting hole should be at least 60 cm, and its diameter should be 80 cm. The hole must be well fertilized with organic matter and minerals. When planting viburnum, the root collar must be buried 8 cm. This is necessary for the formation of additional adventitious roots that provide proper nutrition to the plant. For optimal pollination, you need to plant seedlings of several varieties in one area. The distance between seedlings must be at least 3 m.
For 2 years after planting, viburnum does not produce amazing growth results. Caring for planted viburnum consists of controlling weeds, treating dangerous pests, maintaining optimal site humidity for its growth, and periodically mulching the soil. The gardener can also shape the crown of the viburnum at his discretion: in the form of a lush bush or a standard tree. Regardless of the shape of the crown, it is necessary to carry out annual sanitary pruning of the crown. Every year you need to perform 3 preventive treatments with Fitoverm solution so that the pests retreat and do not spoil the crop.
If the gardener follows these simple rules for caring for the beautiful viburnum, she will generously thank him with a good harvest. Viburnum berries are a source of useful substances in the fight against seasonal anemia; their regular consumption increases hemoglobin levels.
{SOURCE}
How viburnum reproduces in nature. Vegetative propagation of viburnum
Many people have heard about the beneficial properties of red viburnum, but not all summer residents have it. You can, of course, pick it in the forest, but you want to grow it yourself. How to propagate viburnum? What propagation methods are most effective for this crop? We will try to sort out these questions.
Kalina: methods of reproduction
Viburnum viburnum can be propagated by layering, shoots, simple division of the bush and cuttings (green and lignified).
Reproduction by layering
Obtaining seedlings using layering can perhaps be called the simplest method, which does not require much time and effort. It is held in the spring months.
Both young and perennial shoots that are located horizontally to the ground are suitable for rooting. For a perennial branch, the soil is carefully loosened to remove all weeds, and then attached to its surface using wooden or metal pins.
Young one-year shoots are laid out in specially prepared grooves with a depth of 3 to 5 cm. The apical bud of this shoot must be cut off, and it is sprinkled with leaf humus, but the buds from which young shoots will appear must be left free.
As they grow, they are hilled several times throughout the spring and summer. And in the fall, the rooted cuttings are carefully dug up and divided according to the number of shoots. With this propagation option, several viburnum seedlings are obtained at once.
Reproduction by shoots
Shoots or root shoots can be dug up in spring or autumn. When dividing in autumn, it is better to insulate the seedlings for the winter. To obtain a seedling, take a sharpened shovel and with a sharp movement separate the baby from the mother bush. It is better to leave the baby there after cutting so that the root system of the seedling can better develop. If you are in a hurry to replant, when planting, pour heteroauxin into the planting hole and cut the shoot in half.
Dividing the bush
Propagating a viburnum bush by dividing the bush is still the same work... To do this, the bush is dug around the entire perimeter, and the bush with its rhizome is removed. Then use a hacksaw or an ax to cut the bush in half or into several parts. When planting a division, the planting hole is prepared in the same way as described here.
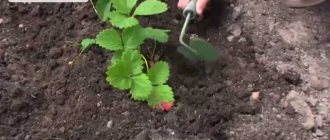
Photo ©klumba.guru
Cuttings
You can also get a large number of plants quite quickly and without problems using green cuttings. Shoots for this method of propagation are harvested at the end of flowering. In the Moscow and Moscow region it falls in June. During this growing season, the shoots begin to gradually become covered with bark and stop breaking.
Photo ©rastenievod.com
The optimal length of the cuttings is short, since it should have from 1 to 2 internodes (2-3 pairs of leaves). The leaves in the lower part of the cutting are completely removed, and in the upper part they are reduced by half. It is worth remembering that cuttings taken from the top of the shoot take root best.
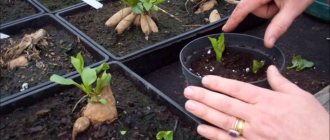
In the beds intended for cuttings, the top layer of soil 12-15 cm high is removed. Instead, 10 cm of a mixture of peat soil, sand and turf or good garden soil, taken in equal parts, is poured. A small layer of sand (2-5 cm) is placed on top of the mixture. The beds must be covered with film. For individual propagation, an ordinary glass or plastic jar is sufficient.
Before planting, it is advisable to soak the cuttings in a solution of heteroauxin (a substance that stimulates the appearance of roots) for 10-16 hours. Rooting of green cuttings occurs in 20-25 days. Throughout this time, the soil in the beds should be kept moist.
You can also obtain viburnum seedlings using lignified cuttings. They are harvested both in spring (before the buds swell) and in autumn (after leaf fall). Autumn cuttings are planted for rooting next spring, and until then they are stored under a layer of snow or in damp peat at a temperature of 3-6 degrees Celsius.
This is probably all that can be said to novice gardeners about methods of vegetative propagation of viburnum bushes. We hope you will find our tips on how to propagate viburnum useful, and you will independently obtain planting material for your site. Good luck and good health to you!
Reproduction by horizontal layering
Work begins in spring and covers two seasons:
- 2-3-year-old branches are cut from the bush (some even “four-year-old” branches are removed, but not older). A stump with 3-4 buds remains. That's all for this year, we leave the viburnum alone until next spring.
Important! If many cuttings have been prepared, they can be tied into a bundle before immersing them in the strengthening solution.
- A year later, young shoots are cut to about 1/5 of the entire length and bent to the soil.
- They are placed in a prepared groove (5-6 cm deep) and secured with hooks. Please note: such layerings are not dug in right away! You will have to wait until the buds shoot off shoots of at least 10 cm.
- Then the hole is filled with a substrate of humus and peat in equal proportions. The tops should remain on the surface. The first hilling is done with powder to about half the height of the shoots.
- In summer, 2 hillings are done with an interval of 2 weeks. The maximum pouring height should reach 20-25 cm.
- With the onset of autumn, the cuttings are cut off from the main bush, and the shoots, which by that time have become stronger and take root, are separated from it. They are transplanted to another place.
Propagation of cherries by cuttings. Method of propagating cherries by cuttings
Cuttings are the most accessible and fastest method of propagating this berry, but there are some difficulties that you will have to face:
- Since cuttings begin at the end of summer, in the fall the daughter plant may freeze or weaken.
- You can transfer diseases and parasites that were on the mother plant to the new tree.
- The cutting requires a lot of attention and constant watering.
But propagating any variety of cherries by cuttings also has its advantages:
- The new tree will be similar to the mother tree - just as strong (with proper care), and the berries will taste the same.
- A new garden resident will bear fruit in less than 5 years.
So, cuttings have both significant advantages and disadvantages. If you are willing to give a new plant some attention and effort, this is a good method for you.
It is better to propagate cherries by cuttings in early autumn or late summer; it is better to take cuttings from the lower branches. Be sure to treat the cut with a growth stimulator, and on the mother plant, cover the cut with ash.
In order for a tree to take root in open ground, high temperatures are required. In August – September it still remains 20-25 degrees.
A new plant requires constant watering and fertilization. But be careful not to overwater the roots, otherwise the process of rotting will begin. If you do everything correctly, by the cold weather the cutting will take root and it will be possible to spud it. After the cherry has overwintered, you should fertilize it again and wait for the first harvest.
Propagating cherries from young green cuttings is not particularly effective, but if you live in an area where it gets very cold in August, you can try this method. In this case, the cuttings are planted in mid-summer - at the very peak of the heat.
Green cuttings should be taken from a well-lit part of the crown after that. The cuts are made with a very sharp knife so as not to damage the thin bark. Before planting, the cuttings should be soaked in fertilizer.
It is worth planting in pre-prepared soil - fertilize it with peat or bagged mixtures. This plant also requires abundant watering and hilling before winter.
Reproduction by root shoots
Another simple trick that doesn’t take much time:
- In the last ten days of May - early June, shoots that have grown up to 20 cm are observed. To stimulate root growth, they are tied with soft wire (at the very base).
- Hill up immediately to a height of 7-8 cm.
- The same procedure is repeated 2-3 times in the summer. By autumn you should have a 20-centimeter mound. This year they don’t touch it anymore, leaving the bush for the winter.
- But next spring, such shoots are separated from the viburnum and transferred to a prepared place. The planting technology is familiar to this plant and does not require any other operations. Just try not to deepen the root collars too much.
There remains one more approach, which raises many questions among gardeners. We will try to answer them.
How to propagate plums from cuttings. Propagation by green cuttings
This method of propagating plums is the most common for dark varieties.
The soil for planting the green cuttings is prepared in advance - a mixture of peat and sand will create an optimal microclimate; before direct planting, good soil moisture and fertilizer are necessary (for example, superphosphate - 1 tsp per 10 liters of water).
On the mother tree, shoots are selected that will be cut - hard and acquiring a varietal reddish tint.
The shoots are cut with a sharp blade, each is divided into several cuttings 25-30 cm long, each of which should have two or three leaves. After pruning, the cuttings are placed in water with growth stimulants for 12-16 hours.
After the preparatory work, the cuttings are planted in the ground approximately 3 cm deep (without covering the bottom leaf), the distance between plantings is 7x7 cm.
Experienced gardeners recommend creating a good microclimate for the planted cuttings - carefully moisten the soil several times a day, cover the planting with film, making sure that the temperature under it does not rise above 30˚C.
After 15-20 days, the film can be removed, during which time the first roots should appear and the plants will need ventilation and oxygen.
The shoots are cut with a sharp blade, placed in water with growth stimulants, and planted in the ground about 3 cm deep.
The choice of time for propagation by cuttings determines the success of the result. Cuttings are cut in mid-summer, preferably early in the morning or evening; during the germination process, it is important for them to avoid excessive heat and cold, which is why a greenhouse film is installed.
For the winter, it is recommended to sprinkle the established cuttings with peat or fallen leaves to avoid frostbite of the young roots.
Reproduction by dividing the bush
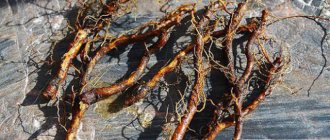
This propagation method is used for shrubs older than six to eight years. It is necessary to dig up red viburnum in the fall and divide it into several parts. Each of them should have three to four shoots and well-developed root processes. At the end of the procedure, open wounds on the “delenki” should be sprinkled with wood ash so that they do not become infected. And then plant the seedlings in a permanent place.
Dividing the bush allows you to rejuvenate the plant
Viburnum buldenezh propagation by cuttings. Propagation by cuttings
Propagation of viburnum Buldenezh by cuttings has its own characteristics. A gardener needs to know how and when to choose the right planting material. You definitely need to understand cutting and planting technology. Equally important are measures to care for plantings - they determine how quickly the plants take root.
Did you know? The name "buldenezh" is of French origin. The original name of the plant is “boule de neige” - “snowball”.
Is it possible to propagate Buldenezh from cuttings?
Viburnum Buldenezh reproduces only vegetatively. This also includes planting cuttings. Other breeding options are impossible, since the crop, unlike the common viburnum, has no seeds and the flowers are sterile.
Cuttings are a common method of propagating crops. Despite the length of the process and the average survival rate, many gardeners resort to this method.
How to choose the right cuttings
To successfully propagate shrubs, you need to choose high-quality planting material. Gardeners distinguish two methods of propagating viburnum Buldenezh: green and lignified cuttings. Before you start harvesting scraps, you need to figure out how to choose them. The rules for choosing cuttings are given below.
Did you know? Buldenezh viburnum was grown by French gardeners back in the Middle Ages.
Green cuttings
The best option for propagation is green cuttings. Prunings are cut from young branches up to a year old. These should be smooth stems without damage. Dry, limp, broken and disease-damaged branches will not take root. Each cut section should have two pairs of internodes.
Lignified
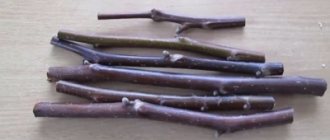
Viburnum Buldenezh can also be propagated using lignified cuttings. They are cut from branches covered with bark. The shoots must be smooth, intact, without rot, plaque or breaks. As in the case of green cuttings, there should be 2 pairs of internodes on the cut sections of woody branches.
How to take cuttings
The cutting rules are the same for green and woody material. The branch is cut into sections that meet the above parameters.
The pruning rules are as follows:
- above the upper internodes, cut diagonally;
- under the lower internodes the cut is straight.
The cuttings should be approximately 10 cm long. The branches are cleared of lower leaves. The upper leaf plates are cut in half.
When is the best time to take cuttings?
The cutting time depends on which shoots the gardener has chosen for pruning. Green and woody shoots are cut at different times. You can take cuttings from the crop in spring or summer.
in spring
In the spring, lignified shoots are cut. The optimal period for preparing planting material is April - May.
In summer
Summer harvesting is suitable for green cuttings. In the summer, scheduled pruning of the Buldenezh viburnum is carried out. During the procedure, it is convenient to select cut healthy shoots.
Caring for cuttings
After cutting, the cuttings need to be rooted. For better development of the root system, the prunings are kept in a growth stimulator. For these purposes, you can use Heteroauxin. 100 mg of the drug is dissolved in 1 liter of water. The planting material is kept in this solution for 6–10 hours. The processed material is planted in pots.
Important! When treating with a root formation stimulator, follow the instructions. Excessive soaking can have the opposite effect.
For planting, you need to prepare a substrate with the following composition:
- turf soil - 3 parts;
- humus - 1 part;
- sand - 1 part.
The cuttings are planted to a depth of 1.5–2 cm and the soil is compacted around the stem. The seedlings are grown until next May, after which they can be planted in open ground. Landing immediately in a permanent place is also allowed. In this case, the plants need to be covered with a cut plastic bottle or a mini-greenhouse should be equipped until next spring.
The shelter must be raised periodically for ventilation. When growing seedlings, follow the care rules below. These include proper lighting, watering and fertilizing.
Do cuttings need light?
Kalina Buldenezh does not need bright lighting. It is better to avoid direct sunlight. Cuttings planted in open ground are shaded. It is advisable to put the seedlings in the basement for autumn and winter.
Watering
The culture loves moisture. Keep the soil moist. Do not let the substrate dry out - it is better to water daily. You can water the plant “under the bush” or spray it with a spray bottle.
Viburnum from seeds
Viburnum reproduces well by vegetative means, and such seedlings begin to bear fruit 2–3 years after planting, while plants grown from seeds bloom only after 5–6 years. At the same time, seed propagation has the advantage that in this case the plants adapt to the growing conditions as much as possible, and are superior to vegetative clones in viability.
You can sow the seeds immediately after harvesting, but then the seedlings will appear only after 18 months. More precisely, the seeds will germinate in a year, overwinter, and only then the active growth of seedlings will begin.
You can speed up the process of obtaining seedlings using two-stage stratification. First, freshly collected seeds must be placed in a moist environment (sand, moss) and stored warm (at room temperature) for 2 months. During this time, the seeds have time to hatch, and then they begin “cold stratification”: the seedlings are kept in the cold (temperature +5 °C) for a month. These simple techniques allow you to save a whole year, during which natural stratification would take place.
After preliminary preparation, the seedlings are planted in planting containers placed in a room or greenhouse. It should be taken into account that the subcotyledon should not be buried in the soil, but only the root, which is colored brown. The harvested seedlings will be freed from the seed coats before the onset of spring and will have time to grow to 5 cm or more.
In the spring, the seedlings dive again, this time into a nursery organized in the open ground. By the time of picking, the seedlings should develop 2–3 pairs of true leaves. In the nursery, the seedlings will be grown until the spring of next year, when the stronger plants can be planted in their permanent location.
Further care
Proper care will help you grow a lush viburnum from a seedling with excellent fruiting. Full development will be ensured by sufficient moisture and fertilizer, as well as preventive measures against diseases and pests. And in the future - regular pruning.
The shrub is moisture-loving. In the evenings in summer, seedlings need abundant watering. And the older they are, the greater the volume of water required.
An adult bush can do without fertilizing. But for better development of the seedling and increased future productivity, you need to use them. It is advisable to fertilize along with mulching with sawdust.
Before the leaves bloom, apply spring nitrogen fertilizers. In the summer months - any mineral complex. In autumn, in preparation for winter, the bush is fertilized with a phosphorus-potassium mixture. The next autumn fertilizing with a solution of manure or potassium-phosphorus fertilizer is carried out 2 years after reproduction, during watering or when digging up the soil.
The shoots must be protected from pests: aphids, leaf beetles, cap moths and scale insects. If necessary, plants should be treated with insecticides before buds open. The use of insecticidal plants is ideal: horse sorrel, dandelion, and wormwood.
In high humidity weather, young shoots can be affected by fungus. These are various types of rot, spotting and powdery mildew. Spraying with fungicides will help. You can treat seedlings with folk remedies throughout the season. For example, solutions of laundry and tar soap with the addition of soda, tobacco, and ash. In case of severe damage, seedlings are treated with Bordeaux mixture.
Prevention measures include regular removal of weeds, loosening the soil cover and root zone of seedlings.
For information on how to propagate viburnum from cuttings, see the following.
Growing viburnum on your own plot is the natural desire of any summer resident. With proper care, the viburnum bush will delight you with lush flowering in the spring, and in the fall - with clusters of red berries. And the berry itself is so useful that you simply must have it on your plot. Moreover, propagation of viburnum does not require any special effort or knowledge.
Secrets of seed germination, stratification and scarification
author Vantenkov V.V., photo Ziborov T.Yu.
Planting material is constantly becoming more expensive, and prices for postal services do not lag behind. Gardeners often complain about the low quality of seedlings obtained from various farms and companies. And it also happens that there are no complaints about the seedlings sent. But even high-quality plants sometimes have difficulty taking root, they get sick for a long time after planting (if they don’t die in the first winter), and they lag behind in bearing fruit.
Many problems with mail-order seedlings are caused by a series of shocks that the plants experience throughout the delivery chain to the gardener. These are: digging and packaging, a long journey in a dark package, planting with disorientation to the cardinal points (I always mark the south side on my seedlings with red paint), adaptation to the new soil and to the microclimate of the garden. Such an abundance of shocks, following one after another, is mainly withstood by shrubby plants (and even then not all species). What can we say about 2-3 year old tree seedlings...
Therefore, the solution here is simple. If seeds are available, there is a reason to grow planting material yourself, following the sowing and care instructions for each type of plant.
I will share with readers of the Gardenia.ru website my experience in seed propagation of various plants with stratification and scarification of seeds.
Scarification of seeds with a very hard shell
The seeds of many stone fruits (cherries, apricots, etc.) have a very hard shell. To pass moisture to the seed embryo, you have to file a particularly thick side part, which prevents the seed from splitting into two halves and releasing the embryo. This disruption of the hard shell of the seed is called scarification.
Scarification is often applied not only to stone fruits, but also to other plant species with a dense protective seed coat. For example, a castor oil seed can float on the surface of the water for a week, but will remain dry inside.
In nature, the abundance of forest populations feeds on seeds and plant sprouts. And in seeds that have fallen to the ground, instead of scarification, rotting of the seeds or seed shells occurs. The natural processes of preparing hard seeds for germination last for years. This is why many plants self-sow so little.
By the way, scarification of seeds then requires stratification, and does not replace it.
And now the stratified seeds are already hatching, and it’s winter outside... In the next article I will talk about the features of sowing stratified seeds and the typical mistakes gardeners make when growing seedlings.
Weekly Free Digest of the Gardenia.ru Site
Every week, for 10 years, for our 100,000 subscribers, an excellent selection of relevant materials about flowers and gardens, as well as other useful information.
Landing at a permanent place
The site for planting viburnum should be chosen in light, with neutral or slightly acidic soil. The distance between adult plants should be at least 3 meters. However, if the bush is isolated, then pollination by bees will be difficult, which will certainly affect the harvest.
Did you know? Since ancient times, viburnum has been planted in courtyards or near houses. The plant was believed to have special magical powers. It can heal the owners, as well as protect against envy, misfortune, and bring peace and prosperity to the family.
The hole is dug so that the roots do not change shape.
A hill is made at its bottom, on which the seedling is placed, the roots are straightened and covered with soil. The root collar is deepened to a distance of 7 cm to form additional roots. After planting, the plant is watered abundantly. After 3 years, viburnum begins to bear fruit. If this does not happen, then it is necessary to increase soil fertility through humus and other mineral fertilizers.
The article discusses how to productively cut viburnum using one of the most painstaking methods. Having analyzed the propagation of a plant using green cuttings step by step, you can come to the conclusion that growing a bush is not so difficult. A reserve of patience and endurance is required in this process, because viburnum needs careful care. Only in hardworking hands can a twig turn into a luxurious bush that will delight its owner with a rich harvest and beauty.
Choosing a landing site
For planting viburnum buldenezh, choose areas located in partial shade. The culture does not like too intense lighting: in direct sunlight, the leaves begin to dry out and curl. Not suitable for growing shrubs and the place is too dark. In this case, the viburnum blooms sparingly and for a short time.
Ornamental shrubs love moisture, so it is advisable to choose places near water bodies for planting. It is important to ensure that there is no stagnation of water in the area.
This is interesting:
Is it possible to dry viburnum and how to do it at home
Choosing fertilizer for currants in spring: what and how to fertilize the bushes for a good harvest