Perennial plantings of phlox need updating over time. A huge variety of varieties and varieties of phlox allows flower growers to constantly replenish their collection. At the same time, phlox lends itself well to propagation, a technique that any amateur gardener can master. Phlox propagation is possible in several ways,
the choice of a particular method will depend on the time of year, purpose and source material. The following methods are distinguished: dividing the mother bush, cuttings (cuttings can be root, stem and leaf), root suckers, layering and sowing seeds.
Reproduction of phlox by dividing the uterine bush
Phlox can be planted in spring and autumn. In early spring, when young shoots appear, approximately 70% of the bush is carefully separated directly into the ground with a sharpened shovel. The excavated part is divided into five or more parts using a knife. The resulting plots are planted in a new place, and the old bush grows intensively over the summer and forms new stems. Even if there is no need to propagate phloxes, it is recommended to renew the plantings in this way every second year, and excess plots can be given away or destroyed.
Flowering of transplanted plots occurs in the first summer. The part of the bush left in its old place blooms more profusely, delighting its owners with large flowers.
Autumn division of the bush begins at the end of the growing season. For these purposes, choose bushes with a diameter of 20 cm and a number of stems of more than 10. These are, as a rule, three- to four-year-old plants. Before dividing, the bushes are cleared of old roots and planted. In 2–3 years of intensive growth, full-fledged bushes are formed.
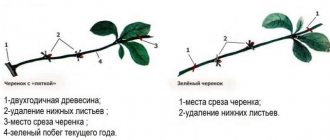
Propagation of phlox by stem cuttings
When cuttings, all varietal characteristics of the mother plant are transmitted. Phlox take cuttings and root quite well. However, you need to know that varieties with dark flowers need more care due to lower winter hardiness. Propagation of phlox by stem cuttings is possible in spring, summer and autumn. Spring cuttings are the most common.
Propagation by spring cuttings
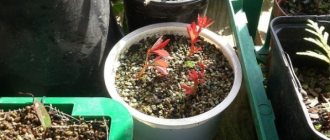
Cuttings are harvested at the end of May. For cutting cuttings, choose healthy, vigorous bushes, without signs of any oppression. The cut cuttings are immediately placed in boxes with damp river sand. After planting the cuttings, the boxes are placed in the shade and covered with film on hot days. For rooting, it is necessary to constantly monitor the humidity of the sand and air, and frequently spray the leaves with a spray bottle. The survival rate of stem cuttings in spring is maximum and amounts to 98–100%. After the root system appears, the cuttings are transplanted into open ground (preferably not in the sun), where seedlings are formed during the summer. Already in the fall, phlox plants are ready for planting in a permanent place. In this case, abundant flowering can be expected in the third year of life.
The timing of cuttings can be shifted to earlier months if in the fall after flowering, several young bushes are selected and transplanted into a pot to be moved to a room with a temperature of 5 ° C, not forgetting about moderate watering. At the end of January, the temperature is raised to 8–10 °C, increasing the frequency of watering. The first cuttings are cut in March; the yield can exceed 100 cuttings per bush. Cuttings 8–10 cm long are suitable for rooting; when cutting, the lower leaves are left for further shoot growth. To plant cuttings, fertile soil of light granulometric composition is poured into a box, and a 2-3 cm layer of river sand is scattered on top. The cuttings are planted close enough to each other, not deeply buried, so that the cut of the cutting remains in a layer of sand, where better oxygen access is ensured. Excessive deepening slows down the growth of callus and may cause it to rot.
Under optimal conditions, root primordia (callus) appear a week after planting. To reduce the processes of assimilation and evaporation, it is advisable to remove leaves from the cuttings. In this case, there will be no need for lighting. If the leaves are not removed, then the room should be equipped with a source of diffused light. Greenhouses are well suited for spring cuttings. A few days after rooting, glass frames begin to be opened (morning and evening). Gradually increasing the hardening time in direct sunlight and fresh air, after a week the frames are removed completely.
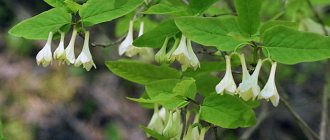
Phlox paniculata `Aida´
Propagation of phlox by summer cuttings
The period of summer cuttings lasts from the second ten days of July to the second ten days of August - during the mass flowering of phlox. Cuttings are cut from shoots without inflorescences. Cuttings can be cut every 5 days. Since in summer higher air temperatures and lower humidity are factors that contribute to intense evaporation of moisture, it is better to cut cuttings early in the morning when there is dew. On the shoots selected for cuttings, the leaves are first trimmed, leaving 1/3 of the leaf, which is enough for photosynthesis and nutrition of future roots and not enough for strong evaporation. Then they begin to cut the cuttings, focusing on the middle part of the shoot, since cuttings from the top practically do not take root.
Cut cuttings should not be placed in water. Without delay, begin planting in a pre-prepared substrate. The substrate is prepared from equal parts of turf, forest litter and humus. The substrate is covered with river sand on top with a layer of several centimeters. It is advisable that the greenhouse be in the shade, otherwise artificial shading is created. Immediately after planting, the cuttings are covered with film or glass frames. During the entire rooting period, it is necessary to strictly monitor the level of soil and atmospheric humidity in the greenhouse. To maintain 100% moisture, watering, spraying and irrigating the area around the greenhouse are used. During summer cuttings, root primordia appear within 2–3 weeks. The number of rooted cuttings drops to 80–90% compared to spring cuttings.
Phlox paniculata 'Anja Gaganova'
Propagation of phlox by autumn cuttings
From the second ten days of September, autumn cuttings can be carried out. Phlox bushes form rich cutting material during the growing season. The cuttings are planted directly in open ground, choosing areas with loamy soil, which is recommended to be mixed with peat. The cuttings are slightly buried in the soil, positioned at an angle. After planting, the soil is mulched with a layer of fallen leaves (preferably birch). Overwintered cuttings are transplanted in the spring to ridges with fertile soil for growing, and in the fall they are transplanted to a permanent place.
To increase shoot formation, all shoots are cut off from bushes marked for autumn cuttings in mid-August, leaving stumps 10 cm high. By September, the bushes will have formed excellent material for cuttings. The cut cuttings are planted in a greenhouse for wintering. In this case, the cuttings take root earlier and are ready for transplanting into garden beds in May, and at the end of summer you can admire their flowering. This method is especially relevant for the propagation of weakly rooting varieties.
Phlox paniculata 'Baby Face'
Tips and tricks
It will be better for stems or leaves to take root, as well as for new shoots to form, if:
- Harvest cuttings in cloudy weather. If it's a hot day outside, cutting stems or leaves is best in the shade.
- Before planting in a box, store the harvested stems in a container covered with a rag soaked in water.
- Treat cuttings with growth stimulants. A solution of heteroauxin (0.5 grams per bucket of water), Kornevin (3 drops per liter of water) or another drug is suitable for this. Leaves or chopped shoots are lowered into the solution and kept in it for about 10 hours (you can put it in the evening, keep it all night and plant it in the morning).
- Treat the cuttings with aloe juice. It is a natural growth stimulator. Dilute the agave juice in water in a ratio of 1 to 1. Dip the cuttings into the resulting solution before planting.
Advice! To maximize the effect of aloe, prepare biostimulated juice in advance. To do this, collect 2-3-year-old agave leaves, put them in a plastic container and refrigerate for 2 weeks. During this time, they will produce many biologically active substances necessary to preserve the viability of the plucked leaves of the plant. Now take out the container and squeeze the juice from the leaves. It will be several times more useful than usual.
Breeding phlox from cuttings is labor-intensive work. But in one season you will receive not a few units, but several dozen bushes, ready for wintering and planting in the flower garden. With early cuttings, you can enjoy the first flowering in early autumn. But it’s better to wait until the next growing season. Then the bushes will be stronger, and they will bloom more magnificently and abundantly.
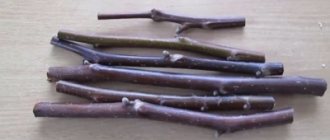
Root cuttings
Root cuttings involve preparing bushes in the fall and storing them at low positive temperatures. In April, powerful roots without signs of disease are cut into cuttings of 2–3 cm. When planting, root cuttings are oriented with the top part up. The cuttings are planted in boxes in dense rows with a row spacing of 10 cm. The cuttings are lightly sprinkled with soil on top. After this, care consists of moderate watering. After about a month, young shoots appear. With normal development and compliance with all conditions, in the third ten days of May, cuttings can be planted in open ground. By this time, shoots 10 cm long and a well-branched root system should have formed. Propagation by root cuttings is used for varieties that, after cutting the shoots during stem cuttings, form curved shoots, lose their attractiveness, and change the shape of the bush.
Phlox paniculata 'Bright Eyes'
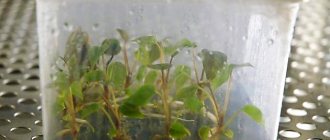
Leaf cuttings
For this method of phlox propagation, the optimal timing is the third ten days of June - the first ten days of July. Only mature stems are selected for cuttings. Using a sharp knife (preferably a garden budding knife), cut the leaf petiole with a thin stem plate 2 cm long. The yield of cuttings from each stem depends on its length and can be up to 15 pieces. The survival rate of such cuttings is 100%. The boxes are filled with a rooting substrate made from compost, peat and river sand, and another thin layer of river sand is poured on top of the substrate. The cuttings are planted in a moistened substrate well saturated with moisture. The cuttings are planted in such a way that the leaf is on the surface at an angle to the substrate, and the bud with part of the stem is in the sand. The distance between the cuttings is left about 5 cm. The boxes with the cuttings are transferred to an open greenhouse with the possibility of shading and shelter from bad weather.
After 2 weeks, callus begins to form. As with other cutting methods, special attention is paid to the level of moisture. Rooting of cuttings lasts for a month, after which gradual hardening begins with direct sunlight and cool air. To stimulate the formation of new buds and increase bushiness, the top of the cutting is pinched. When the plants are formed and strong, they are transplanted into open ground to a permanent place, pinching the roots. The strongest and tallest specimens will bloom in the same year. To increase the winter hardiness of plants, they should be covered with peat and spruce branches to prevent deep freezing of the soil.
Phlox paniculata 'Dorffreude'
Types of cuttings and its advantages
Each gardener chooses the method that suits him most. There are main types:
- propagation by stem cuttings;
- leafy;
- root.
The essence of each of them is approximately the same. The difference is in the origin and size of the cuttings used. In any case, propagating phlox from cuttings gives a similar result. Among the advantages of such propagation of phloxes it is worth highlighting:
- from small parts of the plant large, full-fledged phloxes are obtained;
- the decorative properties of the mother plant are preserved;
- This method itself is quite easy and is suitable even for beginners.
It is worth talking about each type of cutting separately.
Reproduction of phlox by layering
This method does not require frequent transplants and space in a greenhouse. At the beginning of summer, mother phlox bushes are selected, which are heavily covered with moist, loose soil and begin to be watered regularly. The sprinkled parts of the shoots begin to form roots. In August, shoots with roots are cut off and planted immediately in a permanent place.
Phlox paniculata 'Europa'
How to propagate perennial and annual phlox
Phlox fascinates with its beauty and variety of colors. A flowerbed filled with this plant looks festive and elegant. In nature, there are both annual and perennial species of these flowers, and they all lend themselves well to propagation.
Reproduction of perennial phlox
Perennials are propagated in different ways. The fastest and easiest option is considered to be dividing adult bushes. A more labor-intensive process that requires the creation of special maintenance and greenhouse conditions is propagation by spring growth shoots.
How to propagate annual phlox flowers
Annuals are propagated by seeds. It is better to buy planting material in specialized stores. Some gardeners collect seeds themselves, but in this case it is not always possible to transfer all the qualities to the hybrid plant.
Seed propagation of phlox
For perennial phlox, the seed method is secondary, and for annual phlox it is the only possible method of propagation. Phlox seeds are produced in certain weather conditions and take a certain amount of time to mature. Cool summers with frequent rainfall negatively affect this process, so it is better to dig up several phlox bushes at the end of summer and transplant them into pots. Pots with phlox can be kept in the same conditions as indoor plants. At home, phlox will complete the setting and ripening of seeds. For unpretentious varieties, it is possible to use winter sowings. To do this, the seeds are sown on ridges with humus and sand, and then covered with dry leaves. In the spring, the covering material is removed and the seeds germinate under the warm rays of the sun.
However, it is safer to use the seedling method. Prepare the substrate in advance: mix turf soil, humus and river sand in equal parts. Boxes are prepared in the required quantity at the rate of one box half a meter long and 35 cm wide for 250 seeds. When sowing, the seeds are not buried, but sprinkled lightly with substrate. Sowing is carried out in early December, after which the boxes are transferred to an open greenhouse and covered with snow. In the second ten days of March, the boxes are transferred to a greenhouse with a temperature regime of 12 °C during the day and 5 °C at night. The first picking is carried out in the phase of the first pair of leaves. In the phase of four true leaves (closer to the end of April), the seedlings are transplanted into a greenhouse with a feeding area of 8 square meters per plant. cm. After transplantation, the plants must take root, so the greenhouse is covered with glass frames or film. Hardened seedlings are planted in open ground in the second decade of May. Phlox are expected to bloom in the first year.
| Phlox look great in a flower garden along with plants such as monarda, amaranth, and aster. If you want a flower garden on your site like the one in the photo from colorful magazines, see the course “Flower Garden Collection”. 73 flower beds, 8 categories: easy-care, long-flowering, rose gardens, mixborders, rockeries, arabesques, ridges, other flower beds. 2 plant options in each flower bed. The quantity of each plant in all variants is indicated! | |
Phlox paniculata 'Graf Zeppelin'
“The shine of phlox in your garden. Features of cultivation” – you may be interested in this article...