DIY garden decoration
With the advent of garden stores, manufacturers provide a huge selection of different garden decorations: from small lanterns to huge fountains. But skillful hands and imagination do their job, so garden decorations can be made from anything. For example, you can make a variety of garden crafts from mayonnaise buckets. If you use your imagination and put in a little effort, you will get a quite spectacular decoration.
What to make from a mayonnaise bucket? They can be used to create funny little animals or people, chests, flower pots, feeders or birdhouses, borders, etc. But it is necessary to take into account the placement of the product. If it is in a dry place, then using paper, tape or fabric will be acceptable. If the item is placed in an open space, then it will be necessary to use varnish during the final processing of the craft.
Easter decoration
What could be more charming than a pair of chickens in a nest on Easter or just for no reason?
Making decor:
- Take the lid of a mayonnaise or similar bucket.
- Cover the “bottom” with a beautiful circle made of paper (for example, packaging) or fabric, secured with hot-melt adhesive.
- In the center, use the same method to fix the end of the twine and wind the spiral. This will be a nest.
- Glue the chickens in the center. They are sold in household goods or crafts, and can be ordered online. Another option is to make pompoms from woolen thread and fluff them with a needle, glue on the eyes from black beads, and the beak from red felt or cardboard.
- Lay the twine along the edge of the decoration and cover the end with braid. If this is going to be a panel, form a loop.
- All is ready. To add even more beauty, glue on small flowers and twigs, which are often left over from decorative compositions from the store.
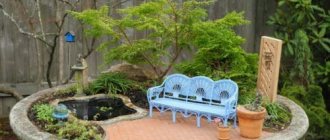
Flower pots from buckets
What to make from mayonnaise buckets with your own hands? The simplest and most interesting activity in creating garden decorations is pots and flower pots. Materials needed for the pot:
- Mayonnaise bucket.
- Magazine with glossy pages.
- Bitumen varnish.
- Solvent No. 646.
- PVA glue.
- Hot glue.
- Braid.
- Acrylic lacquer.
In the bucket, you need to make holes in the bottom in advance to drain excess moisture from the ground. Using sandpaper No. 0, you should sand the surface so that there are no unnecessary protruding parts, and go over the bucket with solvent to remove any remaining grease. Next, you need to tear out the glossy sheets from the magazine and tear them into pieces, approximately 5-6 cm long. Using PVA glue, you need to glue the glossy scraps of the magazine to the bucket. This can be done completely inaccurately by gluing one piece of paper onto another, side by side, or in a different position. After the glue has completely dried, treat the workpiece with a solvent, applying it to a cloth until the color disappears from the scraps of the magazine.
Afterwards you need to open the surface with bitumen varnish. Until it is dry, the pot should be wiped with a dry cloth. Hot-melt adhesive should be applied to the place where the lid is put on and the tape should be glued. Exactly the same manipulation should be done with the bottom of the bucket. To decorate its middle part, one side of a piece of fringe must be sewn manually with a “forward needle” seam and tightened. The result will be something like a flower. Using hot glue, the decoration can be glued to any place, and it is better to place a bead or pebble in the middle of the flower. The entire product must be opened with acrylic varnish and left until completely dry. A bucket lid can serve as a saucer for water. The mayonnaise bucket pot is ready. Now you can plant flowers.
Storage buckets
Plastic mayonnaise buckets are a universal storage container. Unlike cardboard boxes, they are easy to clean. Thanks to the tightly closing lid, things are not covered with dust, food does not absorb foreign odors, and cereals are reliably protected from moths.
In these buckets I store:
- flour and cereals;
- wool threads;
- materials for creativity: napkins, ropes, ribbons, fabrics, beads;
- seeds;
- hair decorations along with combs;
- opened packages of milk, yogurt, kefir (in the refrigerator).
To make the boxes look stylish and presentable, I decorate them. The surface must first be degreased with alcohol. And then the buckets can be painted, twine, foamiran, and ribbons can be glued on.
Applications from mayonnaise lids
Clear plastic lids work very well for reverse applications. First, use a solvent or nail polish remover to degrease the surface. Having selected the desired picture and cut it out, you simply need to glue the image with glue to any side of the lid. You can paste exactly the same picture on the reverse side. If you take a decoupage napkin, creating a mirror image on the lid will not be difficult.
Pictures from plastic caps
You need to wash and dry well, and degrease the plastic cover. Next, you should draw a sketch of the design on paper and place the lid on it with the outer side.
Along the line of the sketch, carefully filling it in, spread a thin layer of plasticine. Using a thin marker on the outside of the lid, you need to trace the contours of the picture, and then glue the side of the lid to the cardboard. You can make a hole in the top of the lid, insert a rope and hang the image. If you open it with varnish, it will not be afraid of water. The application is ready.
Postcards with surprises
It’s very easy to make unusual cards with surprises from plastic caps.
Make a base for a postcard from thick, strong cardboard. To do this, fold the cardboard into a book. The card itself should be wider than the plastic cover. For a round lid, you need to cut off the edge that covers the bucket, keeping only the flat strip. This strip is needed to attach the lid to the card. In the front part of the cardboard blank, cut a round hole 2 millimeters larger than the diameter of the lid. On the back of the card, mark a place that will be visible through the cover. Glue the cover itself to the hole in the front of the card.
Cut a piece of corrugated cardboard into thin strips. Make their width less than the height of the mayonnaise lid. On the back wall of the postcard, in the place marked in advance, lay out a random labyrinth from strips of corrugated cardboard and glue it. When the glue is completely dry, put any round thing in the maze and glue both halves of the postcard together.
Such products from plastic lids can be made with various fillings. You can pour colored chips inside the lid, which will look like sand. You can glue a photo or drawing to the back wall, make an applique or paint it with paints.
Pots made of mayonnaise buckets in decoupage style
Decorating in the decoupage style is now a very popular hobby, and besides, it is not a difficult task. To make the pots look beautiful, you will need:
- The bucket itself.
- Acrylic primer or white acrylic paint.
- PVA glue.
- Napkin for decoupage with any picture.
- Acrylic paints.
The bucket needs to be washed, cleaned of the product sticker, and dried. Sand the surface, cover with primer or acrylic paint to avoid unevenness. Leave until completely dry. Take a decoupage napkin and remove the two bottom white layers, then cut out or tear off the desired part of the design. Since the picture is flat and the bucket is round, it won’t be possible to glue the image right away.
It's easier to do this with an office file or a thick transparent plastic bag. Cut off one side of the file or cut the bag, place the drawing face down on it and pour in a little water, while using a brush to smooth it over the entire surface of the image, expelling the air. Lift the polyethylene and simply apply it to the surface of the bucket, gently smoothing out any irregularities with your finger. After the pattern has stuck to the surface, you can remove the polyethylene.
From the top with a brush you need to apply PVA glue from the center to the edges of the image, smoothing out the “wrinkles”. Leave until completely dry. Cover the drawing with acrylic varnish. When everything has dried, you need to apply paint of a suitable color around the application. For example, if these are sunflowers, you can make the top blue, symbolizing the sky, and the bottom green, symbolizing grass. When the paint has dried, coat the bucket with acrylic varnish.
Basic technology requirements:
- Determine the purpose of plastic buckets;
- When used for planting flowers, it is necessary to provide holes at the bottom for soil drainage before decorating;
- If the buckets will be in the open air, then it is better to paint them with moisture-resistant paint;
- Before using it for pots, you need to strengthen the handles in advance so that they can withstand both the weight of the soil and the plant itself.
All that remains is to thoroughly wash and dry the bucket with a lid and get to work.
Decorating crafts using wooden clothespins
This craft is very easy to make. For this you need: old wooden clothespins and Moment glue.
- Clothespins are freed from metal fastenings;
- The halves are glued to the bucket one by one.
The resulting design looks complete in this form. It will last a long time outdoors too. But if you tie a beautiful belt in the form of a braid or ribbon around the waist of the bucket, and insert a suitable-sized bag inside with a lace edge exposed outward, then the craft becomes an elegant decoration both in the house and in any gazebo in the garden.
An interesting idea for decorating a craft using whole clothespins. They take over in a circle. The bucket becomes taller and more functional. The lower part can be decorated in any of the proposed ways.
If there are no clothespins in the house, wooden branches cut to size will also work perfectly.
If you use this technology to glue ice cream sticks and tie one or two ribbons in a circle, then this decoration will look like a village fence. You can plant flowers in this pot and use it as a box. Such a fence can be painted with moisture-resistant paints or appliqués can be glued to it.
Crafts trimmed with braid, thick threads or fabric
This craft will become a unique decoration for closed areas in the garden. You can put household trinkets, small fruits or seeds in such a container.
PVA glue is applied to the bucket and wrapped in a circle with thick braid or thread. The decoration is completed with contrasting color buttons, corks or appliqués.
In such homemade pots, decorated with coarse twine, flowers also feel great.
A bucket with bright draped fabric around the body also looks great.
Garden lamp
The luminous craft is made only from a transparent plastic bucket. To get such a lamp, you need to first cover the walls and bottom with multi-colored glass. You can draw colored pictures of leaves and flowers. An electric light bulb is connected to the finished pot and the invention is hung in the garden on a tree or in a gazebo.
Bell
A small bucket upside down looks like a bell. All that remains is to decorate it with paints, colored paper or foil, make a handle and a core with a large bead for it.
Such bells will never ring, but will delight both adults and children with their brightness. They can be made shiny and hung on garden trees during the Christmas holidays.
Bucket with decoupage
Even children will want to plant flowers in a homemade pot. Decoupage in this case is an excellent way to decorate. Even people who don’t know how to draw can create colorful pieces of art:
- white acrylic paint is evenly applied with a sponge to the side surface of the bucket;
- after drying, apply a second layer;
- cut out designs from multi-layer napkins;
- the top layer is separated and glued to the bucket;
- to secure the design, cover it with decoupage glue (do this from the center to the edges);
- Acrylic matte varnish is applied on top in 3–4 layers.
This solution for flowerpots behaves perfectly both outdoors and in the apartment. There is also a method of volumetric decoupage. It uses modeling paste mixed with coarse sea sand. A few movements by the sculptor - and the masterpiece is ready!
Decoration from saw cuts
A craft decorated with wood cuts can become a real work of art in every dacha. For this purpose, fallen almost dry branches are collected and sawn into small stumps in the form of buttons. Then they are glued to the surface of the bucket close to each other.
Cartoon craft
Children love to play in the garden sandbox, and buckets don't always last forever. It is enough for parents to show a little imagination and the child will have several of them at once. An ordinary plastic mayonnaise bucket is an excellent solution. Stickers with images of your favorite cartoon characters on the wall of the bucket will give them new life and will delight children from the bottom of their hearts.
Bucket with a heart
Draw a heart template on paper according to the size of the bucket and cut it out. Glue the heart using a piece of double-sided tape.
Along the edge of the template, create a pattern in the form of drops using any colored nail polish.
Remove the template and draw the following contours inside the first drawing, using a new varnish color each time.
The number of hearts depends on the spaces between the colors.
You can make this craft yourself and give it to a loved one on Valentine’s Day. This craft will fit perfectly into the garden design in the form of a flowerpot, and as a pot for indoor flowers.
Lighthouse in the garden
For this structure you will need four buckets of different capacities. First, they are painted in accordance with the accepted colors for a real lighthouse. Then they build a tower. A small flashlight is attached at the very top.
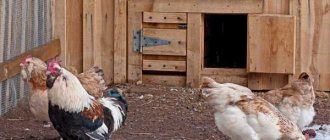
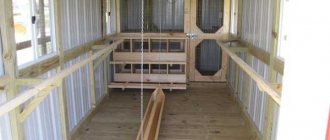
Birdhouse
Starlings will also love the gift of their own house. The entire production comes down to carefully cutting out and securely fastening the lid, which will become the floor.
Birds will fly to the tasty treat in the form of grains; they will also be attracted by the bright colors of the future home.
Flowerbeds and borders made from buckets
If a sufficient number of plastic buckets have accumulated, then building a flower bed will not be difficult. You need to choose a place in the garden, make a small mound of earth based on the number of buckets. Remove the handles from them. Decorate the blanks at your discretion, but take into account changeable weather conditions. After decorating, it is best to open the product with several layers of varnish. Around the flowerbed you need to stick the buckets into the ground at any distance from each other, and the flowerbed of mayonnaise buckets is ready. You can plant flowers.
Crafts for the garden from mayonnaise buckets include making borders. The border is made in the same way and decorated to the taste of the owner of the flowerbed.
Cool shelves
If you have accumulated a lot of plastic buckets, you can use them as boxes for storing various small items. It will be just right in the garage or at the dacha! Attach the buckets to a piece of plywood at the back and fasten them together, and your new spacious shelf with a bunch of compartments is ready. I think such a design, only smaller in size, can be made and shoes can be placed there.
Smooth and fresh skin: dermaplaning, or why a woman needs to shave her face
Rare shot: Viktoria Isakova showed her grown-up daughter from Yuri Moroz (new photo)
"Dad is offended." Agata Muceniece about her relationship with Priluchny after the divorce
Bucket feeders
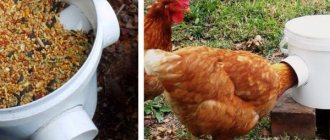
To make a bird feeder from mayonnaise buckets you will need:
- Paper.
- Stationery knife.
- Marker.
- Decor elements.
- Plastic bucket.
Cut out elements from paper that look like windows with shutters and use them to mark the cutout locations on the bucket, tracing the outline with a marker on the surface. Cut out the window sashes using a utility knife in all designated locations. Decorate with decorative elements: paint, glue beads, pebbles, etc. Cover the top with a lid, hang it by the handle in the chosen place and pour grain.
Bird feeders
It is done very simply: we cut a certain size notch from the top of the bucket, then turn it upside down and place it on the surface. Very functional and convenient! Birds can easily fly inside the feeder, and the food is protected from wind, rain and snow.
Another option is hanging. A hole is cut in the bucket just above the level of the bottom, the top of the bucket is closed with a lid and hung on a tree by the bow.
DIY lamps made from plastic buckets
A mayonnaise plastic bucket in skillful hands can become an interesting lamp or lantern. You need to take two buckets of different sizes and insert one into the other. The bucket is pre-treated with sandpaper to ensure strong adhesion of the decoration to its surface. The light bulb socket is installed in the bottom of a smaller plastic container. An energy-saving or ordinary low-power incandescent light bulb is suitable for this. A homemade lampshade made from a bucket is decorated with colored glass, which is simply placed on glue. Having made stencils in the form of animals, plants, houses, etc., you can cut holes along their contours, or decorate the lampshade with a collected herbarium.
For gardening and construction work
In large (3-10 liters) buckets I dilute paint, whitewash, and insect repellent. It’s a shame to dirty a good bucket for these purposes. But there is no mayonnaise packaging.
Also, when we were doing renovations, my husband made a cyclone out of a bucket: he inserted corners into the lid, connected a vacuum cleaner and very quickly removed all the construction debris.
Easter baskets from mayonnaise bucket
For production you will need the following materials:
- Plastic bucket for mayonnaise.
- Solvent.
- Super glue or hot glue.
- A piece of white thick fabric.
- White lace fabric for decoration.
- Wooden clothespins of the same size.
- Scissors.
- Threads.
- Twine rope.
Such crafts for the garden from mayonnaise buckets on a bright holiday will be especially interesting for children if treats are hidden in them.
The bucket needs to be removed from the sales sticker and wiped with solvent. Divide the clothespins into two parts and glue the flat side to the bucket. They should fit snugly against each other. Sew a bag from thick white fabric to the inner size of the bucket. To do this, cut a circle slightly larger than the size of the bottom of the bucket, and a strip the size of its wall. We sewed the two together. Sew lace to the top of the bag. Wrap the handle of the bucket tightly with twine. And tie it around the bucket with clothespins and tie it with a bow.
Garden crafts made from mayonnaise buckets will be a wonderful and unique decoration. This inventive and creative activity will appeal to both children and adults. And now, before getting rid of the empty container, you need to think about whether it might turn into, for example, a border of mayonnaise buckets. You can make a lot of great garden decorations this way.