Many gardeners sometimes conduct experiments by growing fruit trees from seeds. And cherries are no exception. But for this venture to be successful, it is necessary to select suitable varieties, properly prepare planting material and provide the necessary care during the early development of seedlings. Only by following all the recommendations can you expect that the final result will correspond to what was expected. Therefore, it is worth familiarizing yourself with the information on how to grow cherries from pits in more detail.
Is it possible to grow cherries from pits, and will they bear fruit?
The seed propagation process is inherent in all wild trees. It takes a lot of time, so you need to be patient. In the case of cherries, growing a tree is quite possible. But the resulting seedlings will differ from the mother plant. In most cases, a wild form of the crop grows from the seeds.
Therefore, gardeners who need a hardy rootstock for their favorite variety usually resort to this method. This allows you to get a zoned look of the plant and save on purchasing seedlings from the nursery.
Important! The species properties of the mother tree do not apply to seedlings obtained from seeds.
Benefits of cherries grown from pits
Cherries grown from drupes have many advantages. The most important thing is that the plant is fully adapted to climatic conditions; additional hardening or the use of warm shelters is not required. Cherries also compare favorably with their hardiness and resistance to diseases; there will be no problems with care. Propagation by seeds is also recommended if you need to grow a tree to create a bonsai.
The disadvantage of growing a tree from seeds is that varietal characteristics are extremely rarely preserved. The only way to get sweet, tasty fruits is to graft.
Pros and cons of propagating cherries with pits
This method of reproduction has its advantages. But it also has certain disadvantages that need to be taken into account.
Main advantages:
- many seedlings at the same time;
- high survival rate;
- regionalization of species;
- Possibility of use for rootstock.
Flaw:
- non-preservation of species qualities;
- requires a long time;
- late ripening.
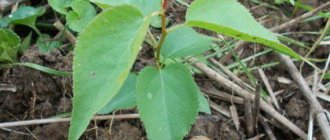
Seedlings obtained from seeds have increased endurance
Further care
In order for the cherry tree to grow healthy and delight you with a rich harvest, you should take care of regular care.
Follow these simple rules:
- loosen the soil regularly, depending on its nature;
- provide balanced watering;
- fertilize the plant;
- take care of the crown, trim it in a timely manner;
- protect the plant from pests and diseases by using special preparations;
- do not allow weeds to multiply near the cherry tree.
Thus, from a small seed, even at home, you can grow a good cherry tree, which will delight not only a successful gardener, but also the whole family.
Preparatory stage
The process of cultivating cherries from seeds is a long and painstaking work. And a successful result largely depends on the preparation of planting material, as well as the step-by-step implementation of all the necessary steps, taking into account the recommendations.
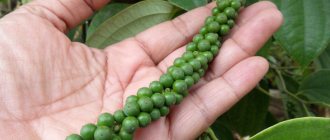
When to collect and how to save cherry pits before planting
Cherry seeds should be collected from large fruits without signs of diseases or pests. Berries should be picked at the stage of technical ripeness and placed on a sunny windowsill to ripen.
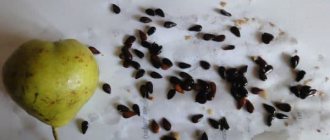
As soon as the fruits acquire a dark red tint and their flesh becomes softer, you need to remove the seeds and wash them thoroughly in cold water to wash off any remaining juice. Then the seeds should be placed on a cloth in one layer and left in a shaded place to dry.
After this, put the seeds in a paper bag and store until planting in a dry place at a temperature of +20 degrees.
Natural stratification: spring and autumn
To germinate a cherry seed, stratification is required. To do this, they need to be kept in the cold for a certain period of time. There are two possible options for this procedure. In the first case, the bones need to be placed in a plastic bag (in the fall, at the end of October, before the onset of cold weather). And then bury it in the ground until spring. In this case, the seeds will undergo natural stratification, but they will not be available until the soil thaws.
Work with planting material
To increase the germination of seeds, it is necessary to first prepare them for stratification:
- Collect the seeds, put them in a bowl and fill them with water. Rinse thoroughly;
- Drain the water, and lay the planting material in one layer on a cloth and place it in a dry and ventilated place to dry;
- Wrap the seeds in paper and store in a warm room until December.
Before stratification, they must be placed in water again for 4–5 days. This link will tell you about planting onion seeds before winter.
During this period, the water must be changed daily. The first time, the seeds can be placed for a few minutes in a slightly pink solution of potassium permanganate.
Stratification
The main purpose of stratification is to remove the seeds from a dormant state. In nature, they usually spend the winter in damp and cold environments. As a result, the hard part cracks under the influence of moisture and frost. And when positive temperatures set in, the embryo begins to seek access to the sun. Stone fruit seeds are stratified as follows:
- Place a wet cloth, damp moss or sand in any sealable container;
- Place the seeds on the substrate;
- Sprinkle moss, sand, etc. on top. The approximate ratio of substrate to seeds is 3:1;
- Seal the dish and place in the refrigerator. The temperature is desirable from 1 to 3 degrees Celsius;
You can carry out sanding (stratification) in another way. 2-3 cm of wet and clean sand is poured into the bottom of the box. Then a layer of seeds. Cover the top with burlap and add another layer of sand.
Seeds can be stratified not only in the refrigerator, but also in the cellar. And the second method of preparing seeds for germination is suitable for this. Moist soil is poured into mustard and sauce jars and one seed is planted there.
Growing and caring for seeds
After friendly shoots appear, the containers should be moved to a bright windowsill and the temperature reduced to +16...+18 degrees. This will prevent the shoots from stretching and stimulate the growth of the root system.
Otherwise, care is the same as for other plants in the house. Seedlings need to be watered as the top layer of soil dries. Periodically loosen the soil in the pot, and also fertilize it with organic matter once every 2 weeks. When the seedlings grow, they should be planted in separate pots.
Important! Young trees should be planted in a permanent place in the country house or garden when they are at least 2 years old.
How to care for sprouts
At home, sprouts are cared for in the same way as indoor flowers. They need regular watering with warm water and loosening of the top layer of soil. This is done so that the soil does not form a hard crust, otherwise oxygen and nutrients will not reach the roots. You should not loosen too deeply, so as not to injure the fragile root system. Fertilizers are periodically applied in the form of organic tinctures, but not fresh organic matter. You also need to inspect the sprouts for diseases and pests. For the slightest problems, use both chemical and natural remedies. Cherries that are one or two years old are transferred to the garden.
Cherry sprouts should be watered regularly, periodically adding organic fertilizers
In open ground, maintenance is a little easier. It is necessary to water and loosen the soil in a timely manner, fight weeds and apply fertilizers. Two-year-old trees begin to form a crown, undergoing health-improving spring pruning. It is very important to properly prepare cherries for cold weather. In autumn, the tree is watered abundantly (up to 8 liters of liquid per plant). Before winter, the roots must be covered and the tree trunk circles mulched. In regions with harsh climates, the trunk and crown are additionally insulated with burlap.
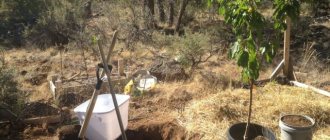
Transplanting germinated seedlings into the ground
The procedure for transplanting cherry seedlings does not involve complex actions, so anyone, even a novice gardener, can cope with it. The main thing is to choose the right place.
When and where to plant
For cherries, you need to choose a sunny area, protected from cold gusts of wind. Seedlings should be planted at a distance of 2.5-3 m from any building. Cherry shows good performance in loamy and sandy loam soil with good aeration and low acidity.
Planting should be carried out in early spring, when the ground has thawed to a depth of 0.5 m, and the temperature will confidently remain above +10...+12 degrees. If there is a threat of return frosts, then young seedlings need to be covered with agrofibre.
Important! The groundwater level in the area intended for cherries must be at least 2 m.
Young seedlings react poorly to excess moisture in the soil
Planting in pots
In order to germinate seeds, special containers for seedlings are used.
But the cells in them should be located so that the distance between the plants is at least 20 cm. Such containers are used if there are a lot of seeds. When there are several of them, they use ordinary flower pots with a volume of at least 0.5 liters. This article will tell you how to grow green onions at home. Place the soil in the container, carefully place the seed and cover it with soil so that a layer 2 to 3 cm thick is formed on top. You can simply make a depression in the soil, put the seed in it and sprinkle it with the same substrate. Place the container in a transparent plastic bag or simply carefully cover the soil with plantings and place it on the windowsill. That is, they form a kind of mini-greenhouse. Within a month you can see small sprouts. Now it's time to care for small plants. And the survival rate of the seedling will depend on its quality.
Features of soil selection
Before planting a Nochka, Morel or any other cherry seed, you need to prepare the soil. It is advisable to use the one on which the future tree will grow. That is, if it is the southern part of the country – chestnut, dark chestnut, southern chernozems. The middle zone is chernozems, gray soils, sod-podzolic soils, etc. However, you can plant the seed in a special soil mixture for indoor flowers, which are sold in specialized stores. By the way, gardeners often use a mixture of perlite and sand. After all, perlite is a volcanic rock that promotes plant growth. Exhibition will tell you about the features of planting and caring for onions in this material.
You can prepare your own nutrient mixture for pots:
- Seven parts of humus;
- Two parts of turf land;
- One part mullein;
- For 10 kg of the mixture add 10 grams of ammonium nitrate, 12 grams of superphosphate, 10 grams of potassium sulfate, 12 grams of fluff lime.
Before planting cherry pits, it is advisable to steam the soil for disinfection.
The main mistakes of novice gardeners
Often, mistakes can lead to failure when growing cherries from pits. To prevent this, you need to study them in advance.
Possible mistakes:
- selection of planting material from varieties not suitable for germination;
- lack of stratification;
- improper storage of seeds before planting;
- excessive seed penetration;
- excessive watering of seedlings;
- increased soil acidity;
- close location of seedlings.
Knowing how to grow cherries at home from a seed and correctly transplant them to a permanent location, it is quite possible to get a fruit-bearing tree. But it should be understood that such a seedling is better used for a rootstock, since in terms of yield and taste of berries it will be significantly inferior to more modern species.
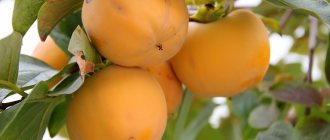
Beneficial and harmful properties of cherries
Dear readers, cherries have many beneficial properties for the body. I will briefly describe its main positive and negative characteristics.
- Pectins and salicylic acid contained in the pulp help get rid of streptococcus, staphylococcus and the harmful environment of the gastrointestinal tract.
- Calcium strengthens bones.
- Anthocyanins prevent the formation of cancer cells.
- Antioxidants and B vitamins strengthen the nervous system.
- Bioflavonoids and vitamin C improve immunity and rejuvenate the body as a whole.
- Magnesium – for the prevention of varicose veins and atherosclerosis.
- Antiseptics cleanse toxins and waste.
- Iron – normalizes blood clotting.
- Not recommended if you are allergic to cherries.
- With acute diseases of the liver and gastrointestinal tract.
- The acids contained in the pulp destroy tooth enamel, so you need to rinse your mouth after eating cherries.
- Use caution if you have diabetes.
- The seeds contain the glycoside amygdalin. It decomposes in the stomach and releases hydrocyanic acid, which can cause poisoning.
Watch a video about the benefits and harm of cherries
Preparatory process
The first thing you need to clarify is whether this climate zone is suitable for growing cherries. This is easy to do - if there are cherry trees in the area that bear fruit normally, the issue is removed. Many people will definitely enjoy collecting the seeds, since the berry itself, as a rule, is immediately eaten.
It is better to buy cherries on the market from private sellers, and not to be greedy, but to choose the one that is tastier and larger. Firstly, such seeds have a higher germination rate, and secondly, the market always has a much wider selection than in the store. Store-bought cherries are treated with preservatives for longer storage, which affects the germination of its seeds.
The best option is to go to a tree with ripe fruits and pick them yourself. The ripest and most delicious berries should be selected. The seeds are washed in water and then dried.
Transplanting sprouts
Transplantation is carried out after the seedlings reach a height of 20-30 cm. After this, the probability that they will take root is quite high, and you can begin replanting.
It is worth considering that cherries love good lighting, and based on this they select a place for planting them. The root collar of the seedling should be 3-4 cm above ground level. The tree will begin to bear fruit 7-9 years after it is planted.
Preparatory work
To quickly germinate seeds, different methods are used. To do this, the bones can be affected by physical, thermal and certain chemical methods. It is easier to soak them in water for 2-5 days before starting stratification. It is important to change it every day, and then begin stratification. To speed up germination, it is important to create a temperature contrast by changing peak values throughout the day. This process can be replaced by treating the seeds with boiling water for 2-3 seconds and then cooling them.
Contrasting pre-sowing preparation can consist of soaking the seeds for 3 days in warm water, changing it every day. The next stage is a 20-minute soaking in a solution of potassium permanganate, after which the seeds are placed in a freezer for 2 hours, the temperature of which should be approximately -6°C. Next, the seed is filled with water at a temperature of 55°C, as a result of which they begin to crack, after which they are ready for planting in the ground.
Another way to accelerate germination is through mechanical action - scarification of seeds. To do this, the hard shell is processed with a file, which makes it easier for the plant to break it down. It is not recommended to pierce them yourself. In this case, it is problematic to keep the seeds unbroken.
Expert opinion
Stanislav Pavlovich
Gardener with 17 years of experience and our expert
Ask a Question
Worth knowing! During plant growth under natural conditions, the shell becomes thinner as a result of exposure to various factors, ranging from moisture and temperature changes to exposure to bacteria.
Care
Once the seeds sprout their first shoots, they require regular care to ensure the plant gets stronger and grows. Watering must be done carefully. The presence of excess moisture causes the development of fungal diseases in seedlings. From the moment the first leaf appears, you need to start fertilizing the soil, repeating this process every 2 weeks. At the same time, every week, using a spray bottle, it is worth spraying the leaves. To prevent water from entering the ground, it can be covered with ordinary plastic film.
Expert opinion
Stanislav Pavlovich
Gardener with 17 years of experience and our expert
Ask a Question
Worth knowing! Watering should be carried out regularly, but moderately, in order to prevent overflow.