The cost of land on slopes is much lower than the cost of plots with a flat surface. This is explained by the complexity of their development: it is necessary to create terraces, retaining walls, level areas for gardens and house construction, and also create a drainage system. That is, the money saved will have to be invested in improving the territory. But there is a strong argument in favor of a site with uneven terrain - it can create a unique landscape, which is almost impossible to create on a flat area. In addition, there are several more pros for the house on the slope.
Where to start landscaping an uneven area
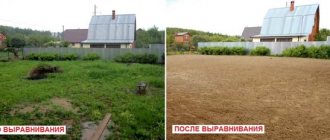
A territory with uneven terrain requires a more responsible analysis than a flat one. Spruce trees in the landscape contain areas with pronounced differences in elevation; it is better to invite surveyors to take measurements.
They will help outline the trajectory of the retaining walls and give recommendations on laying out path routes. If the slopes are gentle enough, you can handle the planning yourself. By visually identifying the highest and lowest points, you can find out the direction of the flow of storm water, and by correlating the elevations with the cardinal points, you can easily find out in which place the soil warms up better. After the initial analysis of the site, a rough relief plan is drawn up on a sheet of paper and its layout is carried out.
Where to build a house?
It is most logical to place a residential building at the highest point of the site, on a previously leveled area. With this arrangement, it is easier to remove melt and rainwater from the foundation, and enough natural light will enter the rooms. In addition, the view from above is always more interesting.
But this is not the only option: the slope can be used in construction, even if it has a large angle of inclination. Of course, you will need to create a special development project adapted to specific terrain conditions, but this has its advantages. The advantage is that in the layout of a house on a slope you can implement interesting architectural and constructive ideas that are not possible when building a flat site.
One of the solutions is a part of the house protruding from the hill and supported by supporting columns, under which a parking lot or place for recreation is arranged. The complex of buildings on several levels with partial embedding into the slope looks dynamic, and the division of the territory into zones is more expressive.
Paths and steps
On a relief site, it is important to correctly plan the trajectory of the paths. If on flat terrain they can be laid along the shortest route, then on a slope you need to take into account the steepness of the climb and look for the smoothest paths: they do not cross the slope strictly from bottom to top, but are laid along its diagonal. On a fairly long hill, the path is made with zigzag turns. The path may not seem short, but it will be easier to climb.
On sections with significant elevation differences, gentle ramps are combined with stairs.
Since you will have to climb the steps quite often, they should be made low and wide. Steps with a height of no more than 20 cm and a width of at least 30 cm are considered comfortable for movement, so that the foot can stand completely on them.
From the terrace to the terrace you can access the stairs.
At the end of each climb, platforms are arranged that allow you to take breaks while moving.
Advice. It is better to make the base for the paths from concrete - although it is labor-intensive, it is reliable.
You can make walking paths in the garden, on the lawn and between flower beds. Individual stone tiles are laid at intervals of 40 cm, and the rest of the space is sown with grass. Such paths are intended more for walking and decorating the site.
Preparation and processing of materials
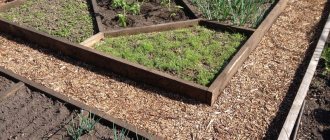
We approached the construction of terraces with all responsibility. We decided not to use improvised rubbish, but to buy high-quality materials to make our beds look decent and presentable. Therefore, an 18-centimeter strong board and four beams were ordered.
I marked the timber and sawed it into half-meter sections - these will be the supports for the board
I sharpened each piece with an ax on one side to make it easier to drive into our “stubborn” soil.
We treated all materials: boards and stakes with an antiseptic so that they do not rot in direct contact with soil and moisture.
We painted our blanks on all sides, stacked them in a ventilated stack and left them to dry in the sun.
Now our materials were ready, it was time to begin further work.
Features of drainage of a site on a slope
Water seems to flow down the slope without any help, so why drain it? Drainage must be arranged because randomly flowing surface water leads to wetting and destruction of the foundation of the house and other buildings. There are two ways to drain excess water: open and closed.
Open drainage system
On the side of the water inflow, a trench about 80 cm deep is dug, which is located parallel to the foundation of the house. At its two ends, ditches are dug to drain water downwards (since the site has a natural slope, the trenches are also sloping). They are connected to a collector (well) to discharge water. Such a system will save the foundation of the house from storm and melt water.
The appearance of the trenches does not decorate the territory of the dacha, so they can be improved by filling them with crushed stone or pebbles. Large stones are piled on the bottom, and the top layer is formed from smaller, more beautiful stones. Some trenches are simply covered with metal gratings.
Slope strengthening
In an area with uneven relief, problems arise during heavy rains and spring melting of snow. Flowing water creates a channel for itself, washing away fertile soil and exposing the roots of cultivated plants. Snow caps along with mud and stones are also possible. Landslides cover the yard, paths, vegetable gardens and gardens, breaking buildings and trees. It is for this reason that slopes and slopes need to be strengthened.
Strengthening using geomaterials
Various types of geosynthetic materials are used to create a durable top layer on a surface that has a bevel from 8 to 70. The principle of use is almost the same for all types of non-woven materials: the fabric is spread over a surface cleared of weeds and stones, and is pinned in place with anchors. The edge of the material is secured more carefully so that at first it does not curl under the pressure of flowing water.
Geomaterials for slopes:
- Biomats - made from coconut fibers and straw;
- Geotextile is a dense non-woven material based on polypropylene fibers, durable, used on slopes with an angle of up to 60;
- Geogrid is a mesh fabric made from polyester and fiberglass;
- Geogrid is a synthetic cellular material that is more durable than mesh and textiles;
- Geomats - consists of several layers of polypropylene gratings.
A thin layer of soil is poured on top of the stretched fabric (mats), lawn grasses are sown or decorative perennials are planted. The root system of plants easily penetrates the geomaterial and creates a solid foundation with it that keeps the soil from sliding. All types of geosynthetics allow moisture and air to pass through well, and therefore do not inhibit the development of vegetation.
Strengthening with plants
Gently sloping areas, the bevel angle of which does not exceed 10, are strengthened by plants that have a well-developed root system. Intensive growth of field grasses contributes to the natural grassing of slopes and is a simple way to combat soil erosion. Soil washout is prevented by ground cover species of unpretentious perennials: tenacious, saxifrage, lilies of the valley, bryozoan, creeping thyme. Euonymus and periwinkle also cope well with this task.
Decorative shrubs and trees are capable of holding together slopes up to 45 . But it must be taken into account that the growth of roots reinforcing the soil will take several years, and during this time the topography may change due to the influence of natural factors: precipitation, wind, groundwater.
To avoid “surprises” with unauthorized changes in the relief, it is not recommended to uproot the existing thickets on the site and immediately plant cultivated plants instead. This must be done in stages, as the territory is developed and retaining walls are created.
Proper arrangement of high beds
For example, a bed with a fence made of boards is taken; This option is the most convenient and inexpensive.
During the work you will need:
- bayonet shovel;
- roulette;
- drill or screwdriver;
- building level;
- circular saw or jigsaw;
- self-tapping screws;
- boards 50x200 mm;
- timber 50x50 mm;
- primer;
- construction mesh.
Step 1. Wood processing
Scheme of a high bed
The boards are cut to the size of the frame, and then covered on all sides with antiseptic impregnation. You can use used oil for these purposes, and to prevent harmful substances from penetrating into the soil, after treatment it is recommended to cover the tree with film on one side. The lower edges of the boards, which will be in contact with the ground, are treated especially carefully. The timber is sawn into pieces 50 cm long and also impregnated with a protective agent. After this, the building material is laid out to dry.
High bed scheme
Step 2. Site preparation
The area for the garden bed should be illuminated by the sun for at least 5 hours a day. They mark the boundaries of the bed, remove stones and branches, and dig up perennial plants. If desired, you can dig up the soil together with fine grass - this will increase the permeability of the soil. If the soil is very dense and trampled, it is enough to remove the layer of turf around the perimeter of the marking to a small depth to make it easier to position the frame.
Step 3. Assembling the frame for the bed
Frame assembly
Assembling the frame for the bed
Dried boards are knocked down in pairs into panels and connected to each other using bars. The height of the shields is equal to the height of the bed, the long sides of the frame are additionally reinforced with transverse bars in the center. Since the length of the bars is greater than the height of the walls, they should protrude 10 cm above the frame. These will be the legs of the frame. To improve the appearance of the structure, boards laid flat, the edges of which are cut at an angle of 45 degrees, are placed around the perimeter of the frame. Finally, the frame can be painted on the outside.
Assembling the frame for the garden bed
Step 4. Installation of the structure
Installation of the structure
The finished frame is transferred to the installation site; align the structure according to the markings, make recesses for the legs, check the location of the bed using a building level. If necessary, place pegs or, conversely, remove excess soil. The structure should be as level as possible, with all corners at the same level. Finally, add soil around the perimeter of the walls and compact it so that there are no gaps left.
Step 5. Filling the bed
First, the bottom is covered with a construction mesh and nailed along the edges to the walls of the frame. The mesh will protect the structure from the penetration of moles and mice. Then geotextiles are laid, which will not allow weeds to grow. Next, the beds are filled in layers:
- small branches, bark, large shavings, leaves;
- bird droppings, rotted manure or compost;
- fallen leaves, branches, bark, grass;
- mineral fertilizer;
- fertile land.
Filling the bed
The thickness of each layer is 10 cm. There is no need to mix the layers, but it is necessary to level and compact them well. If the soil on the site is not of very good quality, it is better to use purchased soil. After filling, the bed is well watered and left for a couple of days. During this time, the layers will settle a little and become denser. It is recommended to cover the frame with black agrofibre, which provides better soil heating and prevents weeds from germinating.
Harvest beds
It is recommended to make high beds in the fall or at the end of summer, so that the layers are well rotted and the plant roots receive the maximum of useful substances. If the beds are installed in the spring, it is necessary to fill them at least a month before planting and pour plenty of water several times to compact them. It is easy to turn such a structure into a greenhouse: to do this, plastic or metal arcs are installed above the frame, the ends of which are secured to the walls with bolts. A polyethylene film or special agrofibre is attached to the arches on top.
Harvest beds
Prices for various types of construction boards
Construction boards
Retaining walls and gabions
It is possible to give stability to the soil forever, even on an almost vertical slope, only with the help of retaining walls. They are built at the foot of the steepest slopes and provide a restraining stop for the ground behind the fence. Durable materials that can withstand weather conditions and soil pressure are used for construction.
Brick retaining wall
The principle of constructing a brick retaining wall is no different from the main wall of a residential building: it is erected on a buried foundation and connected with reinforcement. The difference is that drains are made in the body of the wall to drain water.
How to build a brick retaining wall:
- Along the wall, a trench about 1 m deep is dug and filled to a depth of 40 cm with drainage material (crushed stone, broken brick);
- Concrete is poured into the pit, compacted with a vibrator and left until completely set (1-3 weeks, depending on humidity and air temperature);
- A brick wall is being laid out. If its height is more than a meter, the masonry is made of 1.5 bricks, if lower - 1 or 0.5 bricks;
- In the first row, and then every 2-3 rows, through drainage holes are left. They can be made by inserting pipe cuttings into the masonry. If the wall is long, weirs are installed every 1.2 m;
- The space behind the wall is filled with drainage to almost the entire height of the structure. This must be done simultaneously with filling the soil so that the crushed stone adheres closely to the brick surface.
Drainage: pros and cons
Work to strengthen the slope, as well as drainage work, is the first thing that will have to be done when landscaping a site on a slope. And if open drainage in the form of storm drains is not so difficult to construct, then laying closed drainage will require serious work with digging earthen trenches, filling a “cushion” of sand and gravel, and laying pipes.
Drainage work is quite an expensive undertaking, which depends on the quality and durability of the materials used. There is no need to carry them out in areas where there is minimal rainfall throughout the year. But if it rains often in your area and the soil is prone to waterlogging, you should not skimp on such measures. Excessive humidity will not only interfere with plant growth, but will also lead to damage and destruction of the house (dampness, mold, cracks in the foundation).