- Do-it-yourself compost pit: options for manufacturing and design
- How to make a compost bin: features of this type of construction
- How to properly make a compost bin at your dacha: choosing a location
- What can and cannot be put in a compost bin
- Features of caring for a compost heap: recommendations from experts
- Compost pit: what is it and what is it for?
- DIY compost bin: manufacturing options and design requirements
- DIY compost bin: manufacturing options, photo examples
- DIY compost bin: manufacturing options and instructions
Do-it-yourself compost pit: options for manufacturing and design
The better the quality of the soil, the richer the crop grown on this land will be. But it happens that the initial data is not very good, and you have to fertilize the soil. To do this, you can use various fertilizers, but it is best to make a compost bin , which will become a source of environmentally friendly material. Let's consider how a compost pit should be made, manufacturing options and materials suitable for this purpose.
Using a compost pit or box you can create nutritious soil for garden and vegetable plants
Types of structures and order of construction
Amateur gardeners describe how to quickly make a convenient compost bin with their own hands in numerous videos posted on the Internet. Different materials are used to make open and closed (with lids) composters:
- wood,
- slate,
- plastic,
- stainless metal,
- bricks and blocks.
Wood options
An important advantage of any DIY wooden compost bin option is its natural appearance. They look aesthetically pleasing in the garden and stand out less than plastic products. The disadvantage is considered fragility. Under the influence of weather factors and upon contact with the contents, the wood begins to deteriorate. Over time, you have to replace individual rotten elements or the entire structure.
To make a wooden compost bin last longer, choose hard wood, such as larch.
Additionally, impregnation is used to protect against rotting, and the box is covered with a layer of varnish or oil paint. This composter will last 5-10 years. If there are a lot of mice in the garden, install a metal mesh.
Manufacturing is relatively inexpensive. Typically containers are made from cheap materials:
- boards,
- bars,
- pallet
Wooden box
The simplest design: four bars with a cross section of 50×50 mm located in the corners, to which boards 2-3 cm thick are nailed at a distance of 1 cm from each other.
But it is better to make grooves in the bars for the side boards. They will simultaneously serve as guides and allow you to quickly remove the boards to mix the compost. To increase the strength of the structure, bolts are additionally used. The lid is made removable or secured with hinges.
Beam plus mesh
The mesh, unlike boards, prevents rodents from entering.
Materials for making a 1 kb compost bin. m: 4 “fifty” bars 1.5 m long, slats, chipboard or OSB, galvanized chain-link 1 m wide.
Assembly order:
- Using a tape measure, measure a square with sides of 1 m on the ground and dig the bars into the corners to a depth of 50 cm.
- Attach the slats with screws.
- Attach an OSB cover to the awnings. Cover the inside walls with polyethylene.
Pallets or pallets
Stages of assembling compost bins from pallets or pallets:
- Remove the legs from the two pallets that will serve as the door and lid.
- Using self-tapping screws and corner connectors, connect the back wall with the sides, and then the walls with the bottom.
- Cut one pallet lengthwise into equal halves with a saw. Fasten them with awnings and attach a handle to the bottom (this will be the door).
- Connect the upper half with self-tapping screws to the side walls.
- Attach wind hooks.
- To prevent the contents from falling out, line the inside of the container, including the bottom, with galvanized mesh. Secure it using a staple gun.
- Make a lid. Cover the pallet with cellophane and attach the mesh on top using a stapler.
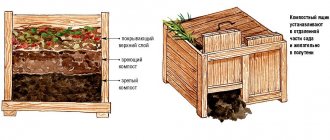
Finnish technology
The Finns equip composters with temperature sensors and install an air supply system. The Russians have made it a little easier to make containers for manure and humus with your own hands without losing quality.
The composter is 3 m long and 1 m high and consists of three sections, each of which is equipped with a lid and a door for extracting compost. To build it, you need boards and beams.
Assembly order:
- Make markings and dig eight beams to a depth of 50 cm. Four of them are external supports, four are internal. Fill the holes with gravel and fill with cement. After hardening, cover it with soil.
- Cover the box with boards on three sides, keeping a distance of 1 cm between them.
- Nail boards intended for partitions tightly.
- Make the bottom from a slab, leaving gaps of about 1 cm.
- Cover the front of the container. Leave 20 cm at the bottom to install the doors.
- Attach the doors.
- Make and attach a gable lid. One of the slopes should have hatches for loading waste.
From slate sheets
Slate retains heat worse than wood, but does not decompose, so a compost bin made from it will last longer.
The disadvantages of the material are that it is not environmentally friendly and fragile. To make the structure durable, a wooden frame is first installed, and then corrugated sheets are attached to it.
One of the options for making a slate compost bin with your own hands:
- Make markings on the ground according to the size of the container.
- Dig holes in the corners and install supports.
- Nail the boards between the supports.
- Using screws or slate nails, attach the slate to the boards.
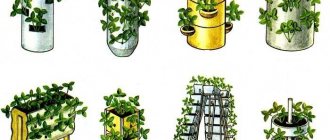
Made from polymers and plastics
In compost boxes made of plastic and polymers, which are also easy to make with your own hands, the mass quickly heats up to a high temperature, due to which decomposition occurs faster by several months.
The containers are resistant to precipitation and corrosion. Small holes provide ventilation and penetration of soil organisms into the container. Other benefits:
- rodents have no chance of getting to the contents,
- the compostable mass is not visible,
- no stirring required.
Composters are made from ordinary barrels by making holes in the bottom and walls. The disadvantage of the box is the release of harmful chemicals when heated.
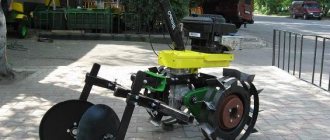
Made from stainless steel
Advantages of a metal box:
- durability,
- attractive appearance,
- low risk of mass molding.
However, the formation of the final product - humus - takes much longer than, for example, in a plastic compost box.
An option for making a metal compost bin with your own hands:
- Cut off the bottom of a stainless steel barrel.
- Drill holes for ventilation.
- Make a hatch door at the bottom.
Made of brick
The brick structure resembles an open rectangular or square pool, which is covered with a wooden lid. The stones are simply stacked on top of each other or joined with mortar to increase the strength of the composter. The earth around the perimeter is first compacted.
For ventilation, leave a distance of 1-2 cm between the bricks.
The lid is made from boards, nailing them tightly to each other.
How to make a compost bin: features of this type of construction
In order to understand how to properly make a compost pit, you first need to understand what it is used for. Typically, a compost pit is used to dispose of organic waste, which, as a result of the rotting process, turns into organic fertilizer. There are many design options and each owner can only choose the most suitable option for himself.
By following the rules for laying layers and fertilizers in a compost pit, you can obtain nutritious soil in a short time.
A compost heap does an excellent job of disposing of mowed grass and fallen leaves. Under the influence of time, moisture and microorganisms, all this turns into fertilizer, which can be used to grow any type of crops both in gardens and in the vegetable garden.
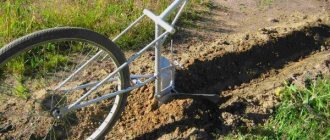
Making a compost heap of organic fertilizers with your own hands is not at all difficult, especially since there are many ideas for independent implementation that can be used as a basis. You can make your own compost pit using pallets, which are usually used for transporting and storing building materials. They can be bought at a fairly low price, or it is quite possible to simply find them on your own site.
How to make a wooden composter
It is not so difficult to make a compost box with your own hands, having studied the corresponding drawings and photos on the Internet. To build a wooden composter, boards of small width up to 100 mm of arbitrary length are suitable; to fasten them you will need a beam with a cross-section of about 50x50 mm. To increase service life, it is advisable to treat all wooden parts with water-repellent agents before installation.
Before making a garden composter, an assembly diagram is drawn, after which the building materials are cut into pieces of the required length in accordance with a pre-drawn drawing. To assemble the boxes you will need a tape measure, a hacksaw (jigsaw) or a circular saw for wood, self-tapping screws, a screwdriver (Phillips screwdriver), a crowbar and a shovel for digging holes in the ground.
Rice. 8 Metal containers
Step-by-step instructions for assembling a wooden box are as follows:
- Dig 4 holes in the ground at the required distances to a depth of at least 30 cm, insert pre-cut bars about 130 cm long into them, fill the holes tightly with stones and compact the soil.
- Screw the horizontal wooden planks to the vertical bars around the perimeter using self-tapping screws, leaving a distance of 2 - 5 cm between them. Another option is to assemble the box on the ground and then immerse it in the dug holes.
- To prevent precipitation from penetrating into the box, a light, removable frame is made from wooden planks knocked down around the perimeter of the container (they can be fastened together with flat corners), and a stretched plastic film or a thin sheet of tin is nailed to it on top.
- In the lower part, to extract ripened humus, two strips are made removable by inserting them into the grooves of a curved rigid metal plate.
Even faster, you can make a wooden box from 4 ready-made pallets (transport pallets), for this they are installed vertically or horizontally close to each other and connected to each other in the corners with self-tapping screws or using wooden planks. The design usually provides for the possibility of removing one of the trays for mixing and extracting the compost mass.
Rice. 9 Wooden box assembly drawing
How to properly make a compost bin at your dacha: choosing a location
Speaking about arranging a compost heap, one cannot fail to mention the importance of its correct location. First of all, the structure must be sufficiently distant from residential buildings. In addition, the place where it is installed should be well blown by the wind to avoid stagnation of air and concentration of the unpleasant odor emanating from it. In addition, access to the compost must be ensured so that the process of adding raw materials or removing finished fertilizer is as comfortable as possible.
In order for the rotting processes in the compost bin to proceed faster, large branches and waste should be crushed.
On a note! In order for the rotting process to proceed faster, it is recommended to periodically mix the layers inside the heap. Therefore, even at the stage of planning and arrangement, it is worth considering how this can be accomplished.
In addition, the following criteria for choosing a site suitable for a compost pit must be taken into account:
- the selected location should be located at a sufficiently large distance from any sources of drinking water, for example, a well or borehole. The distance between these objects must be at least 25 m;
- if the site is not level, but on a slope, then you need to make a compost pit below the water level (preferably at the lowest point of the site). This will prevent the entry of rotting waste and clean water;
- You should inquire in advance about the most common direction of the wind, since the pit often becomes a source of a rather strong and unpleasant odor, and can cause discomfort to both you and your neighbors;
- It is worth making sure that there is not only a free approach to the pit, but also enough space to be able to bring in waste or remove finished compost using a wheelbarrow.
Scheme of construction of a compost bin.
On a note! It is advisable to choose a shaded place for the compost pit, since sunlight has a negative effect on the rotting process, significantly slowing down the composting process.
Composting Bin Requirements
The requirements are primarily for aeration if aerobic bacteria are used. The width between the boards should be at least 2 - 3 cm.
It is not recommended to install a composter with an open bottom near a drinking well. It is carried at least 15 m away. You cannot set up a waste storage facility near your home - when manure and waste decompose, harmful and dangerous substances are released - methane, carbon dioxide, hydrogen sulfide.
The design of a DIY garden composter should be universal:
- storage of ready-made substrates is provided;
- unloading fertilizer from below, because it ripens faster in the lower part;
- possibility of transfer to another place.
If you don’t skimp on materials, the collar will last for many years.
What can and cannot be put in a compost bin
In order for the fertilizer obtained as a result of rotting to be of high quality and bring benefits to the plants and not harm, each summer resident needs to familiarize himself in advance with the list of those products that can or cannot be added to the compost. So, the following are great for composting:
- grass, weeds, leaves, hay, straw, etc.;
- berries, fruits and any peelings from them (raw);
- waste from wood products that have not been painted;
- paper products (napkins, bags, cardboard) in crushed form;
- waste from the preparation of tea, coffee or cereals;
- tree branches and roots after grinding;
- needles;
- herbivore manure (biennial only);
- wood ash.
In order to obtain the highest quality compost, you should carefully select waste for the compost pit.
Note! The percentage of compost containing peelings from products such as potatoes and tomatoes should not exceed 15-20%.
It is strictly forbidden to add to the compost heap:
- any plants that have been affected by pests;
- plants exposed to diseases such as powdery mildew, late blight, etc.;
- excrement of domestic animals, as they may be contaminated with helminth eggs;
- bones and leftovers from meat products. They will cause an extremely unpleasant odor and will also become food for rats;
- inorganic waste - plastic, rubber, synthetic fabrics and metal;
- plants that have been treated with herbicides;
- the remains of cabbage, the rotting of which provokes an extremely strong and unpleasant odor.
As for composting weeds, experts recommend putting them in a separate pile, which is covered with film on top. Thus, the risk that the plants will take root again is eliminated and you can count on their death with one hundred percent probability.
A list of products that are suitable or detrimental to the processes of creating quality compost.
If you add weeds to the general pile, you often have to deal with the fact that perennial plants take root, especially if, as a result of regular watering or rain, the humidity is quite high.
Note! To speed up the decay process of waste, it is recommended to first crush it. This is especially true for items such as branches, roots and paper products.
What can you put in compost?
From household life:
- food waste (not containing meat and milk);
- unused tea leaves and coffee grounds;
- eggshells (an essential ingredient that provides calcium saturation);
- cardboard, paper in any form (napkins, paper towels, notebook and album sheets).
From vegetation:
- vegetable tops (cabbage, carrot, beet);
- weed tops (but without inflorescences, seed pods and rhizomes);
- leaves, chips, sawdust, branches, bark, shavings, roots, pine needles, wood (not painted);
- straw, hay;
- cleaning;
- moss;
- mushrooms (you can even have worms);
- seaweed;
- fresh fruits (except stone fruits);
- fresh vegetables (except potatoes, cucumbers, tomatoes, peppers and eggplants).
Fertilizers and other additives:
- old mulch;
- herbivore manure;
- bone flour;
- turf.
Tip 1. When putting weeds into compost, you should keep in mind that many of them, even without rhizomes, are able to quickly take root and germinate (such as bindweed, gooseberry, horsetail, nettle, wheatgrass, and buttercup). Therefore, it is better to first keep them in the sun for 2-3 days and only then add them to the general pile.
Tip 2. It is recommended to bury the eggshells as deeply as possible.
Tip 3. The leaves of some trees (birch, walnut, oak) contain a large amount of tannic acid, which slows down the formation of humus. Therefore, try not to get carried away with them when adding them to the compost pit.
Tip 4. Many people are interested in whether it is possible to put moss in a compost pit (box). There are different opinions on this matter. And yet, this component is quite possible for enriching the heap, as it has excellent water-absorbing and bactericidal properties.
Tip 5. If for some reason there are no worms in the compost pit, they are started artificially, otherwise the decomposition process will not start. What types of worms are suitable for this purpose:
- red Californian - considered the most highly productive breed;
- Prospector is a selective breed characterized by unpretentiousness, frost resistance and increased productivity;
- classic rain - inferior to the two previous brothers, but in their absence it will do just fine.
All components for compost are divided into 2 types.
- Nitrogen: manure, bird droppings; tops; cleaning; vegetables and fruits; bone meal, etc.
- Carbon-containing: straw, hay; paper; sawdust; needles; branches; grass; leaves; sawdust; algae, etc.
If the compost contains more nitrogen components, it will begin to rot and emit an unpleasant odor. As a result, at best, silage will form, at worst, you will have to destroy the compost you made yourself and start all over again. If there are more carbon-containing components, the recycling process will take years. Therefore, it is so important to maintain a balance between them. There are different opinions about proportions. So the options must be chosen by the site owner himself. Recommended nitrogen to carbon ratios:
- 1 to 20;
- 1 to 25;
- 1 in 30.
The following table will help you balance these substances correctly: but the following table will help you balance these substances:
What means accelerate the maturation of compost:
- special EM preparations: Shining, Baikal, Tamir, Gumi-Omi Compostin, Economic, Oksizin, Compostello;
- sweet yeast water (10 liters of water, 100 g of yeast, 300 g of granulated sugar);
- carbamide solution (10 l of water, 50 g of active substance);
- bird droppings diluted in water.
However, the attitude towards these activators is ambiguous. Some experts believe that a heap that has been rotted on its own for 2 years is characterized by maximum efficiency.
Features of caring for a compost heap: recommendations from experts
Having figured out what can be put in the compost pit and what cannot, all that remains is to familiarize yourself with the rules for caring for waste in order to ensure that it rots as efficiently as possible. Moreover, the duration of the period during which the compost will be formed directly depends on the correctness of the care:
- Humidity is the most important indicator that affects the rotting of waste and the formation of compost. In order to maintain the desired level, it is recommended to periodically water the pile with a watering can. In this case, it is important that the end result is moist, but not wet, since the abundance of water will negatively affect the viability and activity of bacteria;
- Once a month you need to carefully stir the pile, thus ensuring access to oxygen. This allows the waste not so much to rot as to burn out. At the same time, if it is not possible to completely dig up everything, you can use a pitchfork and pierce the pile in as many places as possible;
- To speed up the process of compost maturation, the addition of nitrogen is required, which is found in large quantities in the green parts of plants, as well as in slurry.
In order for the compost creation process to proceed correctly, you should carefully select a location for the composter.
It usually takes 1-1.5 years to form high-quality compost. During this time, almost any waste and residues will fully decompose. You can tell when the compost is ready visually and by smell. The finished mixture is a crumbly brown mass and has the smell of forest soil.
Compost pit: what is it and what is it for?
The issue of using compost is one of the most popular. After all, not every summer resident knows how and why to use the resulting mixture, and how great its benefits are. In fact, you can fertilize the soil with compost for almost any plant. Cucumbers, peppers, zucchini and pumpkin respond best to this type of feeding. The result can be seen already in the next harvest season - the fruits grow large, have a bright and rich color, the taste and aroma are well expressed.
But there are also plants for which compost is not so beneficial. For example, root vegetables, tomatoes, melons and watermelons should not be fertilized abundantly in this way, since this leads to a decrease in the yield, and on the contrary, the amount of green mass increases.
Strawberries respond well to compost, especially if you first cut them “at the root” and cover them with a semi-decomposed composition. Then all this needs to be watered, and all that remains is to wait for new fresh foliage, as well as a bountiful harvest next season.
With the help of compost, you can naturally enrich the soil on your site, thereby increasing the quantity and quality of the harvest.
DIY compost bin: manufacturing options and design requirements
In order to properly build a compost pit, you need to understand how the compost heap should be structured. There are many options for making it yourself, but first of all you should pay attention to the fact that it should consist of three parts. In this case, you need to install 8 support posts, each of which must be treated with a protective agent.
On a note! Machine oil, fuel oil or even tar can be used as a protective composition for posts.
A fence can be used as a fence on one side, but boards are better suited for the rest. Partitions are constructed from them, in which holes for ventilation must be left. This promotes the decay process. It is also necessary to install a door that allows access to the compost.
The compost heap can be divided into compartments for easy removal of compost and laying new layers.
Setting up a compost pit at your dacha with your own hands involves ensuring the proper level of ventilation and at the same time protecting the contents from precipitation. So that the compost heap does not turn into a swamp, during rainfall it needs to be covered with a special lid of a suitable size. And if the weather conditions are not too harsh, then it is quite acceptable to use plastic film for this purpose.
Another option is to use construction pallets that are pre-disassembled. Using a circular saw, the boards can be divided into individual elements and then assembled into a suitable structure. In this case, it is better to fasten the boards vertically. The front board can be secured with adhesive. To give such a structure stability, it is necessary to use a building level and level the lower strips.
It is also important that the height of the walls of the homemade composter is such that it is convenient for a person of any height to add, stir and remove compost.
On a note! You can pay attention to the designs of compost pits made using Finnish technology. In this case, some design features are of interest, for example, when you remove humus from one compartment, it is automatically filled with raw materials from the adjacent one.
An example of a compost bin made from old pallets.
Making a box
After determining the basic parameters of the compost bin, it is recommended to make a design drawing, which will allow you to correctly determine the amount of materials and additional elements (lid hinges, handles, etc.).
Compost bin design diagram
Making from wood
How to build a box from wooden planks or pallets? The work process is carried out in the following order:
- at the first stage, the top layer of soil is removed at the installation site, and supports made of concrete blocks, bricks, metal or wooden beams are installed;
- the frame is made. For the frame, you can use wooden blocks measuring 40x40 mm or metal profiles;
Frame making
- The back and sides of the frame are covered with boards (pallets);
- on the front side, only the lower part of the structure is covered with boards;
Covering the frame with boards
If desired, the front part can be completely sewn up, but in this situation a door must be installed for convenience.
- a cover made according to a similar design is installed;
- the wood is protected with paint or special impregnations.
Using a similar scheme, boxes are made from plastic panels, metal sheets and metal mesh.
How to make a collapsible compost bin from boards, watch the video.
Slate production
To make a slate box, you need:
- dig trenches along the perimeter of the structure, the depth of which is 15 cm and the width is 3 – 5 cm;
- install slate sheets in the trenches;
- compact the soil around the sheets;
- To strengthen this structure, you can use wire or wooden/metal pegs.
Compost frame made from slate sheets
The frame structure of a compost bin can also be made from slate according to the scheme for manufacturing wooden products.
Manufacturing of concrete structure
It takes a longer period of time to make a concrete compost bin. The work is done like this:
- Preparations are made at the installation site. The top layer along the perimeter of the soil is removed to a depth of 10–15 cm. If desired, the box can be buried in the ground to a height of up to 1 m, which will reduce the outer part of the structure or increase the capacity of the structure;
- Formwork is assembled from wooden blocks;
- Concrete is poured into the formwork and left in this form until the mixture completely hardens (at least 12 - 14 days). Reinforcing mesh can be used to strengthen concrete;
- the formwork is dismantled;
Manufacturing from concrete
- the cover is installed.
DIY compost bin: manufacturing options, photo examples
The type of compost pit is determined based on several factors. One of them is the installation method. Let's consider all existing options:
- allocating a specific place for organizing a compost pit. In this case, a pit is initially prepared, which is very similar to a well, but at the same time has a shallower depth. The walls of the pit are additionally strengthened to prevent the soil from shedding and are sheathed at a distance of 20-25 cm from the bottom. This distance is necessary in order to provide the microorganism with free access to the waste;
- Another option is to install a special container in the garden plot designed to collect waste and process it into compost. This method allows you to get the finished product at any time. This design is based on a pit with formwork, as well as a special box made of boards. When implementing this option, it is extremely important to pay due attention to the organization of ventilation;
- a DIY compost heap is the easiest way to solve the problem. To do this, it is enough to make a substrate consisting of sand, gravel and dry grass. Waste is simply placed on top, which will begin to rot on its own over time.
You can make your own compost bin using many different technologies and instructions. The proposed designs may differ in the materials required for work, dimensions, properties and ease of use.
On a note! Regardless of the type of structure chosen, before you begin laying raw materials inside the structure, it is necessary to thoroughly loosen the bottom and install ventilation holes.
Depending on the needs, the compost pit may vary in size.
Building a box for manure and humus with your own hands
You can compost not only plant waste, but also cattle manure and bird droppings. These are nitrogen-containing substances and the primary task is to preserve them. You need to know how to properly make a box for manure or humus.
Manure is stored in two ways - cold and hot. In the first case, bedding manure is folded tightly into a pile and compacted so that less air gets inside.
Such a pile will not burn and the beneficial nutritional components will last longer. The box for the cold composting method is made airtight - the boards are nailed close to each other. The lid is also made airtight. After laying the manure, you will need to cover it with grass, soil or straw.
The hot method of storing manure requires oxygen, so the boards are placed wider. After ripening and overheating, excess liquid evaporates, the substance loses its original volume and weight.
To preserve the remaining nutrients, the humus is covered from rain and other precipitation. It is not recommended to bring manure to its extreme state, because then you will have to add mineral fertilizers to provide nutrition to the plants.