Timing for digging bulbs
Planting material for gladioli ripens 30–40 days after the end of flowering. The timing of excavation depends on the region and weather conditions affecting the condition of the bulbs. The ripening of the bulbs also depends on compliance with agricultural techniques when growing the plant.
In the central zone, harvesting of bulbs begins in mid-September for early varieties and continues until the onset of frost . A slight drop in temperature will not harm the corms, but severe freezing of the soil leads to their darkening, softening and death. If there is a threat of early autumn frosts, plants can be temporarily covered with non-woven material.
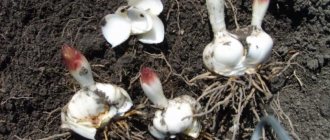
If you focus on the external condition of gladioli, then the bulbs are dug up when the leaves begin to turn yellow and dry . If the above-ground part is damaged by fungal diseases in conditions of high humidity, then digging up the bulbs of such gladioli should begin earlier - at the end of summer, in order to save them from the spread of infection and rotting.
Cleaning should not be delayed even where autumn is warm. Cool, damp weather promotes the development of fungal and bacterial diseases. In addition, when the corm is fully ripe, the largest child is usually separated from the stolons during harvesting and has to be removed from the soil by hand.
Winter storage
If you have collected bulbs with children, then after drying, they should be separated. To ensure that gladioli survive the winter and are pleasing to the eye in the future, you can place a few cloves of peeled garlic near them. So, you can protect planting material from winter hardships such as diseases and parasites.
To avoid having to throw away all the planting material in the spring, you need to provide it with modern insecticides. Experienced gardeners recommend storing bulbs in mesh bags. Thus, round-the-clock ventilation is provided. Optimal storage temperature is +2˚С.
The children should be thoroughly washed, dried and sorted into varieties. Boxes can be marked with tags. In winter, bulbs need to be checked for diseases from time to time. If mold is found on tubers, it is important to immediately ventilate the room, thus reducing the air humidity. And the planting material must be sprinkled with hydrophobic material.
Bulbs on which mold has appeared should be wiped with a cloth moistened with vodka and then dried. Planting material, if processed in a timely manner, will not suffer from mold.
So, from this article you learned when to dig up gladioli and how to store them, which will allow you to delight your family with beautiful flowers in the flowerbed. The question was also answered whether it is possible not to dig up the bulbs and what the consequences of inaction might be. We also invite you to watch a video on the topic:
Preparing for cleaning
Do I need to trim the peduncle and leaves before digging?
Cleaning and drying the bulbs
After flowering, the arrows on the gladioli are not left, but must be cut off . Using a sharp knife or pruning shears, cut off flower stalks with faded flowers, leaving a part of the arrow 5–6 cm high at the soil surface.
You also need to remove yellowed, dried and diseased leaves, leaving green and healthy leaves. You can trim their ends at 30–35 cm, but this procedure is not necessary and is decorative. Completely green foliage cannot be cut off, since the bulb has not yet matured, and the above-ground part is involved in this process.
Which varieties and bulbs to start harvesting with?
First, bulbs of early varieties are harvested, lastly - late varieties and gladioli grown from children and small bulbs.
Harvesting begins with those varieties that have flowered earlier, without focusing on planting dates. In an area with early flowering varieties, plants grown from 2–3-year-old large corms are first harvested. The harvest is completed with plants that have developed from small corms. Plants grown from baby plants are removed last.
This order is due to the fact that in plants grown from older corms, upon completion of the maturation of the daughter corms, not only the roots of the first order and the mother (old) corm, but also the fleshy roots of the second order begin to flake and die faster, which contributes to the disease Fusarium. Secondly, varieties with medium flowering periods are harvested.
Among varieties with the same harvesting time, dark-colored gladioli bulbs are chosen first, as they quickly lose resistance to fungal infections.
Cleaning gladioli
Cleaning and pruning gladioli
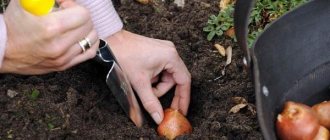
Corms are dug up with a shovel or a pitchfork in dry and clear weather, since in damp soil after rain many children will separate and remain. Before or after digging, the above-ground part is cut to the base, leaving a small stump of no more than 0.5-1 cm so that thrips can be detected, which gather near the stem by autumn. The plant is dug up carefully, trying not to damage the bulb itself and its children.
They clean everything from the earth with their hands. In adult gladioli, cut off the old roots, remove the dirty upper scales and separate the mother bulb, being careful not to damage the bottom of the replacement bulb. This will reduce drying time and reduce the risk of spreading disease. Sometimes the mother bulb cannot be separated immediately, in which case you need to try again after 1-2 weeks. Then it will be easier to do this.
In juvenile bulbs grown from children, the roots are removed only the next year during spring planting, and in the fall after digging they are only slightly shortened. During storage, the root system on them must be preserved. During digging, diseased bulbs are collected in a separate container and destroyed after harvesting.
Quality of planting material
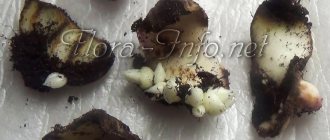
The value of gladioli corms is determined by many features. The first of them is age. Children (young bulbs that have not yet bloomed) have the most valuable planting qualities.
Size also plays an important role: the bulb should not be large, its diameter should not exceed 4 cm, and the diameter of the bottom should not exceed 1 cm.
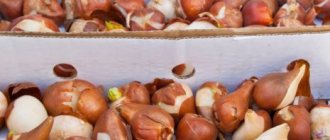
The root tubercles must be fully formed. The scales covering the bulb should be shiny, golden yellow or reddish, without dark stripes or spots.
Gladioli are wonderful flowers. If you want them to delight you in your summer cottage, it is important to know when to dig up gladioli in the fall, as well as how to store gladioli in the winter at home.
The process of preparing gladioli for winter is divided into 7 simple steps. It describes in detail how to prepare gladioli for winter and ensure the safety of planting material during the cold period.
Gladioli are exquisite flowers that are loved by many gardeners, both amateurs and professionals. A large number of varieties of this plant allows you to enjoy unique flowers for quite a long time.
Preparing bulbs for storage
Treatment against pests and diseases
Preparing gladioli bulbs for storage
To protect against diseases and pests, planting material is treated with fungicides and insecticides . After digging, the bulbs are washed in running water and then processed. First, soak for 20–30 minutes in a solution of potassium permanganate (5–10 g per 10 l of water), and then for half an hour in a solution of copper oxychloride (10 g per 10 l of water), 0.1% solution of Fundazol. The disinfectants Vitaros and Maxim are effective. Consumption of drugs is 2 ml per 1 liter of water. This volume is enough for 1 kg of bulbs. Protectants have a long period of protection (up to 6 months).
During winter storage, gladioli are greatly damaged by thrips, which hide under the covering scales in winter. Due to thrips, by spring the bulbs become deformed and dry out. To combat the pest, the bulbs are additionally soaked in solutions of insecticides (Aktellik, Fitoverm, Fufanon).
Drying the bulbs
Before storing the gladioli bulbs, be sure to dry them . This procedure will keep them healthy until spring and reduce losses. After digging, washing and processing, the planting material is laid out on cloth or film and taken out for a short time in the sun. Then the corms are transferred to low boxes and drying continues in a room with good ventilation at a temperature of 25 -30°C.
In such conditions, gladioli are kept for 2 weeks, then the corms should be dried at a temperature of 18-20°C for another 2-3 weeks. To ensure intensive drying, which will stop the proliferation of fungal pathogens, additionally use heating devices, for example, a household hair dryer.
If it is impossible to provide such conditions for drying, the bulbs are laid out on the top open shelf in a warm, dry kitchen or on a rack in the pantry.
Sorting
30–40 days after drying, the planting material is laid out according to varieties and sizes . For corms, division into 4–5 fractions is accepted:
- 1st category includes planting material with a diameter of 3.5–4.4 cm;
- to the 2nd – with a diameter of 2.5–3.4 cm;
- 3rd fraction – these are bulbs with a diameter of 1.5–2.4 cm;
- small – 1–1.4 cm in size belong to the 4th analysis;
- large corms with a diameter of 4.5 cm are classified as extra class.
Children with a diameter of 0.8 cm are considered large, medium - with a diameter of 0.6–0.7 cm, small - from 0.4 cm or less. Separately, you need to set aside weak and unripe bulbs. The disassembled bulbs and children are marked, providing them with labels with the inscriptions of the variety .
Protection from pests and diseases
During wintering, gladioli can suffer from thrips and other pests. Thrips penetrate under the husk and suck out all the juice from the bulb, causing it to die. protect tubers from pests and diseases in the following ways:
- Garlic. The chopped cloves must be placed in containers where the bulbs are stored. When checking planting material, all dried garlic is replaced with fresh garlic.
- Paraffin. The paraffin film protects gladioli from moisture loss, as well as from pests and infections. During spring planting, it can be easily removed by hand. But you need to take into account that this procedure will not save a diseased tuber.
If pests appear on the flowers, treatment with Zineb is recommended. The tubers should be immersed in it for half an hour and then dried for 2-3 days in a well-ventilated area. After the procedure, they are put back into storage.
Where is the best place to store gladiolus bulbs?
After thorough drying, the bulbs can be stored. For successful wintering, a room temperature of 4–8°C, air humidity in the range of 60–80% and good ventilation are required .
In the basement, cellar or vegetable pit
A dry, cool and well-ventilated basement or cellar is the best winter storage for gladiolus bulbs. But this storage method is more suitable for residents of rural areas and small towns. Boxes and crates are placed on shelves in the basement in one row so that there is air access to the bulbs. Nets with bulbs are hung on hooks or nails.
At a summer cottage, a box of bulbs can be placed in a vegetable pit or trench . The bulbs laid out in a container in one row are sprinkled with dry sawdust and placed at the bottom of the pit. Dry leaves are thrown on top, and covered with film to prevent water from getting inside. The hole is then covered with earth. Water should not accumulate around it, so a small mound is formed on top of the pit. This method of storage is not ideal, as it is impossible to ventilate the bulbs, control humidity and prevent the spread of disease.
On the glassed balcony
For storage on a balcony or loggia, choose an insulated box or container with thick walls, for example, made of polystyrene foam. The bulbs are laid out in a box in one layer and placed on the floor near the balcony door. It is necessary to constantly monitor the air temperature and, in case of a significant drop, additionally protect the bulbs from freezing.
In a refrigerator
in the refrigerator , remove the plastic container in which vegetables are stored on the bottom shelf. Each bulb is wrapped in newspaper, and then placed in a bag or small box and placed in the refrigerator.
Planting material needs to be inspected more often than in other storage areas - at least 2 times a month. If condensation has accumulated in the bag and the paper is damp, then lay the bulbs on the table and dry them with a hairdryer. Then wrap it in dry newspaper and put it back in the refrigerator.
Disinfection of planting material
After the housewife has dug up the gladioli, they must be protected from disease. To do this, the bulbs are kept in two solutions. The first consists of water and foundation. You should get a weak 0.1% solution. The second composition, in which the planting material will be soaked before wintering, includes water and potassium permanganate. The result should be a 0.3% solution. Gladioli bulbs should sit in each liquid for 30 minutes. If you are unsure of the result after two treatments, then the gladioli can be kept in a third solution made from karbofos for 10–15 minutes.
Storage is preceded by drying of the planting material, which usually lasts about 2 months. The bulbs should be dried in a well-ventilated area at room temperature. During this period, it is necessary to inspect the bulbs in order to promptly remove from them those that are diseased and unsuitable for future storage and planting.