Home / Sowing
Back
Published: 04/30/2020
Reading time: 12 min
0
12
- 1 Choosing a place to plant gladioli
- 2 Predecessors and neighbors of gladioli
- 3 How to plant gladioli correctly 3.1 Planting scheme
- 3.2 Feeding
- 7.1 Planting tubers
How to plant gladioli in the ground in the fall? Care instructions
Gladioli... These majestic, beautiful and bright flowers not only transform a summer cottage, but also completely change the atmosphere around, making it light and cheerful. Many summer residents strive to grow gladioli. Flowers adapt well to any conditions, are not demanding in care and bloom for a long time. But what to do if you didn’t have time to plant the plant in the spring? There is an exit! Planting gladioli in the ground in the fall is an excellent option for obtaining healthy and hardened flowers in the coming season. What needs to be taken into account when planting and how to properly divide the tubers of the plant? The answers to these questions can be found in this article.
Planting gladioli in the ground in autumn
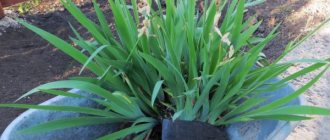
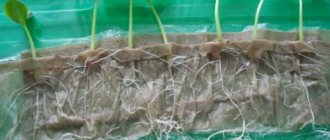
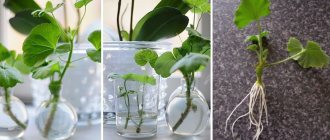
Growing seedlings from gladioli children
If it’s winter or early spring, and you still have time to experiment, then the safest thing to do is try to plant gladioli babies as seedlings. Of course, this will take more time and effort, but as a result, 100% of all children will grow. In principle, growing gladioli seedlings is no fundamentally different from the same tomatoes. There are only two conditions that must be met in order to grow gladioli:
- plant in separate containers so as not to damage the roots when transplanting,
- provide the most cool, and even cold conditions for growth. Ideally, the temperature should be from +5°C to +15°C.
Children of gladioli are usually planted in small cups or cassettes and watered from below into a tray. When the first shoots appear, they need the maximum amount of light. If you live in a private house, you can place the planted seedlings in the basement and illuminate them there with energy-saving lamps. These conditions will be ideal for good growth and root formation in baby gladioli.
Small plants grown in this way can be planted in beds in April. Since each baby was placed in a separate container, there should be no problems with planting.
Planting gladioli in the fall - where to start?
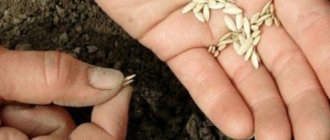
In order for the flower to take root and sprout in the spring, it is important to properly divide the planting material. Gladioli corms, especially large ones, often produce not only one main bud, the central one, but several lateral buds. That is, from one bulb two or more develop. This phenomenon is not common, and it is not characteristic of all varieties of gladioli; this quality is mainly characteristic of new varieties. But since it still takes place, it would be a sin not to use it for the accelerated propagation of new, especially valuable varieties.
How to get more planting material to grow beautiful flowers? Today, various methods are used to increase the number of kidneys. This can be cutting out or pinching the main bud, planting the bulb sideways, and sometimes “upside down” - with the bottom of the bulb facing up. This greatly contributes to the appearance and development of lateral buds, although not all of them are able to grow. To do this, you need to cut the corm, and on each piece after cutting there should be one dormant or ready to awaken bud. It is also important that each piece has at least a tiny part of the bottom, in addition it needs to be treated with a solution that stimulates root formation.
Planting gladioli in open ground begins by observing the following rules:
- Corms are cut about a week before planting. Small onions are cut into 3 or 4 parts, larger ones - into 8-10, and the largest ones can be divided into 10 or 15 parts - strictly in accordance with the number of buds present.
- Each bulb is carefully inspected to identify defects. If, while cutting an onion, it turns out that it is sick - there are signs of viral or fungal infection, it must be immediately destroyed, and the tools must be thoroughly disinfected.
- All parts of the corms resulting from cutting are treated either with brilliant green or sprinkled with crushed charcoal - charcoal or activated. Next, all parts are dried in a warm room with good ventilation. These procedures protect parts of the bulbs from rotting and do not allow the healing process of the cuts to drag on.
- A couple of days before planting, the resulting planting material must be treated with growth stimulants so that roots develop faster and sprouts appear. Before planting, they are treated with fungicides.
Planting gladiolus bulbs is not an easy task because the plant needs to fulfill certain requirements. First you need to choose a suitable location. The plant does not like shade, so it is better to give preference to sunny areas with an abundance of ultraviolet rays. The planting material of corms is planted strictly vertically in well-loosened, light soil. It is best if it is nutritious, well-prepared soil with a high content of nutrients, peat and compost. The planting depth should not exceed five centimeters. The planting material is sprinkled with a thin layer of peat on top; this measure will prevent the buds from drying out. Planting work ends with watering.
Gladioli care
You need to carefully care for planted gladioli. When the seedlings reach a height of ten centimeters, try to mulch the bed with a layer of humus, 5 cm thick: it will protect the soil from dehydration and overheating and, when watering, will feed the bulbs.
Gladioli need to be watered once a week, early in the morning or late in the evening, very generously - 10-12 liters per m2. It is better to pour water into inter-row furrows 3-5 cm deep to prevent drops from getting on the leaves of plants, followed by loosening the soil to a depth of 5-6 cm so that a crust does not form on it, and hilling the gladioli.
It is advisable to loosen the soil at least once a decade, regardless of the presence or absence of precipitation. In the hottest weather, water the gladioli every 3-4 days, otherwise the peduncle will become sluggish and the last flowers will dry out without blooming. When buds appear on the shoots, tie the flower stalks to the pegs, if necessary, and do not forget to remove dried flowers so that the plants do not waste nutrients on the process of ripening seeds that you will not need.
- Horsetail: cultivation, properties
Caring for gladioli includes weeding, also as needed, which on average occurs 3-4 times during the summer. Make sure that weeds do not choke out the seedlings, otherwise the flowering of gladioli may be at risk. In addition, in areas overgrown with weeds, there is a greater risk of disease and damage to gladioli by slugs.
Feeding gladioli with mineral fertilizers is carried out at different stages of growth. The first fertilizing, nitrogenous, is carried out during the appearance of the first 2-3 leaves. To do this, 25 g of ammonium sulfate or 25-35 g of ammonium nitrate, or 25 g of urea are added per 1 m2 of dry soil. As a result of a lack of nitrogen, the plant has pale leaves; an excess, on the contrary, gives powerful growth and rich color to the plants, but, unfortunately, leads to a delay in flowering and reduces resistance to fungal diseases.
The second feeding, nitrogen-potassium-phosphorus, should be done after the appearance of 5-6 leaves by adding 15-20g of superphosphate, 10-20g of ammonium sulfate and 10-20g of potassium sulfate per 1 m2 of soil.
The third feeding, potassium-phosphorus, is given to plants before budding, immediately after the appearance of the peduncle: per 1 m2 - 30-40g of superphosphate and 15-20g of potassium chloride.
How to plant lilies correctly and how to care for them after
Gladioli also need organic fertilizers, which are best applied in liquid form, since this allows the fertilizers to be delivered directly to the root system. At the beginning of plant growth, you can use an infusion of bird droppings (3 buckets of droppings are infused in 4-5 buckets of water for 10-12 days, then one liter of this infusion is diluted in 10 liters of water and the inter-row furrow is watered, followed by loosening the soil and hilling). Liquid mineral fertilizing is carried out every 2-3 weeks, but after August 15 you need to stop feeding gladioli. Do not use horse manure as fertilizer.
Good results are obtained by foliar feeding, that is, spraying plant leaves with a solution of mineral substances, which accelerates the flowering of gladioli and increases their decorative value. It is best to use solutions of boric acid (0.15 g per 1 liter of water), copper sulfate (0.2 g per 1 liter of water) or 0.15% solution of potassium permanganate. Feed the leaves 2-3 times during the summer at the beginning of growth and during budding, adding a little soap to the solution and trying to ensure that the composition gets on both sides of the leaf.
It is very important to cut gladioli correctly. This should be done with a sharp knife early in the morning or evening so that the remainder of the peduncle is deeply hidden between the remaining leaves, of which there must be at least four on the plant, and which should ensure the further growth and development of the corm.
We answer
Frost resistance level of gladiolus
So, you can plant gladioli for the winter, but only if your site is located in the southern regions of Russia. Here the soil will not freeze in winter. In these flowers, the root system develops at a temperature of 10-15 degrees, and shoot growth occurs at 20-25 degrees. To ensure the best development of gladiolus bulbs, you need to store them at a temperature of 3-9 degrees. In this case, the root system will not inhibit the development of the plant. Corms tolerate cold, but die at a temperature of -2 degrees.
Features of planting plants before winter
Before planting gladioli for the winter, you should think about how to provide them with all the conditions for survival and further growth. To do this, you need to ensure the same temperature as during storage.
If the babies have a dense shell, then it can withstand even 4-degree temperatures.
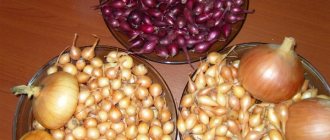
Gladiolus propagation: the use of children and the advantages of such a solution
Each of them can have its own individual size, which varies from 1 to 15 mm. Reaching its optimal level of development, which occurs 3-4 years from the moment of planting, the main bulb is capable of bearing 20-30 children of various diameters. Each of them is capable of growing into a full-fledged individual and forming a new bright flower.
Gladioli from children and their cultivation is an excellent solution that allows you to accomplish the following tasks:
- ensure the safety of the variety;
- rejuvenate plants;
- preserve the characteristics of the mother flower;
- save time and effort on growing bulbs.
The above factors are decisive and significantly distinguish this method of propagating gladioli from other planting methods, such as the use of seeds. With the optimal selection of the baby and the creation of the best conditions for it, the plant will begin to break through the soil already 15-20 days after planting. Otherwise, and the selection of not very good parameters for growing the bulb, the emerging shoot will be poorly developed and will sprout much later than the specified period. Therefore, in order to grow full-fledged bright and colorful gladioli from children, you should take the process of propagation and cultivation of this plant very responsibly.
Planting gladiolus babies is shown in the video.
Reviews and comments
Hello! I share my interesting experience of obtaining a rich harvest. I came across an interview with Mikhail Chursin, Doctor of Agricultural Sciences, and inspired by the article, I decided to take his recommendations, and you know, I was right... All summer we ate cucumbers and tomatoes from the garden, and also prepared some for ourselves and our family for the winter. For those interested, here is a link to the article.
Why did you suddenly need to plant gladioli before winter? It’s not such a labor-intensive task to work on in the spring. And the bulbs are stored well at home under conditions that are also unpretentious. But there is a greater chance of rotting in the ground during such a planting.
To be honest, I haven’t heard of anyone I know planting gladioli in the winter! I always plant in the spring. In the fall, I dig up the bulbs, put them in specially prepared containers and place them in the cellar. They are perfectly preserved in the cellar. And in the spring I plant it in the place where I wanted. I think planting in winter is stupid. For example, this winter we had frosts of up to 18 degrees on the bare ground (there was no snow)! Which flower bulbs can withstand such frosts?
I have always stored gladioli bulbs at home until spring, but now I plant them before winter.
All gardeners know that gladioli bulbs do not tolerate frost and will freeze if they are not dug up for the winter. And I leave the bulbs to winter in the ground, and all my neighbors are jealous of my gladioli!
Of course, if we simply leave the bulbs in the ground after the gladioli have faded, we will simply ruin them. It is necessary to dig up the bulbs after flowering, so we dig them up, clean them from the soil and carry out all the necessary treatments, namely: immerse the bulbs in a Fundazol solution for half an hour, then rinse them under water and soak them in a 3% manganese solution for about an hour, then take them out We dry them.
And now the fun begins! Some people store gladioli bulbs in the apartment, others in the cellar or refrigerator. And I plant them in October before frosts back into the ground. I just plant it much deeper than usual, 20 centimeters, no less. And I always insulate the top with dry leaves and hay.
Gladioli survive winter well! The first shoots appear at the end of spring. And most importantly, after such a winter, gladioli grow strong and powerful - they don’t even need to be tied up. And how they bloom!
Advice from Lyudmila.. It’s a pity the author didn’t write his place of residence.. In the Moscow region, only children of gladioli overwinter.. I once tried to leave them.. But maybe now there are some new varieties.. But in more southern areas, I think some of them will overwinter... So what? do you think?
Is it possible to plant gladioli before winter?
Many bulbous plants are sensitive to low temperatures and cannot overwinter in the soil; such plants must be dug up and stored in appropriate conditions until spring. As for the handsome gladioli, novice amateur gardeners are often interested in whether it is possible to plant gladioli before winter and what the consequences are.
Let's consider this issue in detail and find out whether it is worth taking such a step and what time is generally optimal for planting flowers.
Is it possible to plant gladioli in autumn and before winter?
It is important to note that among the numerous bulbous ornamental plants, gladioli tubers do not overwinter in the ground, and therefore they must be dug out of the soil and sent for storage until spring.
If you leave gladioli bulbs in flower beds over the winter, they will simply die. Therefore, it is impossible to plant gladioli in late autumn and before winter - this is a vain and waste of your energy on your garden plot.
This is why it is imperative to dig up flower bulbs when the leaves have not yet dried completely.
For gladioli, the optimal time for digging up tubers is the second half of summer; sometimes you can do this in the first months of autumn, especially if you planted the flowers late and they bloomed late. Moreover, it is best to dig up gladioli for storage on a warm, dry and, if possible, windless day.
How to store gladioli. When to dig up corms and where to store planting material?
The timing of digging up corms depends mainly on the timing of flowering and cutting. For the corms and children to ripen, 30-40 days must pass from the day of flowering and cutting. So, if the gladiolus bloomed and was cut on August 1, then on September 1 it can already be dug up. If there are a lot of gladioli and it is impossible to remember the flowering time of each, they keep a diary and check the time of digging each plant according to their notes. In cases where the gladiolus is not cut and the flower remains on the plant, additional nutrients are consumed and the digging time is delayed by another 15-20 days.
Excavated gladioli bulbs. © Nancy DuBrule
In the non-chernozem zone of Russia, the bulk of gladioli flourishes in the second half of August. Therefore, excavation can begin as early as September 15. Slight immaturity does not affect the quality of the corm, but is favorable for selecting the baby, since the immature baby has not yet separated from the corm and is easily removed along with it. The bulk of the baby is light gray or gray in color. A well-ripened baby has a dark brown color, difficult to distinguish from the color of the soil; in addition, it is not connected to the corms. It is very likely that such a plant will be lost during digging and will clog the soil.
Gladioli corms are dug up in sunny weather. First, plants grown from corms are selected, and among them, early varieties are selected first. To do this, experienced amateur flower growers try to place plantings according to varieties in such a way that the early ones grow separately from the late ones. This makes digging easier. You can dig with a shovel, but it is better to take two scoops with hard handles.
Gladiolus bulb with children. ©Indie
With a single-line transverse planting, the excavation process is as follows:
- at a distance of approximately 7 cm from the center of the gladiolus corm, scoops are cut into the soil on both sides, passing along the entire row;
- starting from the edge of the row, cut the scoops approximately 15 cm deeper and bend the handles away from the gladioli;
- pressing on the handles, the ends of the scoops stick out the gladioli corms with the baby onto the soil surface;
- select corms and baby bulbs from the soil and place them in containers; The container can be a sieve, box or basin.
When the plantings of one variety are completely dug up, pruning is done:
- cut the stem as close to the corm as possible;
- tear off the old corm from the new one by pressing the thumb of the right hand;
- trim the roots.
Sometimes the old corm is torn off after a week of drying. This depends on the drying conditions and the skills developed by the grower.
After digging, the corms and baby gladioli are placed on a sieve for washing in water. The washed material is placed in bags, the variety is designated and pickled (see section “Preparation of planting material”).
The timing of digging is related not only to the process of maturation of corms and children, but also to the condition of the plants. If the gladiolus plants are green, without visible signs of disease, then dig them up at the usual time. If there are diseased specimens, they are dug up earlier to save the harvest of corms.
Digging up gladioli
The safety of corms and children during storage is closely related to the mode of drying them after digging. If under-dried corms get into storage, there is a danger of them being damaged by fungal diseases under the general name “rot”. Therefore, it is important to dry the dug up, washed and pickled corms and baby gladioli for two to three weeks at a temperature of 25-30 °C, and then a month at room temperature. Beginning flower growers need to learn the rule: it is better to overdry than not to dry.
Only healthy planting material is stored. Corms and baby gladiolus must be examined and all specimens with signs of disease must be discarded. If a corm of a valuable variety is weakly affected and it is a shame to throw it away, you can cut out the diseased tissue to a healthy place, disinfect the sections with brilliant green and store them.
For storage, use a basement, refrigerator, room with an open window, etc., rooms where the temperature is maintained within 3-9 °C. Despite the precautions taken before storing, an infection may persist in the scales of the corms and the unevenness of the shells of the baby. Therefore, during the storage of gladioli, you should review all the material monthly and discard diseased specimens.
Preparing gladiolus bulbs for storage. © diynetwork
The air humidity in the room should be within 60%. If you do not observe the temperature and humidity conditions, root tubercles begin to actively grow on the bottom and sprouts appear. To prevent the development of microorganisms and thrips, storing corms and chicks interspersed with chopped garlic cloves, which are replaced with new ones as they dry, helps prevent the development of microorganisms and thrips.