Independent and solemnly festive, stubbornly striving upward, the perennial corm has its own definitely complex secrets of agricultural technology.
Growing gladioli in open ground is not an easy task, as many gardeners around the world believe. Storing dug up bulbs during the winter also adds difficulties.
And yet, the graceful flower with a royal status is becoming more and more fans every day.
The plant has been in cultivation for more than two centuries, but has been known to botanical science for over 2 thousand years. The first mentions of wild species are found in Pliny and Dioscorides.
The name of the flower is associated with the Latin word gladius, translated as “sword,” probably due to the similarity of the shape of the leaves to the famous bladed weapon.
The homeland of natural species of gladioli is the tropics and subtropics of Africa, the Mediterranean coast, Central Asia and Europe, Western Siberia.
In the genus Speech, or Gladiolus of the Iris family, there are up to 280 species, most of them grow in African spaces.
The ancestors of modern garden hybrids were South African species that appeared in Europe in the 17th century.
The first interspecific hybrids were bred at the beginning of the 19th century, generating widespread interest in the flower, and at the end of the same century, the corms crossed the Atlantic Ocean and firmly won the hearts of American gardeners and breeders, who created the first varieties with corrugated petals.
Most of the current varieties of gladioli appeared from crossing South African and European species and now belong to the hybrid garden species - Gladiolushybrydus.
At the same time, there are approximately 5,000 varieties in the world, some are long-lived, but mostly new hybrids are created to replace the old ones, striking in their diversity.
Among them there are giants and dwarfs, and in terms of color there is hardly another flower that dares to compete with gladiolus.
Gladioli in the flowerbed stand out confidently and unconditionally, pushing many of their rivals into the background.
Botanical portrait
The underground part of the plant consists of a corm, tuber buds and a root system.
The corm is a kind of reservoir for storing nutrients necessary for germination and the initial development of a new flower.
The shape of an adult corm is onion-round. The outside is covered with scales. With age, it acquires a flatter outline, and its height is much less than its diameter.
In young bulbs this ratio is reversed - the circumference of the bulb is less than its height.
An old bulb has 2 or more replacement buds, a young one has only one. During the growing season, the mother corm dies off, giving way to a replacement one.
The color of the corms can vary depending on the variety, from white to dark cherry.
At the base of the bulbs, tubers, or babies, ranging in size from 1 mm to 20 mm are formed. Their quantity varies among different varieties.
The root system of gladioli is two-tiered. Around the bottom, the first tier of roots is first formed, which the plant needs in the first days of development; during budding it dies, and the roots of the second tier develop - ordinary and retracting.
The leaves of gladioli are xiphoid and hard. Conventionally, they are divided into three types - vaginal, or lower, corm and stem. The grassroots are practically invisible from underground, only the upper part may appear no more than 5 cm.
The main ones are those that come out of the bulb, the stem ones are very short. The stem is cylindrical, vertically located, turning into a peduncle in the upper part.
The inflorescence is a loose spike of 23-30 flowers, arranged in 1 or 2 rows, alternately or spirally on one or both sides of the peduncle.
Gladiolus flowers are six-petaled, bisexual, the color can be of all kinds - monochromatic or multi-colored, with spots, streaks, veins, borders and corrugated or ruffled edges of the petals.
What it is
Reproduction of gladioli is not an easy task, but it is quite feasible. Typically, gladioli reproduce using bulbs and so-called children. What are the latter? The baby looks like a small tuber with a dense and dry shell, which protects the inside of this unit from external factors during dormancy. Each such unit, similar to small potatoes, has its own specific size. However, it is necessary to begin the story about the propagation of gladioli with corms. And you need to know that its subsequent flowering depends on the parameters of the gladiolus corm. Let's look at these same dimensions and find out how they affect the future beauty and size of the flower.
- Only a corm that is larger than 3 centimeters in diameter can produce several flower stalks at once. The flowers will be large and beautiful, as they will open completely. Their color will surprise you with its richness.
- The same unit, only slightly smaller in size - from 2 to 3 centimeters, is considered a representative of the second grade. You will also expect lush flowering from it.
- Then the sizes only decrease. Small specimens measuring from 1.5 to 2.5 centimeters are considered a good option. But they begin to bloom much later than the previous ones, about 2-3 weeks. Moreover, the flowers will not open as intensely.
- The units of the fourth analysis are considered the lowest quality. They measure from 1 to 1.5 centimeters. Such crumbs bloom late and bloom very sparingly. But if you show persistence, you can get good results from such specimens.
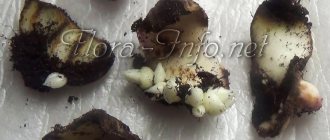
When digging up a corm, you may notice very small coils at its very base - these are corms or so-called children. Imagine that they also have their own sizes and are divided according to parameters.
- Children in first place have sizes from 6 to 11 mm. With subsequent care they can produce first-class corms. With their help, the plant is easy to propagate.
- Second-grade tubers have dimensions from 2.5 to 5 mm. From them you will get small corms.
The gladiolus baby promotes vegetative propagation. Such units retain all their qualities very well in winter during storage. Therefore, their germination rate is always 100%. Children have the following advantages.
- They can be propagated into flowers. This is how the personal seed fund is preserved.
- You will receive a 100% healthy plant, since the babies were grown on your soil, which has its own characteristics.
Reproduction of gladioli
The most common method of propagating gladioli is by small tubers, which form in abundance at the base of a mature bulb during the growing season.
The seed method and dividing the bulbs are practically not used.
Children
In the fall, during digging, the children are carefully separated from the mother bulb, processed and dried until spring in the same way as adults, but in a separate container.
At the beginning of April, the children are taken out of the basement and laid out in a bright and heated place. After warming up, the corms are immersed for several minutes in a warm pink solution of potassium permanganate.
After 15 days, sprouts appear at the top and the roots hatch - it’s time to plant gladioli in the country house or garden.
The children are planted in a shallow furrow with sand sprinkled at the bottom. The top is crushed with fertile soil mixed with horse manure and watered with an epin solution (1 ampoule per 7 liters of water). The top of the crops is covered with film if there is a risk of return frosts.
The seedlings are watered regularly if the summer is rainless, and every week they are fed with mullein solution, and once a month with complex mineral fertilizers with a high nitrogen content. Frequent loosening of the soil and timely removal of weeds are also carried out.
Under favorable conditions, closer to autumn, the children form a good corm that can bloom, but this season it is better to remove the flower stalks and not allow the young plant to waste energy on flowering.
Dividing the bulbs
Propagation of gladioli by dividing the bulb is rarely used by gardeners. There is still a certain risk of losing valuable planting material, especially if it concerns rare varieties.
However, flower growers who practice this method claim that the risk is no greater than with the usual planting of gladioli in open ground.
7-10 days before planting in open ground, the corms are divided into 2 or 3 parts - according to the number of buds.
They are cut in such a way that each part contains a fragment of the bottom with hatched roots, otherwise the plant will not take root. The sections are treated with powdered charcoal or brilliant green and dried.
At the end of April, they are planted shallowly in the beds and covered with a film on top, which is removed when the threat of return frosts has passed.
Gladioli from divided bulbs bloom no worse than children planted in the usual way.
Seeds
The seed method is practically not used in growing gladioli, since it is impossible to obtain an identical plant from planting material collected from hybrid plants.
Usually used by plant breeders, but as an experiment, some gardeners sow seeds in the garden in the spring.
Throughout the growing season, seedlings are fed with mineral fertilizers.
By autumn, they form small corms, which are dug up and stored like other children.
In the spring they are planted in the ground, but a full-fledged corm is formed only in the fall, and gladiolus grown from seeds will bloom only in the 3rd year.
How to propagate gladiolus by children
To get healthy plants that will bloom profusely, propagation should be carried out following the recommendations. Before planting, tubers require preparation. In the future, they need to be planted correctly. Successful cultivation is impossible without quality care.
Also find out what to do to make gladioli grow and bloom quickly.
Preparing for sowing
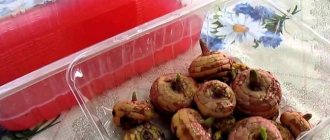
Since tubers are planted in the spring, and collected after flowering - in summer or autumn, they need to be sent for storage in winter. Only well-dried planting material can be stored. The recommended duration of drying under natural conditions is 2-3 weeks.
Video: Storing gladioli in winter
Planting material ready for storage is discarded, getting rid of rotten specimens. If small foci of rot are found, they are cut out, treated with brilliant green and dried. Healthy babies are placed in wooden boxes for 30–40 days to dry out. They need to be covered with newspaper on top to absorb moisture. Periodically it needs to be changed to dry.
After this procedure, each bulb is wrapped in newsprint and placed until the end of winter in a cool place or on the bottom shelf of the refrigerator. Under these conditions, children can be stored for two to three years. Even after such a long period, they will be able to germinate and produce new plants.
In the spring, before planting, the bulbs are removed from storage and cleaned of scales. If they are very dry, then they must be kept for a day in water heated to a temperature of +30°C.
Important! Tuber buds should not be kept in water for longer than two days. This will significantly reduce their germination rate.
Planting and care
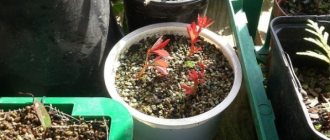
Prepared bulbs are planted for germination in a container filled with nutritious soil. It is placed in a well-lit and warmed place, at a temperature of +18...+25°C. As the top soil layer dries, it is moistened with settled water at a warm temperature. Sprouts should be expected after 2-3 weeks.
After the young plants get stronger, they are planted in open ground. The area must first be fertilized with humus. Plantings must be well moistened and mulched with a layer of peat.
In the future, young plants will require regular watering, loosening, mulching, nitrogen and potassium fertilizing. In order for full-fledged tubers to form, it is worth cutting out the flower stalks. In autumn, the bulbs should be removed from the soil, dried, and stored. They are returned to the site in the spring, when the air and ground warm up.
Did you know? The famous Roman historian, statesman and military leader Pliny described gladioli as plants with magical properties. Warriors wore corms around their necks as amulets.
So, growing gladioli at home is not difficult. These flowers can reproduce in two ways. In order for healthy young plants to grow from cuttings and children, you should follow the recommendations for their preparation and planting.
Selection of planting material
The best bulbs for planting are round, shiny, without visible damage or spots, with a bottom diameter of 3 to 7 mm.
You should not buy large corms with a concave bottom; they have probably already bloomed more than once, so they will no longer form a good inflorescence.
The presence of three or more sprouts does not indicate the strength of the bulb, but the presence of an incurable disease - herbaceousness.
Red spots sprinkled with purple powder indicate that the planting material is infected with thrips, and shiny round brownish spots indicate that the bulbs are affected by bacterial scab.
If brown spots cover the bottom, this is fusarium, such bulbs must be destroyed.
Secrets of growing gladioli - 11 rules
Let's look at the important nuances of growing this flower, the so-called eleven immutable rules:
- The rule of crop rotation is that it is highly not recommended to grow gladioli flowers in one place for more than two years. In the third year they need to be moved to a new place of residence.
- When replanting, it is preferable to choose soil with a different composition. If, for example, your flowers grew on clay soil, it will be better if you transplant them into sandy loam soil.
- Choose “proven” varieties of bulbs, those that are adapted to grow in your region. This flower does not like changes in climatic zones - if you purchase a rare variety from Holland, most likely it will please you with flowering only once.
- During planting, small bulbs are planted first, and then large ones. There is no need to place adult and children's bulbs next to each other - large tubers will overwhelm the "children". It is generally better to plant especially large specimens separately.
- Growing gladioli - here it is extremely important to properly bury the tuber. Look at its diameter; if the soil at the planting site is light, then the depth of “immersion” should be approximately four diameters. If the soil is heavy, then a depth of three diameters will be enough. If the planting is not deep enough, the plant will have to provide additional support, and if it is planted too deep, it may not bloom at all.
- About five days before planting, it is recommended to clear the tubers of hardened husks (for better germination); after planting, water them once every two days.
- Gladioli are light-loving plants; if you choose a late-flowering variety, do not plant it in shaded areas. The shade is a suitable place only for early varieties, but even they can be late in flowering.
- To prevent the occurrence of fungal manifestations, if possible, plant the skewer in a ventilated place.
- If flowers grow in sandy loam soil, it is recommended to fertilize by irrigating the above-ground part of the plant (leaves).
- With the onset of summer, gladioli need to be watered once every 5-7 days, but the moisture saturation should be plentiful. If it is hot, then to avoid overheating of the soil, water the flowers moderately every day (after sunset), and do not forget to loosen the soil and destroy weeds.
- Pay special attention to collecting tubers; subsequent storage of gladioli in winter should be carried out correctly.
It is very important to choose a comfortable place for planting so that the flower can fully grow and bloom. Gladiolus does not like waterlogged soil, so it cannot be planted in places with high groundwater levels. This rule also applies to low-lying areas, areas where water can stagnate.
Preparing bulbs for planting
Already in February, gladioli bulbs are taken out of the basement, where they were stored in the winter, and cleared of scales, washed in warm water, dried and left in a dry place at room temperature, wrapped in newspapers.
Air humidity should be low, otherwise the bulbs will wake up ahead of schedule.
In April, they are unrolled and prepared for planting: they are disinfected and treated for prevention against possible diseases and pests: with the drug Maxim, if there is a suspicion of disease, or with Fundazol.
Immersion in a solution of potassium permanganate does not provide one hundred percent protection.
5 ways to stimulate germination
Treating gladioli before planting will help speed up the germination of planting material.
Some methods tried by gardeners:
- Immersion for 10-12 hours in a solution of microelements accelerates flowering a couple of weeks earlier, in addition, the flowers bloom larger and their number in the ear is greater. Add 2-3 g of boric acid, 0.5 g of zinc sulfate, 2-2.5 g of potassium permanganate, 2-3 g of copper sulfate and 1 g of ammonium molybdate to a bucket of rainwater.
- The bulbs are placed in rainwater heated to 50 degrees and left for a day and a half, with a container wrapped on top.
- Warm up in an infusion of barley malt (1-1.5 kg per bucket of water).
- Bulbs prepared for planting are soaked for a day in an ash extract (2 tablespoons per liter of water) or in a solution of copper sulfate (5 g per liter) for 12 hours.
- Immerse in a solution of growth stimulants, for example, Gibberellin or Heteroauxin.
How to propagate gladioli by dividing the bulb
A well-known method for dividing gladioli is cutting the bulb. If the corm is large and has many buds, then not only the central bud, but also several lateral ones can germinate. It should be noted that this happens quite rarely. If you want to propagate your flowers only this way, you should choose those varieties that have a tendency to germinate multiple times. In them, from one corm, not one, but two, three, four or more bulbs can develop, which are used for replacement.
Propagation of gladioli by a method in which it is necessary to divide the bulb is used by breeders quite often, as a rule, in cases where they are trying to propagate new varieties. This is done in such a way that by correctly cutting the corm with a knife, you can quickly get as many of the expected plants as possible.
To try to increase the number of buds that germinate (meaning stimulation aimed at making the lateral buds germinate faster), a variety of methods are used. The central bud may be plucked or excised; if the corm is to be planted, then it will be placed either sideways or bottom up (that is, the top of the shoot is directed downwards). In this way, you can speed up the development of new buds, although not all of them will begin to grow. And this is achieved in this way: if there is a need to divide the bulbs, then each piece of the bulb should be accompanied by one bud - either dormant or one that is already in a state of awakening.
In order to be able to say with absolute certainty that the roots of the gladioli will develop, you should try to leave at least a small part of the bottom on each of the pieces. It would also be a good idea to treat them with some kind of root formation stimulator.
How to divide a gladiolus bulb
About half a month before the planned day of planting gladioli in the ground, you need to take out the stored bulbs, inspect them and peel them. This must be done with very careful movements so that those sprouts that have already woken up are not damaged. Thanks to such measures, diseased and unsuitable bulbs for planting are discarded. If ulcers from wireworms or plow are visible on any of the bulbs, you can simply remove them with a sharp knife - cut carefully until healthy tissue appears under the blade. This area should be treated with brilliant green or powdered with crushed charcoal.
After these steps, you can begin dividing the gladiolus bulb. Take the onion in your hands and carefully examine it to find eyes (or sprouts). Using a well-sharpened knife, divide it vertically into several parts, so that each piece contains both part of the bottom and one eye. The entire cut surface should be treated with brilliant green, slaked lime, alcohol or ash.
If the bulbs are small, then you can propagate flowers by dividing them like this: it is enough to divide them into three or four parts; if they are a little larger, then into eight or ten. Large onions are allowed to be divided into ten to fifteen parts (taking into account the number of buds that are already set).
Now place the cut onions in a bowl or on a towel and let them lie down so that the processed sections dry a little. The room should be warm enough and well ventilated. Otherwise, the seedlings may rot or the cut tissue will take a very long time to heal.
The knife used to divide the onion must be disinfected after each cut, for example, with alcohol.
Preliminary care should consist of the following steps: a day before planting, the bulbs must be treated with potassium permanganate (dissolve one gram in ten liters of water) or use the drug “Maxim”. If it happens that the bulbs have dried out, you should soak them briefly in a microelement or stimulant.
Planting gladioli
The right time for planting gladioli in open ground is mid or late April, but it also depends on the climate of the area.
You can determine the planting date by the soil temperature at a depth of 10 cm - if it is more than 10 degrees above zero, it is time to plant gladioli.
Choosing a place in the garden beds
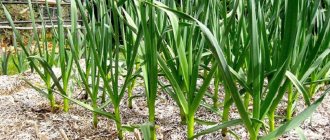
The bed for growing gladioli must be located in an open sunny space.
Lack of lighting will affect flowering - the spike will form small and with fewer flowers.
Gladioli are returned to their original place no less than after 3 years.
Soil preparation
The soil for gladioli is preferably fertile and well-groomed; it is prepared for planting corms a year earlier - in the spring, horse manure and humus or 2-3-year-old compost soil are added.
It is not recommended to add organic matter immediately before planting - this increases the risk of gladioli becoming infected with scab or rot.
The area is dug up and planted, for example, vegetables or dahlias. In the fall, green manure is sown - rapeseed or mustard, which is mowed and embedded in the soil before the onset of frost.
Planting gladioli in the ground in spring
The depth of planting the bulbs depends on their diameter - the larger it is, the deeper the gladioli are planted.
If the circumference of the corms exceeds 3 cm, the planting groove is dug 15 cm or more deep, from 2 to 3 cm - 12-15 cm, small children up to 1.5 cm in diameter are planted to a depth of 10 cm.
The row spacing when planting the largest bulbs is approximately 25-30 cm, and between plants in rows - 20 cm.
The remaining corms are planted more densely, but in such a way that it is possible to freely loosen the soil.
A layer of sand 1-2 cm thick is poured onto the bottom of the grooves in a clayey or chernozem area for better breathability.
When to prepare gladioli for planting in the spring, take them out of the refrigerator for germination
Gladioli cannot be called too picky flowers, however, they, of course, need some care.
Let's start, perhaps, with preparing flowers for planting in spring:
- First you need to remove the gladioli from their storage place - the refrigerator. This should be done about a month before planting in the ground.
- Next, you should look at the condition of the corms. Be sure to clean them of scales. This must be done extremely carefully, as the eyes of the plants can be damaged. Then we take brilliant green and treat all the “wounds” of the crop with it.
- After this, you can move on to the next job. If you have corms that have formed a pair of eyes, you can divide them. They do this, of course, very carefully, and the damaged area is necessarily treated with either ash or activated carbon in tablets, which must first be crushed.
- Further, if desired, you can sort the flowers according to different criteria: variety, size, age.
All corms that are unsuitable in your opinion need to be selected and eliminated. Dry, rotten, blackened corms are definitely not suitable for planting. Now we carefully put the gladioli in a box or box and send them to a fairly bright place, but without direct rays of the sun
It is better to use a box made of cardboard. When laying corms, pay attention to their position. The eyes should not be pressed against anything, otherwise they will grow crookedly.
Each bulb should take its place and not lie on top of another. That's all, the gladioli are prepared for further planting. Now you need to wait for the right time and temperature and start planting flowers.
Caring for gladioli after planting
Plants require constant attention after planting. You can’t say about them – I planted them and forgot about them.
Constant monitoring of the development of flower stalks and the condition of the buds, regular watering and fertilizing - this is the only way to get gorgeous flowers.
Proper watering is the key to a flower’s harmony
Gladioli tolerate hot weather very painfully, they look depressed and stunted, the leaves are soft, and the flower stalks are weak.
If the plantings are watered with a small volume of water, the roots grow only in the top layer of soil, and the plants do not develop powerful flower stalks, the buds open into small flowers, and their varietal identity is hardly identified.
A completely normal water consumption when watering gladioli is considered to be 4 or 5 buckets per 1 square meter. Moisture plays a particularly important role at the very beginning of the growing season.
Feeding gladioli
Timely fertilizer for gladioli is very important, especially for plants grown on sandy loam or peat soils.
There are 4 main periods in the development of gladioli, and in each of them it is necessary to apply feeding that is different from the others.
During the growth of the vegetative mass, from the moment the first leaf appears until the formation of the 4th in the phase of 2-3 leaves, nitrogen fertilizing is applied (25-30 g of urea per bucket of water - approximate consumption per 1 sq. m).
During the formation of 5-6 leaves, the formation and appearance of a peduncle occurs - fertilizing with microelements is necessary.
The solution is prepared from 50-60 g per 10-12 liters of water and watered between the rows.
The next stage is budding.
The plant should be provided with complete mineral fertilizer - 30 g of superphosphate, 15 g of urea and 15 g of potassium sulfate are dissolved in a bucket of water, the plantings of gladioli are watered and fed by leaf - sprayed.
At the very beginning of flowering, phosphorus-potassium fertilizer is applied - 20 g of potassium sulfate and 30 g of superphosphate are added to 10 liters of water and watered with this solution every square meter.
Between the appearance of 4 and 7 leaves, some gardeners also add organic matter - infusions of bird droppings (1:20), horse manure (1:10) or mullein (1:10).
Important! Before any feeding, gladioli are well watered to avoid burns to the root system and foliage.
Flowering and cutting
With the appearance of heavy flower stalks with inflorescences, the plants begin to fall to one side, so they need a reliable garter.
You can arrange it using ordinary twine and pegs hammered at the beginning and end of the row.
Plantings of gladioli are also well secured by plastic nets, which are stretched along the rows in the spring, and the plants grow through its cells.
The mistake of many gladioli lovers is untimely cutting.
If you delay, the plant will use all its nutrients to form a peduncle, and the corm will remain underdeveloped and is unlikely to survive until the next planting.
The flower stalks are cut off after the opening of several lower buds and at least 5-7 leaves are kept on the gladiolus - the more of them left, the larger and more resilient the bulb will be formed.
How to properly dig, trim and dry
Gladioli are dug up in the fall, observing the required timing and order.
As a rule, corms are dug from the ground in early or mid-October, but in wet weather it is worth doing this earlier to protect the planting material from fungal and bacterial infections.
Digging begins with early-flowering varieties grown from 2-3-year-old bulbs, and ends with late-flowering varieties obtained from children.
Violet, purple and cherry-red varieties are dug earlier than others and are believed to be susceptible to diseases more often than others.
Immediately after removing the gladioli from the soil, the above-ground part is cut off, the soil is shaken off and the roots are trimmed.
Diseased bulbs are discarded, treated with fungicides and sent for drying.
Well-dried planting material is stored without loss until spring, so drying is extremely important for storage.
It is carried out in several stages: left in the fresh air for several hours.
Then they are transferred for a couple of days to a room with a temperature of 20-25 degrees Celsius and then for a week in a warmer place with a high temperature of more than 30 degrees.
After this, the corms are sorted, the fallen husks are selected, suspicious and diseased ones are discarded, and placed in a clean lattice container in no more than 2 layers.
Leave in a room with a temperature of 18-20 degrees above zero for another month or a month and a half.
Only after this they are lowered into a dry basement for the winter or placed in the vegetable compartment of the refrigerator.
Bulb storage
The ideal temperature for storing corms is 4-5 degrees Celsius, but not higher than 9.
With such thermometer readings, pathogens and pests of gladioli are activated.
Planting material is inspected monthly: if mold is present, it is washed for half an hour in a 1% solution of copper sulfate and dried in a warm place, for example, near a heating system radiator.
Suitable containers are plastic or wooden boxes, and if the volume of planting material is small, they are placed in cotton or gauze bags.
Synthetic fabrics have a bad effect on the condition of the bulbs, although many gardeners have gotten into the habit of hanging them in the basement, placing them in nylon stockings.
Experienced gardeners advise transferring the corms for the period of storage with dry tansy grass, which repels female parasitic insects.
When to dig up bulbs
Timely cleaning and storage of gladioli. You need to dig up gladioli in the fall, from mid-September, when 35-45 days have passed after flowering. Corms that are ripe for digging have root covering scales, the babies are also covered with dense scales and are easily separated from the mother bulb. You need to dig in dry weather, first the earlier varieties, then the later ones. Plantings of small bulbs and children are dug last. If you notice that the corms are damaged by black or brown spotting, digging up the corms should be done earlier to save them from being damaged by other diseases.
You can mow the stems before digging, or you can trim them with pruning shears after removing the corms from the soil. The roots also need to be pruned. Then you need to carefully shake off the soil and separate the children. The corms are placed in boxes with a fine mesh or mesh bottom, each variety separately from the other, and washed under running water. Then they are disinfected by immersing for 20-30 minutes in a one percent solution of foundationazole, washed again with water, treated with a three percent solution of potassium permanganate, laid out for three days to dry, then transferred to boxes lined with paper and stored at a temperature of 25-30 ° C, from turning over time. After 10-15 days, the temperature is reduced to 18-22 °C. After 30-40 days, the corms can be cleaned and sorted.
How to grow peonies correctly - when to plant, how to care
The topmost, dirty scales are removed from the corms and the children are separated. Gladiolus babies - what to do with them? First, they are sorted by grade and size. A large baby is considered to be 0.8 cm in diameter or larger, a medium one is about 0.6 cm. Then the babies are placed in paper bags, which are stored at a temperature no higher than 5-6 °C. Storing tuber buds at higher temperatures is dangerous, as this can lead to loss of germination. In a city apartment, you can put the kids in the refrigerator.
Diseases and pests
Among the variety of varieties, there are gladioli that are more resistant to diseases and attacks by pests and less resistant, but absolutely immune, unfortunately, breeders have not yet bred.
Fusarium is one of the most insidious fungal infections. Symptoms appear in the form of yellowed tips of leaf blades in the formation phase of 5-6 leaves, and then their complete drying.
On corms during storage it appears as depressed reddish-brown spots.
Botrytis is clearly visible during budding and flowering - brown round spots appear on the foliage and petals, the middle part of the bulb rots and the stem breaks, and soon the entire corm turns into a rotting brown mass.
Sclerotinia is also a fungal disease that spreads in cool, damp weather.
The first signs are yellowing of the leaf blades and softening, and then breaking off of the stem.
Yellow spots with burnt-like edges appear on the bulbs; they gradually grow, the corm hardens and dries out from the inside.
The causative agents of septoria are also fungi. During the growing season, angular red-brown spots form on the leaves; on the bulbs it manifests itself in the form of deepening round spots, small in size.
The affected tissues become hard and mummify.
Treatment of fungal diseases is difficult; it is easier to prevent them than to treat them, and often diseased plants are simply discarded and destroyed.
Fungicide treatments are carried out as preventive measures.
Among bacterial diseases, the most common is scab, which is very difficult to recognize at the initial stage.
Only with severe infection, dark red spots of irregular shape are barely noticeable on the lower part of the stem and leaves.
On the corms, the spots are light and located closer to the bottom, but over time they darken and form an easily detachable cork layer.
Viral lesions are difficult to identify: yellow-greenish stripes sometimes appear on the leaves, the main signs are visible after the buds open - uncolored areas on the petals, deformation, variegation.
Sick plants must be destroyed.
Of the pests, gladioli are bothered by mole crickets and slugs, gnawing stems and corms, wireworms - click beetle larvae that look like a piece of solid wire and make passages in the bulbs, aphids and the most formidable and annoying gladiolus thrips, which destroys the buds.
To combat insect pests, they carry out repeated spraying of insecticides on the leaves - actara, fitoverm, karbofos and others, as well as pre-winter treatment of corms.
Harvesting and storing corms
What time to dig up bulbs
It is necessary to dig up gladioli bulbs in the autumn, when 35 to 45 days will pass after the end of flowering. Bulbs ready for digging have integumentary root scales, while their children are also covered with dense scales, and they themselves effortlessly tear away from the mother corm. To dig up gladioli, you should choose a day when the weather is dry. The early varieties are dug up first, and then the late ones. Lastly, plantings of children and small bulbs are dug. If signs of damage to the corms by brown or black spotting have been detected, then they will need to be dug up earlier, this will help avoid damage to them by other diseases. To make it easier to dig gladioli, you can pre-mow them, but if desired, the stems with foliage can be cut off with pruning shears already at the dug bulbs. The roots are also trimmed. After this, the remaining soil is carefully shaken off the corms, and then the children are separated. After this, they are placed in special boxes with a mesh or fine-grid bottom, each variety separately, then they are thoroughly washed under running water. Next, they need to be disinfected by immersing them for 20–30 minutes. into a solution of Fundazol (1%), then they are taken out and washed again in clean running water. Next, they are treated with a solution of potassium manganese (3%) and laid out to dry for two or three days. The dried onions are placed in boxes, the bottom of which is lined with paper sheets, and stored in a warm place (25 to 30 degrees), but do not forget to systematically turn them over. After 1.5–2 weeks, they are removed to a cooler place (from 18 to 22 degrees). And after another 1–1.5 months, the corms can be cleaned and sorted. The dirty topmost scales are removed from them, and the babies are also separated.
How to properly prepare a baby for storage? To begin with, they should be sorted by size and variety. Large children reach 8 mm or more in diameter, and medium ones - from 6 mm. After this, they are placed in paper bags and stored at a temperature of no more than 5–6 degrees. If they are placed in a warmer place for storage, then there is a high probability that they will not sprout in the spring. If there is no other place, you can store them on the refrigerator shelf.
GLADIOLUS. Autumn digging and storage of corms // How To Store Gladiolus For The Winter
Basic rules for storing bulbs
The duration of the natural dormant period for gladioli is about 35–40 days; during this time, sprouts will not appear on the bulbs, no matter what conditions they are in. However, when this period ends, the likelihood of sprouts appearing increases, but this should not be allowed, since planting in the ground is still very far away. In order to preserve gladioli until the onset of the warm season, they are stored in a cool room (no more than 5-10 degrees), and the air humidity level there should be from 60 to 70 percent. In order for the bulbs to be better preserved, several peeled garlic cloves should be placed in the box where they are located, and the planting material should be inspected at least once every 4 weeks, removing spoiled bulbs, and at the same time the garlic should be replaced. The best room for storing such flowers is considered to be a ventilated cellar or a cold basement, and it is recommended to place them in boxes with a mesh bottom, since the bulbs can breathe normally in them. You can stack the boxes on a rack; this is not only convenient, but also saves usable space. You can also use bags to store planting material, for the manufacture of which you can take oversized tights.
If you have to store gladioli in the refrigerator, then choose the bottom shelf intended for vegetables, and they should be placed in hermetically sealed containers, which will prevent them from dehydration during storage. However, each of the onions is pre-wrapped in a paper sheet. At the end of winter, the corms begin to “breathe”, and moisture is released, so at this time they are pulled out and unfolded, and when they are completely dry, they are again wrapped in fresh paper sheets and put in the refrigerator, but in a colder place.
In regions with a mild climate and warm winters, the bulbs are stored in winter on an insulated balcony or loggia, and are first placed in boxes or crates, which are placed on a stand made of boards. If cold weather is expected, the bulbs are covered with an old fur coat or blanket. In extreme cases, gladioli can be stored indoors, but they are laid out in one layer so that the bulbs do not touch each other. By spring they will dry out, so before planting it is recommended to soak them for some time in a solution of a drug that stimulates growth. And if you take good care of such bushes, they will grow and bloom within normal limits.
How to dig and store gladioli. . Website "Garden World"
The best varieties of gladioli for cutting
The variety of varieties is so numerous that even several volumes of a botanical publication would not be enough to mention them all and describe them.
A special place in world selection is occupied by Russian varieties of famous domestic breeders - V.F. Dybov, A.N. Gromov, A.F. Evdokimov, A.L. Kiselev and others.
Blue snowflake - with snow-white, strongly corrugated petals, surrounded by a soft blue border
Moscow white stone - with white double waxy flowers
Green ice - distinguished by an amazing light green shade of moderately corrugated petals
Contrast - against the main rich yellow background - a distinct bright cherry spot on the lower petal, flowing from the throat
Breath of Autumn – light apricot flowers with a bronze tint with lower greenish-yellow petals
Pink Pearl - with sparkling hot pink ruffled flowers
Vladimir Vysotsky - with bright burning red-orange petals, along which a thin brown arrow peeks out from the throat
Mystery of the night - with black and red flowers, shaded with crimson
Magic flute - with a rich dark purple color of velvety petals
Tired of the sun - yellow veins stretch in a delicate openwork on the salmon-red petals
Proud, bright, many-sided gladioli are a brilliant accent in decorating any garden.
In landscape design they occupy one of the leading places, giving way only to the majestic roses and capricious beauties of lilies.
Reproduction by children (tuber buds)
Tuberbuds (hereinafter referred to as babies) are miniature semblances of adult bulbs that are covered with a dense shell. Their number and size depend on the variety and age of the bulb and agricultural technology for growing plants.
The dense shell of the baby protects it from mechanical damage and prevents its rapid germination. This dry shell must be removed. Usually it cracks in half if you press on it with your thumb and forefinger, and then very carefully remove the halves with your fingernails or a toothpick, just so as not to damage the baby, otherwise it may rot. A healthy baby should be clean, not dry, and without damage.
How to speed up the germination of a baby?
You can speed up the germination of the baby by soaking it in warm water for hours until the shell softens. After this, it is mixed with peat or sand and germinated at a temperature of degrees for
A good remedy is a 10-12% infusion of garlic, in which they are dipped, which acts both as a bactericidal agent and as a growth stimulant, and, of course, the ultra-modern remedy - “Zircon”. And in order to get planting material from a child in 3 ways, the child is often also germinated.
I start planting the baby when the ground warms up to 7-8°C at a depth of 10 cm. Depending on the weather, this happens from the end of April to May 10, because our weather is unpredictable.
To do this, make grooves about 5 cm deep in the beds and add a little humus and sand. If it is impossible to distinguish the top from the bottom on a baby, then I plant it sideways, and if the babies are sprouted, then you can already see where the tops are and where the roots are.
The bottom of the furrow can be shed with a solution of potassium permanganate or heteroauxin (if they were not added during germination). The plantings are covered with earth; you can cover them with fine sawdust mixed with sand in a ratio of 7:3 in a layer of up to 5 cm. Peat can be used instead of sawdust. Before germination, the soil needs to be watered daily.
During the growth period, the baby needs to be fed several times a season. When the second leaf appears, it is advisable to treat it with Epin, which stabilizes the development of the root system in stressful situations, then fertilize with nitrogen and potassium.
With the intensive development of the fifth leaf, the vegetative mass increases. From this moment on, potassium and phosphorus fertilizers are applied. If the weather is warm enough in the fall, the last fertilizing with phosphorus-potassium fertilizers can be done two weeks before harvesting. In addition to the above, you can also feed with nettle infusion, and if you also add wormwood, this will protect the plants from pests.