Quite often, gardeners want to get the plants they like without special expenses. The first thing that comes to mind in such cases is cuttings. A propagation technique that allows, in a fairly short period of time, to obtain a large number of young plants identical (genetically) to the mother plant. What if you are a beginner or a “lazy” gardener? Or do you come to your summer cottage only on weekends, and only every other time, and still want to relax there? Then the idea with cuttings may not succeed. And often, if you need very little material, the game is simply not worth the trouble. Why not let nature do almost all the work for us - propagate our favorite plants by layering?
Reproduction of ornamental and fruit crops by layering. © 360doc
How to propagate plants by layering
This method of plant propagation is suitable for the most inexperienced and lazy gardeners. At the same time, it can be used to propagate woody, ornamental and fruit plants while maintaining varietal characteristics.
The procedure is very simple; below we will describe the process of propagation by layering step by step. The essence of the method is that the branch of the plant that needs to be propagated is stimulated to form roots, after which the resulting specimen is separated and planted in a prepared place.
The best time for propagation by layering is during the period of active growth, that is, spring and early summer. But at other times the method works, it just may take longer to root. In some cases, to stimulate vegetation, the plant is pruned in advance. But, as a rule, this is not required for the needs of ordinary gardens; there will always be a couple of young branches that can be buried.
How to propagate plants in the garden by layering
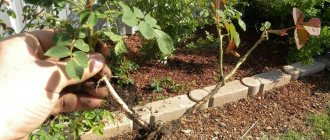
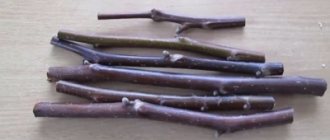
- We select a young twig from the required plant, one or two years old, preferably flexible.
- We tilt the branch towards the ground. We will not dig in the edge of the branch, but in a place closer to the middle. The top of the head remains sticking out on the surface. It is first recommended to dig up the soil a little in the digging area; you can enrich it and make a small depression. Experts recommend cutting off leaves and side shoots in a place that will be covered with earth.
- We press the branch to the ground. You can simply sprinkle it, but by inertia it will tend to rise to its original position. Therefore, it is fixed with a wire bent in half, a stone or any other available method. The top is covered with earth. It is in the absence of sunlight that the formation of the root system begins. The top of the branch can be pinched.
- If the weather is dry, then water the rooting site as needed.
- As a rule, rooting occurs in one season. That is, if you buried a shoot in the spring, by autumn it will form roots. Next, we need to cut off our young plant from the mother plant and leave it for 2-3 weeks so that it adapts to independent life. After this, it can be transplanted to the prepared place. But you can leave it until spring or for a year so that a good root system is formed and the plant gets stronger.
- If we need to root a lignified twig, then it is recommended to make an incision at the digging site, treat it with a fungicide and then follow the indicated scheme.
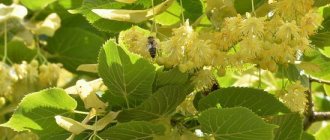
Tree hydrangeas, spirea, bladderworts, lilacs, forsythia, barberries, dogwoods, fruit bushes, vines and many, many other plants reproduce very well by layering You can try absolutely everything.
The video below shows propagation by layering using birch leaf spirea as an example.
Reproduction by layering by weight
It is not always possible to tilt a plant branch low enough to the ground to bury it. But even in this case, you can use the method of propagation by layering. Everything will happen on the fly. The method is suitable for fruit trees.
The whole procedure takes place right on the branch. A branch is selected, not an old one, but one that is actively developing.
- Having stepped back a few internodes from the edge of the branch, you need to make an incision and treat it with a fungicide so as not to infect the tree. The incision can be longitudinal and deep, down to the core. You can make a circular cut about 5-7 mm wide and remove the bark in a circle. You can pull the branch with wire to break the top layer of bark.
- For the speedy development of the root system, it is better to treat the incision site with Kornevin or another drug that stimulates the development of the root system.
- Afterwards, the prepared place must be placed in the ground. You can organize this using a plastic cup, a cut-off plastic bottle or a plastic bag. The container is cut and filled with moist, fertile soil. The twig is placed between the halves of the cup and clamped tightly by them, tied with electrical tape, tape or rope. the soil will need to be watered, since its volume is small and it dries quickly.
- Roots should form in about a month. In this case, the branch can be cut off and planted in a prepared place with fertile soil and shaded from direct sunlight. At first, the seedling will require close attention and care (loosening the soil and watering) so that it can adapt to new living conditions. A strengthened plant can be transplanted to a permanent place.
Regular layering
This is the simplest and most effective method of propagating many plants, with minimal damage to the parent plant. It is convenient for this method to take (or give) your favorite plant varieties from your neighbors. Layers are usually laid in early spring, as soon as it becomes possible to cultivate the soil.
Method 1: the selected branch or shoot must be bent to the ground and its future position must be marked starting from 20 cm from the top. Then release the branch, and in the marked place dig a groove 10–15 cm wide and deep, gradually reducing the depth towards the base of the bush. Then the branch is prepared for rooting (ringed, etc., dusted with a root formation stimulator), placed on the bottom of the groove, leaving the crown bent upward, about 20 cm long, on the outside. If the stem resists bending and tends to straighten, it must be pinned to the soil. Now you can fill the stem with soil. Tamp down a little and water. And take measures to prevent the soil from drying out, especially during dry periods. For example, cover the surface with a piece of roofing felt or film. The growth of the top of the stem will indicate that roots have formed on the layering. Layering in this case is often called horizontal.
Method 2: do not dig a ditch, but simply lay layering on top of the prepared soil, pin it to the soil, and cover it with earth on top. A mound is formed, which is covered with film so that the soil does not dry out. Usually the branch bent from the bush takes an arched position in this case, which is why such a layer is called arcuate. In autumn, the stem of the cutting is cut off from the mother plant. After 3–4 weeks, cut off the top of the rooted shoot. If the cutting has formed a good root system, it is dug up in the fall or spring and planted in a permanent place. Otherwise, it is grown for another year without touching it.
Method 3: the layers are pinned to the bottom of a long and narrow groove. When new shoots 5–10 cm long grow on them, they are covered with earth in the form of a mound. In summer, the soil is added several more times. In autumn, the branch is cut off from the mother bush and cut into pieces according to the number of shoots formed.
Propagating plants by layering is simple and easy
Friends, today we will talk about propagation by layering. Most gardeners at some point come to the idea of growing plant seedlings themselves.
On the one hand, growing shrub seedlings yourself is a troublesome task, on the other hand, it has undoubted attractive aspects.
Firstly , with the help of independent propagation, you can get exactly the plant that the gardener wants, if it is difficult to find.
Secondly , this is a significant financial savings. And, finally, thirdly, seedlings grown and nurtured with their own hands are a source of pride for any gardener.
Unfortunately, not all shrubs can be propagated independently. But many are still possible. One of the most commonly used is the method of propagation by layering.
Reproduction of shrubs by layering: bending technique in drawings
Have you noticed how the lower branches of some trees, shrubs, vines and evergreens become rooted when they touch the ground? Propagation of plants by horizontal layering is the most accessible method for amateur gardeners, suggested by nature itself. This simple method of propagation does not require special skills or much care. I’ll tell you in detail how to propagate plants by horizontal layering, so that even a beginner can do it!
What plants can be propagated by layering?
1. Many berry bushes :
2. Most vines :
- actinidia,
- grape,
- climbing honeysuckle,
- wood pliers
Ornamental shrubs are also suitable for propagation by air layering :
Photo: Stefanandra incisifolia
What branches can be allocated for propagation?
One- and two-year-old branches are subject to diversion. It is allowed to branch branches of different ages
1. A relatively young bush is selected for propagation:
- gooseberries, honeysuckle and viburnum - 1–2 year old, not older than 4–6 years,
- currants, some ornamental shrubs - 2-3 year old bushes,
- junipers and thujas - 3–5 years old.
In most deciduous crops, for more successful formation of root buds, shoots must be annual and powerful.
— To do this, they rejuvenate part of the bush (cut 1-2 branches onto the stump), leaving most of the branches for fruiting.
— Over the summer, strong annual shoots are formed, which are used for layering the following year.
2. If older plants are taken for bending, then they are first rejuvenated 1-2 years before bending:
- remove some very old branches,
- cut out all diseased and damaged branches to the ground level,
- The bush is intensively watered and fed for 1-2 years, until young, healthy shoots grow, which are used for breeding.
3. You can bend any convenient number of branches (1-12 branches per bush).
- More often, 1-2 young branches bend down, and the rest of the bush bears fruit.
How to propagate correctly by layering?
A branch is an inclined branch pinned to the soil and rooted.
- The cuttings are not cut off from the mother bush for 1-2 years (depending on the variety and type).
- Even in unfavorable conditions (lack of stable watering, cold summer), standard seedlings can be obtained in 1–2 years.
- When propagated by layering, pests and diseases can be transmitted along with seedlings. This is especially dangerous for berry crops.
You can bend down shoots both in spring and autumn.
Reproduction technique by layering
1. Removal of shoots (Fig. 1)
Early in the spring, before the mass bud break of the crop, they begin to remove branches for propagation by layering. Before diversion, the soil under the bush is not loosened, not dug (if necessary, these operations are done in the fall) and no furrows are made.
- The branches are retracted radially.
- The shoots are pressed tightly to the soil so that the arc at the base is minimal and the entire shoot is parallel to the soil.
- Hooks made from willow (poplar, other trees) pin the branches tightly to the soil.
- The end of the shoot is shortened by 7-10 cm.
If several shoots are bent at once, then the distance between them should be at least 10 cm.
Photo: technique of bending shoots
2. Hilling up layering (Fig. 2)
At the end of May - beginning of June, in a horizontal position, shoots begin to grow from almost every bud.
- Shoots with a height/length of 15-18 cm (at least 10 cm) are covered with fertile substrate at ½ height.
- After 7-10 days, hilling is repeated so that the total height of the earth mound does not exceed 12-15 cm
- Hilling is repeated 2–3 times; The height of the hill should not be more than 18–25 cm.
- Before hilling, the bushes are watered.
The substrate for hilling is prepared in advance from equal parts of earth, humus, peat and sand. The substrate should also be moist and adhere well to the shoot (without lumps or air cavities).
Reproduction by dividing the bush
Rice. 1. Method of dividing the bush. It is used if you quickly need to get new plants that interest the gardener. Fruit crops such as gooseberries, chokeberries, shadberry, Japanese quince, lemongrass and others, in their development around the bush, form many shoots, which, when separated, turn into independent plants. Such bushes are divided during the dormant period. They are dug up, the bush is cut into pieces with pruning shears or a file so that each of them has well-developed shoots and roots, or the young shoots with roots are simply separated with a shovel without digging and transplanted to a new place in the garden. For better development of a larger number of shoots, it is recommended to pre-prun them to 5-6 buds.
Some forms and varieties of cherries, plums, chokeberries, raspberries and blackberries are propagated by root shoots - that is, offspring grown from adventitious buds on the roots. In our conditions, gardeners widely use this method to propagate Local sour and Vladimir cherries, Local red and Hungarian plums. With good skills and favorable conditions, other varieties can be propagated.
They take offspring only from own-rooted, ungrafted plants. To turn the offspring into seedlings, they are cut off from the mother plant with a shovel in early spring. It is better to take shoots that form further from the trunk of the mother plant. The roots of the separated shoots are cut with a knife, the wounds are covered with garden varnish and planted in a permanent place in the garden. When growing planting material for sale, they are planted in rows, where the desired crown is formed within 1-2 years. Trees grown from offspring begin to bear fruit earlier, but are less durable.
In our conditions, gardeners propagate raspberries and blackberries mainly by root suckers. Lignified or green shoots are planted with a clod of earth in a permanent place in the garden. Plants can be replanted both in spring and autumn, but it is better in early spring.
Reproduction of ornamental and fruit crops by layering
Quite often, gardeners want to get the plants they like without special expenses. The first thing that comes to mind in such cases is cuttings. A propagation technique that allows, in a fairly short period of time, to obtain a large number of young plants identical (genetically) to the mother plant. What if you are a beginner or a “lazy” gardener? Or do you come to your summer cottage only on weekends, and only every other time, and still want to relax there? Then the idea with cuttings may not succeed. And often, if you need very little material, the game is simply not worth the trouble. Why not let nature do almost all the work for us - propagate our favorite plants by layering?
Reproduction of ornamental and fruit crops by layering.
© 360doc Contents:
- Advantages of propagating plants by layering before cuttings
- Reproduction by horizontal layering
- Reproduction by vertical layering
- Plant propagation by arched layering
- Reproduction by apical layering
- Reproduction by air layering
- Examples of plants that can be propagated by one or another layering
Advantages of propagating plants by layering before cuttings
The reasons why a gardener needs to propagate a plant can be very different:
- I want to plant a few more of the same plants or even create a hedge or a living wall (in the case of vines);
- fear of losing the only plant in case of unfavorable conditions;
- the desire to transplant a large bush to another place, but due to its large size this event looks dubious;
- the need to replace an aged plant, etc.
But cuttings, although not a very complicated science, in some cases require special preparation: a substrate (for example, clean sand), moisture, a greenhouse with ventilation and the possibility of shading, containers, the use of phytohormones, and of course, some experience for cutting and preparation Cherenkov. And most importantly - supervision: moisturizing, ventilation, shading. To prevent the cuttings from drying out, rotting, or contracting some kind of fungal disease...
People who have extensive experience in cuttings or do this professionally will probably say: “Problems for me too!”
Of course, there are plants that are very easy to take cuttings (they quickly take root even in water and also take root well). For example, cinquefoil, weigela, deutzia. But with others you will have to tinker, and success is still not guaranteed.
This, oddly enough, is Japanese quince (which reproduces well on its own by root suckers), tanning mackerel, conifers and even some types of spirea. The survival rate of cuttings is only 30-50%.
Sad, right? In addition, any cuttings will require supervision in any case, and their rooting time ranges from 10-14 (for the fastest ones) to 60-120 days.
And layering sometimes even happens by itself if the branches lean too close in the ground. Therefore, before you start propagating by layering, check if you have ready-made rooted shoots?
Or use existing root suckers instead, like in self-rooted lilac or quince. Moreover, they must be removed in any case so as not to weaken the mother plant.
Important! In the case of Japanese quince, plants planted from suckers usually do not produce large fruits, although they bloom beautifully. So, if your goal is fruits, then it is better to tinker with cuttings, make layering, or buy a varietal plant from a nursery.
Rooting of cuttings usually begins in the spring and is done throughout the summer while the growing season continues. In the end, you can simply leave the branches to take root until next year.
Layers are separated in spring or autumn at the usual time for planting and replanting shrubs.
Layers can be horizontal, vertical, arched, apical and even aerial.
Rice. 1. Plant propagation by layering: a) vertical; b) horizontal; c) rooted horizontal layers
Rooting process
In order for roots to begin to form on the section of the branch we have chosen, it must first be prepared. The first group of plants requires a more careful approach in this matter, since the process of root formation for them is more difficult and slower.
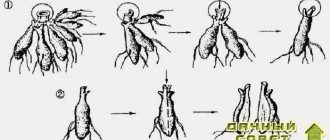
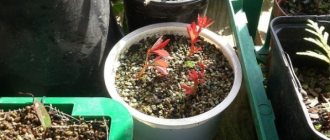
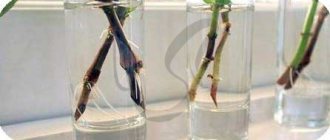
In the root formation area on the side of the mother tree, it is necessary to make two circular cuts in the bark with a depth of 0.5-1.5 mm. The distance between the cuts should be equal to one and a half diameters of the branch. Remove the bark between the cuts. Throughout the entire area, on opposite sides, we make four longitudinal cuts of the bark up to 10 cm long (Fig. 1a). We wrap the branch prepared in this way at the site of the cuts with a rag, generously moistened with a solution of any root formation stimulator, and on top with plastic wrap to prevent drying out, and leave it for a day. If necessary, moisten additionally. For plants of the second group, you can do without all this. Instead of removing the bark, it is enough to tightly pull the branch with steel (soft) or copper wire with a diameter of 0.5-1 mm and make longitudinal cuts in the bark up to 8 cm long (Fig. 1 b). In the first case, after removing the film and rags, we wrap the bare ring with a strip of film, smeared with garden varnish, and in the second, we immediately put the prepared container on the branch, first with one side and then with the other. For convenience, we bend the cut walls of the container inward, and then return them to their original position. So that the branch can hold the container, after filling it with the nutrient mixture, we tie it to a support or to another branch.
We use ready-made purchased soil as a nutrient mixture. For the second group of plants we buy soil for its intended purpose, and for the first group we buy universal soil. The soil should cover the branch in the container by 1.5-2 cm and be constantly moistened, which requires covering it in hot weather. from direct sunlight. We begin rooting in warm weather at temperatures above 19°, which can last differently for different plants: from one and a half weeks for indoor plants, and up to one and a half months, or even longer, for others. After a sufficient volume of roots has formed in the container, which we determine visually, we separate the layer along with it from the mother tree (Fig. 3). Cut off the end protruding from the container. Before planting the resulting seedling in the ground, the container must be cut along the lines shown in Fig. 3, for the convenience of separating the roots with a lump of nutrient mixture from its walls.
- Author: Pavel
Rate this article:
- 5
- 4
- 3
- 2
- 1
(17 votes, average: 4.4 out of 5)
Share with your friends!
Reproduction by vertical layering
Reproduction by vertical layering is used if:
- you need to rejuvenate the old bush;
- the plant froze and had to be cut to a stump;
- you need to get layering from a plant with poorly bending stems;
- need rootstocks for trees.
To do this, you can try in July to fill the middle of a bush trimmed to a stump with humus mixed with garden soil up to 15 cm high. This method is good for young plants or plants that are not afraid of deep root collars and tend to root quickly. Because some bushes, especially old and frozen ones, cannot be kept in this form for a long time, since there is a high probability of developing root collar rot (Fig. 1, A) .
After the shoots begin to take root, they are covered with earth several times. The resulting shoots with roots are planted in the fall, and the bush is dug down to the base for the winter so that the dormant buds on it awaken.
Plant propagation by arched layering
Arc-shaped layering is used for plants with not very flexible stems, or if you want to immediately get a more developed plant. In this case, only one plant is obtained from each layer. The technology is the same as for horizontal layering, but in this case the shoot is bent in an arc and pinned in only one place into a hole with humus. The end of the shoot is left in the air, tied to a peg, to obtain a more or less straight seedling.
Leaves are also removed only in the place intended for rooting. You can also slightly tighten to stimulate root formation, slightly limiting the nutrition from the mother bush or making a ringing of the bark and an incision.
A pebble is inserted into the cut to prevent it from closing. It would also not be superfluous to use phytogromon. Rooting can also be carried out in a technical pot of the appropriate size, dug into the ground and filled with humus. This will make the process of transplanting the cuttings easier.
Horizontal layering with mature vines
Horizontal layering with mature vines begins to be prepared in the fall; during pruning, one or two extra long vines are left on the bush, coming from the head of the bush (from the root), or on the sleeves at a low height. In the spring, after dry tying up the bushes, they dig a ditch up to 15-20 cm deep along the row. Fertilizers, compost, rotted manure, and mineral fertilizers are added to the ditch and mixed with the soil.
The remaining vines must be prepared for rooting. In places where the roots are supposed to emerge, small wounds are made - furrowing (on the shoot opposite the bud), this technique allows you to increase the flow of nutrients to the wound sites and accelerates the formation of callus and roots. It is also a good idea to treat furrow areas with root formation stimulants.
Then the prepared vines are placed at the bottom of the groove, pinned in 2-3 places, and then covered with a 5 cm layer of loose, fertilized soil. The technique of tying the shoot with soft wire at the base has also proven effective; this prevents the backflow of nutrients into the roots of the bush and additionally stimulates root formation. When laying the vine, one apical bud is brought to the surface of the soil. Subsequently, as the shoots grow and take root, the groove is completely filled up.
The eyes at the base of the shoot at the bend (not covered with soil) should be blinded. Layers, depending on soil moisture, are watered several times over the summer and mulched with sawdust or humus.
After 2-3 weeks, sprouted shoots will appear from the ground, and with them roots will begin to form. Throughout the season, it is necessary to maintain moderate humidity in the soil under mulch, carry out preventive treatments against grape diseases, and also provide the mother bush with enhanced nutrition.
In the fall, horizontal cuttings from the bush are cut off, very carefully dug up, minimally damaging the roots, and divided into seedlings.
This method depletes the bush, so it is necessary to create the best conditions for nutrition and soil moisture.
Reproduction by apical layering
Apical cuttings are used for vines or plants of the genus Rubus: blackberries or raspberries, sweet raspberries, black raspberries, etc. You can often see that they have taken root themselves. But this process can be stimulated.
In the spring you need to select several powerful young shoots. As they grow, pinch their tops several times, thereby stimulating the formation of side shoots. By mid-summer, place their ends in holes with humus mixed with sand and secure with pins. In the fall, you will have several new plants to transplant to a new location.
True, the roots of such shoots will not be very strong, so they will need to be planted in holes with light, nutritious soil from a mixture of humus, garden soil, peat and sand, and the soil moisture will need to be closely monitored for some time.
Rice. 4. Reproduction by apical layering. a) Sprinkle the top of the cane with soil; b) The top of the lash stops growing and takes root; c) Separate the young bush from the queen cell
Reproduction by horizontal layering
From ⅓ to ⅔ of all shoots are usually used for layering if you need to get more material. For horizontal layering, only young shoots (from this year or, in extreme cases, from last year) are suitable.
The mother plant is carefully loosened and small (up to 5 cm deep) grooves are made around it. The branches are placed in them, having first removed all the leaves except the top of the shoot, which is left above the ground. The branches are secured in the ground with metal pins. The grooves are filled with humus or other light fertile soil and watered.
If your area has high humidity, then instead of a ditch you can make a mound of humus mixed with soil above a pinned branch (Fig. 1, B) .
As new shoots grow on the layering, it is additionally covered several times with soil and humus, this promotes better root formation.
To increase the number of plants obtained by layering, or in the case of vines, you can remove the apical bud of the shoot and lightly pull the shoot in several places with wire or nylon rope immediately under each developed pair of leaves. They also use ringing of the bark and cuts on the stem, but these are still technologies for advanced users, and we will talk about them next time.
As the shoot takes root, it is raked and cut in several places and young plants are planted. This process can be stretched out a little in time so that the root system of the layering develops better; first cut the shoot, and transplant it to a permanent place only after some time.
Rice. 2. Reproduction by horizontal layering. As the shoot takes root, it is raked and cut in several places, and young plants are planted
Reproduction by air layering
Air layering is most often used for trees and indoor plants. In China, this technology has existed for about 400 thousand years. This method was often used when creating bonsai, in order to quickly obtain a dwarf tree with a spreading crown from a branched side branch of a tree.
This is a somewhat more labor-intensive procedure, and we will talk about it in one of the following materials.
Rice. 5. Reproduction by air layering
Jars on branches
We start by choosing a well-developed 1-3-year-old branch located horizontally in the crown of the tree or bush from which we want to get a seedling, or giving it such a position. On it we determine a rooting area 10-12 cm long for apple trees, pears, plums (the first group of plants) and 7-8 cm long for roses, grapes, currants and indoor plants (the second group). The height of the seedling will be determined by the length from the end of the branch to the rooting site. For the first group of garden crops, the optimal height will be up to 50 cm, and for the second - up to 40 cm (Fig. 1). Here we must be guided by the fact that the smaller the seedling, the better it will take root after being separated from the mother tree and planted in the ground.
Root formation will be carried out in a container with a nutrient mixture, which we will hang on a branch at the rooting site. We will make the container from a plastic transparent water bottle with a volume of 1.5-2 liters or more, which will allow us to monitor root formation. We use the cut-off lower part of the bottle, 10-12 cm high. In order for it to be put on the branch, we make 5 cm long cuts on opposite sides and round holes with a diameter equal to the thickness of the branch at the rooting site (Fig. 2).