2
14319
Cuttings are a practical and cheap way to obtain young coniferous plants for landscaping. It takes 2-3 years to grow seedlings, but in this way it is possible to purchase several dozen new specimens for creating a hedge or subsequent sale. To achieve the desired result when propagating thuja by cuttings in winter, spring and autumn, you will have to adhere to certain harvesting and planting dates.
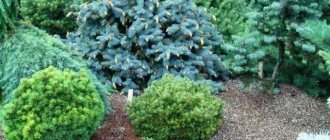
Aurea with hydrangea
Advantages of autumn propagation of thuja by cuttings
The main advantage of propagating conifers in the autumn is the possibility of obtaining a full-fledged plant in three years. Such a plant will fully comply with the botanical characteristics of the mother crop, but the survival rate is not at a high level.
It should be noted that cuttings grown at home are quite difficult to tolerate the replanting process and do not have very high resistance to pathogenic flora and sudden temperature changes. However, it is autumn propagation that is most often practiced by gardeners and flower growers in our country.
The right time
The first step is to decide on the cutting time. In general, this can be done at any time of the year, including in winter, if you follow all the rules for preparing branches and provide them with proper care. Gardeners have differing opinions on the question of the best time for cuttings.
- Many argue that it is best to do this in the fall, in October, since over the summer the plant has received good nutrition, which means that the planted branches will be more hardy. Such plants take root slowly, but they take root well and do not suffer from lack of moisture.
- Propagation by cuttings in the spring also has its advantages. Supporters of the spring deadline argue for their position by faster rooting of plants due to rapid vegetation - the roots will appear after 3 months.
- In the summer - in June - cuttings are carried out if time is lost in the spring, or closer to autumn, in mid-August, when growth slows down. It is believed that summer nights promote root growth. However, the branches will take root only in the spring, and their survival rate will be lower.
- Proponents of winter cuttings argue that the best time for harvesting twigs is February, when there is still cold weather, but sap flow is already beginning in the plants. At this time, the thuja is “tuned” to development and the news will take root well. In addition, propagating thuja by cuttings in winter at home actually minimizes the chance of encountering a problem with pests that are not active at this time. And a gardener has more free time in winter.
In any case, no matter what time period is chosen for cuttings, to get a good result you need to carefully organize all cultivation activities. And start with the main thing - preparing the cuttings.
Preparation of cuttings
Planting material can be harvested at any time of the year; it is better to do this in autumn and spring. Proper preparation of cuttings is the first component of successful seedling production. When collecting material, you need to strictly follow certain conditions.
- To select cuttings, you need to take a young, healthy, well-developed tree, aged from 4 to 9 years; shoots are not harvested from old thujas. The older the plant, the less likely it is to obtain seedlings.
- For rooting, branches from the top of the thuja and side shoots are cut off - to obtain a pyramidal tree, if a spherical thuja is required, only the side branches are taken.
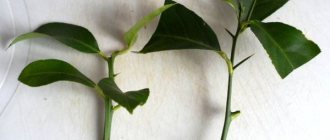
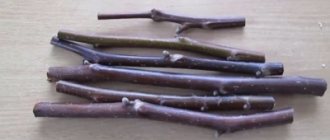
- Shoots for cuttings should be 2-3 years old, bright green, already woody, 15-25 cm long.
- Do not use garden shears or pruning shears to obtain the material. The branches are torn off by pulling the shoot sharply down so that a woody “heel” remains on it - part of the bark of the mother tree. This is necessary for better rooting of the cuttings.
- After separation from the thuja, the shoot is processed: sections of exfoliated bark are cut off, all leaves are removed 3-4 cm from the base of the cutting. The upper leaves are cut to 2/3 of their length.
After all the procedures performed, the cutting is ready for rooting.
When and how to properly carry out thuja cuttings in the fall
Cutting planting material is carried out only from branches that have reached two years of age and are well developed. When cutting, you need to remember that the length of the shoot should be about a quarter of a meter. The best option is not to cut the cuttings with a pruner or knife, but to break them off from a branch of the mother plant, which will allow you to obtain planting material with a characteristic “heel” of bark.
All prepared ephedra cuttings must be placed for several hours in a container filled with water with the addition of a growth stimulant and bio-rooting agent. It is advisable to carry out the main process of germinating cuttings inside a special greenhouse, which must first be filled with clean river sand, peat chips and turf soil mixed in equal proportions.
Planting a young plant and caring for it
There is no need to rush to plant the germinated thuja from school in the place prepared for it. It is necessary to think through all the nuances of the future existence of the plant. It should grow in a place well warmed by the sun, where the sun's rays will be especially frequent in the first half of the day, and in the second half there will be partial shade from neighboring trees.
In the thuja hole you need to put a mixture of manure, compost and garden soil. The roots of the plant should not be broken, and the root collar should be above the ground. After replanting, you should water the plant generously and put sawdust or pine bark on top. This will protect the root system. It is necessary to ensure that the mulch does not cover the lower branches of the thuja and its fragile trunk - they can prohibit it.
Young shoots should:
- regularly water with a bucket of water once a week;
- spray with clean water from a spray bottle, which helps moisturize the thuja branches and wash away dusty deposits from them;
- feed;
- weed;
- for the winter, cover with spruce branches or fallen leaves;
- clear the cover in the spring and continue caring for the thuja as before.
- trim with pruning shears in the spring, removing all dry branches and shortening the shoots, giving shape to the plant so that it does not turn into a shapeless bush of pine needles.
Propagation of thuja by cuttings is a very interesting and sensitive process. A beautifully growing tree will be a reward for all the efforts made during the entire period of growing the cutting. This plant will fit perfectly into any landscape design.
Methods of propagation of thuja (video)
It is important to remember that the nutrient soil mixture must be disinfected before backfilling, using for this purpose a fairly strong solution based on potassium permanganate.
Cuttings prepared and pre-treated in growth stimulants should be planted in a moistened nutrient substrate, maintaining a distance of 50-70 mm. The depth into the nutrient substrate should be approximately 20 mm. Plantings in a greenhouse must be covered with transparent plastic film , which will allow the rooted ephedra cuttings to be shaded from direct sunlight.
Growing thuja seedlings
Maintain humidity in the greenhouse. In April–May, water the cuttings daily in dry weather or every other day if it is cloudy. During the rainy season, reduce watering to prevent the lower ends of the cuttings from rotting. With the arrival of heat in June, irrigate the seedlings more often. As rhizomes begin to form (the tops will begin to grow at the same time), gradually reduce the number of waterings and bring the substrate humidity closer to the conditions of ordinary open ground.
Avoid excessive dampness. In the first months, half an hour is enough for ventilation; later, open the thuja cuttings for 1–2 hours, and in July, remove the film overnight. If mold or green deposits occur, loosen the soil and carry out preventive spraying with a fungicide.
In the second half of August, prepare containers or a “school” with fertile soil saturated with mineral fertilizers. Replant rooted shoots without destroying the earthen ball. Keep the thuja seedlings in the shade and irrigate the young needles using a watering can with a fine sieve. Sprinkle containers with mulch or bury them in the ground for the winter, install a frame and cover them with protective material when frost arrives.
Growing thuja seedlings from twigs guarantees the continuity of varietal characteristics, in contrast to seed propagation, where the offspring are divided into different forms. Propagation of thuja by cuttings helps the plants to form faster and are ready for transplanting to a permanent place after 2–3 years.
Now you know what propagation of thuja by cuttings is. We hope this advice will be useful to you when propagating other plants from cuttings.
I really love evergreens because of their year-round decorative value. But, unfortunately, planting material for such plants is not cheap, so I mastered the method of propagating evergreens by cuttings. This allows you to grow a very beautiful evergreen without spending a penny. After all, getting a cutting is very simple, you just need to find a tree you like and break off a small branch from it. In my experience, not all evergreens take root from cuttings. And the easiest way for me was to root an ordinary green thuja. The experiment with blue thuja was also a success, but today I want to talk about cutting green ones.
Cuttings of green thuja.
1. Selecting a cutting. In my opinion, the larger the cutting, the better it will take root. Therefore, I take a twig from an adult thuja 25-30 centimeters high. And I cut it off with sharp scissors or pruning shears right at the trunk. Also, it is worth tearing off the lower leaves.
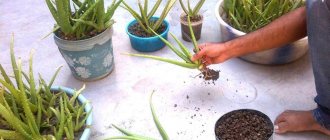
2. Preparing the hole. For thuja cuttings, I usually choose a shaded, damp place in an inconspicuous corner of the site. I dig a hole 20-25 centimeters deep. And I loosen the soil well at the bottom.
3. I always add organic fertilizers to the holes for evergreens. Moreover, it seems to me that it is better to choose water-soluble ones to avoid burning the roots. Next, I water the hole well with water and fertilizer and leave it for a while to soak the soil.
4. After that, I simply stick the cutting into the ground right up to the leaves. It is worth immediately leveling it vertically and if it is not standing firmly, then sprinkle it with a little earth and compact the soil around it.
5. Organization of a greenhouse. Since cuttings of evergreen plants must remain in the greenhouse for quite a long time, it is worth using durable transparent materials for this. Light-colored cut-off plastic bottles are best, or preferably completely transparent. And it is worth pruning it, taking into account not only the height of the cutting, but also the several centimeters that will be in the ground.
6. Next, I cover the cutting with a greenhouse, tucking in all the leaves, and press it a little into the ground. It is necessary to completely exclude the flow of cold air into the greenhouse, so I also sprinkle the edges of the greenhouse with a little earth. 7. I spill the entire @structure@ a little with water and leave it alone.
Further care of the thuja seedling consists only of periodic watering and ventilation of the greenhouse, but not earlier than 2 weeks after planting. When signs of rooting appear, you can open the greenhouse and continue to keep the cuttings without shelter. Next year you can replant the plant, but it is better to let it grow in one place for at least a year or two.
In decorative landscaping, it has recently become especially fashionable to use coniferous crops, among which the undoubted favorite of designers is the beautiful Asian evergreen thuja.
A slender, spectacular tree looks equally good both in a city landscape and in a suburban area. In addition, thuja is very unpretentious and feels great in the polluted atmosphere of megacities.
Due to the fact that the conifer tolerates shearing well, its crown can be given the most imaginative shape. But to decorate an alley, create a hedge or grow a nice thuja group, a lot of planting material is required, and the prices for it in specialized nurseries, frankly speaking, are prohibitive.
Where can you get a large number of seedlings without spending money? The answer is simple - grow it yourself! The crop can be propagated both generatively (seed) and vegetatively (cuttings).
However, in the first case, the process will take quite a long time - from 3-5 years. The second method makes it possible to obtain planting material much earlier - after 2-3 years, young plants can be planted in a permanent place of growth.
In addition, propagation of thuja by cuttings allows you to fully preserve the characteristics of the mother variety, that is, the seedlings will be an exact copy of the tree from which the cuttings were taken. Let us consider in detail the technology of vegetative propagation of thuja.
Why you can’t store thuja cuttings
Cuttings can be carried out in spring or autumn , but such planting material cannot be stored, as extremely rapid dehydration and death of the wood occurs. This vegetative method, compared to seed propagation, is the most convenient in indoor and home gardening conditions.
Cuttings from spring or autumn harvesting need to be properly grown. For this purpose, it is necessary to form special ridges, which are called “school”. In such conditions, the planting material will remain for a couple of years, after which the coniferous seedling will be transplanted to a permanent place. Planting material cut in the autumn is planted on shkolka ridges only next year.
When to germinate cuttings - in spring or autumn?
You can grow thuja from a twig throughout the year, but it is better to do it in autumn or spring. In September, the movement of sap in the trunk and branches of the bush slows down, cool weather sets in, conducive to optimal hydration of the cuttings. At this time it is recommended to cut them from the mother tree. The percentage reaches 100%. On the other hand, autumn cuttings grow more slowly than those germinated in spring. Only after 6 months, new roots on autumn cuttings can reach a length of 15-20 cm.
When harvesting shoots in summer, all the plant’s forces are directed toward vegetative growth. In hot weather, the evaporation of water from the leaves increases, so the roots grow worse. Summer cuttings are harvested at the end of June. Their roots take the longest to form, and the plants remain dormant for some time. But by next spring, such seedlings develop a fairly strong root system and are ready for transplanting into open ground.
In spring, the most optimal time for cutting cuttings is the first half of April. At this time, the movement of juice in the stems of the plant begins, but the growth of green mass has not yet begun. Spring cuttings take root worse (up to 20% of all seedlings), they are more likely to get sick and die.
Technology for rooting thuja cuttings at home in autumn
At home, rooting conifers for autumn propagation is most often done using sphagnum peat moss. It is also necessary to prepare plastic film, clean cloth and a growth stimulator, including Epin or Kornevin. The technology for this method of rooting conifers at home is not complicated, but it must be carried out taking into account the following recommendations:
- place the thuja shoots in a container filled with water with the addition of any root formation stimulator for about twelve hours;
- pour sphagnum moss with boiled warm water for about three hours, which will allow the natural material to increase in size and also be well saturated with moisture;
- lay a wide strip of fabric on a flat surface, visually divide the width of the strip in half, and evenly distribute moistened sphagnum moss over the entire upper part;
- It is necessary to place chopped conifer cuttings at a slight distance from each other, and then cover them with damp sphagnum.
At the final stage, it is necessary to cover the cuttings with the bottom of the fabric strip and roll them into a not too dense roll, which is placed in polyethylene. The workpiece must be placed in a room with sufficient natural light. If necessary, the moss must be periodically moistened with clean water at room temperature from a household spray bottle.
Growing cuttings in substrate
The substrate must be fertile and loose so that there is enough nutrients and oxygen for the formation of roots. Low capacity required. It is necessary to drill holes at the bottom to drain excess water.
The first layer is drainage. Small pebbles, crushed stone, and expanded clay are suitable for this purpose. The second layer is a fertile mixture. It is prepared a week before planting from garden soil (1 part) and peat (1 part). The soil must be disinfected with a manganese solution.
Important!
Regularly ventilate the greenhouse with thuja cuttings. Water the soil using a spray bottle.
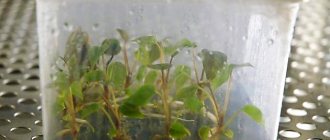
The ends of the cuttings (heels) are dipped into Kornevin’s solution for 12 hours. They are stuck into the ground to a depth of 3-4 cm at an angle of 45 °. The soil is watered. The entire surface is sprinkled with a thin layer of sand, which is wetted from a sprayer.
The container is covered with film and placed in a room where the temperature is maintained at 18-22 °C. Lighting is provided for long periods of time, but not too bright. In the substrate, propagation of thuja by cuttings is carried out in winter.
You may be interested in:
Is it necessary and how to cover a thuja for the winter? A striking representative of the cypress tree family is the beauty - the thuja. It is considered unpretentious in care,...Read more...
What you need to know about planting thuja cuttings in open ground in the fall
Thuja is a light-loving plant, and in shady areas such a conifer can quickly lose its natural splendor and all its decorative appeal. The site should be represented by fertile and well-permeable soils with a sufficient amount of moisture. Before you start planting a coniferous plant, you need to prepare a good planting hole, the size of which depends on the development parameters of the roots of the crop. A drainage layer in the form of broken bricks or expanded clay is poured into the bottom of the planting hole. A nutrient substrate based on sand, peat and garden soil is poured on top.
The ideal time for planting is September and early October, but always before sufficiently strong and stable frosts appear. The roots of the plant must have time to take root before the onset of winter. When planting, the root collar of a coniferous plant should be placed at the same level with the ground.
After planting, watering is carried out, and timely and proper fertilizing will allow the plant to take root well and easily withstand the stress caused by planting. Potassium and phosphorus fertilizers can be used as autumn feeding. After planting, you need to provide the decorative crop with daily irrigation and regular sprinkling with a hose.
If you follow the planting regime and care rules, you can count on getting a beautiful and strong coniferous plant.
Features of reproduction
Thuja is an unpretentious and frost-resistant plant. It is often used for landscaping garden plots or country houses. However, thujas are an expensive pleasure, so it’s easier to breed them yourself. In addition, by following simple recommendations, you can grow thuja even if you are not an experienced gardener.
This plant can be propagated in two ways:
- Using seeds;
- Using twigs or cuttings.
The first method, which involves seeds, is very painstaking and time-consuming. It will take from two to six years. In addition, it is generally accepted that thujas grown from cuttings are more hardy. If you have a decorative type of thuja, you should also not propagate it from seeds. It is best to choose propagation by branches.
When can thuja be grown from a twig?
You can harvest twigs at any time of the year. They cannot be stored for a long time; it is advisable to immediately put them in water or plant them in the ground. In indoor conditions it is possible to carry out rooting even in winter. If you maintain the required air temperature and humidity, your efforts will be crowned with success.
According to experienced gardeners, the best time to root thuja branches is late spring or June. At this time, root regrowth occurs more uniformly, and the survival rate of seedlings increases.
When rooting shoots in spring and summer, roots form quickly. In autumn or winter, the process may take three months. Therefore, you should not rush and throw away a twig if it does not begin to grow for a long time.
Preparing containers and soil
Any plastic container with holes in the bottom is suitable for rooting. One seedling at a time is planted in small pots with a diameter of 8 cm; several can be placed in a large tray at once.
To grow thuja from a branch yourself, it is best to buy good quality soil. When using garden soil, you need to add peat and sand to it in a 1:1:1 ratio. You can mix vermiculite into the soil; it provides good loosening. The soil mixture should be loose so that it is easier for the resulting roots to spread in it.
Advice! For better rooting of thuja, it is useful to use coniferous litter from the forest. It contains mycorrhiza of soil fungi and helps coniferous plants take root.