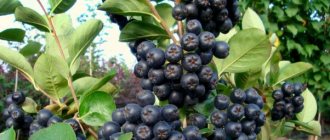
Both adults and children love chokeberry. In addition, its berries have many beneficial properties, for example, chokeberry helps lower blood pressure, so hypertensive patients often use these medicinal berries. However, after you plant the first rowan bush, you will immediately ask yourself the question of how to get several from one plant. We are glad to inform you that even a beginner can propagate this crop. This plant is considered unpretentious, not very picky, so it is grown in many regions of our country, and today we will tell you how to propagate this shrub.
Methods of propagation of chokeberry.
It is best to propagate this crop in the fall. However, you can do this work in the spring. It should be noted right away that due to the fact that in different regions there are different climatic conditions, the timing of work on propagating shrubs will, of course, be different. That is why, first of all, you should take into account weather conditions and coordinate them with the gardening calendar. If you propagate chokeberry in the fall, it is best to do this in September or October. It is not difficult to care for the plantings in the future, and if you propagate the shrub in the spring, it is better to carry out planting work in March or April. However, take into account the climatic conditions of the region where you live. Therefore, everything needs to be done in a timely manner. Chokeberry is propagated by many methods. Firstly, this is cuttings, secondly, breeding layering, as well as dividing shrubs. Chokeberry can be propagated by seeds, through grafting, and also through the formation of root suckers. It should be said that propagation by seeds and grafting is the least effective compared to the previous proposed methods, therefore, if you are a beginner gardener, then it is best to do, for example, cuttings. But only experienced gardeners can graft a plant or plant seeds. If we talk about cuttings, it can be done both in spring and autumn. In order to cut off the necessary branches, it is best to choose young shoots. Cuttings are cut at the end of May or at the beginning of June. And then they are grown in greenhouses or greenhouses. It should be said that they winter there too. But it will be possible to plant cuttings in a permanent habitat only next season. Very often, gardeners take cuttings in the fall. For this purpose, already lignified annuals are used; it is these shoots that adapt better to new conditions. Moreover, these shoots are immediately planted in a new place. In principle, they take root normally. If we talk about dividing the bush, then it should be noted that it is best to divide old plants. They must have strong shoots and a good root system, it is better to do this in the spring; before this procedure, it is recommended to water the chokeberry intensively; after transplanting, the plants are also watered abundantly, and the soil around them is loosened. Layers are rooted mainly in the spring. For this purpose, both one-year and two-year-olds are used. It is these shoots that best take root in the soil and form roots. In order to propagate chokeberry using the layering method, you will need to dig peculiar grooves, bend the shoots to the ground, cover them with loose soil and wait for the root system to form. But it will be possible to separate the shoots from the mother bush only next season. It should also be said that sometimes new plants do not take root. A lot of shoots usually form around the chokeberry bushes, so the root shoots are often transplanted to new habitats, separating them from the mother bush. And they do this throughout the season. However, it is most effective to carry out these procedures in summer and spring. New plants must be given time to adapt to new conditions. But it takes a very long time to propagate chokeberry with seeds; in addition, such planting material will need to be stratified, but despite this, the germination rate of the seeds is still very low, and the plant takes a very long time to develop. You can more quickly propagate chokeberry by grafting; this must be done in the spring, but in order for the cutting to take root well on the new plant, you will need to provide the shrub with favorable growing conditions and care for it properly. However, even in this case, the vaccine does not take root very well. Well, we have described the main methods of propagation of chokeberry, and now we will proceed to a more specific description of the presented methods of propagation.
Selection of rowan seeds
However, picked fruits are weak seed material that requires additional processing. The main problem when growing rowan from seeds is their poor germination and a small percentage of specimens suitable for propagation. To increase the likelihood of obtaining healthy seedlings in the required quantities, care should be taken in advance preparation.
To identify material suitable for further cultivation, you should carefully mash the selected berries and fill them with a small amount of cool water. After some short time, healthy, strong seeds should sink to the bottom.
This is what rowan seeds look like
Having chosen the required number of healthy seeds, you need to take care of creating conditions for them that are as close to natural as possible. This process is called stratification in botany. Peat, sawdust, chopped straw and other similar substrate may be suitable for this. When selecting material, you need to remember that rowan does not readily reproduce by seeds, so you need to take fruits with a significant supply.
The still wet seeds should be mixed with the prepared substrate and placed in an open container in an even layer of small thickness. This mixture is kept at room temperature for about 25-30 days. After this, it must be removed to a cool place until planting in the spring. A cellar is perfect for these purposes.
Careful preparation of this type serves several purposes:
- helps increase germination;
- allows you to reject obviously unsuitable material;
- helps preserve seeds until planting;
- saturates with substances necessary for growth and development.
Proper selection and harvesting of berries makes it possible to confidently count on obtaining strong seedlings in sufficient quantities.
Disembarkation
You can take out containers with substrate in early spring. At the same time, there is no need to rush into planting until the earth warms up at least a little. You can inspect the substrate and discard seeds you don’t like, but this procedure is not necessary.
Choosing a planting location is key to the growth of healthy, strong seedlings. Although rowan is not picky about soils, the best option is to choose neutral soils. The site of the future nursery should be well lit by the sun and have a sufficient amount of moisture.
When sowing seeds, they do not need to be removed from the substrate. They are introduced into the soil along with this material, which contributes to their better germination. Do not embed the material too deeply into the soil. It is enough to cover it with a layer of soil about 5-10 mm thick.
According to accepted successful practice, the planting norm is to place rows at a distance of 25-30 centimeters from each other. The seeds should be densely spaced in the row. Some gardeners practice adding several pieces per 1-2 centimeters. Such conditions are dictated by low germination.
Cultivation
Usually the seedlings appear quite amicably and grow intensively. If they appear abundantly, the rows should be thinned, since the presence of a large number of seedlings negatively affects their properties.
Plant care is standard. The soil should be moderately moistened, and in dry periods more attention should be paid to watering. Sprouts are not afraid of weeds, but unnecessary competitors can slow down their development.
Selection of seedlings
According to statistical studies, this plant can have different growth rates on different soils. However, the standard is considered to be half a meter of growth for six-month seedlings. Among all the material that survived until the autumn period, you should choose the tallest and strongest plants.
Carefully, trying not to damage the delicate root system, you should transplant the selected specimens to the place of permanent dislocation. If the process is carried out correctly, the seedlings take root fairly quickly and well.
mountain ash leaf
After planting the shoots, care for them can be moderated. Plants that are well rooted during autumn and winter can develop further with virtually no human help. Very soon, new trees will be able to please the owner of the plot with their fruits.
Rowan is propagated by root shoots, seeds, green cuttings, layering and grafting of cultivated varieties onto the rootstock of wild forest rowan. When grafted onto forest rowan, the tree begins to bear fruit in the 3rd-5th year, and when propagated by layering and root shoots - in the 5th-7th year.
Propagation of mountain ash by seeds.
Seeds are isolated from crushed, ripened fruits.
Seeds are planted in the fall, in September-October (immediately after collecting the seeds) or in the spring, as soon as the soil allows (the collected seeds are placed in damp sand in the fall for the winter and stored in the basement until spring).
Seeds are sown evenly into the soil in a selected area in a mound or in grooves 6-8 cm deep and covered 1-1.5 cm with coarse washed sand (sand has good drainage, ensuring a uniform supply of moisture to the soil). The surface is leveled with the back of the rake and watered generously with a fine strainer. The seed sowing rate is 200-250 pcs per square meter.
To obtain good planting material, the seedlings are thinned out for the first time when two true leaves form, leaving a distance of 3 cm between them, the second time - in the phase of four to five leaves at a distance of 6 cm. The last thinning is done in the spring of next year with a distance of 10 cm.
The soil is kept moist, free from weeds and systematically loosened. In early spring, apply 5 kg of slurry per 1 m2. By the autumn of the 2nd year, the seedlings reach a standard size and are ready to be transplanted to a permanent location.
Propagation of mountain ash by cuttings.
Propagation by woody cuttings.
For propagation by woody cuttings, well-ripened annual shoots (from 2-4-year-old branches) are taken.
It is better to cut shoots for cuttings in the fall in the second half of September.
On the same day, the shoots are cut into cuttings 15-20 cm long, with 5-6 buds. The very top part of the shoot should not be taken for cuttings. The upper cut on the cutting is made oblique, on the bud, the lower one under the bud. Planting is done on the day the cuttings are taken.
In well-prepared soil (dug up, free of weeds, leveled), the cuttings are planted in rows with a distance between them of 60-70 cm, and in a row of 10-15 cm, obliquely at approximately an angle of 45°. 2 buds are left at the top, and one of them should be at soil level. The soil around the cuttings is pressed tightly so that there are no voids, watered well and mulched with clean peat.
If the planting of cuttings is postponed to spring, then it is better to prepare them in the fall and store them in the basement, in damp sand, until spring. In spring, cuttings should be planted as early as possible, as soon as the soil allows.
For good and quick rooting of cuttings, the soil in the garden bed should always be kept moist and loose. This is especially important in the first month after planting. With good care by autumn, a cutting can be grown into a standard seedling suitable for planting.
Propagation by green cuttings makes it possible to speed up the production of rowan seedlings, since already one-year-old plants have an excellent fibrous root system and a well-branched aerial part.
Cuttings are taken from the tops of all branches of the tree in early summer.
The green stalk is cut 10-15 cm long (depending on growth). After cutting, the cuttings are prepared for planting: the lower leaves are removed, leaving 2-3 upper ones. For better and faster rooting, a light longitudinal cut is made above each bud, and 3-4 such cuts are made in the lower part of the cutting. Before planting, for better rooting, the lower ends of the cuttings are immersed in a growth stimulator solution for 6-12 hours. Then the cuttings, washed in clean water, are planted in pre-prepared cold greenhouses.
Cold greenhouses for green cuttings are prepared in advance. Coarse, sifted, well-washed sand in a layer of 7-10 cm is poured onto the dug up clean layer of soil in greenhouses before planting the cuttings.
Cuttings cut and planted in greenhouses before mid-summer will have a developed root system by the end of summer and can be transplanted to a separate area for growing.
The cuttings should be planted obliquely, almost close to each other at a distance of 3-4 cm. There should be a free space of 15-20 cm high between the greenhouse film and the cuttings. After planting, the cuttings are carefully and abundantly watered from a watering can with a very fine strainer. It is very important that the water does not flow in a continuous stream, but splashes. After watering, the greenhouse is covered with film.
The main care for cuttings consists of regular watering (at first it is important that the air in the greenhouses is warm and humid) and ventilation of the greenhouses when the temperature in them rises above 25°.
Three to four weeks after planting, the cuttings in the greenhouses take root well. Then the film is opened slightly during the day, and when the cuttings have undergone some hardening, the greenhouse is left open at night. 7-10 days after rooting of the cuttings, the film is removed altogether.
Three-week-old cuttings, with proper care, form a good fibrous root system. The survival rate of cuttings in some rowan varieties reaches 70-100%.
A month after rooting (by the end of summer), the cuttings from the greenhouse are transplanted for growing. As soon as the seedlings take root after transplanting for growing, they are liquid fed with nitrogen mineral fertilizers (30 g of ammonium nitrate per bucket of water) or slurry diluted with water 6-8 times.
During the entire growing period, the soil is loosened and weeded, and in dry weather the soil is watered abundantly.
Next autumn, rowan seedlings are dug up and planted in a permanent place. Seedlings suitable for planting must have well-developed roots and strong shoots.
Reproduction of mountain ash by root suckers.
Reproduction by root suckers, which grow in large numbers around the tree every year, is the main method of propagation of mountain ash.
The number of root shoots depends on the variety, soil moisture, nutrient content and plant care. By the spring of next year, the shoots reach normal development and have their own root system. They are separated with pruning shears or a shovel and transplanted to a permanent place.
Propagation of rowan by ordinary grafting.
Grafting is the joining of two parts of different plants, as a result of which they grow together and continue to grow as a single organism.
One component of the graft, called the scion, is part of the stem of the plant to be propagated. It is grafted onto the root system of another plant, called a rootstock. Methods of vegetative connection of plants are called grafting.
For successful grafting, it is extremely important to correctly connect the various tissues of the scion and rootstock so that they grow together as quickly as possible and last as long as possible in this form in the future. Under the stem bark there is an actively growing layer of cambium. It is important to position the scion and rootstock so that their cambial layers overlap or have as much contact as possible.
The success of grafting also depends on how quickly and cleanly the cuts are made - the cut surfaces must be connected with minimal delay.
The result of grafting is largely determined by the creation of the necessary conditions for the growth and development of tissues, and therefore for the healing of the junction. In reality, this means the need to reduce water loss and provide warmth to the grafted parts, which is achieved by carefully covering them until they grow together.
The grafting site is tied with a transparent polyethylene tape 1-1.5 cm wide. Its use makes it possible to achieve reliable coverage of the junctions of the grafting parts, as a result of which water loss is reduced to a minimum.
After the grafted parts have fused, the further development of the new plant will depend on preventing its competitive relationship with the rootstock. Therefore, it is necessary to immediately remove the shoots that form on the rootstock.
Theoretically, vaccination can be done almost all year round; the best time for this is spring.
Common rowan is most often propagated by grafting into splits.
In the middle of winter (in mild climates, cuttings from the tree from the previous year's growth are harvested. They are tied into bunches and stored in an upright position, dug 15 cm into the ground or sand, so the cuttings will not dry out, and staying in the cold will delay their development .
At the beginning of spring, a plant is selected for a rootstock—an annual seedling—or a part of the root of a plant with vigorous growth is separated. The rootstock is dug up and the soil is washed away from it.
Any species of this breed can be used as rootstocks for cultivated rowan varieties in the country, since grafting tissue incompatibility is not observed among species of this genus. Due to its high winter hardiness, early fruiting, annual stable yield, immunity and environmental adaptability, rowan is a valuable rootstock in all fruit growing zones.
The grafting is carried out into the root apex (“root collar”) or into the seedling stem (hypocotyl). Using a sharp knife, cut the rootstock horizontally. Then, in the middle of this cut, a vertical cut (or split) about 3 cm deep is made.
Dig up scion cuttings. Select one with well-developed healthy buds and the same diameter as the rootstock. An oblique cut is made with a sharp knife above the upper bud of the cutting, and a horizontal cut is made about 15 cm below. A wedge is formed from the lower end of the cutting with two oblique cuts about 4 cm long: one of them starts near the bud, the other on the opposite side.
The scion is carefully, but also with some effort, inserted into the split on the rootstock. Part of the scion cut remains outside. This kind of “window” will contribute to the development of callus.
The junction of the rootstock and scion is tightly tied with transparent polyethylene tape. The top of the scion is coated with garden pitch to reduce evaporation.
The grafted plants are dug into a box with a mixture of sand and peat so that the connection point is just above the surface of the substrate. The box is placed in a cold greenhouse, a closed chamber or on a rack in a greenhouse. The higher the temperature, the faster the parts of the graft will grow together. But it is necessary to ensure that they do not dry out.
When the grafting components grow together, callus will begin to form on the exposed parts of the cuts. This can be observed in the “window” directly above the cut of the rootstock. The callus formed here increases the strength of the joint.
When the graft has grown together well enough, the polyethylene tape is cut and removed. Grafted rowan is planted in open ground. The shoots formed on the rootstock are cut out.
Reproduction of mountain ash by layering.
For propagation by horizontal and arcuate layering, well-developed annual shoots of a young tree are bent to the ground or shoots of root shoots are bent down. Layering is best done in early spring, as soon as the soil allows. The soil in the area intended for layering must be well dug up and leveled in advance.
After this, shallow grooves are made in the soil from the base of the tree, into which young shoots are bent and pinned. The tops of the latter are lightly pinched. When 10-12-centimeter young green shoots develop from the buds of the branched branches, they are sprinkled up to half the height with moist, fertile soil or humus. After 15-20 days, when the shoots have grown another 10-15 cm, the powder is repeated.
Rooted cuttings can be separated from the tree and transplanted to a permanent location either in the fall or next spring. It is preferable to separate the cuttings next spring.
HOW TO PROPAGATE ARONY BERRY Growing chokeberry planting material is not particularly difficult. Chokeberry reproduces well by seeds, layering and suckers, green and lignified cuttings, grafting and dividing the bush.
SEED REPRODUCTION The most common method of propagation is seed. Rowan seedlings retain their parental characteristics and begin bearing fruit in the fourth year. In order for the seeds to undergo stratification under natural conditions, they need to be sown in the fall. To do this, ripe fruits collected in early September are kneaded and the resulting pulp is washed with water. During this procedure, viable seeds sink to the bottom, and puny seeds float to the surface. Cleaned and dried seeds are stored for a month. In early October, they are sown in the ground to a depth of 1.0-1.5 cm; if the specified depth is not observed, germination is reduced. The beds are mulched, the top layer of soil is compacted so that there are no voids left around the seeds. In May, when warm weather sets in, the first shoots appear. Caring for them comes down to watering, weeding, loosening and thinning. When thickening, weak plants develop, so leave two to three centimeters between seedlings in the rows, removing excess, weaker specimens. If there is a lack of planting material, they can be planted in another bed for growing. Chokeberry seedlings are grown for two years without replanting. When sowing in spring, long-term stratification is needed. Experts recommend doing it as follows: • Seeds are soaked in warm water for a day. • After which it is kept for 10 days at a temperature of 12-14 °C. • Then another 10 days – at a temperature not exceeding 3 °C. • In this way, the temperature regime is changed within one and a half to two months. The mucus that appears on the surface of the seeds is removed by rinsing the seed bags in warm water. • The remaining time before planting is stored at 0 ° C and only three to four days before sowing is transferred to a warm place. In spring, the seeds are sown in the ground. Shoots do not appear simultaneously, although the overall germination rate is about 90%. With proper care on rich soils, the height of one-year-old seedlings reaches 40 cm, on poor soils - 10 cm. Fertilizing carried out in the first half of summer enhances the growth of seedlings. VEGETATIVE PROPAGATION OF ARONY BERRY
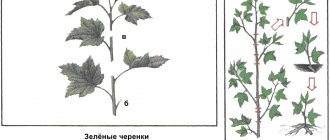
Green and woody cuttings Green cuttings are harvested in late May - early June. They are planted in greenhouses and rooted at high air humidity, like cuttings of other crops. If the survival rate of green cuttings is 96-98%, then the survival rate of lignified ones is only 8-30%, so the second method of propagating chokeberry is used much less frequently. According to experts, seedlings obtained from cuttings are weaker and less productive than plants grown from seeds.
Layering This method allows you to quickly obtain a small number of young plants. In early spring, strong side shoots on the mother bushes are bent to the ground, secured in this position, sprinkled with fertile substrate and moistened. In summer they are regularly watered and hilled. New plants are separated from the mother bush in the same fall or left until spring. Seedlings obtained from root suckers begin to bear fruit the very next year after planting.
We advise you to read: BLACK ROWAN: PLANTING, CARE, GROWING ROWAN ORDINARY ROWAN, RECIPES FOR WINTER AND DESSERTS
Grafting Chokeberry grown in standard form looks impressive. To get a compact tree, chokeberry is grafted with a cutting or bud onto a seedling of ordinary red rowan, hawthorn or pear. The grafting can be done at the level of the root collar, into the stem or crown. APPLICATION IN DESIGN Propagation of chokeberry is a simple procedure. Every gardener can get enough bushes to reap a good harvest and decorate their plot. After all, chokeberry is not only a valuable fruit plant, but also a highly ornamental plant. It looks great in hedges, in solitary plantings and in groups next to other shrubs, in the foreground of tall trees. Rowan is resistant to air pollution by smoke and gases. It can be successfully used for landscaping the territory of industrial enterprises.
Cuttings.
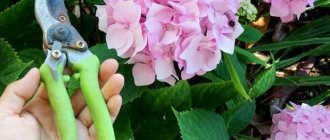
It is easy and simple to propagate chokeberry from cuttings. Moreover, you don’t need any special knowledge. It is best to do cuttings in the autumn, since usually the result is always positive. But you don’t have to intensively care for the plant; if you didn’t have time to root the planting material in the fall, then you can save it until spring; nothing will happen to the cuttings. The shoots must be long enough, within 10-20 cm. The cut must be oblique; lignified shoots will need to be cut off. It is best not to use the upper parts of the branches; cut off the shoots in the middle. Each cutting should have approximately six active buds. However, most often the cut is made straight. The cuttings can be planted immediately in loose and fertile soil. It is advisable to place them in a well-lit place. Two buds should remain above the ground on each cutting. Usually the shoots take root within a month, so in early spring, already in March or April, the plants begin to grow and develop intensively. It is recommended to mulch the trunk circle around the cuttings. This helps the plant to overwinter normally. If there is less than a month left before the arrival of frost, then it is best to leave the cuttings until spring; to do this, you can sort them by type and then tie them into bundles. The lower parts of the cuttings should be either wrapped in a damp cloth or placed in well-moistened sand. Do not allow the substrate to dry out; for this, gardeners often additionally place cuttings in a bag. This way the branches will definitely not dry out. The safety of the cuttings will need to be monitored until spring; it is advisable to inspect them every week and, if possible, moisten the sand or cloth. Naturally, cuttings will need to be stored in a cool place. A refrigerator or cellar is quite suitable for this. You can place bunches of cuttings on the summer veranda. In early spring, cuttings should be planted in separate containers; disposable cups are good for this. After this, you will need to water the shoots well, and as soon as the weather is consistently warm outside, the cuttings can be sent to open ground. Make sure the soil is well warmed. Sometimes chokeberry is also propagated by green cuttings. To do this, you will need to cut annual cuttings, young cuttings, with a length of no more than 15 cm. You can combine business with pleasure by collecting the remaining tops from the branches of the bush after pruning. The lower leaves must be torn off; each cutting must have two upper leaves; they must also be shortened. It is advisable to cut a small part from the bottom of the cutting; roots will form in these places in the future. After this, you will definitely need to keep the cuttings in a growth stimulator for half a day, and only after that they can be planted in the greenhouse. The distance between the shoots should be approximately 3 cm. After planting, the soil will need to be well watered. In order for the cuttings to take root well, the air temperature in the greenhouse should be approximately plus 22 degrees. If the greenhouse is very hot, do not forget to ventilate it. Usually within a month the cuttings take root and take root, so the protective cover can be gradually removed. In order for the seedlings to grow more intensively, it will be possible to feed them with a small amount of organic matter or mineral fertilizer. After this, it is advisable to loosen the soil, water the plants, and mulch the top layer. Usually the cuttings take root perfectly, but if you do something incorrectly, the root system of the shoots may not form.
Rules for propagation by cuttings
Gardeners use both woody and green cuttings to propagate their favorite varieties
Lignified cuttings
Last year's branches are used for planting material. Cuttings are separated in the second part of September. If you do this later, they will not have time to take root before the onset of frost.
The upper part of the cutting is cut at an angle, and the lower part in a straight line. The length of planting material should be within 20 cm with several full buds.
The cuttings are planted in a moist nutrient substrate at an angle. In this case, no more than two buds should remain above the ground.
When planting, you need to monitor the distance of the branches. The optimal values are 10-12 cm. After the procedure, water the soil generously and mulch.
Propagation using green cuttings
This method is used least often, as it requires some effort. Planting of cuttings is carried out only in a cold greenhouse. The soil should consist of deciduous soil and compost. You can also add a small amount of coarse sand to the composition.
Cuttings are separated only from healthy and large branches. Their length should not exceed 15 cm. The lower leaves must be removed and the upper ones shortened by half.
For quick rooting, it is recommended to make several shallow cuts in the lower part of the planting material and one under the upper leaf plate.
Before planting chokeberry, you need to dip the cuttings in a growth stimulator. Keep them in this state for 8 hours. At the end of this time, landing is carried out. The specimens are placed at an angle, maintaining a distance of 4 cm. Keep the greenhouse at a temperature not lower than 25C, watering periodically.
Green cuttings can be replanted after 10 days. During the first few months, young chokeberries are often and abundantly irrigated, weeds are removed and the soil is loosened. They are transplanted to a permanent place in the first month of autumn.
Layerings.
Chokeberry also reproduces well by layering. To do this, you will need to choose healthy annual shoots, preferably those that are located directly in the root part. You can dig in five cuttings at a time, but too many shoots can deplete the bush, so the chokeberry itself may not have enough nutrients, so it’s better to root no more than two or three branches at a time. The selected cuttings should first be shortened by a couple of centimeters, and only then tilted towards the ground and broken. It is at the site of the fracture that roots will form in the future. In order to fix the shoots on the soil surface, they can be pressed down with stones or pinned with staples. Fill the prepared grooves with fertile and loose soil. In a couple of months, the shoots usually take root, so closer to autumn, the root system of new plants is formed well, but it is better to separate the cuttings from the mother bush in the next season.
Dividing the bush.
When mature chokeberry bushes are dug up, they are often divided. Moreover, each new plant should have powerful shoots, as well as a well-developed root system. Each bush should also have at least 3 young shoots. To prevent infection from getting into the wounds, they will need to be treated with either crushed coal or garden pitch. The planting pits themselves are also prepared in advance. To do this, dig holes of appropriate sizes, place seedlings there, cover them with fertile soil, and very often add a little superphosphate and humus. The distance between plants should be approximately one and a half to two meters. In the future, these seedlings will need to be cared for in the same way as mature bushes. Don’t forget to moisten the soil and feed the plants. When watering, one bush usually consumes 5-10 liters of water. Do not forget to immediately shorten the shoots after planting. In late autumn, the tree trunk circle of bushes will need to be mulched with peat, humus or straw. In order for the plant to better adapt to a new location, you will need to carefully straighten the root system during transplantation; if you transport the seedlings, you will not damage the plants. It is best to transport these bushes by wrapping them in a damp cloth. Before planting seedlings in open ground, it is recommended to place chokeberry in water for several hours, so that the root system is saturated with moisture. On the third day, seedlings are usually planted after dividing the bush. Sometimes before planting, gardeners prepare a special mixture of clay and smear the roots with this mixture to prevent rot from developing.
Growing from seeds
Although in the wild many plants reproduce this way, it is not easy to get new growth at home using this method. This method is not relevant for most gardeners, but it is good for growing plants for sale. This is how you can immediately obtain a lot of planting material - seedlings - in a small area. All activities for propagating rowan by seeds will last more than one season.
First you need to prepare the seeds. To prevent rotting, you should separate them from the pulp and skin by rubbing the berries through a sieve. After this, stratify the seeds to increase their germination by overwintering them in conditions similar to natural ones. To do this, cleaned grains must be placed in damp sand and kept in the refrigerator for three months. To avoid damage to the seeds by bacteria and fungus, the sand must be disinfected by calcining it on a baking sheet.
You can sow seeds in open ground in the spring in the second half of April. Seeds should be placed at a depth of 6-8 cm, covered with soil, and then mulched with humus. All summer long they need to be looked after - watered, fed with liquid organic fertilizer, loosened the soil and removed weeds. In the fall, small plants can be replanted.
In order for young seedlings to grow well, they need to be thinned out. So, between shoots with two or three true leaves there should be a distance of about 3 cm. When there are five leaves - at least 6 cm. After a year, if the shoots have not been replanted, in the spring they will need to be thinned out, leaving the strongest ones at a distance of about 10 cm apart.
Root suckers.
In order to separate the young shoots from the chokeberry bush, you will need to use a shovel. Do not forget that this shoot should still have good roots; before planting the offspring in a new place, you will need to shorten their length a little, literally by a couple of buds. Only after this will you be able to root the shrubs in the new area. For planting, it is best to choose a well-lit place. If we talk about the type of soil, then there are no fundamental requirements. However, plants do not develop well in saline soils. But groundwater may lie close to the surface of the earth; chokeberry does not have any special requirements for soil moisture. That is why these shrubs are often planted as hedges. Black rowan makes a beautiful green fence, and its branches produce healthy and tasty berries.
Let's sum it up
- – it is better to determine spring planting in April, and autumn planting - at the end of September to the beginning of October
- – chokeberry bush can be propagated by: seeds, cuttings, grafting, dividing the bush, root suckers, layering
- – propagation by cuttings in spring and autumn will give more fruitful results than propagation by cuttings in summer
- – the soil must be kept moist. Count one watering on one specific chokeberry bush in 2.5-3 buckets of water
- – the bush should be pruned in the spring
The medicinal properties of chokeberry are famous for their diversity. In addition, chokeberry berries have a pleasant taste. If you decide to grow chokeberry in your garden, this article will help you properly plant and propagate this shrub in your area in the future.
Seeds.
You can propagate chokeberry from seeds, but it is not easy. To do this you will need to be patient. It will take a long time to grow shrubs from seeds. First, you should select the ripest berries and leave them in the room to ferment. Only after several days can the berries be rubbed through cheesecloth, the pulp is usually removed, and the remaining seeds are washed with clean water. This way you can prepare chokeberry for growing. In order for the seeds to enter together, they should be mixed with damp sand and stored for several months in a cool place, for example, in a basement. Sometimes this substrate is stored in the refrigerator. Many professionals simply dig a container with this substrate into the snow, and after winter they germinate the seeds. The beds for planting seeds are prepared in mid-April; do not plant them too deep, otherwise the plants may not grow. The seeds are distributed evenly over the area and covered with loose and fertile soil. To make plantings appear faster, you can mulch the top layer of soil with humus. However, the seeds will take a very long time to germinate; the first sprouts will appear no earlier than in a month. But it will be possible to transplant young shoots to a new habitat only after a year. As you understand, it will take you a very long time to grow chokeberry using seeds. Do not forget that the seedlings will still need to be looked after, which is why gardeners are not very fond of this method of propagation. When the first pair of leaves appear on the plants, the beds will need to be thinned. It is recommended to discard all diseased and weak sprouts. Leave a distance of 5 cm between the bushes. When the second pair of leaves appears on each stem, the plantings are thinned out again. The final thinning is carried out when the shoots become the strongest and healthiest. The distance between seedlings should be no less than 10 cm. Chokeberry needs a little space to grow and develop. Do not forget to water and feed the seedlings in a timely manner. The soil around the beds will need to be loosened and weeds removed from the site. For fertilizing, organic fertilizers, previously diluted in water, are most often used. Organic matter is added to the soil several times a season, this is done so that the seedlings gain strength and grow more intensively.
Graft.
Chokeberry is often propagated through grafting. However, in order to properly graft the plant, you will need to follow some recommendations. The rootstock is prepared in advance. To do this, water the seedling abundantly, remove dust from the leaves, and trim it. The split must be deep enough. Moreover, all work should be carried out carefully; garden tools must be sharp and sterile. In order to graft the plants, you will need to use a strong cutting. It is best to choose the top shoots; the length of the cutting should be approximately 15 cm, and there must be 2-3 active buds on it. Over the course of a year, the foliage will grow; the branch at the bottom is sharpened like a wedge so that the cutting fits tightly into the cleft being formed. After grafting, the rootstock must be wrapped in film, and all wounds must be lubricated with crushed coal or garden pitch. The rootstock takes root well if there is high air humidity outside. It is for this purpose that gardeners wrap the grafting sites with a plastic bag, thus creating a kind of greenhouse. Usually this shelter is fixed below the graft itself. Within a month, the film can be removed; if young leaves appear on the scion, this means that propagation was successful. Do not forget that this should be done before the sap flow begins. If you are a little confused about the concepts, we will explain to you: the rootstock is the seedling on which you will graft this or that crop, and the scion itself is the cutting itself. It's simple. In order to propagate chokeberry in this way, you will need to choose related, winter-hardy varieties, in which case the grafting will be successful.