Phalaenopsis is a hybrid flower that is considered the best plant for those who have always dreamed of growing an orchid at home, but did not know how to do it correctly. Before you learn how to grow roots in a phalaenopsis orchid, it’s worth learning the basics of caring for this plant.
The maximum temperature for growing is considered to be 28 degrees Celsius, and the minimum is 10. Under dry substrate conditions, the plant can tolerate lower temperatures. In hot conditions, it is very important to provide the orchid with good ventilation, and it should be watered in such conditions only when necessary.
Under normal conditions, watering is reduced to once every couple of weeks. People with experience in growing orchids recommend watering in the first half of the day so that the roots are dry by night. This minimizes the possibility of roots freezing and further problems with the flower. Phalaenopsis can be fertilized only at the stage of flower bud formation.
Don't forget about proper air humidity. To do this, you do not need a tray with expanded clay; you just need to spray it from time to time. It is important not to overdo it. With proper watering (by immersion method), additional moistening is carried out extremely rarely.
Preparing for resuscitation
Root growth of phalaenopsis in water will be successful only if the preparatory process is correct:
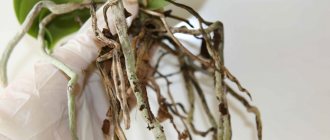
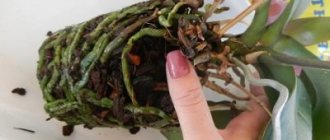
- Carefully remove from the pot and get rid of the substrate to find out how damaged the root is. The root system is washed.
- Select the parts that will be removed. Roots that are still light green in color, have good texture and leave. It is important to consider that healthy roots may be whitish; this happens when little sunlight gets into the pot. The roots to be removed will be beige with a brown tint.
- Damaged leaves of the plant that look wilted should not be touched. The orchid itself will get rid of them when the time comes.
- Peduncles can be safely removed. They will be responsible for the fact that the roots grow slowly, because the plant will put more energy into the flower stalks. The maximum that can be left is the lower part.
- All excess parts are removed with sterile instruments. At this stage, areas that indicate rot or dryness can be removed from healthy leaves.
- The cut needs processing. This is necessary in order to avoid possible rotting. The rotting process can completely kill a plant in just a couple of days
- Treatment is carried out with ash, cinnamon or activated carbon. Many also use charcoal or a fungicide for these purposes (in the case of the latter, soaking is carried out for no longer than 15 minutes, the dosage is halved, based on what the manufacturer recommends). It is forbidden to use brilliant green or iodine. Such products will only cause harm to the plant, in the form of burns.
- The last stage is drying. This does not take much time: from half an hour to several hours.
All these steps cannot be skipped if you want to know how to revive a phalaenopsis orchid when its roots have dried out.
Causes of root loss
Root diseases most often occur for the following reasons:
- excessive watering;
- low temperature;
- unsuitable substrate that does not retain moisture well;
- insufficient lighting.
Healthy phalaenopsis roots are green or silver-green in color. A diseased root system loses its elasticity, and dark spots with a putrid odor appear on it.
Diseased roots should be trimmed with a sharp, disinfected knife; dried aerial roots and flower stalks should also be removed. The sections should be dried for 3-4 hours. Leaves, even those that have lost their elasticity, do not need to be trimmed.
A thorough inspection of the plant should be carried out. If there are at least two healthy roots left, it makes sense to plant the orchid in a fine-grained substrate, avoiding the root extension procedure.
Treatment and recovery in the greenhouse
A greenhouse can create conditions similar to those in the natural environment of plant development. It is easy to set the humidity and temperature required for the plant. Such conditions allow the orchid to grow quickly. Growth will be noticeable almost daily.
A greenhouse can be made using a 10-liter plastic bottle or an aquarium. The bottom is covered with expanded clay. Its layer should be small. Moss is laid on top. The place where the plant's roots begin to develop should be in contact with moss. The roots can be seen after two weeks. Once they are large enough (at least 4 centimeters), the plant can be potted. This method is good if you do not know how to root a phalaenopsis orchid without roots.
In water
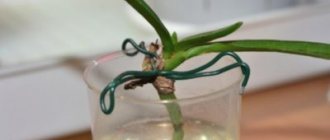
Phalaenopsis root growth in water can be done in different ways:
- Alternating between soaking and drying is a good method. In this case, the plant is placed in a large container. The base should be immersed in water for 6 hours, after which the plant is left to dry until the next day. The water may contain honey or sugar, and liquid potash fertilizers can be used once a month.
- Constantly in the water. This method is similar to the previous one. All you need to do is skip draining the water. The plant needs to be soaked constantly, but the water is changed at least once every 5-7 days.
- Above the water. The bottom of the vessel is filled with water and the phalaenopsis is placed so that the root is above the water. The container containing the plant must be closed. The orchid should be treated daily in plain water with added sugar.
- Upside down. This method is considered the most effective. The plant is inserted into the bottle (cut) with the leaves facing up. Based on the length of the leaves (middle), the phalaenopsis is filled with water. It must contain coal. The root that will be visible from above must be sprayed daily.
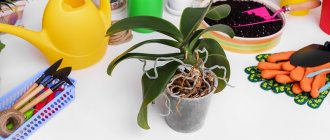
- In the substrate. The method is suitable only for those plants that have few healthy roots left. They must be at least 2 centimeters long. When using this method, it is necessary to monitor the humidity of the substrate. To maintain moisture, immersion in water is necessary, as when moisturizing a healthy plant. Growth can be stimulated by using vitamin B1, which is diluted in water. A good option would be resuscitation in sphagnum moss, which is poured into a bag. Sphagnum is good because it perfectly retains the moisture necessary for root growth.
- On the bark. The plant is fixed to the bark, its base should be in direct contact with the bark. Treatment with vitamin B1 is necessary. Watering is not needed; spraying is avoided. Resuscitation of phalaenopsis using this method will give results in three months.
Features of care during orchid root extension
In the process of growing the root system, the orchid needs proper care, which has several features:
- Nutrition . It is not recommended to feed the plant with any means before the roots appear. You can help the crop only after the first root appears. To do this, the flower should be soaked for 30 minutes in a solution prepared from 1 liter of water, 1 tsp. honey or sugar and root solution, taken in the amount specified in the instructions.
- Lighting . During the entire rooting period, the orchid must be provided with sufficient light, at least 12 hours. In cold weather, it is recommended to use additional lighting devices for lighting. It is strictly forbidden for the flower to be exposed to direct sunlight, under the influence of which it can dry out and die.
- Temperature . If temperatures are too low, the plant runs the risk of prematurely going into hibernation, so you should stick to stable temperatures of +23...+25°C.
Did you know? In terms of the amount of seed material, the orchid is the leader among all flowers. More than 4 million seeds can form in the middle of one plant.
Root dipping solutions
Now you know how to grow roots in a phalaenopsis orchid above water and other methods of resuscitation. In order to successfully revive the plant, you need to know what solutions are used to treat the roots.
- Ribav Extra. An excellent solution for strengthening even the most weakened roots. For 200 milliliters of water you need only a few drops of this product. This is one of the most popular growth regulators at the moment. Its popularity is due to the undeniable effectiveness of Ribav Extra.
- Zircona is known for having a very gentle effect on orchid roots, but at the same time causing active growth at the cellular level. This product helps achieve the perfect balance between root growth and root health.
- Radifarm helps to achieve quick results during orchid resuscitation. Phalaenopsis that is treated with this solution will quickly develop not only central, but also lateral roots.
- New synthetic regulator. Its use leads to the rapid formation of roots, which, among other things, can very quickly and efficiently absorb all important mineral components.
Phalaenopsis: general information and varieties
The Phalaenopsis orchid variety is represented by a huge number of subspecies of herbaceous plants that can grow both on trees and on the ground.
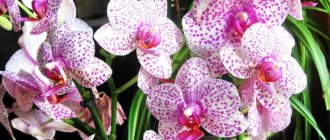
A distinctive feature of this variety from other types of orchids is its rather short stem and massive leaves with a leathery structure, which can reach a length of up to 30 centimeters and are decorated with various incredibly beautiful patterns. Peduncles appear between the leaves during the flowering period and, with proper care, can grow up to 80 centimeters in length. The flowers are quite large and can have different colors from plain and pale to bright and variegated. The aroma of the flower depends on the specific variety and can either be completely absent or fill the air around with incredibly sweet notes. Aerial roots form on the stems between the leaves, so to breed Phalaenopsis at home you need to know how to help the orchid grow roots for further development.
Common gardener mistakes
Reanimation of phalaenopsis without roots is not without mistakes. It is difficult to find a person who carried out this procedure quickly and efficiently the first time. Gross mistakes during plant resuscitation include avoiding all preparation steps or untimely watering or spraying when revitalization methods are used that require the following steps:
- Growing roots in water
When you have a phalaenopsis without roots and you need to quickly know how to save it, resort to this method. This is a popular method of growing orchid roots, because it gives good results almost guaranteed. The main thing is not to forget to change the water every week and sometimes soak the plant in a glucose solution. Now you know how to grow roots in phalaenopsis, which, it would seem, has no chance of survival.
- Orchid lighting
A window that faces north is the best place to grow this orchid. This flower can also grow on window sills that face other sides, but the north side is preferable. There should be enough sunlight for the normal development of phalaenopsis. But in spring and summer it is important to ensure that the sun does not damage the sensitive leaves of the orchid.
- Rules for transplanting phalaenopsis
Transplantation is carried out only in extreme cases. The orchid does not like replanting, but it is necessary when the roots begin to rot or the root system is already crowded in its pot. Before the transplantation process, the roots of the plant are cleaned and damaged areas are trimmed. The sections are treated with charcoal. Coal is considered an excellent disinfectant and protector against rot. Expanded clay or granite is laid out at the bottom of the new pot, which will provide good drainage to the plant.
When to plant in the ground?
Phalaenopsis is transplanted into the ground after new roots grow 4-5 centimeters. Choose a small pot so that the roots are not too free in it. It is convenient to take a small peat pot, in this case, when the root system becomes larger, you can simply put it in a new container and cover it with substrate.
It will take from a month to a year to revive a rootless orchid. The period depends on the condition of the plant, the ability to provide the required temperature and lighting, and the regularity of feeding.
Important! When transplanting into the ground, active feeding of the plant stops. When transplanting, the orchid is secured on a support. After 3-4 weeks, when the plant has taken root in the soil, it can be removed.
Rooting an orchid in a greenhouse is an effective, but rather complex method that requires either experience or attentiveness and strict adherence to instructions. If you lack time or lack experience, it is better to choose a less troublesome method.
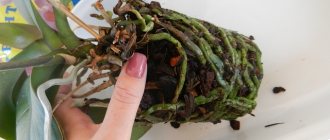
Resuscitation in sphagnum moss
It is possible to restore the root system of a pet whose roots have rotted using the light soil used for growing Orchids - sphagnum moss. It is used after preliminary disinfection or steaming. You can save a flower like this:
- Place a drainage layer at the bottom of the plastic container.
- Compact the moss layer.
- Place the damaged pet so that the growth zone remains open (it is possible to install supports to stabilize the pet).
- Spray the soil surface with a spray bottle.
This method is suitable for those gardeners who find it difficult to control the humidity of the substrate. Its only drawback is the rooting time. Prepare for flower transplantation no earlier than 6 months later.
What you need to know about replanting Phalaenopsis
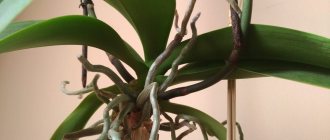
Newly transplanted Phalaenopsis, after growing roots
Like any other type of orchid, Phalaenopsis must be replanted every 2 years. Frequent watering and fertilizer remove all components important for flowers from the substrate. First of all, pH values change. The bark, which occupies almost 50-60% of the substrate, loses air permeability, and the use of fertilizers leads to soil salinization. The plant , having received less of the elements necessary for life, begins to weaken, and if the substrate is not changed, it will die.
The best time for replanting is the period when new roots begin to appear on the Phalaenopsis. It is unacceptable to replant orchids at a time when they are preparing to bloom. Because of this, the development of peduncles will slow down, and unopened buds will fall off. Pots for transplantation should be plastic or transparent glass. Moreover, the second option is preferable: beginners will be able to monitor the state of the root system and prevent overflow. Read also the article: → “Glass pots for indoor plants.”
Saving a flower without roots
It is also possible to save an orchid without roots. There is hope for salvation only if the grower acts immediately and according to a certain algorithm. If only one stem remains from the pet, its resuscitation is carried out in water. Before immersing the flower in warm, settled water, trim damaged tissues and treat open wounds with antiseptic agents.
After immersing the remaining stem with leaves in warm water, place the container in a well-lit place. It is better to avoid exposure to direct sunlight. As the liquid level evaporates, it is topped up. Caring for an orchid that has lost all its roots can be supplemented by wiping the leaves with a solution of succinic acid prepared in the proportion of 1 tablet per 250 ml of water. To avoid hypothermia of the pet, when the air temperature drops at night, cover the container with plastic wrap or do this using a regular bag.
Under properly created conditions, the flower rarely dies. After 2-4 weeks, root growth brings the first results - new young roots appear. When the orchid has produced several of these shoots, it will have to be cut off, leaving the baby behind and transplanting it into a pot. The best soil for further rehabilitation is sphagnum moss. It absorbs moisture well, is breathable and is rarely subject to infection by various infections.
Main causes of root loss
The orchid family is quite extensive. It contains both terrestrial and epiphytic species. Consequently, they will also differ in the types of root systems. Their roots can receive nutrition both from the air and directly from the substrate. But they all have one thing in common: they are easily damaged and die if the rules of care are not followed.
Most often, the main reasons for the loss of the root system are the following:
- non-compliance with the watering regime, flooding or over-drying can very quickly destroy even the healthiest roots;
- inappropriate temperature conditions, systematic hypothermia or overheating also do not contribute to the health of the root system;
- pests
But there are also a number of other reasons. Despite this, you should not immediately throw out the damaged plant. In most cases, its roots can be successfully grown. A variety of methods can be used for this.