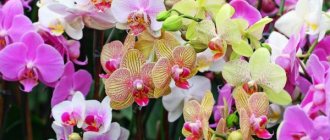
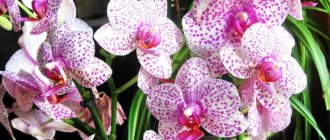
Let's help revive an orchid: how to save a flower without roots and leaves, or with just one thing?
The consequences of such a circumstance will be obvious.
A flower cannot grow without these important elements. His gradual death will occur. To determine how serious it is, you need to inspect the roots for damage.
The following signs will indicate the death of the root system:
- Color change (you can find out what the normal color of a healthy root system should be and why it changes here).
- Slimy and wet areas.
- If you press on the roots, water will flow out of them.
- The presence of collapsed thread-like roots.
What are the reasons for this problem?
The reasons for the falling leaves and lack of roots in an orchid can be different. The most common are the following:
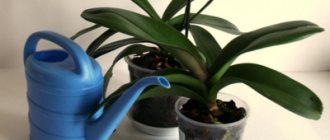
- Incorrect watering. Many inexperienced gardeners believe that the more often you water an orchid, the better for its growth. Actually this is not true. It is necessary to know the size of the flower roots and the period of their activity. It is necessary to water after the substrate has completely dried. To do this, the orchid is planted in a transparent container with holes, where you can see when the plant needs watering.
- Lighting. More precisely, poor lighting, especially in the autumn-winter period. If the normal lighting system is disrupted, the growth of the flower occurs. First, this affects the leaves, which wither, turn yellow and fall off. They, in turn, send a signal to the root system, which also gradually loses its vitality.
- Unsterility of the substrate. If a flower is present in the soil for a long time, then various insects - mites, fungi and other microorganisms - can accumulate in it. They can be both useful and harmful. Some aggressive representatives destroy the roots and foliage of the orchid.
- It happens that the cause of leaf falling and death of the root system has not been established. In this case, the plant is placed in a fungicide. Its dosage should be half that in the instructions. If you regularly treat an orchid this way, its immune system will be strengthened.
Temperature conditions and lighting after resuscitation
The temperature in the room where the plant is being resuscitated should be between 21-25 degrees Celsius . Because fluctuations up or down in temperature can lead to the death of a weakened plant.
Lighting must be sufficient, and if resuscitation takes place in autumn or winter, it is necessary to organize additional lighting for the good development of growing roots and leaves on the orchid.
How to resuscitate at home: step-by-step instructions
Is it possible if all the roots and leaves have fallen off?
In this case, urgent resuscitation actions are needed. In this case, the flower is planted in a small greenhouse, which is purchased at a specialized store or made independently from a plastic box. Expanded clay and moss are poured onto the bottom of the greenhouse.
After which the plant is carefully placed there. In this case, good lighting is very important, so you should purchase a phytolamp in advance.
The following procedures are followed:
- Periodically you need to soak the flower in a nutrient solution and water.
- Wipe the base where the leaves should appear with substances to stimulate growth.
- Bathe the orchid in water with the addition of special preparations.
Preparations that are added to water to restore the root system:
- B vitamins. They help restore rotted root systems. The flower needs to be soaked in this solution once a month and wiped once a week.
- Growth regulators. They contain phytohormones that restore the structure of the roots. The plant should be soaked in them monthly (you can learn about effective means for growing orchid roots here).
- Fertilizers based on potassium and phosphorus. They are fed once every 2 months.
- Glucose. If the plant is healthy, then glucose is produced itself as a result of photosynthesis. A sick flower needs feeding containing this substance, since glucose promotes the formation of new cells.
- Microfertilizer with iron chelate stimulates the growth of roots and leaves.
Read more about how to resuscitate an orchid without roots here.
Without growth point
In this case, all rotten roots are removed. This is done using previously disinfected scissors. Then the plant is installed in the water so that its upper part rises above the water. You need to move the container with the orchid to a well-lit place. This way the orchid will begin to recover, and a new root system should soon appear.
We invite you to watch a video about the resuscitation of an orchid without a growing point:
There is not a single leaf
If the orchid’s leaves begin to fall off, but the root remains unchanged, the following restoration tips will help:
- You shouldn’t wait for all the orchid’s leaves to fall off; you need to remove the flower from the pot and inspect the condition of the root system.
- It is necessary to monitor the system of natural leaf change so as not to confuse the natural process with a pathological condition.
- The rules for watering indoors must be clearly regulated.
- If you have just purchased a plant, you should immediately check the roots for rot or diseases (what leaf diseases are found in orchids?).
- If necessary, you need to use an indoor greenhouse.
- From time to time it is worth replanting the flower into a new substrate.
- Strictly adhere to the concept when using strengthening agents.
We invite you to watch a video on how to revive an orchid without leaves:
How to choose a rescue method
If the orchid does not grow, its leaves become limp, turn yellow from the trunk, then this is a reason to pull it out of the pot and reconsider the root system. Depending on its condition, the method of how to revive the orchid is determined, taking into account your home conditions.
There are several options for growing roots and leaves:
- greenhouse - suitable in cases where there is at least 1 root and quite a lot of leaves;
- above water, without a greenhouse - in a similar way, plants are reanimated without roots and with a small number of leaves;
- leaves in water - the method is suitable for growing roots with a well-preserved bush.
Also, orchid owners have many questions related to caring for young growths without roots. It often happens that the mother plant begins to dry out the peduncle or it accidentally turns out to be broken. In such a situation, the baby orchid growing on it will need to be nursed in greenhouse conditions, where a warm and humid environment can be created and the plant will restore turgor and grow new roots. A similar method is used to resuscitate mini-orchids.
Features of resuscitation in greenhouse conditions
Before we begin to revive the orchid, it is necessary to competently assess the condition of our “patient”. Since phalaenopsis often dies due to excess humidity and low temperatures, it is quite possible that the plant also needs a complex of therapeutic measures.
Carefully inspect the neck of the plant for blackening or wet spots. With such symptoms, you absolutely cannot use this method, since a greenhouse in a greenhouse will increase the growth of bacteria, and it will not be possible to bring the orchid back to life. Before using greenhouse conditions, it is necessary to remove the infected areas with a sharp sterile instrument, dry the sections and lubricate them with a systemic fungicide.
It is also not recommended to use a greenhouse for frozen plants with damaged leaves, swelling and all types of bacterial infections.
It is easiest to grow phalaenopsis leaves in greenhouse conditions. For this we need:
- plastic transparent container according to the size of the plant;
- moisture-intensive substrate - medium or fine bark and moss;
- fertilizers;
- cling film.
We put the substrate in the container, sprinkle it generously with water and diluted fertilizers, then place the plant there and cover it with cling film. The greenhouse is installed in a bright place and the plant is ventilated at intervals of 2 times a day. During resuscitation, daylight hours should be at least 12-15 hours.
When the orchid takes root, it is necessary to feed the substrate again with a solution of vitamins with succinic acid.
A solution of vitamin B6 + vitamin C + succinic acid has proven itself to be excellent. You need to do it like this:
- 1 liter of water, temperature 22-25 degrees;
- vitamin B ampoule;
- Open the Acerola capsule and pour out the powder;
- 1 tablet of succinic acid.
Mix and generously spray the entire substrate in the greenhouse with this solution. We continue to keep the plant in the greenhouse until at least 3 roots grow and they reach a length of 5 cm. Then we plant it in a regular pot the size of the root system, filling it with the same substrate that was in the greenhouse.
Important! When planting an orchid in a pot, be sure to strengthen it with sticks so that during further care you do not injure the newly grown roots.
Features of resuscitation without the use of a greenhouse
Unfortunately, a greenhouse is not suitable in every case, so let’s look at other ways to save a dying orchid. Florists use the following:
- over-water resuscitation;
- resuscitation in water upside down.
Both of these methods are quite effective, but have their own characteristics. So, you can grow roots above water when there are at least 2 leaves.
As a rule, leaves in water restore the root system if there is only one leaf and a growing point left.
Overwater resuscitation is the following process:
- An aqueous solution of the drug Kornevin, prepared at the rate of 1 g per 1 liter of water, is poured into a glass container - you can take a glass.
- The plant is placed on top so that the neck does not touch the water, but is above the water at a height of 2-3 cm.
The plant needs to be provided with 12-15 hours of daylight. If resuscitation occurs in the winter season, you can use phytolamps or a UV lamp. When adding additional lighting, it is important to install it at the optimal distance so that the phalaenopsis does not get burned and does not stop the growth process.
When resuscitated in this way, the orchid quite often loses the elasticity of its leaves. To preserve turgor, it is necessary to regularly wipe the leaves with succinic acid. To prepare the solution, 1 tablet of succinic acid is diluted in 1 glass of warm water (250 ml).
Reanimation with leaves in water is a similar action, while immediately adding succinic acid to the water in the same concentration - 1 tablet per 250 g. water.
It is important to remember that a sick orchid must first be treated and only then should activities to grow roots and leaves begin.
When does resuscitation no longer make sense?
When all the roots of an orchid have rotted and all the leaves have withered, it will be impossible to save the plant.
But if, nevertheless, small parts of the roots remain in normal condition, then it is worth trying to revive the orchid.
- To begin with, all rotten areas of the plant are removed. Then it dries well.
- Where the cuts were made, the areas are disinfected. This is done using activated carbon. It is crushed into powder, and the sections are treated with this product.
- After this, the areas where future roots should form are treated with vitamin solutions.
- And that is not all. After all these actions, constant care and feeding of the orchid is necessary.
Caring for a wilted plant
When growing an orchid, it is always worth remembering that the flower tolerates dryness more easily than excess moisture. The orchid should be in a transparent pot with holes, this will make it easier to regulate the watering time. It is also worth paying attention to ensuring that the plant does not overheat and receives sufficient lighting. But direct sunlight is detrimental to an orchid; the light must be diffused.
Caring for a sick plant is difficult, but restoring it is quite possible. You will have to put in a little effort before the flower will again delight your household with its blooming.
If you find an error, please select a piece of text and press Ctrl+Enter.
Most common reasons
Leaves are very important for the normal development of the orchid. Being an epiphyte, it can feed not only through the root system, but also with the help of leaf blades. And even when problems arise with the roots, the plant can be revived through the leaves. Therefore, it is very important to understand the reasons for stopping their growth.
Air temperature
An orchid pleases its admirer only under comfortable conditions of its maintenance. The air temperature of the room where the plant is located should be about 21-26 degrees. In summer, it is better to move phalaenopsis from the windowsill deeper into the room with diffused lighting away from direct sunlight. This will help avoid burns on the leaves, which appear as discolored spots with a brown edge and contribute to subsequent drying.
In winter, a slight decrease in temperature to 16-20 degrees, but no less, is favorable for the orchid. But it is also necessary to ensure that the flower located on the windowsill is not exposed to a temperature difference between day and night of more than 5-6 degrees, since a significant temperature difference can lead to its death. Small temperature fluctuations do not harm the plant, but promote the formation of flower buds.
Watering
Improper watering may be one of the reasons why an orchid has problems with leaf growth. During the heating season, when the air in the room is very dry, the plant quickly loses moisture. In this case, it is recommended to water at least twice a week, and if necessary, irrigate or spray every other day. It is good to use a humidifier for living spaces.
For a comfortable existence, plants of this species require balanced watering. With excess moisture, the roots rot, which contributes to the death of the flower, and insufficient water leads to drying out. Therefore, you should focus on the color of the roots and the condition of the leaves. Yellowing, softness and wateriness of the lower leaves indicate increased humidity of the substrate, which has led to rotting of the root system.
But it is also important to properly water at home. Use only soft or medium hard water at room temperature. It is good to combine watering methods. When watering from a watering can, water is poured until it begins to flow out through the drainage holes. Moisture should not flow into the center of the outlet, as if it gets inside, there is a risk of rotting. Excess water is drained from the pan. After a few minutes, the flower is watered again, and again the excess moisture is removed.
The shower watering method creates conditions closer to the natural habitat of phalaenopsis.
The ingress of warm water onto the substrate in small streams promotes uniform wetting. After the shower, the flower must be dried and all moisture thoroughly blotted off. For orchids growing in baskets with tree bark, the water immersion method is useful. Only a perforated pot is immersed in a special bowl of warm water for 40-80 minutes; the leaves should not be in the water.
Lighting
Lack of lighting can have a detrimental effect on the condition of orchid leaves. The photoperiod for this species should be 12-14 hours; in winter, it is necessary to provide illumination with a special phytolamp for plants or a fluorescent fluorescent lamp.
When growing an orchid on a south window during periods of pronounced solar activity, the plant is shaded with a special net, and when the flower is located on the north side, additional lighting is used. Finding phalaenopsis deep in the room has a beneficial effect on its condition, provided there is 12-14 hours of daylight. To avoid one-sidedness of the plant, it is necessary to periodically turn its other side towards the light.
Nutrition
One of the reasons why new leaves do not grow may be due to insufficient nutrition with potassium and phosphorus compounds. This manifests itself in the appearance of yellowish and brown spots on the leaves. To maintain the plant, it is worth foliar feeding.
The nutrient solution is prepared according to the instructions on the package, but at a weaker concentration than for root feeding. Then each phalaenopsis leaf is sprayed evenly. With this method, the solution does not burn or damage the roots, and nutrients are better absorbed through the leaves. But it should be remembered that excessive amounts of fertilizer cause serious harm.
All that's left of the orchid are the roots, what should I do?
The main reason that an orchid sheds its leaves is improper care. Of course, if we are talking about the loss of a single leaf, then there is no reason to worry - this is an absolutely natural process. But when a plant systematically gets rid of leaves, you should seriously think about it.
As a rule, the stem of orchids becomes bare due to the condition of the root system. Most often the cause is overwatering. With constant high humidity, the roots inevitably rot, and the above-ground part of the plant lacks moisture and nutrients.
Another likely cause of leaf shedding is over-fertilizing the pot. This can cause serious chemical burns to the roots, and the latter will no longer be able to fully perform their functions. Be that as it may, if you do not take urgent measures, your orchid will inevitably die.
Video “Orchids without leaves”
Video about how to revive an orchid without leaves, the reasons for the loss of leaves.
Main symptoms of root problems
You can determine that the phalaenopsis has begun to rot by the root system by the following signs:
- The leaves became soft and wrinkled. Their turgor is not restored even after watering.
- The aerial roots changed their color to dark, dried out, or, on the contrary, began to rot.
- Due to the loss of roots, the plant does not hold well in the pot.
- You can see green deposits or mold on the walls of the pot.
Even if one of these signs is present, the condition of the root system is definitely worth checking. Timely monitoring will help determine the condition of the plant and begin its immediate resuscitation. So, how to save an orchid without roots?
How to get your roots in order
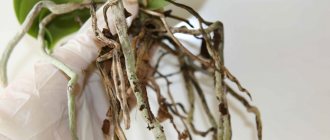
To save the flower, resuscitation measures should be resorted to immediately. Of course, we start from the roots. So, a healthy orchid root system meets the following characteristics: the roots are dense, elastic and uniform along their entire length, have a uniform color, they are dry, smooth and hard. If, when you take the orchid out of the pot, you see a completely different picture, it means the plant is sick. The affected roots will be slippery, have a changed shade, and destroyed thread-like root processes will be noticeable.
Don't panic, let's get down to business! First of all, we get rid of all damaged roots, including dried ones. Sprinkle all the sections with crushed activated carbon, then send the plant to dry for several hours. Next, we place the remaining roots in a fungicide solution - this will prevent the development of a fungal infection. Now you can treat the roots with a growth stimulator and plant the orchid in fresh substrate.
Nuances of root care
You can completely save an orchid even when only a few roots remain. In this case, the order of actions depends on their number and condition.
If there are few or no good ones left
When there is only one root left on the orchid rosette, and sometimes only “stumps,” the plant can be restored in a regular substrate. After removing the rotten parts, the cut areas are powdered with Kornevin. Then the orchid is planted in a small narrow pot (6-8 cm in diameter) and placed in a bright place. The temperature of the plant is moderate, since overheating at this time is destructive.
Important! If a peduncle has formed, it is cut off so that all efforts are aimed at the formation of healthy roots.
If they are bad and rotten
When all the roots on the rosette are bad or rotten, it is advisable to completely cut them off and restore the plant using one of the methods described above. Trimming old, rotten roots often exposes the beginnings of new ones and gives them the opportunity to grow. The procedure has a beneficial effect on the condition of the entire plant: it is rejuvenated and soon blooms.
What to do with a sluggish root system?
Slightly wilted orchid roots should not be removed from the outlet immediately. There are restoration methods that can bring the plant back to life:
- Transplantation into fresh soil. The plant is removed from the pot and soaked in warm water to remove the old substrate. If completely rotten areas are found, they are cleaned and the cuts are treated with charcoal. The new substrate is prepared from charcoal, pine bark, moss and perlite.
- Watering with softened water. Common ways to improve the quality of tap water are filtration, freezing followed by thawing, and settling for 2 days.
- Soaking in soft water. You can also soften the water by adding wood ash (3 g per liter), peat (100 g per liter).
If all recommendations are followed, the orchid will successfully grow new roots and continue growth and development.
5 / 5 ( 1 voice )
Normalization of microclimate
But manipulation of the root system alone is not enough; it is important to create suitable conditions for the plant to recover. The leading role here is played by temperature and lighting. A pot with a recovering orchid should be placed on a well-lit windowsill, but in slight shade.
It is important that the plant is not exposed to direct sunlight, otherwise it may suffer from burns. The temperature regime will depend on the variety of your orchid. Study the characteristics of your pet well, because for some varieties even +25 °C is already an extremely high temperature, leading to heat stroke.
Do not forget also about the need to regularly ventilate the room with the orchid, but at the same time avoid drafts.
Special preparations
In the painstaking task of resuscitating an orchid that has lost all its leaves, special supporting and restorative drugs will be useful. These can safely include all kinds of growth stimulants that strengthen the plant.
Here it is worth highlighting such products as “Zircon” and “Epin”. They are used to treat the surviving roots of the crop to speed up the regeneration process. But you shouldn’t get carried away and exceed the concentration allowed by the instructions, otherwise, instead of the expected positive effect, you can cause irreparable harm to the plant.
Simple advice on how to revive an orchid if even the roots have rotted
Indoor orchids are considered difficult to care for and maintain only because many novice gardeners' plants die due to loss of the root system. Is it possible, and how, to revive an orchid in which most of the roots that feed the flower have rotted or dried out?
The autumn-winter period is most dangerous for people from the tropics, where there are practically no seasonal fluctuations in temperature, light and humidity. In the warm season, actively growing, flowering orchids feel comfortable in natural conditions, easily tolerating the lack of lighting, heating and additional air humidification.
An orchid without roots can be saved. But by winter the picture changes. And the plant noticeably slows down its growth, consuming less nutrients and moisture. What is the reason that orchids die at home, and how to save a beautiful flower?
If the grower did not react in time to the change of season, did not adjust the care and maintenance conditions, the consequences in the form of weeping, rotting roots will definitely make themselves felt. How to save an orchid with rotten roots?
Having noticed that recently a living and healthy flower has become lethargic, the leaves have lost their juiciness, withered, and even watering does not help the plant recover, the gardener should be wary. The sooner the problem is discovered, the easier it will be to resuscitate the orchid, because without roots the flower will not be able to feed and will inevitably die.
A sick plant must be carefully inspected. Before resuscitating an orchid at home, you need to assess the situation and find out the extent of the damage. This is done by carefully examining the root system.
Living and healthy roots are always dense, with an elastic, uniform surface. The younger the rhizomes, the lighter their color, and when immersed in water or after abundant irrigation they become noticeably greener. Old rhizomes have a gray or brownish tint. But as long as they feed the leaf rosette and peduncles, the roots remain hard, smooth and dry to the touch.
Rotten and dead roots must be removed
Removing the substrate and washing the underground part of the plant will show a complete picture of the damage. A sign of rotting, bacterial or fungal infection is:
- darkening of rhizomes;
- the appearance of wet, slimy areas on them;
- flow of water when you press on the root;
- thread-like appearance of collapsed roots.
Unfortunately, rotten roots can no longer be saved, so they are removed, carefully trimmed to healthy tissue. Do the same with dried rhizomes. The loss of two or three roots, if the plant is properly cared for, will not affect its viability.
Why do orchid roots die?
The main reason for the rotting of an orchid is waterlogging during watering or planting in a substrate that is too dense. In the natural environment, the roots are on bark or stones and independently regulate the amount of moisture absorbed. At home, a constantly wet and dense substrate disrupts air circulation in the roots. Unable to cope with excess water, they begin to rot.
The reasons for disruption of metabolic processes in the roots and their death may also be as follows:
- Lack of moisture or overdrying of the substrate.
- Infection with fungi or bacteria.
- Watering with hard and saline water;
- Burns due to improper application of fertilizers or overfeeding. The thin roots of the orchid suffer from the increased content of macroelements in the fertilizer and begin to “burn”.
- Lack of lighting. With a lack of sunlight, roots stop developing and photosynthesis processes are disrupted.
Signs of decay appear on the leaves of the orchid and affect its general condition:
- the leaves lose their green color, become lethargic, and the tips dry out;
- the roots soften, darken, and become covered with necrotic spots;
- the orchid does not release a flower arrow and does not form new shoots.
Let's understand the problem
If a plant loses one leaf blade, then this is not a problem for it. But if the bush sheds all its leaves, then there is an obvious mistake in care and we need to figure it out so that this does not happen again. Reasons why a plant may lose its leaf mass:
- End of flowering period;
- Root system disease
All that was left of the orchid were the roots.
Sick plant roots are a reason to take emergency measures
If the root system is dead, then the leaves will not have enough nutrition and the bush will shed them . Therefore, it is necessary to organize watering in such a way that the roots of the plant do not begin to rot.
Possible reasons
Let's look at the main reasons why an orchid may lose its leaf mass:
- Poor lighting - an orchid can tolerate a lack of diffused sunlight for a short period. But if it drags on, the plant weakens, the leaves stretch out and become thinner. As a result they fall off;
- Loss of roots - roots most often die from rotting, since inexperienced gardeners often water their orchid without allowing the substrate to dry out;
- Overheating of the plant - under the influence of elevated temperature, the leaf mass evaporates too much moisture and the turgor of the leaf mass is lost, and, as a result, the orchid bush loses its foliage;
- Fusarium is a fungal disease that causes loss of foliage. If you start treating the plant in time, it will still lose some of its foliage, but the gardener will still have a chance to save the entire remaining bush.
How to distinguish a diseased and rotten root from a healthy one?
Even a beginner in growing orchids can distinguish a healthy root from a diseased one.
A healthy root has:
- The color of the root is light green with a silvery tint of velamen;
- Elastic;
- Does not deform when pressed;
- Roots growing in the thickness of the substrate acquire a light brown tint due to the lack of sunlight.
Damaged and problematic roots:
- They have a putrid odor ;
- Dark color;
- Soft to the touch;
- When pressed, a liquid with a putrid odor is released.
Sick and rotten orchid roots.
What to do with diseased plant roots?
If damaged roots are found, they must be cut with pruning shears to a healthy place that has a light cut.
The pruning shears are treated with alcohol after each plant that is being reanimated, so that if one of them is infected, it does not infect all the flowers that are at that moment under resuscitation.
After all areas affected by rot have been cut out, the sections are treated with one of the antiseptics:
- Activated carbon;
- Wood ash;
- Cinnamon.
After pruning and antiseptic treatment, the remaining root mass must be dried for at least 8 hours, after which the flower is planted in an appropriate substrate.
What to do if the orchid only has roots left?
If the orchid has only one root and part of the trunk left, then the grower and his ward have a chance to survive and continue their magnificent flowering.
Trimming all affected areas
Pruning the affected areas is the first step in resuscitating the plant. Anything that is dark in color, dried out, rotted, or turns into a liquid substance when pressed is cut out.
It is best to cut with pruning shears, as they are specially designed so that the cuts on the plant are quickly tightened.
Everything is cut down to healthy light-colored tissue without dark inclusions . If you don't have pruning shears, you can use scissors or a surgical scalpel.
IMPORTANT! After each plant, the cutting device must be disinfected in alcohol.
Thorough disinfection of sections
All cuts are well treated with a fungicide and any antiseptic so that rotting stops and no longer occurs on the plant.
If the plant is not treated and planted in a substrate , then after some time a complete loss of root mass will be revealed due to rotting. Therefore, this point in intensive care is very important and each section must be processed carefully.
Fungicide treatment to prevent the development of fungal diseases
The reason for the development of fungal diseases on orchid plants is improperly organized care. And most often this is excessive abundant watering, which affects the increased humidity inside the substrate.
This leads to the formation of pathogenic fungi that can destroy the orchid. To prevent this from happening, it must be treated with an appropriate fungicide . Among the effective drugs, experienced flower growers now highlight:
Transplantation into a new substrate
After pruning and treating the root mass, the orchid must be transplanted into a new substrate to avoid re-infection. Before transplanting, select a new pot according to the size of the root system.
If the old container still fits, then it should be thoroughly doused with boiling water to destroy pathogenic fungi.
Next, a layer of large bark is poured, which will serve as drainage. Then there is fine bark, into which the plant is planted so that the neck is on the surface of the substrate.
IMPORTANT! The first watering is carried out on the 5th day.
In water
Many experienced gardeners grow orchid roots in water. The options may also be different, so let’s consider everything in order.
Alternating soaking and drying
With this method, external conditions are preserved:
- the flower in the container is in a lighted place (but not in direct sunlight);
- air temperature is ensured +25…+26 ºC.
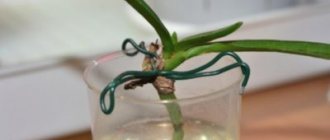
To immerse phalaenopsis in water, select a transparent container and place the plant so that the base of the roots is higher than the bottom.
Every day in the morning, pour a little water into the bottom of the container so that the roots of the plant are in it. After 6-10 hours, the water is drained, leaving the flower in this state until the next morning. In the morning the procedure is repeated again.
ON A NOTE! It is advisable to add special preparations (for example, kornevin) and fertilizers containing potassium and phosphorus needed by the plant to the water.
Also, honey, sugar, and glucose are added instead (no more than one teaspoon per liter of water).
Always in the water
Another method involves keeping the plant in water constantly, and changing the liquid every 5-6 days. This option is least suitable for orchids, since plants take a long time to grow roots, often rot, and even if they survive, they take root very poorly in substrates.
Above the water
Another way is to grow phalaenopsis roots above water. Similar to the first option, when drying and soaking is used, but in a different format. The plant is placed in a container of water, with the base of the roots above the surface of the water and not touching it. The container is closed from above.
Every day the plant is taken out (for example, in the morning), the roots are soaked in water with added sugar, then taken out, dried and placed again in a container over water.
IMPORTANT! The duration of soaking in sweet water is 60 minutes.
Upside down
A method is also used when it is not the base of the phalaenopsis roots that is immersed in water, but its leaves. To do this, you need to carefully place the plant in a container where water has already been poured. In this case, the leaves should be immersed in water only one third.
The base of the roots is exposed to air.
Every day, the upper part of the plant is irrigated with warm water from a spray bottle. In about 30-40 days, the phalaenopsis will produce the first roots.
ON A NOTE! Activated carbon must be added to the water where the leaves are immersed.
After the first roots appear at the base, the plant is placed in a transparent pot with sphagnum moss, where it will grow further. This option is convenient because not only the roots of phalaenopsis actively grow, but new leaves are preserved and even appear.
In the substrate
Very often, gardeners revive the roots of phalaenopsis not in water, but in special substrates. Many say that this option is more suitable for plants that have at least small (2-3 cm) roots. But for plants without roots, growing in a loose substrate can also be successful.
The general rules are:
- any substrate for phalaenopsis must be moist (but without excess moisture content);
- It is useful to spray orchid leaves for better growth with a special solution with vitamin B1.
Types of substrate for growing phalaenopsis roots:
- tree bark (fine fraction materials are used, which must be well steamed and dried);
- a mixture of fine expanded clay, crushed bark, sphagnum (expanded clay is used as a drainage layer);
- tightly compacted sphagnum moss.
If the plant was completely devoid of roots, then it will take a long time for regrowth - up to 10-12 months. In phalaenopsis, which have at least tiny roots, the process goes faster.
You may be interested in: How to care for orchids in a pot after purchase Why the leaves of an orchid wither and how to save it Features of the care and propagation of the Dendrobium Nobile orchid
On the bark
This method is rarely used, since the plant needs to create optimal humidity levels. In dry air, roots will not grow.
Phalaenopsis must be fixed on a piece of bark, and to stimulate growth, treat the plant with a special solution with vitamin B1. There is no need to water or even spray the flower.
The period for roots to appear is three months, but it is quite possible that there will be a longer wait.