Briefly about the flower
Phalaenopsis is a perennial herbaceous plant belonging to the Orchidaceae family . It is an epiphyte and grows on tree branches or snags without parasitizing them. Phalaenopsis prefers a humid tropical climate, so it can be found in the forests of Australia, the Philippines and Southeast Asia.
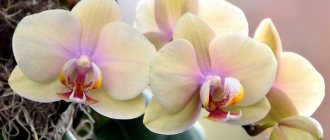
It grows only upward and can reach a height of 50 cm. Large, colored phalaenopsis flowers look like the wings of butterflies, which was the reason for the name - Phalaenopsis (moth-like, night butterfly).
The importance of periodic replanting
Transplantation is a mandatory procedure when caring for a plant , because its health and development depend on it.
Phalaenopsis needs periodic replanting, since every 2-3 years it is necessary to replace the compacted substrate with a new one.
In addition, the continuous development of the plant’s root system also requires replacing the container in which it is located from time to time. These factors cannot be ignored, since the lack of periodic flower transplantation can lead to the development of diseases and its death.
We talked in detail about how and when to replant a phalaenopsis orchid at home in a separate article.
Features of caring for a transplanted orchid
Once the Phalaenopsis orchid transplant is completed, it requires normal care at home. For this plant, the following are important:
- Lighting. Phalaenopsis orchid loves bright, diffused light. Direct sunlight leaves burns on its leaves. The sun's rays do not harm the plant in the morning and evening hours;
- Watering. Water the plant by immersing the pot in water for 20-30 minutes. Then they take it out and drain the water. Watering is carried out only when the substrate in the pot is completely dry. For irrigation use warm and soft water;
- Air humidity. Phalaenopsis is moisture-loving. Air humidity around the plant is maintained by spraying. You can keep pots with plants in a deep tray with moistened moss or expanded clay;
- Temperature conditions. The optimal temperature for growing phalaenopsis is the range of 23-30°C. The temperature should be stable throughout the year. Phalaenopsis does not like sudden changes in temperature and cold drafts;
- Feeding. Feed the plant every 2 weeks with special fertilizers for orchids. They are added to water, which is then used for irrigation.
Causes
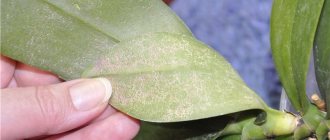
A disease of the root system of a plant can be identified by such signs as: yellowing of the leaves, dark color of the roots, their drying out and the appearance of black spots on them. Occurs most often due to improper care of the plant (excessive watering, low air temperature).- Depletion of the plant's substrate - over time, the soil tends to cake and form dense lumps, as a result of which it prevents the access of air to the roots and causes oxygen starvation of the plant. This can be noticed by changes in the consistency and color of the soil, as well as rotting of the substrate.
- The growth of plant roots leads to enveloping the entire space and clogging the drainage holes with roots. As a result, the soil becomes waterlogged, since water does not seep through the clogged drainage holes.
- Pest damage - most often the plant is attacked by mealybugs. If spraying does not help get rid of pests, a flower transplant is necessary.
What to consider when choosing a pot
Phalaenopsis must be replanted in a special orchid pot. When choosing it when transplanting phalaenopsis, you need to consider:
- Material of manufacture. The orchid needs a transparent pot. Its roots participate in the process of photosynthesis, and therefore have a characteristic greenish tint. You can purchase budget pots of various sizes made of transparent plastic. Expensive natural glass orchid pots are also sold;
- Size. The pot should be large enough to accommodate the root system. Only 1-2 uppermost aerial roots can remain on the surface. The remaining roots should be immersed in the substrate;
- Construction. The design of orchid pots can be very different. There are double pots with flowerpots and regular single flowerpots without trays. The main thing in their design is drainage holes. There should be several of them at the bottom. A good design has holes on the sides of the pot to allow air to reach the roots of the plant.
When can the procedure be performed and when not?
It is recommended to replant phalaenopsis only after flowering. Interference with the root system of a plant at this time can lead to disruption of its flowering, shedding of buds, and possibly to the death of the flower.
It is not recommended to replant phalaenopsis after purchase if it is in high-quality soil (read about how to care for phalaenopsis after purchasing it in a store). It is better to replant the plant a year after purchase . The exception is if after purchase:
- phalaenopsis loses its balance and cannot be in an upright position due to large foliage or an unsuccessfully selected container;
- there is a small amount of substrate in the pot, which is why the plant dangles in it;
- The roots of the plant are in poor condition. In this case, the diseased parts of the plant are cut off, treated with activated carbon and planted in new soil.
Season
The best time to transplant a plant is spring, approximately March-April .
At the end of April, after the dormant phase, active growth of phalaenopsis roots and leaves begins, so it is recommended to replant the plant before this time. It is worth considering that if the phalaenopsis bloomed in the spring, it is better not to replant it, so as not to harm it by interfering with the root system. It is better to start replanting after flowering has ended.
Emergency move to a new potty
Carried out in the following cases:
- Complete decomposition of the soil . This is evidenced by its ability to retain moisture for a week or more.
- Root system disease . The roots of the plant become black and dry out, the leaves fall off or look sickly.
When to replant: the main reasons for replanting
It should be borne in mind that transplanting into a new container is a certain test for the flower. Therefore, throughout the entire process, it is important to be very careful and do everything correctly.
The main reasons for replanting an orchid are soil that has outlived its time and a container that is too small for the plant. As for the period when it is preferable to replant orchids at home, this is the spring season, as the plant begins to actively grow.
Watch the video on how to replant an Orchid.
There are several external signs indicating the need for an orchid transplant:
- If you notice that a lot of free space has formed in the container and the soil has almost completely settled and crumpled. In this case, try to wait until the budding period ends and the plant begins to produce new leaves and roots. This is the best period for replanting an orchid, during which it becomes well established.
- If there is a noticeable smell of dampness, mold or rotting leaves.
- If after watering the container becomes heavier than usual.
- If the roots of the orchid have darkened and acquired a gray or brown tint. If rotten roots are detected, the orchid must be urgently replanted. Healthy orchid roots should be green.
- If the orchid has a faded appearance.
Regarding whether it is possible to replant an orchid in the fall, we note that replanting is still permissible in September-October. However, in November, as daylight hours shorten, the orchid begins to enter a resting phase.
Therefore, if replanting a plant is not required for any urgent reasons, then it is better to postpone it until spring.
How to choose a pot for transplanting at home
If you have purchased an orchid and are wondering how to replant it in another pot, and in which pot it should be planted, our tips will come to the rescue. When choosing a pot for an orchid, you should initially rely on the type of orchid and the future conditions of the plant. In ceramic flowerpots, the roots will grow to the walls and break when transplanted.
- To ensure that the orchid's roots are not damaged and you have the opportunity to monitor their condition, it is recommended to plant the plant in transparent plastic pots.
- In addition, the plastic container helps maintain the required level of soil and root moisture. As for the size of the container, the new pot should be slightly taller and wider.
If the proximity of a simple plastic container to a flower of exotic beauty is unacceptable to you, place the pot in an elegant glass container or a beautiful basket.
This trick will disguise the plastic and further highlight the splendor of your orchid. The void around the container with the plant can be filled with decorative stones and shells.
Before transplanting your orchid into a new pot, prepare the soil.
Soil for growing orchid flowers
During active growth of orchids, it is recommended to feed them with a weak solution of mineral fertilizers. The easiest way to do this is to use a complex mineral fertilizer. Fertilizing is carried out very carefully every 10-15 days, for epiphytic species - in a weaker concentration.
The proportions of the land should be as follows:
- Epiphytic orchids are grown in baskets or perforated pots and bowls. The generally accepted substrate for growing orchids is a mixture of crushed fern roots and sphagnum moss in a 2:1 ratio with the addition of pieces of charcoal.
- Orchids can also be grown on crushed pieces of pine or spruce bark or on a mixture of bark, broken shards and charcoal in a ratio of 1:1:0.5.
- Many orchids grow successfully on blocks of pine, cork or oak bark.
- Terrestrial orchids are grown on a mixture of leaf soil, peat, humus and river sand; some species are grown on a looser mixture of rotted leaves and fibrous peat.
In all cases, charcoal and broken shards are added as a leavening agent.
Nuances depending on flowering
For phalaenopsis there are uniform transplantation rules. However, the phase of plant development should be taken into account :
- Transplantation of flowering phalaenopsis is carried out only in emergency cases, when the flower is diseased or damaged by pests. If the plant is not in danger, it is recommended to postpone replanting.
- When replanting a non-flowering phalaenopsis, you need to remove damaged leaves and roots, if any. Then leave the plant in a weak solution of potassium permanganate for 5 minutes. The soil prepared for planting phalaenopsis is treated with the same solution. After this, the plant is washed with warm water and treated with Fitoverm.
- Transplanting a faded phalaenopsis is carried out in the same way as replanting a non-flowering one. Also, to reduce the load on the plant, you need to remove the peduncle.
How often to repot?
Flower growers agree that Phalaenopsis needs to be replanted at least every 2-3 years. During this time the following happens:
- The substrate partially decomposes , loses its breathability, becomes overgrown with moss and becomes saturated with salts.
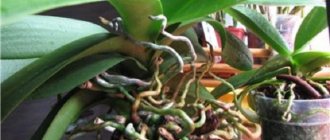
- The central part of the root system dies from waterlogging, poor aeration, and excess salts. The roots braid the walls of the pot and sprout from the drainage holes.
- The stem grows from above , becomes bare, and often hangs sideways from the pot - this is a biological feature of growth. The green mass outweighs, the pot may tip over.
- Young roots growing from the stem suffer from drying out, especially in winter.
All these signs mean that the time has come for a transplant. Prepare a pot for the orchid. Phalaenopsis is buried in it to the level of the lower leaves. The part of the stem that has died from below can be broken off.
Transplant methods
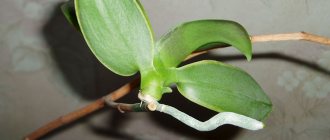
One of the ways to transplant phalaenopsis is to separate the baby, that is, the young shoot of the plant.
The baby is separated when its roots reach a length of 5 cm.
To separate the baby you need:
carefully cut off the baby from the mother plant;
- half an hour after separating the baby, sprinkle the cuts with charcoal powder;
- put a small amount of expanded clay on the bottom of a plastic pot and place the baby in the center, straightening its roots;
- pour fine bark into the pot, put a layer of wet sphagnum on top;
- After 2-3 days the baby can be watered.
Another method is cuttings . To do this, separate the faded stem or side shoot from the plant, which must have at least two axillary buds. These cuttings are first grown on a moist substrate in a small greenhouse and then transplanted into the ground.
What substrate is needed for the plant?
An orchid is transplanted into soil of a certain composition. The soil or substrate for a phalaenopsis orchid should not consist of soil, even partially. It is also desirable that there is no peat in it. The basis of the mixture for orchids is dry pine bark.
This material occupies more than half of the substrate. Pine bark should not be too fine. It is desirable that its pieces be cubic in shape. The soil for orchids may also include:
- Dry sphagnum moss;
- Chopped fern roots;
- Pieces of charcoal;
- Pieces of foam;
- Dry pine needles.
These ingredients are taken equally and in a volume of 1/5 of the pine bark included in this substrate. Making soil for an orchid with your own hands is very difficult and time-consuming. It’s easier to buy a ready-made substrate at a flower shop. When purchasing, you need to pay attention to the composition of the soil.
Step-by-step instruction
Preparatory stage
Before transplanting, you need to prepare the necessary materials and tools in advance. For this you will need:
- a transparent pot 2-3 cm larger than the previous one, so that you can freely place the roots of the plant in it (read about how to choose the right pot for phalaenopsis here);
- sharp scissors for cutting off diseased parts of the plant, if any are found;
- substrate for orchids from pine bark and sphagnum moss (bought in a store or prepared independently);
- support for stability;
- means for sterilizing instruments;
- activated carbon, chalk or cinnamon to treat cut areas.
Removing from container
You should remove the plant from the pot very carefully so as not to damage the roots , which are quite long, tangled and tightly attached to the substrate.
To easily remove the flower, you need to knock on the walls of the pot and gently knead it with your hands. You can place the pot with the plant in warm water for 30 minutes, and then also gently mash it.
If you cannot get the flower, you should cut or break the pot and carefully remove the orchid.
Washing and inspection
After removing the plant, carefully shake off the remaining substrate from the roots.
- Then the orchid is lowered into a basin, the roots are filled with warm water and left for 15-20 minutes.
- After this procedure, the soaked substrate will be much easier to separate from the roots. If some remnants of the substrate are firmly attached to the roots, it is better to leave them so as not to injure the plant.
- After washing the plant, you should carefully inspect it for the presence of pests, and also make sure that the roots of the plant are healthy.
What to do if pests and problems are found?
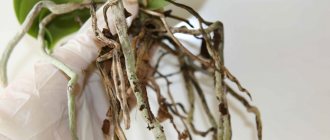
Healthy phalaenopsis roots should be dense, elastic, without soft wet spots, and green or white in color. If the plant has dry, darkened or damaged roots, they must be removed with disinfected scissors.
The sections are treated with crushed activated carbon, cinnamon or chalk . Dried yellow leaves should also be removed. To do this, they are first cut along the central vein, and then pulled by the ends in different directions, thus removing them from the stem.
The breakage areas are treated with activated carbon or alcohol-containing preparations. If pests are found on a plant, it must be treated with a special compound according to the instructions. Before treatment, it is necessary to remove all diseased areas of the plant.
Placement in a new pot and soil
- A drainage layer of expanded clay, pebbles or pieces of cork tree bark is placed at the bottom of the pot.
- Next, you should place the phalaenopsis root system in the pot.
- While holding the plant suspended, you need to carefully fill the spaces between the roots with fresh substrate (you can find out what the soil should be like for growing a phalaenopsis orchid here).
The orchid should be firmly fixed in the pot, located in the center, but not located too deep in the substrate to avoid rotting of the lower leaves. It is better to place these leaves on the surface, and cover the top ones a little with bark.
Is it possible to replant a flowering orchid while it is blooming?
You can replant orchids during flowering, but in the most urgent cases.
There is only one situation in which you can replant a blooming orchid - if it is in danger of dying for any reason and you need to choose one of two:
- The orchid will fade, but then die, having spent its last energy on flowering.
- The peduncle is cut short, but later with good care, the plant is completely restored and after a while it will bloom again.
What to do in the second case? Adviсe:
- Prepare fresh substrate and pot. How to do this has already been said above in the text.
- Cut the flower stalks of the orchid to about 2/3 of the length. By the way, the flowers can be placed in water - they will last for almost a week.
- Carefully remove the plant from the pot and inspect the roots, cutting out any rotten ones.
- If the substrate is in normal condition, i.e. there is no mold or its smell, it is not overdried or, on the contrary, very waterlogged, then in this case you need to try to preserve it as much as possible without shaking off the roots. Otherwise, proceed as with a regular transplant, the procedure of which has already been described.
- Now you need to place the plant in the pot and secure it well there.
All that remains is to put the orchid, transplanted during flowering, into the greenhouse and observe how it will feel further. Do not forget to follow all the rules for caring for this flower, which are no more complicated than the rules for caring for other indoor flowers.
How to properly care after the procedure?
- After transplantation, you need to place the phalaenopsis in a shaded place, protected from drafts, for about 10 days. If for some reason this cannot be done, the plant should be sprayed and covered with a plastic bag. To avoid fungal diseases, you should ventilate the plant every day for 1-2 hours.
- The temperature in the room with the orchid should be +20-22°C.
- For the first 3-4 days, phalaenopsis does not need watering. You can spray the moss, while carefully ensuring that no water gets into the axils of the leaves.
- For the peduncle you need to make a support, and if necessary, more than one. You can use a bamboo stick with a clamp as a support.
After 2-3 weeks, the transplanted plant should fully adapt to the new substrate . From now on, phalaenopsis can be watered by soaking (we talked about how often to water the plant at home here).
- To do this, lower the orchid pot into warm water for 5 minutes, gently holding the bark.
- Then remove the pot, let the water drain and put the plant back in place.
You should also spray the plant daily and feed it during the spring-summer season.
Follow-up care at home
After transplantation, the orchid needs favorable conditions that must be created for its successful establishment in the new soil. It is very important to maintain suitable temperature, humidity and light conditions.
Watering
The process of watering orchids occurs when a flower pot is placed in a container with warm water for 15 minutes. When the substrate is completely saturated with moisture, the water must be drained. It is better to use boiled or purified water.
This video talks about how to water phalaenopsis:
Fertilizer
After transplanting the orchid, it is recommended to start fertilizing only after three to four weeks.
- To feed phalaenopsis, it is better to use specialized liquid fertilizers containing nitrogen, phosphorus and potassium (Kemira Lux, Cameleon, BonaForte). Fertilize after watering twice a month, diluting the fertilizer with double the volume of water compared to that specified in the instructions , or an even less concentrated solution after each watering, once a week.
- You can use stimulants and adapters to improve the growth of phalaenopsis (Epin, Zircon).
Standard feeding of orchids is carried out in spring and summer, before the first bud appears. During the flowering period, root fertilizers are replaced with foliar fertilizers, and in winter the plant is not fertilized.
Important. It is not recommended to use folk remedies or universal fertilizers for indoor plants to feed orchids.
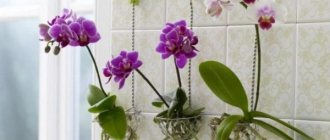
Photo
In the photo below you can see a phalaenopsis transplant:
Consequences of errors
Transplanting phalaenopsis during flowering can lead to weakening of the plant , dropping flowers, stopping flowering and poor growth. Such a flower will be significantly weakened and may become less resistant to diseases.
Timely transplantation of phalaenopsis and proper implementation of the procedure are the key to the healthy development and functioning of the plant. By being careful and following all recommendations, you can avoid possible mistakes and negative consequences for the flower.