The Phalaenopsis orchid is considered one of the most unpretentious species of these exotic plants to keep at home, and therefore is especially popular among beginner gardeners.
It propagates by two methods - sowing seeds and vegetatively (by dividing the rosette, peduncle cuttings and children). The latter is considered simpler and more accessible for a novice gardener.
When is a plant ready to reproduce?
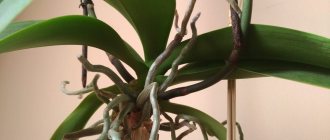
Only absolutely healthy adult (from three years old) plants are suitable for propagation. Excellent health is indicated by a developed root system and the absence of signs of damage by pathogenic bacteria or insects. A flower ready for propagation must have at least five leaves. It is also advisable to propagate an orchid when the flower is already old. We will tell you further how to propagate a plant with the help of children.
Appearance
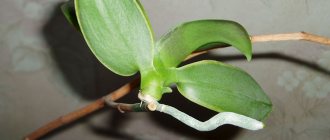
Phalaenopsis orchid babies are small-sized shoots that have a sharp tip at the initial stage of development (in contrast to the peduncle thrown out by the plant, which has a rounded tip).
Children may appear:
- on the roots;
- peduncles;
- stems.
A baby orchid is often called a “keik” (from the Hawaiian word “keiki” - baby).
The offspring grows for six months, releasing leaves and roots. If the leaves did not appear, it means that these were not babies, but flower stalks, which will eventually develop flower buds. To transplant the kindergarten into separate pots, you need to wait until their roots grow sufficiently long (from 3 to 5 cm).
Rooting and caring for children
If all manipulations are performed correctly and the plant is ready for reproduction, after 10-14 days the treated bud swells and wakes up. The development of the shoot on the mother plant continues for up to six months . By the time of separation, the baby should grow 5-6 young leaves and release its own aerial roots 3-5 cm long.
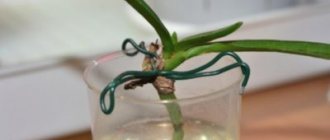
To speed up the emergence of roots, a nest of damp moss is built at the base of the shoots. To create a greenhouse effect, wrap the top with cling film.
Sphagnum moss is attached to the peduncle with a thread.
Tip #1. To stimulate the formation of roots, the substrate at the base of the rosette is irrigated with the preparation “Kornevin”, “Epin” or “Heteroauxin”.
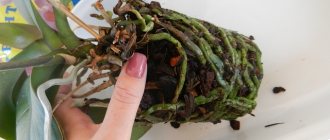
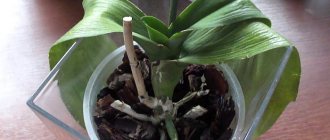
The grown-up baby is separated from the mother plant along with a fragment of the peduncle and planted in a separate container.
When separating the process, the cut sites are treated with charcoal powder.
At the bottom of the pot, drainage is laid out from pebbles, expanded clay, crushed brick, and pieces of polystyrene foam. The roots are sprinkled with fine-grained substrate used for this type of orchid. As a rule, this is pine bark, charcoal, peat, sphagnum moss. Watering the young plant begins 2-3 days after transplantation; further care is identical to that of an adult orchid.
A rooted baby is cared for in the same way as an adult plant.
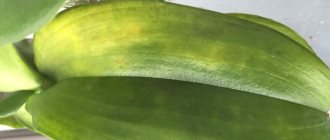
Sometimes the lower pair of leaves of a young orchid begins to turn yellow and fade. There is nothing wrong with this, it’s just that the nutrients accumulated in them are spent on the development of the rhizome. These leaves should not be removed; they will fall off on their own over time.
Conditions for appearance
Seasonality is very important for obtaining offspring. The most suitable period is considered to be the beginning of March and the beginning of September. At this time, the flowering phase ends (the plant no longer produces young flower stalks, and there are no new buds on the old ones). But the orchid should not be in the resting phase, when the leaves do not grow and the roots are not active.
To stimulate the reproduction of a plant by children, it is necessary to create certain conditions:
- Provide plenty of sunlight. You can replace it with an ultraviolet lamp.
- Control the average daily air temperature (it should be from + 25 to + 30 ° C) and humidity in the range from 25 to 85%.
- Before the onset of a favorable period, introduce two-a-day feedings of nitrogen at intervals of two weeks. Fertilizer should be selected in an NPK ratio, which corresponds to 7-3-6.
- Cut the peduncle to the level of the first dormant bud.
It often happens that the baby that appears on the peduncle slowly grows roots. To stimulate the roots, you can wrap them around the peduncle with a small amount of sphagnum, attaching the moss with improvised material, such as thread.
Sphagnum must be constantly moistened, not allowing it to dry out too much.
Children's education
As a rule, at home, orchids, with the exception of Phalaenopsis and Dendrobium, are reluctant to form lateral processes. You can wait for years for the plant to produce children suitable for reproduction. Therefore, gardeners stimulate the plant with hormonal drugs.
Orchids form babies on any part of the plant.
| Location of children | Conditions of appearance | Procedure for separating babies |
| On the rhizome | Appear when creating an optimal microclimate for the plant | The young plant is separated from the mother rhizome during transplantation |
| On the stem | Appears on an old or problematic plant | Separation of stem children is not practiced to avoid the death of the entire plant |
| On the peduncle | Appear naturally or after stimulation with phytohormones | When growing its own roots, the baby is separated from the peduncle and planted in a separate container |
Features of formation
Growing orchids at home is not so difficult if you create conditions that are close to the plant’s natural growing environment.
How to grow on a cut peduncle?
The procedure consists of several simple steps:
- Cut off the flowering stem at the very base.
- We cut it into fragments 3–4 cm long so that in the middle of each part there is a “sleeping” bud.
- Sprinkle the sections with activated charcoal or charcoal.
- We place the chopped pieces of the stem in a prepared small plastic container with damp sphagnum moss laid in it.
- We provide optimal conditions - temperature +25...+28 °C and humidity 25–85%.
- Future children should be in an improvised mini-greenhouse until the roots sprout.
On the roots
The baby sometimes appears on the mother's root. The shoot makes its way through the bark. To separate the offspring from the root of an adult plant, you need to carefully cut off the baby along with a piece of it.
The separation procedure should be carried out when the baby grows roots at least 3 cm long.
On the stem
Offspring on the stem can appear on both healthy and dying flowers. A dying orchid produces offspring in the following cases:
- due to excessive watering, which leads to rotting of the roots;
- stem injury or death of the growing point.
Professionals do not recommend separating the baby from the dying mother, since the baby will not survive on its own. Wait. The mother plant will die over time, and a young plant will take its place.
Methods of propagation of the Phalaenopsis orchid
In order to propagate the Phalaenopsis orchid, there are several ways; below we will consider each of them in detail.
Stem division (peduncle cuttings)
One of the common methods of propagating the Phalaenopsis orchid is vegetative propagation, or cuttings - dividing the stem of the peduncle into parts. The optimal season for this is late spring - early summer.
We take cuttings from the trunk
To begin, prepare the plant for cuttings: remove the lower leaves.
- Sterilize the sections with charcoal or activated carbon.
- Provide the plant with the most comfortable conditions possible. Use as many different fertilizers as possible.
- When new roots grow above the cuts, make a cut slightly below the new roots that have appeared.
- Sterilize the sections.
- Plant the cut cuttings into the soil.
- For two days, do not water or moisten the soil in any way; let the young cuttings dry.
- Provide the young orchid with optimal conditions.
- After a few months, new plants will appear from the stump.
You can learn more about cuttings from an orchid peduncle from the video below:
How to grow in water?
Phalaenopsis orchids can be propagated by cutting off the peduncle. This method is suitable when the mother plant is very sick and cannot be saved.
How to propagate phalaenopsis in water?
Carefully cut off the flower stalk of the plant.
- Place it in a bottle with the neck cut off by 5 cm, pour soft purified water into it and add one tablet of activated carbon. The peduncle should be submerged under water by 4-5 cm with the lower, cut part.
- Awaken the sleeping phalaenopsis bud by carefully cutting off the semicircular scale covering the bud with a sharp razor and lubricate it with cytokinin ointment, which can be found in any flower shop.
- Repeated ointment treatment will be required every week for a month.
- Change the liquid in the bottle along with the bottle itself once a week.
Important conditions for caring for cut peduncles
- The temperature should not exceed 25 and not exceed 28 degrees; under other conditions, not a baby, but a peduncle will grow from the bud.
- In addition to activated carbon, you can add mineral fertilizer to a bottle of clean water in a concentration of 1:4 of the usual concentration.
- Separate the baby when the young plant has 3-4 leaves and roots of at least 3-6 cm. Simply cut it off along with part of the peduncle, plant it in a transparent pot filled with bark and do not allow direct sunlight.
How to drop off children
It is important that the plant has already left the flowering phase, is absolutely healthy and has a peduncle no older than 1.5-2 years.
The baby itself looks like a bud located on a peduncle.
Important terms:
- It is advisable to begin stimulating bud growth in February. The flower should be placed on the western or eastern side, shading the leaves and allowing the sun's rays to fall only on the peduncle.
- The temperature during the day should reach 27 degrees, and at night it should be around 16-17 degrees.
- It is advisable to reduce watering of phalaenopsis to a minimum.
- No fertilizing should be done until the bud wakes up. After about a month of such care, the dormant kidney wakes up.
After the kidney wakes up you need:
- Move the plant to a warm but shaded place. Do not expose your baby to direct sunlight.
- Normalize your plant's watering schedule.
- Apply foliar fertilizers, that is, on the leaves. When the plant has developed sufficiently, you can begin to add roots. After about six months, the baby will have 2-3 leaves and roots longer than 2-3 cm; you will need to carefully separate it from the mother plant and replant it in a pot.
You can learn more about the propagation of Phalaenopsis orchids by children from the video below:
How to propagate using cytokinin paste?
The method of propagating the phalaenopsis orchid using cytokinin paste is one of the simplest and most rewarding. It is best to use this method at the end of winter or spring, when the plant has the most vitality and energy.
Attention! Cytokinin paste can only be stored in the refrigerator!
So, to start growing a bud on a peduncle stem using paste, you need to follow the instructions below.
- Using a sterile knife or needle, scratch the surface of the peduncle.
- Apply approximately 1.5-2.3 millimeters of paste to the scratch area. After about 10 days, the bud will begin to emerge. The best option is to apply the paste using a toothpick. Apply it a little more; if the amount of cytokinin paste is insufficient, a new peduncle will appear, not a bud.
- To awaken a nascent bud, cut off the scales protecting it and apply the same amount of paste to the bud.
- After 10-20 days, the bud will awaken, let it grow two to three leaves and 3-5 cm roots and plant the baby in a pot. Do not expose to sun.
Propagation by seeds with photos at home
Propagation by seeds is one of the most difficult methods; previously it was considered impossible. The main reasons why this method is not used very often and takes so much time and effort:
- Orchid seeds are very small and it is almost impossible to see them with the naked eye.
- They lack endosperm. Endosperm is the tissue that surrounds the embryo, nourishes it and prevents harmful environmental influences from damaging the embryo.
- Any interaction with the environment, diseases and deviations from care standards leads to the death of the plant.
How to grow a phalaenopsis orchid from seeds, step by step instructions?
To get orchid seeds yourself, you need to carefully pollinate the flower with a toothpick, as in the photo below. Or you can buy ready-made seeds.
After successful pollination, the orchid capsules begin to grow.
After 6 months, the pods with Phalaenopsis orchid seeds ripen.
Next, we extract the seeds from the box.
To take the next step you need to prepare a nutrient medium for the plant. There are several recipes for preparing a nutritional mixture.
Recipe 1
You will need 10-20 grams of agar-agar powder, 10 grams of fructose, the same amount of glucose, a little phosphoric acid, calcium carbonate, and about 200 ml of purified water. let the agar-agar swell in water, pour the jelly you received into boiling water and add fructose with glucose, calcium carbonate and acid. Stir until you get a homogeneous substance without crystals.
Recipe 2
Another recipe for a growing medium. We need:
- 400 ml distilled water;
- 100 ml tomato juice;
- 20 grams of sugar;
- 40 grams of banana;
- 0.5 ml fertilizer for orchids;
- 2 tablets of activated carbon;
- 0.5 g honey.
You need to grow orchids in glass tubes with sealed stoppers. If you don't have such test tubes, use small jars with very tight-fitting lids. Thoroughly sterilize the jars, pour in 30-50 ml of the nutrient mixture.
Attention! It is very important to make the environment sterile, otherwise the plants in the mixture will grow mold and the plants will not germinate.
Re-sterilize the jars by pouring the resulting solution into them in a water bath and leave for 3-6 days to make sure that the disinfection was successful. If mold appears, this solution cannot be used!
Cover the seeds with a 1% chlorine lime solution and leave for 15-20 minutes. During this time, actively shake the container 3-5 times.
Take a small saucepan with boiling water, cover it with a grid with cells in which you can secure flasks or jars with nutrient medium. The lids should also be kept nearby for disinfection.
Gently remove the seeds from the bleach solution and place them in the growing medium using a sterile syringe. Carefully close the containers and place them in the greenhouse.
After six months, carefully open the containers. If the seeds germinate successfully, you will see sprouts in the jar as in the photo below.
Pour in 40-60 ml of warm water and shake until dissolved. Pour the resulting substance into a wide bowl and add 2-5 drops of 1% Furnadzol solution. Now leave your sprouted seeds for 15-20 minutes.
Now, using the smallest, thinnest and softest brush, plant the germinated seeds one at a time in pots with nutritious soil made of bark and moss. Add crushed fern roots and several crushed activated carbon tablets to the soil.
After about six months, it will be possible to transplant the seedlings into soil intended for adult plants. Unfortunately, flowering of orchids grown in this way should not be expected earlier than after 4-7 years.
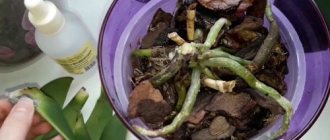
How do Phalaenopsis reproduce by roots?
Even a beginner can propagate an orchid by roots.
- Lift the plant above the pot and carefully remove the soil.
- Cut the rhizome with a sterile knife or pruning shears, leaving 2-3 pseudobulbs per sprout.
- Sprinkle the cuts with charcoal powder.
- Plant each separated part in a separate pot with fresh soil, spray twice a day until real leaves and good roots appear. After some time you will have a healthy plant!
Dal cake: what to do and how to separate?
A baby that can take root has developed roots from 3 to 5 cm long and a pair of formed leaves. In order not to injure either the baby or the mother plant, it is necessary to correctly and extremely carefully separate the shoot. For this purpose, it is best to arm yourself with a sterile scalpel.
The shoot must be cut with a gap of at least 1.5 cm.
After disconnecting, the baby should dry for about half an hour. Then the sections should be treated with activated carbon. You can use cinnamon or pharmacy greens instead.
Baby on an orchid peduncle
In order for a baby to appear on a peduncle, certain growing conditions are required , namely:
- high humidity;
- quite a lot of diffused sunlight;
- The ambient temperature is not less than 25-27 degrees Celsius.
If these conditions are created for the flower, then soon after flowering you can expect the appearance of babies .
IMPORTANT! If the humidity is low, then the lateral peduncle will grow instead of the children.
Appearance
At the first sign of growth of a waiting bud, impatient flower growers want to know how to determine whether a flower stalk or a baby has emerged from it. Experienced flower growers will help here; they are of the opinion that on the 5th day the growing peduncle has a sharp growth tip, and the baby has a rounded tip .
But it will be completely clear what came out of the waiting bud on the 10-15th day.
Photo
Below you can see several photos of the baby on a peduncle . First, a rosette of young leaves develops, and then roots will appear.
Soil and container
Before planting the baby, you need to prepare the substrate and container. Standard drainage for orchids with the addition of sphagnum moss and peat is suitable as soil. And instead of a pot, you can use a regular plastic cup, since orchids do not like spacious containers. Holes must be made in the bottom of the cup and on the sides to allow excess moisture to escape.
Step-by-step landing instructions
Dropping off a baby is quite simple:
- Fill one third of the cup with drainage.
- Add some substrate.
- Carefully place the baby so that the growth point of the layer is at the same level as the edges of the cup.
- Carefully spread the roots to the sides.
- Sprinkle the substrate on top. To compact it in the container, tap it lightly on the walls, rather than compact it with your hands (to avoid damaging the roots).
How to wake up sleeping kidneys?
Babies are new miniature plants with their own roots and leaves . Most often, baby orchids appear on their own. In cases where you want new seedlings, but an adult plant does not produce them, artificial stimulation is required. To do this, you can use hormonal cytokinin paste. It helps awaken dormant orchid buds and forms shoots.
It is necessary to carry out the following agrotechnical measures:
- carefully open the upper and lower dormant buds on the peduncle, removing the scales with tweezers (toothpick);
- Apply a small amount of paste to the kidney with a cotton swab;
- carry out the procedure in early spring;
- ensure a comfortable temperature regime (+27 – 30°С);
- Spray the treated areas regularly to prevent the paste from drying out.
Important : no more than three dormant buds can be treated with cytokinin paste. It is recommended to stimulate baby growth only on a healthy plant that is 3 or more years old.
Usually babies appear within two to three weeks after the procedure.
We invite you to watch a video on how to awaken sleeping buds on an orchid:
Home care
After planting, you must adhere to some rules:
- Do not water the young plant immediately after planting and during the first four days.
- In the future, instead of regular watering, organize moistening of the substrate from a sprayer.
- Switch to the traditional method of watering and normal care when it becomes clear that the baby has taken root.
- At first, you can add a small amount of growth stimulator to the water for irrigation.
- The first feeding is carried out no earlier than a month after transplantation.
- Provide the plant with a comfortable temperature, humidity and light conditions.
If you follow all the recommendations, then in 4–6 years the plant will thank you with beautiful and lush flowering.
How to make an orchid sprout?
In order for an orchid to need to produce offspring, the conditions of its existence must be a little uncomfortable. If a flower is in ideal conditions, it will produce offspring very reluctantly or not at all.
Among the natural methods of stimulating an orchid to procreate, the following are considered the most effective:
- constant diffused light for 10–12 hours;
- consistently high temperature during the day and its drop at night with a difference of up to 10 °C;
- limited watering;
- permanent humidity at 50–60%;
- increased nitrogen content in the fertilizer.
Attention! Some gardeners recommend giving the flower a warm shower, which helps awaken the sleeping bud.
If natural methods of enhancing reproductive activity do not help, you can use chemicals. There are various phytohormonal products on sale that, when used correctly, can awaken several kidneys at once.
What to do to get on the peduncle?
In addition to creating conditions suitable for reproduction, the appearance of babies can be stimulated by trimming the peduncle. There is an opinion that after flowering the peduncle should not be cut, because the plant can independently control its condition. But practice shows that most often the orchid simply dries out the peduncle in order to save nutrients.
Pruning of the peduncle is carried out as follows:
- two centimeters above the second bud from below, the cut site is marked;
- the cut is made with a sharp sterile instrument;
- The pruning site is treated with an antiseptic.
How to grow it on a stem?
The appearance of babies on the stem in most cases is a consequence of unfavorable factors or abnormal development of the flower. It is impossible to separate such a baby from the mother plant. Often a new shoot appears as a replacement for an old one that can no longer produce color. If the adult plant develops normally, then both flowers will live in the same pot, but the bush will become more lush.
Among the reasons causing the appearance of offspring on the stem are the following:
- the stem was injured;
- the growing point of the flower has died;
- the plant was in a state of drought for a long time;
- A peduncle grew in the center of the rosette.