Beneficial and harmful properties of chili
I always used chili pepper. I don’t know about you, but for me this is just a necessary product. When I decided to grow it myself, I thought about the dangers and benefits of pepper. I collected a lot of valuable information for myself. Now I will share with you.
So, let's talk about the benefits.
- Prevents the appearance of cancerous tumors. Scientists have proven that those people who regularly consume chili peppers are 90% less susceptible to cancer.
- Affects blood pressure: dilates the vessels of the circulatory system and normalizes heart function. As a result, blood pressure decreases. So it is recommended to use it for hypertension.
- Contains capsaicinoids. They are what give the vegetable its pungent taste. And their juice destroys harmful bacteria that cause infectious diseases. So you can use it for stomach and intestinal disorders, sore throats and food poisoning.
- Regular consumption of pepper strengthens and normalizes the functioning of the nervous system. Helps relieve stress and depression, helps in the fight against insomnia. It also affects mood: it drives away apathy.
- Prevents the occurrence of diabetes mellitus.
- Has analgesic properties. Used for joint pain and to treat gout.
- Acts as an antipyretic and diaphoretic, also used for coughs and runny nose.
- With constant use, it accelerates metabolism, relieves swelling, promotes the breakdown of fat cells, which has a positive effect on excess weight. Pepper also reduces your appetite, so you will eat less after it.
These are just some of the beneficial properties that chili peppers have. You can learn about its other strengths from the video below:
Chemical composition of chili pepper
| Name | Quantity |
| Vitamin A | 1,324.0 mcg |
| Beta carotene | 14,840.0 mcg |
| Vitamin E | 3.1 mg |
| Vitamin K | 108.2 mg |
| Iron | 6.0 mg |
| Potassium | 1,870.0 mg |
| Manganese | 0.8 mg |
Chili will cause harm if consumed in excessive quantities. For example, if you eat 2 kg of fruit at once, it can be fatal. So you need to know when to stop. With excessive consumption of pepper, the following deviations may occur:
- causes heartburn;
- the development of gastrointestinal diseases increases;
- Burns on the mucous membrane may occur.
Author's note
Natalia Papanova
Blog author
The recommended consumption rate by experts is 1 pod per day.
And don’t forget about contraindications for use. These include:
- disorders of the gastrointestinal tract, liver and kidneys;
- gastritis and other diseases that cause inflammation of the mucous membrane of internal organs;
- stomach ulcer;
- pregnancy;
- should not be given to small children.
Moderate consumption will not harm the human body
Chili pepper - description
Scientists attribute the spice to the Solanaceae family, genus Capsicum, which has more than 140 varieties. Most chefs probably know what chili pepper looks like:
- This is most often an annual herbaceous plant no more than 1 m in height, although wild semi-shrub forms are also found in the tropics.
- The flowers are large, white, green or purple in color, arranged singly or collected in inflorescences.
- The fruit is a hollow, elongated, leathery false berry with small flat seeds inside.
- The shade of peppercorns varies depending on the variety and can be either fiery red, yellow, green or even black.
- The weight of the fruit varies from 0.3 to 190 g.
- A special substance that gives pepper its heat is capsaicin. The heat of a chili pepper on the Scoville scale shows the amount of this very element. It can vary from 30,000 units for cayenne, to 2,200,000 for the hottest variety, Carolina Reaper.
Where do chili peppers grow?
Central and South America are considered the birthplace of chili peppers. Local aborigines cultivated it several thousand years ago, using it both in cooking and in the treatment of a variety of ailments of the circulatory system, muscles and joints. The spread of wild varieties throughout the continent was facilitated by birds, which, unlike mammals, are absolutely insensitive to capsaicin.
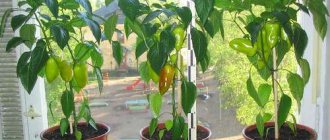
Currently, most of the spice is grown in India and Thailand. Depending on how the chili pepper grows, that is, what the ambient temperature, humidity and soil composition are, fruits with different taste characteristics, even of the same variety, are obtained. You can grow the spice both at your dacha and on the windowsill in an ordinary apartment.
How to grow chili peppers at home on the window
Now let's start with the pepper growing scheme. I’ll say right away: the culture is not picky, so you shouldn’t have any problems. Even if you make some mistakes, it doesn’t matter. In most cases, the pepper experiences similar moments.
Do you want to try planting an interesting variety? Read how to care for Ogonyok peppers at home. I recently wrote about this.
Preparing the pot for planting
Sowing is best done in a small container. If you plant a seed directly into a pot, it will quickly rot as excess moisture may accumulate in the soil. Therefore, I recommend the following options:
- Plastic cells measuring 6 by 6. Convenient, practical and not very expensive.
- Disposable cups. The option is similar to the previous one. Only in this case, make drainage holes in the bottom yourself.
- Wooden boxes. Economy option. I use it extremely rarely because it is inconvenient. The seeds are arranged densely, so the root system of the seedlings is injured during transplantation.
- Peat cups. Very convenient, saves time when transferring. But the price is too high.
Have you tried growing chili peppers at home?
Not really
As soon as the seedlings get stronger, it’s time to think about the pot. The main thing here is size. The required volume is 1-2 liters. If we talk about material, I recommend plastic. Others will also be suitable, but the culture will not be so comfortable in them. I tried planting it in clay. Did not like. The soil dries out too quickly, as the clay absorbs moisture. And the pepper loves abundant watering.
Author's note
Natalia Papanova
Blog author
Before planting, treat the containers with boiling water to kill any infection that may be on them.
You can also plant other crops at home. For example, you can learn how to grow radishes on a windowsill.
I used regular flower pots for planting.
Soil selection
I paid more attention to the choice of soil. I’ll even say this: I made it myself to control the quality. I needed the following components:
- turf soil (you can bring it from the forest);
- river sand;
- peat;
- a bucket of water;
- superphosphate (10 g), potassium sulfate (30 g), urea (10 g);
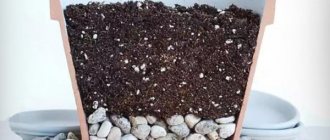
- brick chips, pebbles, crushed stone, etc. (for the drainage layer).
The first three components were mixed in equal proportions. Then I diluted fertilizers in a bucket of water (9-10 l). Watered the soil generously. This amount is enough for 10 kg of soil. Then I let it dry completely. Before planting, a drainage layer was laid on the bottom of the container. For pepper, its thickness should be 2-3 cm.
If we talk about the purchased option, then take the “People's Universal” or “Fart” soil. These two are my favorite. I have used them more than once until they disappointed me, so I recommend them.
Before planting, a disinfection procedure must be carried out. It will help kill harmful organisms and save seedlings from diseases. You can use one of the methods below:
- Spill the soil with a weak solution of potassium permanganate. To prepare the working product, dilute 20 g of the drug in 10 liters of water. Then spill the soil.
- Use the oven: place the soil there for 30-40 minutes at a temperature of 50 degrees.
- Warm in a water bath for 30 minutes. The most inconvenient method, so I recommend using it as a last resort.
Author's note
Natalia Papanova
Blog author
Do not heat the oven to temperatures above 50 degrees. Otherwise, microorganisms beneficial to the plant will also die.
To learn how to prepare universal soil for seedlings, watch the video below:
Planting from seeds
So, planting seeds is carried out in several stages:
- Dilute 30 g of salt in 1 liter of warm water and place the seeds there. Any that float up must be thrown away. Drain the rest and dry.
- Place the seeds in gauze moistened with water. Leave in this state until germination. Use a spray bottle to moisten the gauze as needed.
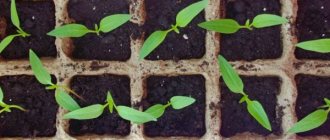
- As soon as the sprouts appear, you can start planting. To do this, fill the prepared containers with earth and make small depressions (1.5-2 cm) in them.
- Place one sprouted seed in the hole. You can put 2-3 pieces, but when they hatch, remove the excess ones, leaving the strongest sprout.
- Sprinkle with soil. Moisten the soil, cover with film (food film) or glass to create a greenhouse effect.
That's it, landing is complete. Now all you have to do is ventilate the containers every day (15-20 minutes) and moisten the soil as it dries.
Introduced to planting chilies? Then it’s time to learn how to grow other varieties of peppers at home. I think you will find this interesting.
You can remove the greenhouse after the first shoots appear
Choosing a pepper variety to grow on a windowsill
It is not difficult to grow chili peppers at home on a windowsill if you choose the right variety.
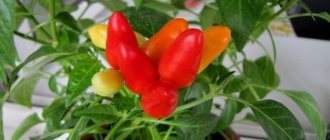
Exotic names of pepper: Swallow, Bell have different shapes, fruit color, leaf color and ripening period.
Early ripening varieties ripen in 90-120 days, mid-ripening varieties in 120-140 days from the moment of planting.
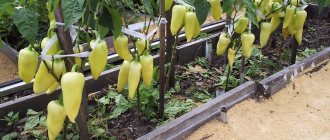
The Tabasco variety has hot fruit pulp. Suitable for growing on a window, and for industrial purposes - on plantations. Pepper is valued for its early ripening.
Salute is a low-growing variety, its compact round bush grows up to 20 cm. Five-centimeter fruits in the form of orange and red cones are directed upward and have a strong aroma.
The Aladdin variety is grown on a windowsill or in open ground. During the growing process, its fruits change from green to flint, purple and red. Pepper is distinguished by its long and abundant fruiting, as well as its early ripening.
The bell has red fruits of an unusual shape; the variety ripens in 150 days. The pungency in the fruits is unevenly distributed.
Other early ripening varieties for growing at home are also popular:
- Dwarf;
- Watercolor;
- Treasure Island;
- The firstborn of Siberia.
On a note. There are also inedible types of peppers that are grown only for decorative purposes: Red Rocket, Pepperoni, Orange, Clown, Filius Blue, Goldfinger.
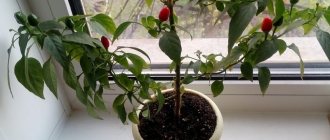
Caring for peppers at home on the window
You already know how to plant chili peppers in a room. Now let's find out how to care for an already grown plant. There are a couple of subtleties in care that I will share with you. So be prepared to remember.
If you like to grow something, then you should be interested in how to properly store the grown crop. For example, you can read how to store garlic at home.
Lighting, temperature and humidity
Chili pepper is a real “child of the sun”, a very light-loving plant. He simply needs sunlight. But be careful: excess chlorophyll can cause the appearance of the bush to deteriorate or it will lag in growth. Therefore, for growing, I recommend window sills located on the southeast or southwest side, where the sun is active during hours that are safe for the plant.
As for the temperature, there are two points to take into account - daytime and nighttime indicators. During the day you need to keep the temperature within 22-25 degrees, but at night make sure that the temperature does not drop below 18 degrees. If there are sudden changes or too low readings, the chili may die
.
There are no special requirements for air humidity; it is enough to maintain it in the range from 75% to 80%. You can check the air humidity in your room using a special device - a hygrometer. It is inexpensive and sold at any garden store. If there is insufficient humidity, place a couple of containers of water in the room and spray the plant with a spray bottle. It is recommended to do the latter once a week.
Proper watering
The watering schedule depends on weather conditions. On hot, dry days I moisten the soil every day. If it’s cloudy outside or raining, then I reduce watering to 2-3 times a week. In general, everything depends on the condition of the earth. Just make sure that it is constantly moist and does not dry out. But there was no waterlogging. Otherwise, the roots will begin to rot and the pepper will simply die.
Author's note
Natalia Papanova
Blog author
Since peppers are usually grown on a windowsill, under which there is a radiator, it is necessary to provide additional protection to the plant from heat and dry air. To do this, place a wet cloth on the battery.
Now that you've learned how to water peppers, it's time to take on something else. For example, you can read how to preserve cucumbers at home longer.
Periodically loosen the soil to make it easier for air to flow into it.
Fertilizer and feeding
In order for the pepper to grow and you to be able to reap a good harvest, you need to carry out 5 mandatory feedings. I’ll tell you now when and how to do it:
- The first feeding is carried out when 2-3 leaves appear on the plant. I use Fertika Lux complex fertilizer. Diluted in the proportion of 1 sachet (20 g) per 10 liters of water. This feeding stimulates the growth and growth of green mass.
- The second feeding is done one day before planting the seedlings in a permanent place. Here I use mullein. I dilute it with water in a ratio of 4 to 10. Then I water it. Thanks to this, the pepper can more easily withstand the stress of transplantation.
- Feed the chili for the third time two weeks after transplanting. To do this, use urea: dilute it at the rate of 2 g per 1 liter of water. Then apply it to the root part of the plant. This feeding promotes the growth of the “skeleton” and the development of the root system, preparing the bush for flowering.
- The fourth is done at the moment of flowering. During this period, pepper needs potassium and phosphorus. They contribute to the formation of flowers and ovaries. Take potassium monophosphate, dilute in a proportion of 10 g per 10 liters of water. It significantly increases the number of flowers and prevents the ovary from shedding.
- The last time chili is fed is during the fruiting period. Here I recommend using organic matter - the same mullein solution (I wrote above about how to prepare it). Consumption per 1 bush is 1 liter. After 10 days, this feeding must be repeated.
To learn how and why to feed peppers with wood ash, watch the video below:
Trimming
Chili belongs to the compact varieties of pepper: the bush is miniature, elliptical in shape. Does not require special pruning. I carry it out only to remove branches that have already produced fruit, are dried out or damaged.
You can also learn how to store zucchini in your apartment. Not long ago I wrote about this in detail.
How to care in winter
Winter care comes down to the following:
- Keep branch pruning to a minimum.
- Provide the plant with additional light for 2-3 hours in the morning or evening. If the day is cloudy, then leave the light on for 4-6 hours.
- Reduce the frequency of watering to 1-2 times a week. In general, look at the condition of the soil: maybe you will need to water even less often.
- Spray the pepper regularly, as heating devices dry out the air greatly.
- If the pot is on a windowsill, then place a thick layer of foam under it to prevent the root system from drying out due to the radiator.
With proper care, peppers can bear fruit even in winter.
What care does the plant require?
After planting, chili peppers must be properly cared for in order to obtain a large and high-quality harvest. It is necessary to monitor timely watering, fertilizing, and pollination.
Watering mode
The crop needs to be watered as the soil dries out. Chili peppers do not like either excessive moisture or excessive dryness. If you overdo it with watering, there is a risk of rotting of the root system. After the procedure, you need to give the water time to drain into the pan, after which it will need to be removed so that there is no stagnation.
During the heating season, when there is aridity in the room, it is better to irrigate the plant with warm water at room temperature from a spray bottle. The interval between procedures should be around 2 weeks. In summer you can also irrigate, but much less frequently - once a month.
What and how to feed
The type of fertilizer for chili peppers depends on their growing season. During the formation of green mass, it is better to give preference to mineral products that contain large quantities of nitrogen and sodium. When the first fruits ripen, it is necessary to switch to organic fertilizers - peat, humus, chicken manure.
It is necessary to feed the crop once a week in spring and summer, when there is a period of active flowering. After harvesting and during wintering, fertilizers are applied once a month. If the planted variety is considered year-round, then the crop will have to be fertilized constantly, regardless of the time of year.
Bush formation
Timely pinching and pruning is necessary for the correct formation of the bush and the growth of new shoots. In the autumn, when the entire harvest has been harvested, gardeners advise shortening the crown of the plant. This procedure will stimulate further growth of the bush and help strengthen its root system. It is better to pinch peppers in the summer, when its branches grow as much as possible.
Prevention from diseases and pests
Chili peppers have good resistance to many pathologies and pests. If all growing conditions are met, the risk of encountering trouble is minimal. But with high humidity or insufficient soil fertility, novice gardeners may encounter blackleg, spider mites, and midges. To get rid of pathologies, fungicides and preventive solutions are used, which are sold in specialized stores.
See also: How to get rid of aphids using folk remedies
It is better to fertilize with medicinal preparations before the period of green mass formation. It is best if it is performed 1-2 weeks before the appearance of the first fruits. It is important to read the instructions and take prophylactic agents in the right quantities. Overuse of fungicides can result in stunted growth and low yields.
Pollination
In order for a plant crop to produce a full harvest, it must be properly pollinated. In some varieties of chili peppers, the pollination process occurs independently. These include Indian Summer, Medusa, Rowan. The remaining fruits will have to be pollinated by hand. This is done by regularly shaking the bush or using a natural brush. With its help, pollen is collected from male inflorescences and transferred to female ones.
How to pollinate indoor chili peppers
The bush usually does not require any special pollination actions. The fruit sets without problems. But I shake the plants a little to help spread the pollen. As a result, I always received a bountiful harvest. So I recommend doing this. I think you'll like it.
If you don’t want to bother with pollination to get a harvest, then read how to grow ornamental peppers. He does not need such a procedure.
Planting and caring for hot peppers
- Planting: sowing seeds for seedlings - in February-March in areas with a cold climate and in January-February in areas with a warm one. Seedlings are planted in open ground during the budding period, when the average daily temperature in the garden rises to 15-17˚C.
- Lighting: bright sunlight.
- Soil: light, permeable.
- Watering: frequent and plentiful, especially during flowering and fruiting: the soil on the site should not dry out. In hot weather, daily watering will be needed, and in drought, the beds will have to be watered twice a day.
- Fertilizing: at the beginning of the growing season, fertilizers containing phosphorus and magnesium are applied to the soil, and as the fruits ripen, the amount of nitrogen must be reduced.
- Reproduction: seed.
- Pests: aphids, spider mites, Colorado potato beetles, whiteflies, cutworms, thrips, mole crickets and naked slugs.
- Diseases: white, brown and black spot, black leg, tobacco mosaic, late blight, bacterial cancer, streak, gray, white and blossom end rot, verticillium, fusarium and downy mildew.
- Properties: the plant has medicinal properties.
Read more about growing hot peppers below.
How to propagate homemade chili
Hot peppers are cultivated in two ways: cuttings and seeds. Let's look at each one separately.
- Cuttings. To do this, select a young branch on the bush, the size of which will be at least 10 cm. Cut it, remove 3-4 lower leaves. Place in the “Kornevin” solution (diluted in the proportion of 1 g per 1 liter of water) for a day. Then stick it into the ground. Moisten the soil after 2-3 days. If new leaves begin to appear, then the seedling has taken root.
- Seeds. We have discussed this method of reproduction in detail. All that remains is to figure out how to obtain planting material from homemade peppers. It's simple: cut the fruit and remove the seeds. There is no need to rinse or clean them. As a rule, they are already dry inside and completely clean. That's all, the seeds for planting have been collected.
Do you propagate chili peppers yourself?
Not really
Chili peppers - varieties
The seasoning is used not only in cooking, but also in medicine, traditional and folk, and cosmetology. However, the widest area of use of chili pepper is cooking, for which a large number of varieties have been bred, differing in pungency, color, shape and size of the fruit:
- A burning bouquet
. A variety with a special spicy aroma of fruits not exceeding 10 cm in length. It is considered early and is suitable for both greenhouse cultivation and cultivation in open ground. - Chinese fire
. A variety with long (up to 25 cm) fruits that have a strong pungency. The plant is considered medium-sized and has good immunity to pests and diseases. - Jalapeño
. A spicy variety that is harvested without waiting for maturity. On one bush about 1 m high, approximately 30-35 peppercorns grow, no more than 10 cm in length. - Habanero
. Red chili pepper, which can have other colors. The variety is distinguished by a slightly “crumpled” shape and a fruity flavor. Some gardeners harvest several hundred peppercorns from one bush. - Cayenne
. The bush variety grows up to 1.5 m and requires a garter. The thin fruits are about 12 cm long and have a medium pungency. The variety is considered productive; about 40 peppers can be collected from each bush. - Tabasco
. This type of chili pepper is used to prepare the sauce of the same name. The fruits do not exceed 5 cm in length and have medium pungency.
How to store hot chili peppers at home
Let's say you have reaped a good harvest. Questions immediately arise: what to do with it and how to preserve it. There are several ways. And I will share each of them with you.
If you still don’t get the harvest, then there are obvious problems with the ovary. To eliminate them, see how to pollinate peppers at home.
Dried
One way is to dry the pepper. It can remain in this state for 12 months or more. For drying, you can choose one of the following options:
- Oven. Place the fruits on a baking sheet lined with baking paper in one layer. In this case, you can either put the fruits whole or cut them into slices. Preheat the oven to 50 degrees, keeping the door slightly open. Leave in this state for 4-6 hours.
- Electric dryer. Everything is simple here: put the fruits on the racks and set the desired mode. Depending on the dryer and its manufacturer, the entire process will take from 10 to 14 hours.
- On the window. The old-fashioned way: lay out a layer of paper on the windowsill and place peppers on it. The window should be south. The drying time in this way is 2-3 weeks. And then you can put the pepper away for storage.
Once the chili is dried, it can be ground in a coffee grinder and placed in glass jars with a lid. And use it as a seasoning.
After drying, the sharpness does not go away and remains the same
In a refrigerator
The easiest way is to put the fruits in the refrigerator: put the peppers in a plastic bag and put them on the middle shelf of the refrigerator. In this state, vegetables can be stored for 2 weeks without loss of elasticity.
Author's note
Natalia Papanova
Blog author
Do not rinse the peppers before storing them in the refrigerator. Excess moisture can cause mold and other fungal damage.
In the freezer
I put the whole pepper in the freezer (honestly, I’m just too lazy to bother with it). The method is convenient and long-term. In this state, the fruits can be stored for up to a year.
To defrost, first place the pepper in the refrigerator for a couple of hours, and only then leave it at room temperature. So the beneficial properties and fiery taste of chili will not go away.
You can watch another way to freeze hot peppers in the video below:
How to store for the winter
Peppers can be stored frozen or dried until winter. Or canned. But I'll tell you about this a little later.
How to store fresh
If you want to keep them fresh, place the fruits in a cool, dark place, such as a pantry, cellar or basement. In this case, the following rules must be observed:
- Good ventilation. If there is none, then ventilate the room yourself.
- No stale air or mold.
- Minimum humidity.
Wrap the peppers themselves in paper and place them in rows in a wooden box. In this state, the fruits will remain elastic and will not lose their properties for 3-4 weeks
.
Marinated
To prepare pickled peppers you will need the following ingredients:
- chili capsicum - 1 kg;
- vinegar essence - 1 tbsp. l.;
- sugar - 2 tbsp;
- salt - 1 tbsp. l.;
- garlic cloves - 2 pcs;
- horseradish leaf;
- filtered water - 2 l.
Sequencing:
- Sterilize pickling jars in a convenient way. For example, for a couple. Dry.
- Wash the peppers and cut off the ends and tails.
- Divide into jars. Add a horseradish leaf, cut into several pieces, and chopped garlic cloves.
- Prepare the marinade. To do this, boil 2 liters of water and dissolve salt and sugar in it. Fill the jars up to the neck.
- Leave in this state for 15-20 minutes.
- Then drain the liquid to boil again. After boiling, add the essence, stir, remove from heat and fill the jars again. Close the lid.
That's all, the bright and beautiful peppers are ready. This product can be stored for up to two years or more.
Calorie content per 100 g - 40 Kcal.
For beauty and aroma, you can add fresh herbs to the jar.
In oil
Another option for preparing chili for the winter is in oil. I really like the recipe, I make this spicy preparation every year.
Grocery list:
- olive oil - 250 ml;
- chili - 7-10 pcs;
- garlic cloves - 10-12 pcs;
- rosemary - 2-3 sprigs;
- laurel - 2 pcs.
Step by step recipe:
- Peel the garlic cloves. There is no need to cut, just pierce it with a needle in several places. Do the same with the chili.
- Wash the rosemary sprigs and cut them into 4-5 cm pieces.
- Place half of the cooked rosemary, garlic and bay leaves in a metal pan. Add oil. Bring to a boil and immediately reduce heat to low. Simmer the garlic in this state for 15-30 minutes.
- Then remove from the heat and distribute the garlic with rosemary and bay leaf into sterilized jars, after straining from the oil.
- Place the pepper in this oil. Bring to a boil, reduce heat to low and simmer for 10 minutes.
- Then add the chili to the garlic, add fresh rosemary on top and pour hot oil over it. Close the lid. After cooling, you can store it.
Shelf life is from one to two years. Calorie content per 100 g - 65 Kcal.
These storage methods are not suitable, then read how else you can store pepper at home. I think you will find the information you need.
Author's note
Natalia Papanova
Blog author
The oil should not boil during cooking.
Pepper planting rules
Preparing suitable seeds and choosing the right location for the plant will greatly increase the likelihood that the pepper will grow and produce a harvest.
Timing for sowing seeds for seedlings
Even though most chili varieties are shade tolerant, they still need adequate sunlight. You can plant seed for future peppers at any time of the year, but since there is a need to ensure light and thermal conditions, it is best to plant in the spring, at the end of March or the first half of April.
Appropriate place
The pot with the plant should be placed in a well-lit place, and the south side is best suited for this. Because chili is a pepper originally from Mexico, it needs light and warmth.
In addition to fruits, peppers have decorative properties and will look good in the interior.
Preparing the container and soil
It is recommended to plant seedlings in separate containers. If you place several bushes in one container, the stronger and faster growing ones will begin to suppress their stunted counterparts.
Seedlings can be planted in small pots up to 200 ml. In the future, as the bush develops, the chili will have to be transplanted into a larger pot, with a volume of 3 to 6 liters.
Attention! It is not recommended to use ceramic containers, as the soil in them will dry out very quickly.
Pepper is unpretentious to the ground. Seed material can be planted in soil purchased at the store.
Suitable soil
If possible, it is recommended to prepare the nutrient soil yourself. The following ingredients are mixed:
- leaf soil - 2 parts;
- river sand - 1 part;
- peat - 1 part;
- coconut fiber - 1 part;
- perlite - 1 part, vermiculite can be used instead.
Attention! Before chili peppers are grown from grains, the soil must be disinfected.
The nutrient substrate is treated with a fungicide, for example Previkur, or calcined in the oven
Seed processing, germination
To grow chili, you must first properly prepare the seeds:
- The seed is filled with water. You can use the seeds that remain at the bottom. Those that have surfaced have a minimal likelihood of germination.
- The grains are soaked in water at a temperature of about 40 ° C for several hours.
- Disinfection of grains - soaking for half an hour in a solution of potassium permanganate.
- To speed up the germination process, it is recommended to treat the seed with a growth stimulant.
Let me sum it up
- Chili is only harmful if consumed in excess.
- The daily norm is 1 pod.
- Chilli likes moist soil, so there is no need to plant it in pots made of material that absorbs moisture.
- Eating fruits causes active sweating, so eat chilly in hot weather.
Now you know how to grow chili peppers at home. I hope it has become clear that there is nothing complicated in this process. The main thing is to start and not be afraid to make mistakes. You will definitely succeed.
Hot pepper pick
When the first pair of true leaves appear, they begin picking the seedlings.
The soil in a common container is watered so that the seedlings are easily separated without tearing off the roots. The soil is taken the same as for sowing. At the same time, the seedlings are not buried - they are sprinkled with earth until they thicken above the root - the growth point. Water well with warm water.
Subsequent care of seedlings comes down to:
- regular watering without waterlogging to avoid blackleg disease;
- additional lighting;
- 1-2 fertilizing with complete mineral fertilizer.
Before planting seedlings, they must be hardened off.
Features of harvesting
When harvesting and processing chili peppers, careful attention must be paid to precautions. To ensure that touching a burning product does not cause irritation of the skin and mucous membranes, it is recommended to use rubber gloves, never touching the eyes, nose and lips. When crushing pods, you must wear a respirator or mask to prevent caustic dust from entering your respiratory tract. And of course, following safety precautions when picking peppers is extremely important for those who have small children, who may be attracted by the bright appearance of the fruit. If a young “gourmet” still manages to try chili pepper, a couple of sips of milk or yogurt (but not water!) can help overcome the hot taste. Adults can drink a little beer in this version.
The collected pods are used as a spicy seasoning for meat and fish dishes, soups, and marinades, both dried and fresh. In addition, medicinal tinctures are prepared from chili fruits, helping with lack of appetite, digestive disorders, heart attacks and colds. Warming ointments based on hot pepper are indicated for arthritis, radiculitis, and rheumatic pain.
Timing of emergence and first harvest of homemade hot pepper
Hot pepper seeds take a long time to germinate, which is why this feature must be taken into account when planting. Shoots appear within 14-21 days if all recommendations for sowing are followed.
The first harvest of pepper on the windowsill ripens 105-150 days from the moment the first sprouts appear, depending on the selected variety.
As soon as the pepper turns red (ripe), you should promptly remove the fruit from the bush along with the stalk. Then, after some time, a flower will appear in the same place, in other words, the plant will continue to bear fruit - set new fruits.
Table of the best varieties of hot peppers for growing at home
At home, it is better to plant low-growing peppers in pots. It is distinguished by its unpretentiousness, resistance to temperature fluctuations, and good immunity. Compact-sized bushes will not be more than 50 cm in height. Such peppers can be easily placed on the windowsill.
| Variety | Description |
| Treasure Island | The fruits are red-orange. After the ovary, the harvest can be harvested on the 90-100th day. Heart-shaped, peel thickness no more than 7 mm, weight 60 g |
| Firstborn of Siberia | After germination, the fruits are ready for consumption in 107-114 days. The pepper grows large, weighs around 100 g, the peel is up to 6 mm thick, the color is bright red. The aroma is rich and the taste is pronounced and pungent. |
| Dwarf | The fruits are juicy and fleshy, cone-shaped. They are red in color, the wall thickness is no more than 9 m, and the maximum weight is 80-83 g. After the shoots appear, the crop ripens on the 110th day |
| Watercolor | The shape of the pepper resembles a small cone. The fruits are scarlet in color, and they themselves are very small. The thin wall with a glossy coating does not exceed 3 mm in thickness, and the weight is up to 30 g. You can enjoy the taste in about 110 days |
| Gift from Moldova | Those who plan to grow sweet bell peppers at home should pay attention to the variety. The fruits are large, their weight is 90 g, the thickness of the peel is about 6 mm. Harvest can be obtained 123-135 days after germination |
| Martin | The variety is distinguished by its pronounced aroma and juiciness of the fruit. The pepper is rich red in color, weighs no more than 85 g, and the wall thickness is about 5 mm. Ripening occurs at 130 days |
The presented varieties of hot chili peppers are characterized by high productivity. Along with this, each one is distinguished by the bright color of its fruits, and they ripen relatively quickly. Therefore, the spicy seasoning can be enjoyed all year round.
Protection from diseases and pests
Having strong antibacterial characteristics, chili peppers are very rarely affected by diseases or parasites. However, if agricultural practices are not followed, problems cannot be avoided. Excessive watering can stimulate the development of a terrible fungal infection - the so-called “blackleg”. When the ambient air is dry and there is little ventilation, there is a greater possibility of attacks by spider mites and aphids, as well as the falling of fruit ovaries. Bushes are treated against pests with a strong solution of laundry or tar soap, and fungicidal preparations can help cope with fungal diseases in the early stages.