What are the beneficial properties of celery?
My first experience of growing celery on a windowsill came when I came across a cute pot of herbs that are sold in greengrocers. My sister, who was visiting me, said that she has not bought greens in the store for a long time, but grows them from the remains of petioles. I thought it was a fun experiment to try. As a result, after 2 weeks young greenery appeared from the stalk. Now I can safely recommend that you do not spend extra money on buying celery, but grow it at home yourself.
So, celery is a green vegetable rich in vitamins. All parts of the plant are eaten: roots, petioles and leaves. I recently wrote about growing a bay tree - be sure to check it out, there are just as many benefits!
See how healthy this vegetable is:
- When used externally, the leaves will quickly relieve irritation, small ulcers and inflammation of the skin.
- Celery juice relieves hives and treats the most “stubborn” skin diseases.
- A spoonful of fresh juice will help you cope with the heat more easily.
- Celery normalizes metabolism and helps you lose weight.
- The presence of vitamin C promotes hematopoiesis and stabilization of blood pressure.
- Neutralizes carcinogens.
- Celery is an aphrodisiac and good for men's health.
- Helps women cope with menstruation more easily.
- Protects the body from premature aging and reduces the likelihood of age-related dementia (Alzheimer's disease).
Want to learn more about the healing properties of other plants? Read how I grow turmeric in the window.
Forcing
Further our manipulations will be reduced to the following:
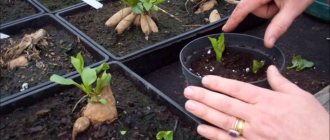
- Trim the head of celery to approximately 4 cm from the bottom. The cut areas will wither and turn brown. There's nothing wrong with that.
- Pour water into the bottom of the container.
- We place the stalk from the cut stems there so that the water covers only the bottom. If we pour more, the putrefactive process begins.
- We put it on the windowsill.
- We make sure that the liquid does not evaporate to a critical limit, which happens quickly at home with central heating; top up if necessary.
Within a week, the root buds will grow to 1-2 cm, and new stems with greenery will begin to emerge from the depths of the rosette.
True, the leaves and petioles will be white and yellow. This is mainly due to lack of light. And there's not enough food.
I read that you can simply add fertilizer to the water with the petiole, but I think that this can “get” nitrates in the resulting sprouts and greens.
We thoroughly water the soil with the rudiments of petioles and leaves planted there, and place it in a bright place - a windowsill.
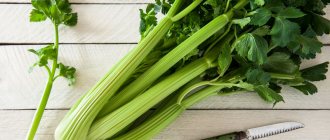
Gradually, the color of the foliage begins to change to green. I'm glad that new stems and leaves are growing. They will be thinner than before, but are still great for preparing a variety of dishes from salads to soups and sauces. The calorie content of stem celery is only 12 kcal.
We continue to care for the planted pet - we water it, lengthen its daylight hours, moving it from the window to a lighted place in the evenings.
To prevent flies from appearing in the ground, we mulch it with any suitable material, for example, expanded clay. I often use dry moss - sphagnum.
When more than three stems grow, I start cutting them off. To the ground. This stimulates the formation of new petioles.
In this easy way you can grow celery on your windowsill at home. If you plant several heads of cabbage close together in a plastic box, you will get a whole bouquet of healthy greens and petioles with an acceptable calorie content.
I highly recommend it, especially from late autumn to spring. It invigorates and brings joy to summer memories.
Calories and nutritional value of celery
Celery has “negative” calories. This means that the body spends more energy on digesting it than it receives. This property is used by nutritionists when creating diets for those losing weight. There are only 15 kcal per 100 g of product.
The stems of the plant are rich in amino acids, organic and mineral substances. And the nutritional value of 100 g of greens is:
- proteins - 0.9 g;
- fats - 0.1 g;
- carbohydrates - 2.1 g.
Root vegetables differ slightly in their BJU content and have the following composition:
- proteins - 1.3 g;
- fats - 0.3 g;
- carbohydrates - 6.4 g.
By watching the following video, you will learn how to make a healthy celery smoothie:
All parts of celery are suitable for human consumption.
Description of culture
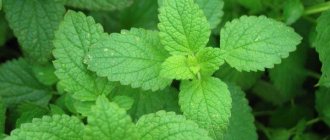
Celery belongs to vegetable crops and to the umbelliferous family. The plant is considered perennial and has a thickened root. The leaves are pinnately dissected.
Growth limit - 1 m. Preferences for cultivation - moist soils, swamps, salt marshes. Cold-resistant and moisture-loving variety, not afraid of frost. It has a strong aroma and is therefore widely used in the culinary field. All parts of the root vegetable are used for cooking: root, stem and leaves.
Ideal for many dishes as a flavorful seasoning. It has also proven itself well in medicine, thanks to its numerous beneficial and medicinal properties.
Celery appeared many centuries ago. It was considered an ornamental plant that prolongs beauty and youth.
Celery varieties for growing at home
This plant is great for home growing. Look at the characteristics of the varieties I liked.
| Variety | Growing season, days | Characteristics of the variety | Disease resistance | Disease resistance |
| Delicious | 190 | Root vegetables with a diameter of up to 6 cm and a weight of 200 g. Produces abundant greenery. | At home it is used for forcing leaves. | High |
| Severing ball | 145 | Variety with large juicy root crops weighing up to 400 g, gray-white color | Suitable for salads, stores well. Used for growing greens. | High |
| Apple | 160 | A high-yielding variety with juicy root crops weighing up to 200 g and 8 cm in diameter. | At home it is used for forcing greens. Root vegetables are suitable for storage. | Increased |
| Cheerfulness | 70 | A high-yielding early variety with a powerful rosette of erect, glossy leaves. | Drought-resistant and cold-resistant variety. Very fragrant. | Increased |
| Gentle | 105 | High-yielding variety with dark greenery. | The aromatic leaves are suitable for drying. | High |
| Zakhar | 100 | A high-yielding variety with smooth green leaves and a medium hollow petiole. | Cut leaves grow quickly, are tasty and aromatic. | High |
| Sail | 90 | An early variety that produces a bountiful harvest of greenery. | High aromatic and taste qualities. Unpretentious in cultivation. | High |
If you don’t want to grow celery, then read how to easily grow rosemary in your apartment.
Home-made forcing of greens from store-bought petiole varieties
Features of growing celery on a window
When growing celery from seeds at home on a windowsill, it is worth remembering the following features:
- The easiest way to grow a crop is to take a stalk from petioles purchased in a store;
- To get a year-round and abundant harvest, you need to plant several stalks at once in a special box;
- In winter, celery does not require frequent watering: it is enough to do it once a week, otherwise the plant will rot.
Helpful information
Daria Vorontsova
Amateur gardener. He is interested in growing various greens at home.
The first harvest of leaf celery can be harvested 3 months after the sprouts appear. You have to wait from 90 to 160 days for the root one.
What you need to grow celery from seeds on a windowsill
Celery is not a very capricious plant. But let’s take a closer look and I’ll tell you some small nuances on how to grow stem celery at home.
Choosing the optimal place in the house
Celery needs good lighting. Any window sill except the northern one is suitable for growing it. I place pots of herbs sometimes on the west side, and sometimes on the south.
Don't want to grow celery? Then read how to choose the right conditions for growing basil on the windowsill, which has a special spicy aroma.
Selection and preparation of containers
Boxes for seedlings, pots for home flowers - everything you have at home is suitable for growing celery. I had small flower boxes at my disposal. They look beautiful when filled with bright, curly greenery.
I prepare the container like this: I wash it with soap and rinse it with a disinfectant solution of potassium permanganate.
Author's note
Natalia Papanova
Blog author
To plant root celery, you need to use deep containers so that the root crop does not rest on the bottom.
Flower pots with drainage holes are suitable for growing greens.
Soil selection
Celery loves nutritious soil. I buy universal Biosoil at a garden store. For those who like to make their own substrate, I recommend a recipe: mix garden soil, humus and turf in a ratio of 7:2.5:0.5.
The soil should be airy and light, so I sometimes add coconut fiber (2 parts to 1 part soil).
I also use fertilizers. Most often these are lime and phosphorus additives, which I add in the following quantities (per 1 kg of substrate):
- Lime - 10 g;
- Phosphorus fertilizer - 30 g.
Don't forget about drainage. I take expanded clay, crushed stone, pieces of brick or shards.
See how to pour soil into pots:
- At the bottom of a clean container I place a drainage layer of 5 centimeters.
- Then I add sand. It is better to pre-calcine it to remove sources of disease and rot.
- I put a nutrient substrate on top.
When preparing boxes for celery seedlings, make another one and I will tell you how to plant dill on the windowsill, which will delight you with fresh aromatic herbs all winter.
For seedlings, you can purchase ready-made universal soil
Necessary conditions: lighting, air humidity, temperature
Celery is a light-loving crop that loves warmth and good air humidity.
During seed germination, you need to maintain a temperature of about 25 degrees; to do this, I place the container with the seeds on the windowsill, under which the radiator is located. I make sure the soil is always moist.
Celery needs a lot of light. Therefore, in winter I put it under lamps to extend daylight hours to 15 hours.
Air humidity is important for the plant, since in a dry room the seedlings quickly wither, and the greens turn yellow and dry out. In winter, when the radiators dry the air, I spray the plants and place containers of water next to the pots.
Light-loving crops require additional lighting for good growth.
Seed preparation
I disinfect the seeds in a solution of potassium permanganate for 20-30 minutes, and then wash them.
There is one more secret to preparing seeds that I want to share. Their surface contains essential oils that inhibit the germination process. Therefore, I place the seeds in 60 degree water until they cool. After this, I wash the seeds. The essential oils will go away and you will get early shoots.
To have fragrant greens in the winter, I plant the seeds in late summer.
For good seedling growth, additional lighting is needed. Find out how easy it is to do it yourself by watching the video:
I use 2 methods for planting seeds and I want to say that both are good. I’ll tell you about each one, and you can decide which one is more acceptable to you.
Dry landing
- I pour hot water over the substrate prepared in the boxes.
- I make transverse grooves 1.5 cm deep on the soil surface. The distance between them is 10-12 cm.
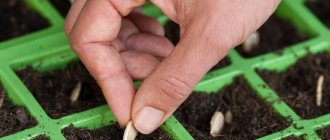
- I evenly place dry celery seeds into the grooves.
- I don’t fill the grooves, I cover the box with film.
- Before emergence, I regularly spray the soil with a spray bottle.
- Shoots appear in 2-2.5 weeks.
Planting sprouted seeds
- I pour the seeds into a container with water and put them in a warm place for 3 days. I change the water every day.
- Then I transfer the seeds to damp gauze and leave them to germinate in a warm place for about 7 days.
- I place the hatched seeds in grooves and sprinkle them with soil. With this method, the first shoots appear after 5 days.
Author's note
Natalia Papanova
Blog author
Maintain the air temperature until seedlings appear at 24-26 degrees.
This is what sprouted celery seeds look like
Seedling care
Celery shoots are tender and need moisture and a temperature of no more than 20 degrees. Therefore, I place the pots in a bright place away from radiators and often spray the seedlings.
I feed it once every 10 days. So the seedlings grow very amicably. If caring for seedlings seemed difficult to you, take a look at how to care for lemongrass. It's much easier.