Indoor fern - leaves dry
Despite folk superstitions that say that a fern in the house threatens loneliness, many flower growers simply cannot imagine their homes without this wonderful plant. But quite often they are faced with the fact that the leaves of the fern turn yellow and dry out. Why this happens and what to do if the leaves of an indoor fern dry out, we will talk in our article.
Why do the leaves of indoor ferns dry out?
The main reasons for fern leaves drying out:
- The most common cause of yellowing and drying of leaves in all types of indoor ferns is a simple failure to follow the rules of caring for them. Most often, the gardener encounters this problem during the transition periods in autumn and spring, when the heating in the apartment has either already been turned on or has not yet been turned off. Excessive heat in the room, combined with dry air coming from heating radiators, leads to the fact that the tips of the ferns first dry out, and then all the leaves completely.
- The second probable cause of fern leaves drying out may be a violation of the drinking regime. It is no secret that it is quite difficult to determine whether the earthen lump in the pot is completely saturated with water or whether the water has simply flowed into the pan along its walls. Meanwhile, it is very important that the soil in the fern pot is constantly moist, but not overwatered.
- The third reason that causes yellowing and drying of fern leaves is pests, for example, scale insects. Their active life on the fern leads to the fact that its delicate leaves die and crumble.
What to do if fern leaves dry out?
If your green pet has begun to lose its decorative properties, then the first thing to do is to inspect it for the presence of pests on the leaves. Fighting scale insects is a rather difficult task, requiring the use of toxic insecticides. If it is nevertheless detected, then the leaves damaged by it should be carefully removed, and then the entire plant should be treated with a special preparation.
If the leaves of the fern turn yellow and dry out due to increased dryness of the air in the room, then the situation can be corrected by bringing the humidity in the room to normal levels. To do this, you need to move the fern away from the heating radiator, and cover the radiator itself with a damp cloth. You can also place the fern pot on a wire rack in a tray filled with water.
If the fern loses its beauty due to a violation of the drinking regime, then it can be revived as follows: you need to immerse the pot with it in a container with settled tap water and hold it until the soil in the pot is saturated. Such “bathing” will help revive even an almost completely dried-out fern.
| Why do Decembrist leaves turn red? Indoor Decembrist is very popular due to its unpretentiousness. But sometimes it can also cause trouble for the owners. We’ll talk about why Decembrist’s leaves turn red and what to do if you encounter a similar problem in our article. | Flower “female happiness” - the tips of the leaves dry out. Spathiphyllum, also known as female happiness, is a very beautiful flower. But flower growers know that its leaves often dry out and turn yellow for no apparent reason. We will talk about the reasons for the drying out of the leaves of the “female happiness” flower and methods of dealing with this problem in the article. |
| Date palm - leaves drying out It is very easy to grow a date palm seedling at home, but caring for an adult plant is more difficult - to avoid problems with it, you need to know some of the subtleties of care. We will talk about the problem of date palm leaf drying in this article. | Croton - leaves dry and fall off Croton is an ornamental foliage indoor plant. It is the bright, juicy foliage that is the main “trump card” of this flower. And it’s even more offensive if the leaves suddenly become stained, begin to crumble, or die. We will look into the reasons for the drying out and falling of croton leaves in this article. |
–>
25 comical pictures of how some men see themselves as coolDaddy's girls: 20 stellar family shots that will make you cry20 moms and dads who should be deprived of parental rights before it's too late...25 times when people took ordinary photos, but a masterpiece came out
| Women can't understand: 20 funny photos about men's problems | Weird people around us: 20 photos that will make you laugh heartily | |
| Spotted on the beach - 16 incredibly funny photos from vacation | 25 Hilarious Ads You Can See in Student Dorms | 20 emotional photos that will lift your spirits with a bang |
Features of fern propagation
Good care of ferns at home will help not only to grow a strong plant, but also to successfully propagate it. The most suitable methods: rooting young shoots (layers) and dividing an adult bush.
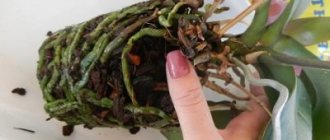
- Rooting of young shoots. You need to prepare a container with loose soil, place it next to the fern bush, then bend the long arrow that appears on the plant in the spring and strengthen it on the top layer of soil. You can use a pin or stone to secure it. The soil needs to be constantly moistened, or better yet covered with moss. Under good conditions, after a few weeks the shoot will take root and a young fern will emerge. When it gets stronger, the shoot needs to be cut off and the plant should be planted in a separate container.
- Dividing the bush. During the spring home care of the fern, you can propagate it, but for this it is necessary that there are several young basal rosettes near the adult bush. The earthen ball is carefully sorted and the plants are separated. Young specimens are planted in separate containers, and a moist and warm habitat is created for them. A clear plastic bag is best for this. The air temperature should not be lower than +24 °, the soil is moderately moist, the lighting is diffused. It is necessary to ventilate the greenhouse periodically to avoid the appearance of fungal diseases. As soon as the bush produces new leaves, the bag can be removed and the young fern can be cared for at home in the same way as for adult ferns.
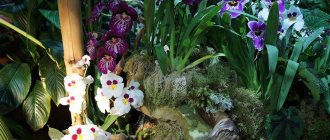
This is interesting! The largest number of ferns can be found in Tasmania. Most of the island is occupied by rain forests and national parks, where ferns of various types grow among lakes and waterfalls, creating an atmosphere of the prehistoric period.
Why do spots and plaque appear on fern leaves, the main pests and diseases of the plant
Also, if yellowing or other spots or plaque is detected on the fronds, it is necessary to inspect the flower for pests and diseases. If they are identified, the necessary measures must be taken immediately. However, it is important to understand that with proper planting and care, the risk of fern infection is very low.
House fern pests
The most common fern pest is the scale insect. Unfortunately, the plant does not always signal externally about the creeping parasite, and only after some time, when the infection has reached its peak, the fronds begin to dry out and fall off. Another difficulty in detecting scale insects is that they settle at the base of leaves and often cannot be distinguished from plant spores. Affected leaves must be pruned along with the petiole. Scale insects are removed mechanically by scraping them off with a brush. The plant is treated with Actellik (15-20 drops / 1 liter of water).
Also, the reason that the house fern dries out can be a spider mite, which causes harm by sucking the juices from the plant and likes to make cobwebs on it. The leaves wither, turn yellow and fall off.
If watering is improper, nematodes may develop in the roots. In this case, only replanting a flower with Actellik treatment can help.
If the air in the room is too dry, the fern can be attacked by aphids and whiteflies. In case of severe infection, spraying with Actellik, Karbofos, Aktara and other drugs will help. Mealybugs also cause yellowing of foliage.
Indoor fern diseases
Low temperatures and excessive watering can provoke the development of fungal diseases, such as gray rot, sooty fungus, etc. When these diseases appear, it will be too late to look for information on how to cure indoor fern. It is better to promptly protect the diseased plant from healthy ones in order to avoid infection. The use of fungicides will most likely be ineffective.
The best fight in this case will be to prevent the occurrence of diseases - maintaining the required level of soil and air moisture and favorable temperatures.
How to fertilize ferns in the garden: organic matter and minerals
Before planting, the ingredients are processed and the hole is moistened. As you may have noticed, moisture must be maintained constantly, especially in the first months after planting on the site and during the transitional spring-summer periods.
Moisturizing ferns: watering and air humidity
Young ferns - the first 2 years after planting - are moistened regularly, monitoring the condition of the soil in the garden. It should dry out, but only a couple of centimeters, after which another batch of water is added again so as not to lose the root system. In summer, if the air temperature rises significantly, you need to mulch the soil mixture. Use herbs, sawdust, dry leaves, coniferous lapnyaks - any means that retains moisture, but does not allow rotting. We cannot change the air humidity in the garden, but additional spraying will return the green pigment to the leaves.
Yellow leaves of a garden fern with brown dots
If you notice brown dots on the lower leaves that look like pustules, then these are spores. Don't worry, the plant is not infected with pests - often mites on shrubs settle in such buds. Especially if it is time for the fern to reproduce, it will accumulate spores and then spread to new areas. Main features of the external structure of ferns . There is no need to pick, trim or otherwise remove the lower leaves with brown spots. The yellowing will disappear if care is restored.
↓ Write in the comments why your garden fern turned yellow and what did you do to revive it?
Please rate the material you read :)
Why fern leaves turn yellow, care mistakes
Nephrolepis is an unpretentious plant with a fast growth rate. Usually tolerates room conditions well - humidity, temperature. However, there are times when a flower needs help to overcome unfavorable factors or cope with a disease. This is especially true in the off-season, at the beginning of the heating season or immediately after its completion.
If you suddenly begin to notice that your indoor fern has begun to look worse, is growing poorly, its leaves are turning yellow and drying, we advise you to take a test to determine whether you are caring for it correctly and whether you are keeping it in comfortable conditions.
Important! Nephrolepis may need some time to get used to new environmental conditions, for example, after purchase or transplantation. So, a two to three year old plant will need 1.5-2 months to settle in a new place. For a young seedling this period will be longer. The main mistakes when growing, which can become the reasons why the fern dries out at home, are:
- excessive or insufficient watering;
- incorrect temperature conditions;
- insufficient air humidity in the room;
- insufficient lighting or access to direct sunlight to the plant;
- excessive or improperly applied fertilizing.
In the following sections you can familiarize yourself with recommendations for proper plant care.
Improper watering and spraying of the plant
The most common reason why indoor fern leaves dry is improper watering. It is the lack or excess of moisture that often affects the appearance of the plant.
If the flower suffers from severe waterlogging, its lower leaves will turn yellow, and their tips will turn brown and dry out. Mold and rot may appear on them, as well as on the roots. Later the fronds will fall off.
In case of insufficient moisture, the flower will signal you by stopping the growth of leaves and turning them yellow. They will look drooping, lethargic, and unhealthy.
If you are starting to worry about the fact that your indoor fern is drying out, the first thing you need to do is switch it to the correct watering regime. When growing nephrolepis, you should make it a rule to water the soil until it is slightly moist. It should not dry out, but the plant also cannot tolerate excess moisture.
Did you know? Plants growing in ceramic pots require more frequent watering than those planted in plastic ones. Ferns are watered abundantly in late spring, summer and early autumn, that is, during especially hot periods. Whether the plant needs regular watering is determined by the condition of the soil - if the top layer is dry, then it needs to be moistened. On average, in summer, a fern will need moisture once every two to three days.
Watering in the cold season will depend on the room temperature. If the apartment is hot, then the flower is moistened in the same volume as in the summer. At moderate temperatures, watering is carried out rarely and in small portions. The optimal frequency of soil moistening for the winter period is once a week.
Important! Watering is carried out only with warm, well-settled water or rainwater. Changes in the appearance of the fern, such as yellowing, browning, and then curling fronds, indicate that you are using water that is too cold, hard, or too chlorinated.
In warm weather, it is recommended to water the plant in the evening, and in cold weather - in the morning. You also need to remember to loosen the soil if a crust forms on it after watering.
Fern loves daily or one-day interval spraying. They are also produced with soft warm water. Spraying will allow the plant to get rid of dust on the leaves and humidify the air in the apartment.
Important! It is forbidden to spray the plant during the period when its leaves are exposed to direct sunlight. This can cause burns, which is also a possible reason why fern leaves turn yellow.
Failure to comply with temperature and humidity requirements
The second common mistake when growing ferns is incorrectly selected temperature and air humidity for its maintenance. If the leaves turn yellow and the plant grows slower, pay attention to whether the conditions in your apartment comply with the recommended values.
The following temperature indicators are considered comfortable for nephrolepis:
- in winter – 16 °C;
- in summer – 22 °C.
If the temperature exceeds 25 °C, then it is necessary to increase the frequency of spraying the plant to humidify the air in the room. Yellowing of the leaves from the base indicates that the fern is hot and needs to be moved to a cooler location.
When the mercury column on the thermometer drops to 12 °C, it is recommended to reduce the number and volume of watering.
We noticed that young fronds wither and die - this is a sure sign that the plant is cold: either from the low temperature in the room or from watering with cold water.
Important! If the lower leaves of the fern turn yellow over time, then this is a natural process. In this case, they simply need to be removed. Ferns have high air humidity requirements - no lower than 60%. As soon as the air becomes dry for him and the temperature is too high, he will show you this first by drying out the tips of the leaves, and soon the entire frond. Also, brown spots may appear on the leaves under such conditions.
Optimal performance can be achieved by regular spraying at intervals from twice a day (morning and evening) to one spray every other day.
During very hot periods, a summer shower is recommended; in order to prevent water from getting on the substrate, it is covered with plastic wrap or a bag. Ferns also feel comfortable if the container in which it grows is placed on a tray with damp expanded clay, sand or peat. During the heating season, the flower must be placed away from radiators.
Excess or lack of fertilizers
Improperly applied fertilizing can cause a number of diseases in ferns. It is necessary to fertilize the plant only during the period of active growth - from spring to early autumn. This must be done every two to three weeks. It is better to reduce the recommended dosages by two to three times. Any fertilizer for decorative foliage plants is suitable for feeding.
Since the dormant period of nephrolepis falls on October-February, it is necessary to stop any feeding from October until the beginning of spring.
If the plant has become faded or has stopped growing, this may be because it lacks nutrients, or the container has become small for the development of the root system. The fern needs to be fertilized or transplanted into a larger pot.
Mistakes when choosing lighting
Another reason for the decrease in the decorative value of nephrolepis leaves is insufficient lighting or prolonged exposure of the plant to direct sunlight.
The fern prefers diffused lighting and will most likely refuse to grow in the shade. Penetration of direct rays is possible only for a couple of hours a day; nephrolepis cannot withstand more. An excess of lighting will certainly affect the decorative effect of the flower - its leaves will become faded and lethargic.
If the leaves of a fern dry out, to the recommendations on what to do in such cases, it is necessary to add moving the flower to the north or east sides, where it should be more comfortable.
Nephrolepis: proper watering and spraying
Watering any house plant is done only with settled water, soft, without chlorine. The water must stand for at least 12 hours. The water temperature should be room temperature. If you have the opportunity, occasionally water Nephrolepis with rainwater. You need to water it two to three times a week and sometimes put the fern in the shower.
If you water your indoor fern incorrectly, its leaves will begin to dry out, the flower will become covered with brown spots and may die over time. The soil in the pot should be moist, but not wet.
It was already mentioned earlier that nephrolepis really does not like dry air, so you need to regularly spray its leaves. If the room where your bush is located has very dry air, the fern must be sprayed every day. If the air humidity is normal, spraying is done two or three times a week.
You also need to spray the bush with settled soft water at room temperature.
Why does fern turn yellow in indoor conditions?
Fern, or nephrolepis (lat. Nephrolepis) is a very beautiful decorative foliage flower, which is popular both among gardeners for planting in open ground and among gardeners who plant it indoors. However, often the owners of the fern are upset by the fact that the leaves of the flower turn yellow and dry, or, as they are correctly called in this plant, fronds. If you look at the most popular threads on online gardening forums, you will find that this is a very common problem. And the reasons why the fern turns yellow lie in improper care.
In this article, we have selected a list of the most common mistakes that are made when growing this hanging plant at home and provoke the occurrence of indoor fern diseases. By preventing them, you can count on the fact that nephrolepis will delight you with its lush green bushes for a long time.
Did you know? In addition to its decorative properties, ferns also purify the air in the apartment from substances harmful to human health emitted by finishing materials and furniture, in particular formaldehyde, toluene and xylene.
Fern in an apartment: care features and possible difficulties
Fern is an ancient and mysterious plant; superstitious Slavs identified it with evil spirits and created beautiful legends, the most famous of which is to pick a mythical fern flower on Kupala night (July 7) and receive the gift of clairvoyance. In addition to fairy tales, the plant is widely known for its hardiness, but when planning a purchase, you need to take into account that even with quality care, the fern will not always grow well at home. To successfully grow a strong indoor plant, you need to give preference only to those species that adapt well to indoor life.
Asplenium has stopped growing: causes and solutions to the problem
So, how can you please your plants? Most often, several varieties of asplenium can be found on window sills. Among the large rosette forms with whole or slightly dissected foliage are:
- asplenium nidus, which grows wild in the tropical zone of the planet;
- asplenium ancient, also living under the canopy of dense, humid forest in the tropics;
- Asplenium scolopendra, which is a European and American forest species.
Ferns from this family with feathery and almost thread-like foliage are:
- asplenium bulbiferous;
- Asplenium viviparous.
Fans of indoor floriculture also grow other types of ferns, but they are all extremely sensitive to lighting conditions, temperature and air humidity. When caring for asplenium, in the photo, take into account that the plants are shade-loving and do not tolerate too bright light. The first reaction of a fern to excess sun is the blanching of the leaves, and then the plant responds to the unwanted effects of sunlight with brown spots on the fronds, their gradual withering and dying.
Dry air is equally sensitive for aspleniums, especially noticeable in winter, when the rooms are heated, as well as on hot summer days. Dry air causes asplenium to stop growing, its old leaves begin to dry out, and new ones do not appear at all.
If a gardener is faced with such a situation, it is necessary to take all measures to humidify the air.
And here a good help in caring for asplenium will be:
- Irrigation of the aboveground part of the fern with warm water;
- using a household humidifier;
- placing a pot with asplenium in a tray with moistened gravel or fine expanded clay.
When the tips of asplenium leaves begin to dry, treatment consists of increasing air humidity to 60–65% and adjusting the watering regime. You can soon notice that the growth of the fern has resumed, and necrosis does not involve new tissue of the frond.
In a room with low air humidity, the plant will be comfortable only if the temperature does not rise above 22 °C.
In summer, for shade-tolerant ferns, you need to choose a place where the average daily temperature was in the range of 18–21 °C, but in winter the air can be 3–5 degrees cooler.
At the same time, at any time of the year, the fern should not be allowed to be exposed to the cold. For tropical and feathery leaves, the critical temperature is 10–12 °C. Plunging into suspended animation, asplenium stops growing, the reason here is that in such cold air the roots of the plant stop absorbing moisture. And when left in cold, damp soil for a long time, the fern rhizome inevitably rots. Spraying foliage at low temperatures is also not beneficial.
Characteristics and species diversity of nephrolepis
The fern has a well-developed root system. The roots are shortened and superficial. The leaves are collected in a basal rosette. They are attached to the bush using shortened petioles. The shape of the plates is lanceolate, segmented. The edges of the segments can be smooth or serrated, depending on the type.
The length of the leaf reaches 70 cm, the length of the segment is up to 5 cm. The color of the leaves is bright green, mainly in light green shades. In the Variegate variety of nephrolepis, the color of the plates combines light green and yellow.
In addition to the leaves, bare scaly shoots extend from the rhizome. They are used for vegetative propagation of ferns.
Green Lady
The variety got its name for its tenderness and femininity. Representatives of Green Lady are often called a green fountain or fireworks. Refined fronds cascade down like streams. The leaves grow very densely, creating a lush bush.
Green Lady
They are bright green, slightly curled, with pointed tips. The segments are openwork. Flowers are grown as hanging plants. Due to their unpretentiousness to lighting conditions, they can be placed in any part of the room.
Why do fern leaves turn yellow after transplantation?
A prerequisite for fern care is its replanting. It is recommended to carry out this procedure every year in April-May until the plant reaches the age of three years. After that - once every two to three years. When transplanting, choose a slightly larger container. It should not be too deep, but wide enough, slightly larger than the root system of the plant.
It should be noted that nephrolepis does not always tolerate this procedure easily and quickly. He needs time to lay down new vines. What to do if you have just transplanted a fern, but it begins to dry out? First of all, it is necessary to provide the plant with all the conditions that it prefers, and wait a couple of months until it adapts.
If you have chosen the right soil and pot, it is important to understand that frequent changes in conditions also entail a change in the appearance of the fern - this is how it becomes capricious due to being disturbed. At this point, you need to remove the dried leaves.
Growing ferns at home will bring you real pleasure. This flower does not require too much attention. But it happens that the fern dries out and crumbles, and the owner is tormented by the question of why this happened. Find the source of the problem, and then boldly revive the plant!
Soil for house fern
Before replanting the fern, you need to prepare the soil for replanting. Now there are no problems with this; such land is sold in flower shops. The main thing is that the soil should be highly acidic; it is also advisable to add sand and humus to the soil; it is advisable to add leaf soil. The land should be almost like in natural conditions.
In the forest, the soil is loose, with peat residues. It is advisable to bring the soil as close as possible to that in natural conditions. If the soil is not loose, the fern will not absorb water well, and then the roots of your plant will begin to rot. If the soil does not allow air to pass through, the leaves will dry out and become covered with brown spots.
We invite you to familiarize yourself with Homemade canned bream in oil
Errors in caring for, watering and feeding asplenium
Therefore, in addition to maintaining a comfortable air temperature and humidity, the fern needs regular, but not excessive, watering.
Dry air, abnormal temperature conditions and improper watering are not the only reasons why leaves on asplenium turn pale or turn brown.
Often, spots on fern fronds are a sign of improper use of fertilizing, as well as insect attacks, causing weakening and sometimes death of the fern.
The substrate should not be allowed to dry out, but excess soil moisture is no less dangerous. Watering is combined with fertilizing, which is carried out every 10–14 days in the summer.
By leaving the fern without watering, the gardener runs the risk that due to lack of moisture, the asplenium leaves will turn yellow and die. In this case, you should not hesitate, because even with the complete loss of the above-ground part, a viable rhizome still remains. If you take timely measures to resuscitate asplenium, the fern can still be saved.
All yellowed or dried leaves are removed from the rosette, the rhizome is transferred to fresh soil and the fern begins to be carefully watered and sprayed. The surviving dormant leaf primordia wake up within 10–15 days, as evidenced by the appearance of first brown and then green buds in the middle of the rosette.
As a substrate for asplenium you can take:
- ready-made soil for ferns, after adding a little vermiculite and ground charcoal to it,
- soil for orchids and epiphytes, mixed with a small amount of nutrient soil and vermiculite;
- a homemade mixture of peat, leaf soil and humus with the addition of pieces of charcoal, perlite and chopped sphagnum.
During transplantation, it is necessary to carefully examine the roots of the asplenium, and if they are found dry or rotten, be sure to remove them. Healthy rhizomes are brownish, dense, covered with scales. A sign of the disease can be considered blackening of the rhizome tissue and its liquefaction.
To prevent the cut areas from rotting, they are treated with ground cinnamon, which has mild bactericidal properties, or charcoal powder.
Planting and replanting ferns
The plant is very sensitive to transplantation, therefore, the less often this procedure is performed, the better. Young bushes are replanted every year with the arrival of spring. The earthen lump must be carefully destroyed and the roots carefully examined. If rotten or dry fragments are found, they should be trimmed. To do this, it is recommended to boil a sharp knife or scissors for 8 minutes and only then cut off the root; the cut should be located 2 cm above the place where the rot ends. Be sure to powder the cut area with crushed charcoal to prevent infection.
It is advisable to replant adult ferns (from 3–4 years old) no more than once every 2 years and use the transfer method, immersing the earthen ball in a new pot, which is 3–4 cm larger in diameter. To fill the resulting void in the container, you need to use soil of a similar composition. It is quite possible that after suffering stress, the fern will hurt for some time, so you should carefully monitor it.
Important! Ferns do not like to be moved from place to place, so it is advisable to immediately think about which part of the room it will decorate.
How to prevent diseases and pests.
For your fern, and it doesn’t matter which one, the one that grows in the garden or the one that grows on the windowsill, to have some kind of pests, and it doesn’t matter what it will be, an insect or a disease, even a small deviation from the norm is enough. An increase or decrease in air humidity, an increase or decrease in watering, and many other deviations will definitely lead to your plant suffering from pest attacks. It is to prevent this from happening that it is necessary to carry out prevention. First of all, the fern needs to be inspected regularly, and about once a month the soil needs to be shed with a weak solution of potassium permanganate, this will disinfect the soil. If the plant grows in a house, the room must be ventilated regularly. If you carry out preventive maintenance constantly, then most likely your plant will always be healthy and strong, but if suddenly something happens to it, then by carrying out all the simple steps listed above, you will notice the pests immediately, and it will be much easier to eliminate them, and without causing any harm to your fern at all. But if measures are not taken immediately, then the insects or the disease will quickly multiply and spread, then it will be much more difficult to get rid of them, and at this time it will be very difficult for the plant itself, and it may even die.
Fern diseases and home treatment methods
If the fern is not properly cared for and the growing conditions are not observed, the flower begins to hurt and its appearance changes dramatically for the worse.
Causes of nephrolepis diseases:
- If you water a flower with cold, unsettled water containing a large amount of chlorine, then there is a possibility that nephrolepis may develop a pest such as a nematode. Signs of a nematode are yellow, dry leaves. In order to cure the plant, it must be urgently replanted. Before transplanting, the fern must be treated with an insecticide. This treatment can be purchased at flower shops.
- Insufficient humidity and very dry air can lead to the appearance of insects such as thrips, stink bugs and aphids. If you spray nephrolepis frequently, this can be avoided. Do not forget that it is also advisable to spray the plant with settled soft water. To get rid of emerging insects, the plant needs treatment with insecticides.
- If the leaves of the fern begin to turn pale, lose color, and the tips of the leaves begin to turn yellow, it means there are not enough nutrients in the soil or nephrolepis is grown in a cramped small pot.
- If the leaves begin to wither and dry out, this means that strong sunlight is falling on the plant. Ferns love shade, so they urgently need to be placed on a darkened windowsill.
- Drafts can also cause fern diseases. Drafts lead to lethargy and yellowing of the foliage, after which the plant dies.
For better care, fern growth and disease prevention, you can use complex mineral fertilizers. Frequent feeding of a flower can be harmful; it is necessary to moderately feed the fern with fertilizers. Be sure to follow the instructions on the fertilizer package, otherwise the plant may get burned.
With proper care of nephrolepis, your fern will always have beautiful, bright and healthy foliage.
Basic rules of care
All ferns cannot tolerate wintering in a warm, dry place, but in a humid greenhouse they can easily do without coolness. When growing openly in a room, on a windowsill, you need to isolate the plants from the drying air coming from the battery.
For planting most common species, standard flower pots and cache-pots are quite suitable, and for species with creeping rhizomes, such as polypodiums and dali, planting in wide and shallow containers is advisable. Platycerium is best planted in pots with holes or baskets, while species such as pyrrosia prefer to be planted on blocks.
The main requirement for soil is not even its composition, but its physical properties. It should be light, loose, water- and breathable, this is especially important for epiphytic ferns. For most species, any purchased mixtures based on peat humus with the addition of washed sand are quite suitable. Epiphytic species can be planted in a mixture of bark, sphagnum and cut dry leaves, add pieces of peat and coal.
Almost all ferns prefer uniform, moderate watering. They do not like either dryness or constant dampness. For irrigation, it is better to use soft, settled water (hard water must first be boiled and left for about a day) or rain, osmosis, etc. A number of species, such as maidenhair, are more often found in nature on calcareous soils, so they will grow well even when watered with regular tap water. Most ferns are very useful to spray regularly, because... the air in the rooms is usually quite dry, but polypodium aureum, for example, is not recommended to be sprayed, as this often leaves unsightly brown spots on its leaves.
Main diseases with descriptions.
If a fern is sick, you can see it almost immediately, especially noticeably if your plant is attacked by any fungal disease.
First of all, a coating may appear on the leaves of the fern, which gradually spreads to the shoots of the plant.
The leaves may soon begin to curl toward the center.
The root system of the plant begins to rot, the plant begins to wither. Gradually, this rot will spread to the fern stems.
All these signs mean that he was attacked by a fungus, or some kind of infection. First of all, you need to immediately remove all affected parts of the fern, and purchase any preparations to protect the plant from the gardening store and use them strictly following the instructions. Also be sure to keep an eye on their expiration date. Also, if there are a small number of insect pests on the fern, then you can use traditional methods, such as infusion or decoction of onions, garlic or mustard. They need to carefully spray the plant with a spray bottle.
Ferns also have very common diseases such as: Fern anthractosis - with this disease, brown spots appear on the leaves of the fern. Once they appear, the spotted leaves will need to be immediately removed and burned, and the plant itself will need to be treated with a fungicide. After this, do not spray the fern for 10 days, and the watering itself will need to be halved.
Root rot - with this disease, the leaves of the fern immediately begin to turn yellow, and if no measures are taken immediately, that is, watering is not reduced as much as possible, then the plant will simply die, because this disease itself appears due to waterlogging of the soil.
Leaf spotting - initially brown spots appear on the leaves, which grow over time and occupy an increasingly larger area of the leaf. If this happens to your fern, you should immediately remove all affected leaves and burn them. The plant itself needs to be treated with a fungicide and watering and spraying should be stopped for 3-4 days.
Gray rot - in this case, white mold appears on the plant itself and the ground around it. To prevent this disease from attacking, prevention must first be carried out: there should be no crowding between plants. As mentioned above, the room should be regularly ventilated, but there should be no draft. You need to water the fern bush directly at the root so that water does not get on the leaves. Do not feed the fern with fertilizers with a high nitrogen content, this will only harm the fern. If you suddenly notice this disease on your plant, you need to immediately remove and burn such leaves and, as with other diseases, the fern needs to be treated with a fungicide and stop watering for several days.
Basic fern care.
Caring for ferns is not as difficult as it may initially seem; here are the most up-to-date tips from experienced gardeners:
When planting ferns, the soil must be disinfected. If you plant it at home in pots, it is best to purchase the soil at a gardening store, or prepare it yourself, and be sure to heat it well. And when planting a fern on a site, the soil in the chosen place must be shed with potassium permanganate.
If a fern is already growing in your house or on your property, and you decide to purchase more, then the new plants need to be inspected very carefully; they must be completely healthy.
Make sure that the fern is not in a draft or in extreme heat. And never place a pot with a plant on objects such as a TV, refrigerator, etc. In such places, the plant can die very quickly, or when watering you risk that water will spill and get on the equipment.
Main reasons
Why does indoor fern dry out? This is a question you may well have asked yourself. There are several key reasons for the drying and wilting of a plant. All you need to do is consider them in detail and then make the right decision. If, for example, a Dutch indoor fern begins to disappear, it can be saved, but this must be done under the condition of comprehensive care. First of all, we will study why the tips of fern leaves dry out, and how to prevent it.
Watering errors
You will be able to quickly restore an indoor fern only if you can find out in time why it began to dry out in the first place. Most often, the plant suffers due to improper watering. Moreover, both waterlogging of the substrate and its drying out will not have the most favorable effect on the condition of the plant.
As a rule, if you over-water a fern, its lower fronds begin to actively turn yellow, and their tips simply dry out. In this case, the rhizome of the plant suffers the most - its shoots are constantly exposed to high humidity, so fungal formations or rot may appear on them. When there is a lack of water in the substrate, the flower looks drooping and lethargic, and it significantly slows down its growth. The leaves of this green specimen are turning yellow.
It is quite possible to prevent your favorite houseplant from drying out. The first thing you need to do to prevent the flower from dying is to provide it with proper watering. Irrigate the substrate regularly, but keep the soil lightly moist. Water should not remain in the pot after the next watering. Determine the frequency yourself, because a lot depends on the type of plant, and even on the flowerpot.
If you planted a fern in a ceramic pot, you will have to water it more often than a flower in a plastic container. The average irrigation frequency is once every 2–3 days. Adjust the soil moisture regime and get a healthy fern that will delight you with its greenery for a long time.
Pay special attention to the water itself. It is very important to use either rain liquid or the liquid you collected from the tap and left to sit for several days. Try to irrigate the soil composition of the fern with warm water. Remember that if you regularly water a plant with hard, chlorinated water, its leaves will turn brown and begin to wilt.
Incorrect microclimate
Now let's find out why the house fern suddenly dries out if you have normalized the watering regime.
Sometimes the reason is hidden in the microclimate you created incorrectly. Interestingly, this green specimen is often called an indicator of air in the home. If your apartment constantly maintains a microclimate that is too dry or too humid, this will not have the best effect on the condition of the indoor fern.
Normalize it: place the flower pot in winter away from heaters and radiators, and occasionally ventilate the apartment if necessary. In this case, the tips of the fern leaves will stop turning yellow and drying.
Unregulated application of fertilizers
We continue to figure out why indoor ferns turn yellow and disappear. The structure of the soil composition is of great importance for its full growth. If it becomes poor, it means the plant needs feeding. The optimal substrate for a fern should ideally include a small amount of peat, rotted leaves, and loose soil.
When a flower lacks nutritional components, it begins to turn black, and the leaves dry out and fall off. Add complex mineral fertilizer to the soil or saturate it with organic matter.
The main thing is not to overdo it with the amount of useful mixtures, as this can cause burns to the rhizome.
Methods for propagating indoor plants
Nephrolepis reproduces in three ways: by shoots, by dividing the bush and by spores. In indoor floriculture, only the first two methods are popular.
Whiskers are special shoots that the plant sends out directly from the leaf rosette. Outwardly, they appear as bare shoots.
Fern propagation by whiskers involves the following steps:
- An additional pot filled with moist fern substrate is placed next to the mother plant.
- The mustache is dug into the soil of an additional pot so that its base remains on the mother bush, and the top is in the air.
- For reliability, the mustache is fixed with a bracket or pin.
We suggest you read: Quick salting of cabbage at home
Rooting of the shoot
The soil of the additional pot should always be moist. The air around the shoot is constantly sprayed, providing a high level of air humidity. When the tendril releases its leaves, it is separated from the mother bush.
Dividing the bush
Adult nephrolepis can be propagated by dividing the bush. In mature plants, several leaf rosettes are formed over time. When transplanting, daughter rosettes are carefully separated from the mother bush. It is very important that each child has her own roots and growth point.
Dividing the bush
If the roots are very tangled and interfere with division, they should be soaked and untangled. The division sites must be treated with an antiseptic. Crushed activated or charcoal is suitable for this. New ferns are planted as mature plants. They do not need growing.
Disputes
Reproduction by spores is a very labor-intensive, but no less exciting process. Fern spores are located on the inside of the leaf. They are visible to the naked eye. Nephrolepis is removed from spores as follows:
- The spores are scraped off and dried in the sun for two weeks.
- Peat is placed in a glass jar. The layer should be 2-3 cm.
- The jar of peat is placed in the oven for sterilization.
- The peat is moistened and spores are poured onto it. The jar is closed with a lid.
- The jar is placed in a warm place with bright light. Spores germinate in high humidity conditions. The disputes are aired daily.
Fern spores
After all these procedures, the gardener should be patient and wait. After some time, moss will appear on the peat. This is an intermediate stage of development of nephrolepis. Only after 8-10 weeks will young ferns begin to develop. When they get a little stronger, they are planted separately.
It should be noted that not all indoor fern species can reproduce by spores. Some of them produce non-viable spores.
Propagating an indoor fern is quite simple; this process is a bit like propagating the flower Women's Happiness in that the root system needs to be divided and then transplanted into a new pot.
Before you start replanting, water the plant well, then take a larger pot and transfer the flower to a new pot. Such a transplant will preserve the nephrolepis roots from damage.
Ferns can be replanted every year. Transplantation is done mainly because the roots grow and become cramped in a small pot. If you transship your fern in the autumn, the plant may get sick and will have to recover for several months, so the best period for transshipment is the beginning of spring.
If you want to not only transplant, but also propagate Nephrolepis, then this is not a difficult process. To propagate during transplantation, you need to pull the bush out of the pot, after which you will see young basal rosettes. They need to be very carefully separated from the parent bush so as not to damage both the adult plant and the small children. Then you plant the children in a separate container.
In order for a young bush to take root faster, it needs to create greenhouse conditions. Take a plastic or film shelter and cover the container with the transplanted fern with it, this will facilitate and speed up the survival process of the young plant, since there will be enough heat and humidity under the plastic or film.
In order for your new plants to take root well, create all the necessary conditions for them and provide them with proper care. The air must be moist and the soil must not be too dry. If you do not adhere to these not at all complicated rules, then your children will most likely die.