Vegetable growing » Potatoes
0
1252
Article rating
Kira Stoletova
Modern technical equipment makes it possible to speed up the pace of agricultural work and facilitate human labor when planting vegetables. Hoes and other hand tools require a lot of physical effort and time. A disc hiller for a walk-behind tractor is an indispensable assistant for a vegetable grower who grows potatoes and other crops in large areas and wants to improve the planting process.
The principle of operation of disc hillers for walk-behind tractors
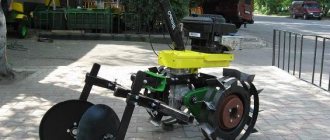
Disc hiller
The most popular type of equipment among users. It has become widespread for its simplicity of design and operation, does not require much effort during operation, and is convenient to set up and repair.
It also has two subspecies:
- without the possibility of adjustment - designed for light walk-behind tractors with low power. The working width is usually about 30 cm;
- with interchangeable working width - a universal type, since the width can increase up to 70 cm. With its help, you can hill up any crops - from beans to potatoes.
Potato hillers for walk-behind tractor
We’ll put lug wheels on the cultivator, set the maximum working width, and at the first shift we’ll put the walk-behind tractor between the beds.
Since the distance between the rows and both hillers is the same, the wheels will go exactly along the rows along the bottoms of the furrows and will not touch the stems of the potato bushes, and the hiller will evenly roll the soil to the base of the stems.
In this way we plant the entire garden. If you only have a single-row hiller, then you need to install wheels with rubber tires on the walk-behind tractor and run it between the rows.
A width of 70 cm is enough so as not to damage the potato bushes. It is important to note that hilling potatoes with a walk-behind tractor should be done after rain, when the soil has dried out a little, but remains moist. The benefits of hilling are enormous: air access is provided to the potatoes, weeds are destroyed and soil is added to the tubers.
How to install a hiller on a walk-behind tractor?
Installing and setting up a potato hiller for a walk-behind tractor is not a very complicated procedure. It is attached to the hitch using bolts and washers. When working with a simple hiller, you need to adjust its operating angle and depth of immersion into the ground. The plowing depth of the hiller is less than that of a plow, so for adjustment you do not need to place the walk-behind tractor on a hill. Simply adjust the hiller stand vertically. The required angle of attack is determined by how deep the hiller enters the ground in the working position. This depth should be about 15 cm.
If during the work you notice that the hiller is digging deep into the ground, tilt the stand forward. Otherwise, if the hiller does not deepen enough, the stand, on the contrary, is tilted back.
Setting up and installing a disc hiller is a little more complicated. First you need to set the distance between the lower points of the hiller disks. It will be 40-70 cm, depending on the upcoming work. Next, the angle of inclination of the disks relative to the horizontal axis is set.
The settings of both disks must be identical, otherwise the walk-behind tractor may skid to the side.
Disc hiller for walk-behind tractor device and use
The most common on farms are hillers with a fixed or variable working width, as well as disk hillers. The first and second types differ only in the design of the movable wings, which set the working width.
Hiller device for walk-behind tractor with fixed and variable working width
A hiller with a fixed working width is usually mounted on light walk-behind tractors weighing up to thirty kilograms with engine power up to 3.5 horsepower. These hillers are distinguished by thin racks with a diameter of 12 mm, which act as overload protectors for light walk-behind tractors.
Hiller with variable working width is the most common type of hiller used by farmers due to its relatively low cost and ease of operation. The disadvantage of this type of hiller is that some of the soil, after being poured onto the rows of plants, rolls down into the furrow.
This disadvantage is largely absent from the so-called. “Dutch” hillers, which are a separate subtype of hillers with variable working width. Their wings have the ability to move not only sideways, but also up and down. These hillers are intended for connection to walk-behind tractors weighing more than thirty kilograms with engine power of 4.0 horsepower and above.
Setting the depth of the hiller stroke
To fix the depth of travel of the hiller for the walk-behind tractor, use the side bolt 1. We set the hiller stand in a vertical position with bolt 2, located with the head towards the hiller stand to prevent the threads from bending. The beam is leveled to a strictly horizontal position using two bolts B on the hitch bracket and secured with locknuts G.
Setting the working width of the hiller
The gripping width of the hiller is set with bolt B and nut.
The universal hitch is distinguished by the absence of a screw mechanism for adjusting the angle of attack of the hiller; instead, a vertical groove of the bracket is used, as a result of which there is no loosening of the hitch during hilling.
Before setting the angle of attack of the hiller, first set the desired depth of its stroke, and then look at its stance. If its upper end is tilted forward, then the toe of the hiller will turn lumps of wet soil onto the surface, which will cause the walk-behind tractor to brake and “drive” it from one side to the other.
To prevent this, you need to loosen the two bolts on the hitch bracket and move the beam upward along the vertical groove, as a result of which the walk-behind tractor will “fall” back, and the hiller stand will stand vertically. If, on the contrary, the hiller stand is “piled up” back, then the hiller will not go deep to the required depth. Therefore, we move the beam along the vertical groove down until the hiller stand is in a vertical position.
We control the verticality of the stand along the heel of the hiller, located between its wings at the bottom and sliding along the bottom of the furrow being cut. After installation, tighten the nuts on the bolts securing the beam to the hitch bracket. The angle of attack for other mounted working parts is set in the same way.
Disc hiller for walk-behind tractor: device and application
The disc hiller contains a T-shaped leader, two stands, two disks and two screw lanyards. The discs are constantly tilted forward, and the angle of their rotation around the vertical axis is adjusted using turnbuckles.
It will be a pleasure to work with a disk hiller if you first fulfill one condition - install the disks in such a way that the gap between their lower points is equal to the width between the rows (in this case, the track width from the wheels of the walk-behind tractor is also equal to the width between the rows).
Disc hiller for walk-behind tractor
To set the required gap between the lower points of the disks, we rearrange the racks C of both disks and bolts B into different holes on the hiller’s leash. Thus, the width between the rows varies from 35 to 70 cm. Second: to prevent the hiller from being pulled to the side, we will set the same angles of rotation of the disks by turns of turnbuckles.
Setting the distance between the hiller discs
To make it easier to rotate the lanyards, the following method of attaching their ears is used: a nut or thick washer 1 is placed between the leash bar and the lanyard ear, the bolt is threaded through the lanyard ear, the nut and the bar. All this is tightened with nut 2. Then this nut is released 0.5-1 turns and locked with nut 3.
Attaching the lanyard and the hiller leash bar
The disc hiller is attached to the walk-behind tractor on a hitch bracket that does not have a beam. Like the beam, the hiller’s leash is attached to such a bracket using a stopper and two bolts with flat washers. The square pipe of the bracket is placed on the stopper, and the bolts firmly press the hiller arm from the outside to the square pipe.
After this, using two bolts B, the hitch bracket is rotated until the hiller’s leash is aligned strictly along the longitudinal axis of the walk-behind tractor. In this position, the leash is fixed with nuts G.
Hiller mount for disc walk-behind tractor
It is preferable to work with a hiller for a walk-behind tractor in first low gear. At a low forward speed of the walk-behind tractor, it is much more convenient for the operator to work, and the thrust of the walk-behind tractor increases accordingly. If the walk-behind tractor has only one forward gear, then try pairing the wheels to prevent them from slipping.
Do-it-yourself hiller for walk-behind tractor
Making a homemade hiller for a walk-behind tractor is not that difficult. It will consist of such basic components as 2 disks, 2 racks, 2 screw adjustment tarlaps, and a T-shaped rod for fastening the structure.
Before starting work, prepare the necessary preparations:
- metal sheets for making disks (or ready-made disks);
- square metal profile for making a rod;
- parts for making tarlap adjustment.
The photo below shows exactly how the vertical axes of the hiller will be adjusted using the tarlep. The letter “B” denotes the adjustment screws, the letter “C” denotes the racks:
If you have the necessary preparations, the manufacture of the hiller should be carried out according to the drawings given below. Remember to adhere to the specified dimensions to obtain a quality product.
The hiller will be attached to the walk-behind tractor by a bracket, the leash, in turn, is attached to the bracket with bolts with a stopper.
We also suggest that you watch the video, which describes the intricacies of making a homemade hiller for a walk-behind tractor:
Such a hiller will be compatible with such models of walk-behind tractors as Neva MB-1, MB-2, Agro, MTZ, etc.
Lister hiller
Models with a lister design can be considered the simplest, because they do not have the ability to adjust the working width; the system has already set the furrow width. The average reach of a lister hiller is 30 cm, which is quite average for planting most crops.
The lister hiller works perfectly with most walk-behind tractors; with the racks installed, there is no possibility of overloading the walk-behind tractor.
A Neva walk-behind tractor with a 6.5 hp Subaru engine is suitable for hilling.
Trailed equipment
Trailed attachments have been developed for the walk-behind tractor: hillers, plows, potato planter. Gardeners prefer to have a device with a hiller on their farm, which can be adjusted to suit their working width.
This takes into account the size of the plot and the variety of potatoes.
Planting under the plow
Passage in the opposite direction is accompanied by covering the furrows with soil. This method is used often, and there is no need to pre-mark the area for sowing.
Working with a disc hiller
Planting is also carried out with a disk hiller. This device is an attachment for a walk-behind tractor in the form of a special frame on which metal disks are suspended at an angle to the surface of the earth.
The hiller not only cuts ridges for planting, but also loosens the soil.
Potato planter
Planting with a potato planter differs from the previously mentioned methods in that it does not require marking or manually laying out the tubers. This process is completely mechanized.
The use of potato planters is advisable on large areas. But the specific design of the equipment requires additional careful selection of seed material by size.
Using a two-row hiller
Other devices are also used, for example, a two-row hiller. It would seem that the work should be halved in time. But there are features of planting potatoes using a walk-behind tractor with a two-row hiller.
With this technology, two ridges are processed simultaneously. It is difficult to control both ridges at once, so people try to simplify the planting process.
Features of operation
Before you start hilling potatoes using a hiller, you need to set it up correctly. To do this, the lower points of the disks are spaced apart from each other at a distance equal to the row spacing, and the angle of attack is calculated, the value of which depends on the type and structure of the soil. So, for dry soil the angle should be slightly increased, and for moist soil it should be set to the minimum position. Otherwise, there is a risk of damaging the plant stems with large piles of wet, and therefore heavy, soil.
The discs must be adjusted absolutely symmetrically, otherwise the hiller will begin to move to the adjacent row, and it will damage the tops and tubers.
Cultivating a potato field with a hiller is not difficult even for beginners. The main thing is to carefully read the instructions for its use and follow a number of simple rules.
- So, the first hilling of potatoes is carried out immediately after they sprout. In particularly cold years, when there is a threat of return frosts, it is recommended to make the ridges higher during the first treatment. This will protect the crop from freezing and ensure that a temperature comfortable for the plants is maintained inside the earthen mound.
- After the tops grow to about 30 cm, hilling should be repeated. In this case, you need to be especially careful, trying to do the work so that the stems remain in an upright position and do not fall down.
- Hilling should be carried out in the morning or evening hours on moist soil. In case of prolonged drought, the plantation is watered before processing.
- Removed weeds, as a rule, are not collected and are left between the rows. This protects the tops from adverse weather conditions and helps maintain a favorable microclimate in the soil.
Read also: How to make beautiful things
How to hill potatoes with a single-row plow-shaped hiller?
The simplest device for hilling is a single-row plow-shaped hiller. Unlike the two-row model, it is not highly productive, but at the same time it is more convenient for working on a small plot of land.
To hill up plants with such a device, you will need to install wheels with minimal outer edges on the walk-behind tractor. Since the body of the unit will move between the rows, the smaller the width of the wheels, the smaller the row spacing required for passage. The hilling process itself is no different. You just need to adjust the depth and you can start working.
The choice between different types comes down solely to individual conditions of use. In general, each device can significantly facilitate the work of any gardener.
Instructions on how to install and adjust the hiller
Open photo Instructions on how to install and adjust the hiller in an enlarged view. If this is a drawing or diagram of a device, you can download it to your computer by opening it in large size and using the “Save picture as” function. "(right mouse button). Please rate this material by highlighting the appropriate number of stars.
- 1
- 2
- 3
- 4
- 5
Most often, together with this material on the topic
“Setting and adjusting hillers for a walk-behind tractor”
You can view all photographs, drawings, pictures and diagrams from the category “How to make a hiller: photo with description” by clicking on the link. You will find even more materials with descriptions of how to make your own motor-cultivator and accessories for it in the section “ Attachments for a walk-behind tractor ” or by selecting from all the materials on the site motoblok.populjarno.com under the following TARKS: adjustment, Mechanisms, instructions, hiller.
Perhaps what you are looking for is in one of the most viewed sections of our website:
DRAWINGS AND PHOTOS OF HOMEMADE MOTOR-BLOCKS and ATTACHMENTS (CLICK ON THE PICTURE or name):
Comments on the material “
How to set up a two-row hiller on a walk-behind tractor: methods for installing and adjusting the hiller ” are located at the bottom of the page - here you can express your opinion, ask for advice from visitors to our site, share interesting materials, talk about your positive or negative experience during the assembly of walk-behind tractors and do-it-yourself trailer equipment. If you have questions or suggestions about this material, please leave your comment below. For those who want to share their photos using the keywords “adjusting the hiller, how to set up, adjust, installation, instructions, double-row hiller, change settings” or any other questions about diesel, gasoline, light, medium or heavy homemade walk-behind tractors, motor-cultivators and mounted accessories for them - you need to register and use the link “Add a photo. "(visible after registration on the page of all Photo Albums of walk-behind tractors and attachments ). | Photo dimensions: 720px by 720px; 292.0 Kb
Types and types of hillers for Neva walk-behind tractors
A distinctive feature of the Neva walk-behind tractor is its compatibility with almost any type of attachment.
Hillers are designed to form furrows for further planting of agricultural crops. They are also sometimes used to loosen the soil and roll down grass from the rows to the roots of crops.
The official website offers 4 models. Let's figure out what the differences are between each model.
They are all similar in their purpose and end result. But they differ in manufacturers, designs, sizes and functional purposes.
Double-row hillers allow you to simultaneously process two rows of crops. It is a bracket post that is connected to the hitch. And two racks with hillers that are bolted to it. You can adjust the width of the hiller and adjust it to the required conditions.
There are two options available on the manufacturer's website.
Double row OND
This hiller is produced by.
It is designed to work on light and prepared soils. In particular for cultivating soil in gardens, greenhouses or small vegetable gardens.
- The maximum depth for hilling is 120 mm, the minimum is 80 mm.
- The depth of penetration of the unit into the ground can be adjusted manually.
- The width of the OND wings can range from 25 to 43 cm.
The mounted double-row hiller OND has the following dimensions:
- 72 cm long,
- 54 cm high,
- 35 cm wide.
- With such dimensions, the weight of the OND is up to 9.5 kg.
The operating principle of a double-row hiller is shown in the video:
Double-row STV
It is produced by Volzhskaya.
This company offers two options for manufacturing hillers for the Neva walk-behind tractor. The main difference between them is the width of the wings and the distance between the bodies. That is, everyone can choose the option that suits them best.
- The weight of models can be 10 or 13 kg.
- The width is from 86 cm to 1 m. The length of the model can be from 39 to 46 cm. And the height is from 46 to 68 cm.
- The distance between the shares is adjustable and can be from 21 to 65 cm.
- The maximum plowing depth can reach 15 cm.
As we can see, this model offers a wide range of settings. Therefore, each owner will be able to adjust the hilling devices to their needs. If your two-row STV hiller is slipping, you can alternatively use a solution with upgraded lugs:
Single-row STV NPD
They are designed to process only one field row. It is more effective if you look at it from the point of view of ease of management. Because when working with a two-row hiller, it is necessary to monitor the work of two rows at the same time. But this is not always possible and it is possible to make the wrong movement and damage the sown crops.
|
Plus, the arrangement of the beds is not always level and there are uneven lines when planting. In this case, there is a high probability of crop damage. Single-row hillers for the Neva walk-behind tractor are much easier to operate than double-row hillers.
Therefore, ZAO VRMZ offers its customers a wide selection of single-row hillers. Various configurations and sizes. In total there are more than 15 different models and configurations.
Here are their average characteristics:
- Overall dimensions – 46 cm in length, 21 cm in width and 65 cm in height. The average weight of the structure is 5 kg.
- Hilling depth can reach 15 cm.
- And the working width of the hiller is from 21 to 36 cm.
How to use it correctly?
A special coupling is used to connect it to the walk-behind tractor.
After coupling, special bolts should be used to adjust the working depth and the width of the hiller. To do this, it is necessary to take into account the characteristics of the soil that is planned to be cultivated.
The depth of hilling is adjusted by changing the angle of inclination of the body itself.
If the need arises, the angle of inclination can be easily adjusted during agricultural work.
It is recommended to use special wheels with lugs in combination with a single-row hiller. They will be able to give additional stability to the walk-behind tractor.
Here is a video showing how a single-row hiller is used:
Single row disc
This type is a structure consisting of a rack, a disk and a shaft. The drain is mounted on a special bracket using a bracket. This bracket allows you to adjust the position of the stand in any direction. The shaft is equipped with a sector, it allows you to adjust the angle of the disk. The discs are mounted on a shaft, which is driven by plain bearings.
JSC "VRMZ" offers the following characteristics:
- Weight can range from 5 to 10 kg.
- The length of the hiller ranges from 24 to 27 cm.
- The width can be adjusted from 33 to 66 cm.
- The height can be adjusted from 54 to 70 cm.
- The maximum height of the ridge can reach 20 cm.
- The tilt angle of the discs is adjustable from 27° to 35°.
CJSC VRMZ does not offer its clients to use what they have. They offer their customers a wide range of settings for the mounted hiller. So that you can adjust its work for beds of a specific size.
Setup and operation
First, it engages with the walk-behind tractor. Then the distance between the hiller bodies and their width are adjusted.
The width can be adjusted by spreading or narrowing the wings.
And the working width is controlled by loosening the bolts and rearranging the hiller body. After installation at the required distance, you should securely fasten them back.
IMPORTANT! After adjustment, the housings should be at a symmetrical distance from the axis. Otherwise, the walk-behind tractor will constantly lead in one direction and work will be impossible.
Before use, you must first couple the hiller to the walk-behind tractor.
Then adjust the angle of inclination and the distance between the discs to obtain the comb of the required height. To do this, you must use special bolts according to the manufacturer's instructions.
The discs go deeper into the ground by pressing the handle of the walk-behind tractor as it moves.
If the need arises, it is possible to adjust the angle of inclination of the disks and the distance between them directly during work.
Here is a detailed video review of the disc hiller for the Neva walk-behind tractor and an example of its operation:
Setting up the walk-behind tractor correctly
Hilling is carried out using a single-row, double-row or three-row device.
Weeding potatoes with a walk-behind tractor
To work with the hiller, the usual wheels of the walk-behind tractor are removed and lugs are installed, and only after that the device is attached.
The lugs are designed to make the mechanism heavier and improve its adhesion to the soil. On the market you can purchase both universal devices and devices made for a specific model. For the most common models of walk-behind tractors Neva and Salyut, the lug width is 43 and 50 cm, respectively, and the tenon length is 15 and 20 cm.
The distance between the lugs for a single-row hiller should be minimal, since both wheels move along the same row spacing.
On the ground! The coupling should not be rigid. It is attached to one kingpin. The play in the horizontal plane should be about 5-6°.
You cannot install the hitch on two kingpins, as in this case a rigid connection is obtained. Also, a rigid coupling between the hiller and the walk-behind tractor is obtained if the backlash is removed. In a garden plot there are always areas with denser soil. If the hiller gets into such an area, the walk-behind tractor turns around a little. With a non-rigid connection, the force exerted by the hard soil is not transferred to the handles (the hitch plays out the force), and the walk-behind tractor goes straight, although the hiller itself wobbles a little. With this connection, the row turns out to be more even, and the worker expends much less effort.
Feasibility of the procedure
Disc hillers are used for a very important agricultural technique - hilling. Carrying out this event is a mandatory procedure when growing potatoes. It performs a number of important tasks:
- removing weeds, which is quite problematic to do manually with a hoe;
- hilling protects the tubers from exposure to direct sunlight, which, if the potatoes are close to the surface of the earth, can slow down their development and sometimes even lead to drying out;
- Correct and timely hilling leads to improved air exchange in soils and normalizes the evaporation of moisture from the surface of the earth.
Hilled potatoes are less susceptible to rotting and invasion of parasites, which is due to the high drainage properties of loosened soil and the free outflow of excess moisture. In addition, the size of the tubers of hilled potatoes is much larger than that of a crop that is not cared for.
If there are several rows of potatoes in a summer cottage, there is, of course, no need to purchase a hiller, but if quite large areas are occupied by potatoes, then mechanization of this process is indispensable.
Firework
The second place in popularity is occupied by the Salyut walk-behind tractor with a power of 6.5 hp. To plant potatoes, you need to have, in addition to the unit, an additional plow, a hiller, and, above all, devices for adhesion to the ground.
Read also: Original garden furniture made of wood
Planting potatoes with a Salyut walk-behind tractor fundamentally looks like this: the mechanism moves in one direction and cuts a furrow for planting seed material, the same unit returns back and covers the furrow with soil.
The peculiarity of the walk-behind tractor is expressed in the selection of appropriate attachments.
MTZ walk-behind tractors came to us from the Soviet Minsk Tractor Plant, they are still popular today and are in demand among the Russian population.
An agricultural machine of minimal size turns out to be multifunctional and universal. It fulfills its purpose well.
The model has disadvantages:
- there are problems with gear shifting;
- a load of physical strength is required when switching the differential.
Each business owner purchases equipment based on considerations of cost and expediency. Requirements for agricultural practices do not change.
What types are there?
Also check out these articles
- Description of the gooseberry variety Komandor
- Geranium flower
- Cabbage for the winter in jars
- Honey Apitonus
Disc hillers for hilling potatoes and other crops come in two types: manual and for walk-behind tractors. If the plot is small, then the manual version is usually used, if the whole plantation is planted with potatoes - a hiller with a walk-behind tractor. Now in more detail about each of them.
Types of hillers
Mechanisms for walk-behind tractors have almost all metal parts. They rarely break with proper care, and always do their job efficiently. Such mechanisms are attached to the walk-behind tractor with special nuts, which are included in the assembly. When the walk-behind tractor moves, the disks begin to rotate. They grab the soil and pour it under the plant, thus making a hill. However, such devices are quite expensive. Iron construction, reliability, a resonant brand - everything requires money, so more often gardeners use manual disc hillers.
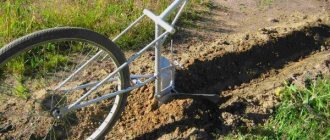
A manual hiller is cheaper, and what’s more, you can make it yourself, which will be discussed below. The method of operation of the manual analogue is the same as for the walk-behind tractor, only in this case the mechanism is pulled not by a machine, but by a person. To do this, the mechanism of such structures has a T-shaped pipe with a diameter of 2-5 cm, by which you need to pull or push the hiller.
Wire harrow for weeding
Weeds in the garden grow next to the potatoes. Special equipment is used to clear the area of weeds.
Wire harrow for weed removal
Weeding is easy with a harrow. The harrow teeth are attached to the mesh and face the ground, the mesh is suspended from the frame. The technical means pulls this drag across the field, and as it moves, the weeds are pulled out.
Use a harrow when weeds appear after plowing before germination.
Read also: White sediment in canned cucumbers
So, the row crop potato, which is loved by the entire population, requires a special approach. Growing involves many agrotechnical methods. Designers and manufacturers of small-scale mechanization make good gifts for rural workers.
Agricultural work is the most labor-intensive, and those who cultivate large areas will benefit from special equipment. For example, it is much easier to plant potatoes not under a shovel, manually, but mechanized, using a walk-behind tractor. To implement the plan, you need planting material, a walk-behind tractor and special attachments.