Basic rules for arrangement
In order for the hen to pay attention to the nest offered to her, and not lay eggs where she wants, you need to make it as comfortable and safe as possible. The laying process takes 30-60 minutes, during which it is not advisable to disturb the bird. Instinctively, she chooses a dark and secluded corner where there is soft bedding. When kept free-range, chickens can hide in thickets of grass, under berry bushes and in other places that are inaccessible to the owner.
To attract chickens to artificial nesting sites, the following conditions must be met:
- install them in a shaded corner of the chicken coop;
- choose a warm and dry place without drafts;
- install the box not on the floor, but slightly above it (up to 30 cm);
- High installation of nests (more than 50 cm above the floor) is also undesirable: these most often contain eggs with blood streaks in the yolk;
- the number of nesting sites depends on the number of birds - 5 pcs. 1 box is enough;
- There should be soft and dry bedding inside (straw, shavings, etc.).
You can install boxes for laying eggs where chickens prefer to lay eggs themselves, if it is convenient for the owner.
Chicken coop equipment - what you need to have
In the summer, many things necessary for the comfortable living of laying hens may not be remembered. The issue concerns lighting and heating. Additional lighting is installed in autumn and winter. Many farmers, especially in small chicken coops, install a regular socket into which light bulbs of different wattages are screwed. However, chickens can fly around the coop and touch the cord with the light bulb. This behavior of birds can cause a short circuit.
Such lighting - without switches - burns in the poultry house for days, making laying hens nervous. Ideally, these egg-laying females should be provided with no more than 15 hours of daylight in winter, and the rest of the time in the coop the lights should be turned off so that the birds have the opportunity to rest until the morning. In this case, even in cold weather, the birds do not change the rhythm of their life and lay eggs with the same regularity as in summer.
Typically, fluorescent lamps equipped with switches are used for winter lighting.
Properly installed ventilation allows you to remove all unpleasant odors from the poultry house, in which case the air in the room will always be fresh, but without drafts harmful to poultry.
In addition to lighting and ventilation in winter, you should take care of heating the chicken coop. And although it is believed that if there are a large number of chickens in a small winter room, you should not install additional electric heating devices, since the birds will heat themselves, this is not entirely true. Even with good insulation materials that cover the walls of the “bird house”, in winter the thermometer in it does not rise higher than +7+8⸰С.
Therefore, prudent farmers must install oil heaters in poultry houses for the winter, lined with a wooden box in which round holes are made for ventilation of warm air. Such a box is needed so that birds do not get burns when they come into contact with the heater, and also do not drop it.
Maintaining a certain temperature and humidity in the room, as well as additional lighting, are important measures for comfort and normal productivity in winter. But besides this, it is necessary to arrange places where chickens will lay eggs, as well as roosts.
Cells
If it is not possible to build a large chicken coop, but you want to breed more chickens of egg and meat-egg breeds, you can place cages indoors. In this case, it will be possible to have these birds two to three times more than the size of the house allows. When installing cages, you need to imagine what cages for keeping chickens should be equipped with:
- for laying hens, the cage size should be about 0.6 m2, for meat-egg birds - 0.8 m2, since such individuals are larger in size than laying hens;
- Individual feeders and drinkers are installed in each cage;
- cell walls are made of glass or metal mesh; blank walls are not made;
- the floor must be strong so that it does not sag under the mass of birds;
- there should also be a place where the chickens will lay eggs;
- Cages should not be placed on the floor or near a door, where it may be damp and cold.
Nests
Arrangement of nests is an important detail when breeding chickens of egg and meat-egg breeds. Although chickens are quite unpretentious in breeding birds, due to their physiology they need a shaded, warm and dry place to lay eggs. Therefore, for normal egg production, these individuals need to install nests correctly. The dimensions and making of places for masonry with your own hands will be discussed below.
Perches
The perch is usually made of rounded blanks or bars and is intended for the night rest of these birds. Bird breeders make the perches themselves in different ways, since there are many options:
- in small chicken coops, where the number of laying hens is small, you can simply place the perches along the walls of the room;
- also in small rooms, perches are fixed at different heights, the distance between them should be at least 0.3 m so that the birds do not stain each other with their droppings;
- Some poultry farmers make portable perches, which are practical in small chicken coops - the floor is easier to clean, and the structures can be moved to any location indoors.
You should know the basic dimensions of the perches: for meat-and-egg chickens, a crossbar of 0.3 m is sufficient for one individual; the height of this structure should be no more than 0.6 m, and its cross-section should be 5 by 6 cm. The distance between the crossbars is about 0.4 m.
For birds less than 5-6 months old, the dimensions of the perches should be as follows: the length of the crossbar is calculated based on the fact that no more than 0.15 m is needed for one individual, the crossbars are placed at a height from the floor of no more than 0.2 m. The cross-section of the bar should be about 5 cm, and the distance between the crossbars is no more than 0.2 m.
What do you need to know?
The most important factor to consider when building nest boxes is their internal dimensions. When keeping egg breeds of birds, the following dimensions of the nest for chickens are observed:
- width - 25 cm;
- height - 35 cm;
- depth - 35 cm.
Households often keep meat and egg poultry, which is larger in size. For these chickens, the width, height and depth are 30, 45 and 40 cm, respectively.
To prevent nest litter from being scattered, a side is installed on the front of the nest box. The height of the threshold must be at least 5 cm. In front of the entrance, it is recommended to make a shelf onto which a bird about to lay eggs will fly. The shelf should be wide enough for a chicken to walk along it. Sometimes this detail is made in the form of a perch. Then it is placed parallel to the front wall at a distance of 10-15 cm from it. The section of the bar is 5x2 cm.
It is advisable to make the roof of the nest boxes steeply inclined (at least 45°). This will prevent chickens from trying to sit on it.
How to do it yourself?
Making nests for laying hens with your own hands is quite simple. Poultry farmers who do not have any construction skills can build them from scrap materials.
Quick socket
The simplest version of a quick-made nest can be an ordinary plastic vegetable box filled with straw, sawdust or hay.
As a curtain to darken such a nest and cover it from the front, you can use:
- a piece of old cloth;
- a piece of plywood;
- a large sheet of thick paper.
The main disadvantage of such nests is that they take up too much space. In addition, being placed directly on the floor of the poultry house, they do not protect laying hens from the possibility of colds.
As a rule, quick sockets are used for a short time: until a more convenient design is made.
If the area of the chicken coop is large enough, and the chickens lay eggs well even in such conditions, you can use this option for a longer period.
Nest-box
To build a structure that resembles a dog house, you need to prepare:
- sheet of plywood (at least 1 cm thick);
- wooden block;
- jigsaw;
- set of self-tapping screws;
- screwdriver;
- sandpaper.
The exact dimensions of the parts for the future nest depend on the dimensions of the hen. The parameters of a standard nest are 35x35x35 cm. For chickens of the meat-egg cross, the height of the house can be increased to 40 cm.
Manufacturing sequence:
- 4 wall blanks (size 35x35 cm) are cut out of plywood.
- A semicircular hole is cut out on one of them, intended for entering the nest.
- Mark and cut out the threshold that will be placed at the entrance.
- 4 parts are cut out of a wooden block, the length of which is equal to the height of the walls.
- A box is assembled from the cut blanks using self-tapping screws and wooden blocks placed in the corners.
- Carefully inspect the structure for sharp corners, protruding screws and chips. Identified defects are immediately eliminated.
- Cut out the ceiling and floor parts and fasten them to the walls.
The bottom of the finished house is covered with sawdust, hay or straw and, having attached it to a vertical support 30 cm above the floor level, a ladder is attached to it.
Nest box
To make such a nest you will need:
- thin boards or plywood;
- sandpaper (coarse-grained);
- wooden beam;
- nails;
- saw or jigsaw.
Manufacturing sequence:
- The surface of the board is carefully treated with sandpaper.
- To calculate the length of the future box, you need to multiply the width of one cell (equal to 30-35 cm) by the required number of sections.
- The height of the box is calculated in the same way (if there are a large number of laying hens, it is advisable to make a multi-tiered structure).
- From the cut parts, according to the developed diagram, a box is knocked together. To make the structure more durable, a wooden beam is attached to the inside of the box, making sure that the nails do not come out.
- The entrance is either left open, or, by cutting a series of semicircular holes on the board (according to the number of planned sections), the front wall of the box is sheathed.
- A threshold is attached to the bottom of the finished box (along its entire length) - a narrow strip with a height of 8 to 10 cm.
- A take-off platform is built 10 cm from the entrance, representing a horizontal bar 10-15 cm wide.
- A multi-tiered nesting area is equipped with ladders (one for each tier).
- The structure is attached to vertical supports installed at some distance from the wall. The lower tier must be raised above the floor by at least 30 cm.
With egg collector
Nests with an egg collector have a more complex design, but they are a real salvation for those poultry farmers who do not have the opportunity to visit the chicken coop during the day. Such nests are divided into several types, but the most popular are those described below.
Double bottom nest
To work on the design you need to prepare:
- thin boards or sheet of plywood;
- nails or screws;
- sandpaper;
- hammer or screwdriver;
- hacksaw;
- scissors;
- soft material (for upholstering the egg collector).
Sequence of work:
- The upper part of the nest box is made in the same way as the nest box (its production is described above).
- The difference lies in the special design of the bottom, which must be given a slight (no more than 5 degrees) slope towards the rear wall. It is necessary to leave a gap between the bottom of the nest and its wall, into which the laid egg can easily pass.
- The egg collector (or tray) is made separately, and then upholstered with non-slip soft material (rubber, the wrong side of linoleum, felt or soft fabric). The width of the tray should be 10 cm greater than the depth of the nest: this will make it possible to collect eggs from the outside of the nest. To prevent eggs that have rolled into the tray from falling onto the floor, it is necessary to attach a horizontal bar to it.
- The finished pallet is attached to the main part of the nest at an angle of 5 degrees. If everything is done correctly, the eggs that have rolled into the lower tray will lie there completely safe until the poultry farmer collects them.
Nest with egg container
A simpler version of the nesting described above:
- Referring to the drawing, a box is made: first, the side walls are fastened, then the bottom is attached (at an angle of 10 degrees), and only after that the roof.
- Having cut out the inlet hole on the front wall blank, close the front part of the structure.
- A hole is cut out in the lower part of the back wall, the size of which is slightly larger than a chicken egg.
- A container is placed under the floor, lined with any soft material that prevents damage to the eggs rolling into it.
In order for the eggs to roll into the egg collector without problems, the amount of litter in nesting boxes with a sloping bottom should be minimal.
"Family" nest
For 10 chickens, a special design is required, equipped with an egg collector, a feeder, a drinking bowl and a shelf for collecting litter. For each laying hen in such a nest there should be at least 1 square meter. meters of area.
To make such a design you need to get:
- sheet metal;
- metal profile or durable wooden beam with a section of 4x4 cm;
- metal mesh;
- nails (if the nest is made of a profile, rivets will be required);
- door latches;
- drinking bowls and feeders of the required size (if there are none, you will have to make them from tin);
- wheels (for legs).
Sequence of work:
- Referring to the drawn diagram, they assemble the nesting frame. To provide the necessary strength, additional stiffening ribs are created on the walls and in the lower part of the frame.
- If desired, the legs of the future nest can be equipped with wheels: with their help, the structure can be moved during cleaning, as well as easily moved to another place.
- The bottom is attached to the frame at an angle not exceeding 10 degrees, and then a pallet is placed under it.
- The partitions between the sections are made of metal mesh, which allows for good ventilation. To fasten the mesh, pliers and rivets are used.
- Feeders and drinkers are attached to the front of the structure.
- At the last stage, doors are installed, made of coarse mesh and providing unhindered access to water and feed for laying hens. They must be equipped with door latches.
Frame
Frame nests, constructed from the same materials as conventional box nests, are valued by poultry farmers for their particular strength and long service life.
The sequence of their manufacture is as follows: in accordance with the drawing, a strong frame is first knocked together from wooden blocks, and then covered with plywood. If desired, an egg collector can be installed under the structure.
Metal
Photo:
The process of manufacturing a nest made of sheet steel is quite labor-intensive and requires significant material costs, but the resulting product can be used for decades.
Necessary materials:
- screws;
- galvanized steel sheets;
- iron pipes with a cross-section of no more than 5 cm;
- several meters of metal mesh or a coil of wire.
To work on the structure, you need to acquire an electric drill and a metal grinder.
Sequence of work:
- Steel sheets are marked in exact accordance with the drawing.
- Using a grinder, cut out the details of the future nest.
- Its bottom is made of metal mesh or woven from wire.
- All elements are connected: first of all – the walls, then – the bottom (the angle of inclination should be equal to 10 degrees); The roof is attached last.
- An egg collector made of metal and covered with any soft materials is placed in the front part of the structure.
Nest-box
This type of chicken nest is a wooden box, open only on one side. Products are removed through the inlet. If the bird is calm and does not peck its own egg, then such a design will be sufficient. If there are a large number of laying hens, the booths can be made in the form of sections combining several cell-boxes.
To work you will need:
- sheet wood material (plywood, chipboard) or boards;
- block with a cross section of 2-3 cm;
- screws or nails;
- sawing tool;
- file.
Cut out 5 rectangles with the dimensions of width, depth and height as needed (2 side walls, floor and roof, backdrop). Cut bars to attach the walls to each other. From the remaining material, make a threshold and a flight board in front of the entrance to the nest for the chicken. Using a file and sandpaper, process the edges of the parts until smooth.
Strengthen 4 bars along the perimeter of the bottom and lid, flush with the edges, and nail 2 of the same parts on the sides to the back. When cutting a block, you need to take into account its thickness and make some of the parts shorter so that they fit well on the plane.
Screw the side walls to the bars fixed to the bottom and lid. Insert a backdrop between them and attach it at the top and bottom. Connect the sides with the bars on the back. Decorate the façade: attach a threshold and a narrow strip on top to the bars. If the bird houses are combined into a section, when calculating the details, you need to take into account that the internal walls of the cells are common. Finally, nail down the landing board and place the box on a raised platform or attach it to the wall.
Dimensions
When building nests, it is necessary to take into account the breed of chickens:
- For ordinary laying hens, small structures with the following parameters will be sufficient: 25x35x35 cm.
- Individuals of meat and egg breeds need more spacious shelters with dimensions of 30x40x45.
Each nest (regardless of the breed) must have a threshold with a height of 5 to 8 cm, as well as a special bar designed for birds to take off (located ten centimeters from the entrance and having a cross-section of 5x2 cm).
With a large number of laying hens, it is advisable to place nests in 2-3 tiers, making sure that the height of the nests of the lower tier is at least 30-40 cm from the floor level.
Above the upper tier it is necessary to make a reliable roof with an angle of inclination equal to 45-50 degrees (such a slope is needed in order to wean chickens from the habit of sitting on the roof and soiling nests with their droppings).
Nest with egg collector
Sometimes the bird begins to peck at its own products, destroying some of it and staining other eggs. In this case, it is advisable to install nests for chickens with an egg collector, where the egg is rolled immediately after laying, hiding from the sight of those who like to feast on it.
The design is based on the principle of making a nest-box. The difference between the new model is the enlarged floor detail and the shortened heel. These parts should be cut like this:
- the backdrop is shortened in height so that there is a gap of about 10 cm between its lower edge and the floor;
- the bottom part is increased in length (depth measure): it should protrude beyond the back wall by at least 15 cm and have a slope, which will also require an increase in length by at least 5 cm.
Assembly is carried out using the same technology, securing the bottom with a slope from the front to the back. A block attached along the edge will prevent the egg from rolling off the sloping bottom. To slightly reduce the speed of rolling, attach a flap made of thick fabric, plastic, or rubber to the gap under the backdrop.
The valve should open easily, allowing the egg to pass out of the nest. In a tray formed by slats, it is advisable to place a soft bedding that will slow down the rolling object and prevent it from breaking on the sides. If the tray is inconvenient to install on the back wall, the floor can be made sloping towards the side wall and the slope can be moved beyond it.
How to make a nest for laying hens: box-shaped design
A little effort on your part and the birds will have a real home where they can feel comfortable, which means they will please you with activity and a lot of eggs.
To make a structure in the form of boxes, you will need the following materials and tools:
- boards, plywood;
- sandpaper;
- fasteners;
- beam;
- screwdriver;
- hammer;
- jigsaw
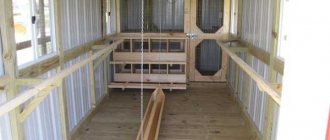
The process of building a poultry house with your own hands, arranging nests and perches
How to make nests for laying hens with your own hands: drawings and procedures
Creating a comfortable nest is not difficult. Follow the instructions and everything will work out even without much experience in building such structures:
- If you use boards for construction, sand them thoroughly using sandpaper.
- Next you need to cut out the blanks. It is important to make accurate calculations of the parameters of the parts you need. First of all, count the required number of cells. Then multiply the resulting number by the width of one cell - it should be at least 25 cm. The height of the box is calculated using the same formula. If there are a lot of birds on your farm, make several floors.
- Pin the cut pieces together.
- To give the structure strength, fasten timber on the inside of the resulting box at the corners.
- The entrance can be left open. Or cut round holes corresponding to the number of places for laying hens and line the box.
- Make a threshold. To do this, take a 10 cm wide strip and fasten it from below along the entire length of the structure divided into cells.
- Step back 10 cm from the entrance to the nest and secure the take-off platform.
- If you have a structure with several tiers, make stairs. There should be one staircase for each tier.
Diagram with installation dimensions of nests for poultry (dimensions for chickens are indicated in brackets)
Helpful advice! If the structure has a horizontal roof, coat the surface with stizol to prevent damage from bird droppings.
Double bottom nest
The following design of a chicken nest is designed to protect products from pecking. Its peculiarity is the presence of a false bottom with a slope and a hole into which the laid egg will roll, hiding from the bird’s field of view. The difference from a simple booth is the enlarged sidewalls and inclined floor parts installed inside.
To create such a nest, you need to do the following:
- when cutting, increase the length (height) of the sides and back by 15-20 cm;
- supplement the design with 2 false bottom parts: their width is calculated so that when installed inside the box there is a gap of about 7 cm between them;
- you will need to cut supports from the block to install the raised floor parts in an inclined position;
- make it yourself or choose a suitable tray for the eggs to roll into;
- provide soft bedding in the tray.
The assembly of the main box is carried out according to the booth diagram. Before assembly, a support block for an inclined floor is secured to the inside of each side wall. After the outer walls are installed, 4 false floor parts need to be inserted and secured inside the box. A box filled with soft material is placed in the pallet. The egg will roll between the inclined boards and fall into the tray, from which it can be removed.
How to train a laying hen to the nest?
Usually, in order to train a chicken to lay eggs in a new nest, it is enough to close it inside for 1-2 nights. If the hen still refuses the offered place, you can put an egg laid by another hen, or simply a suitable white pebble or a piece of chalk of the appropriate shape into the nest. Sometimes chickens are denied access to their favorite place to lay eggs, or pieces of feathers or down are placed in new nests. In cases where no measures help, and the hens still lay eggs in another place, you need to check the nests for the presence of parasites (even insects invisible to the eye can bother the birds), as well as mold and dampness.
In order to accustom a chicken to the nest, you can close it inside for 1-2 nights.
Prices for feed additives for chickens and egg-laying birds
Feed additive for chickens and egg-laying birds Royal Feed
Simple nest
If the poultry farmer has not had time to fully equip the poultry house, then you can organize a nest for chickens with your own hands from any suitable sized boxes, drawers or other containers that are unnecessary on the farm. A simple nest can even be made from a tire. The larger one (from a tractor or mining dump truck) is cut into 4 parts, and the chickens lay eggs inside such improvised nests.
A small one (from a passenger car) is placed in the chicken coop, filling its recess with hay or shavings. Plastic containers for paints or other building mixtures, fuels and lubricants, etc. can also be used as temporary nests, cutting off unnecessary parts from them and shaping them into a box.
The box is easy to put together from a piece of plywood and 4 bars 5-7 cm high. These parts are fixed to the bottom from a piece of plywood. The simplest nest is filled with bedding and used as a temporary option.
Types of nests for laying hens
If you don’t have the desire or ability to make nests for laying hens with your own hands, you can purchase ready-made ones. But many poultry farmers create places for chickens to lay eggs from scrap materials: boxes made of wood and plastic, old baskets of any size, and cardboard boxes are used. The next point in preparing nests is to choose a suitable place in the chicken coop, where there is no light and it is quiet.
Whether poultry farmers decide to purchase ready-made structures or make them themselves, but first they need to decide what type of nests will be.
There are two types of such structures:
- Nest in the form of boxes. It is easy to set up such a structure, and the external data of the boxes allows you to arrange many cells for laying eggs in one place. In such nests it is easier to train laying hens to lay eggs - the females are locked in the nest for several days, developing the habit of laying eggs in a certain place.
- Designs with egg collectors. Such nests can be different in shape, but the principle of their arrangement is the same - the laid egg is immediately rolled into a special tray using the equipment, so the laying hen does not touch it and cannot damage it. Such nests are usually set up in poultry farms or large farms, where they breed laying hens in large quantities for the mass collection of egg products.
Useful tips
To prevent chickens from getting used to spending the night in nests, soiling the bedding, it is better to install a door at the entrance to the hutch. The bird rushes in the morning hours, and the boxes can be closed at night.
If chickens fly onto the roof of the huts and sit or spend the night there, it is advisable to sheathe it with a sheet of tin so that the wood does not deteriorate from droppings. Most often, the tin coating also scares off those who like to relax at heights.
If the chicken coop is small, you can install nesting boxes on top of each other. In this case, it will be necessary to supplement the structure with ladders along which birds can climb. It is convenient to place a bath with ash under the nesting sections so as not to take up the free floor space.
Types of nests for laying hens
For domestic laying hens you can make:
- The nest-box is a simple design, the appearance of which resembles a dog kennel. The advantage of such a nest is that its construction does not require professional skills and will not take much time, but the disadvantage is the absence of an egg receptacle, due to which hens that have access to eggs often damage or peck them. Despite this, nests of this type are quite common.
- A nest made from improvised means. You can build it from any spacious containers (baskets, cardboard boxes or plastic buckets), always intact and clean. The main advantage of such nests is the insignificance of material costs.
- A nest box is a simple box with a semicircular opening in the front wall. The extreme simplicity of the design allows the boxes to be fastened together, making entire batteries out of them, which significantly saves space inside the poultry house.
- A nest with an egg collector is a more complex structure, differing from a simple nest by the presence of a bottom that has a slight slope. Thanks to this slope, the laid eggs rush down and, having left the nest through a hole in the front wall, end up in a special tray, which significantly facilitates the process of collecting eggs, the main purpose of which is to prevent chickens from pecking the eggs. In all other respects, the construction of such nests is similar to the production of nest boxes. Serious miscalculations made in the manufacture of an egg collector can cause eggs to fall and break, therefore, having found a drawing of a similar design on the Internet, you must strictly adhere to the parameters specified in it.
How to properly attach sockets
Correct installation of nests involves placing them in such a way that there is a small gap between the walls of the nest box and the wall of the chicken coop. To make a base for the nesting box, you will need several boards and bars.
From this material you need to cut 4 legs about 30 cm high and 4 veins. The length of the veins corresponds to the dimensions of the nest on the floor. Connect the parts with nails so as to get something like a bench without a seat. We attach a nest-box or another type to this base. There is no need to nail it down: this will make it easier to clean the box itself and replace the bedding in the chicken coop. The lightweight structure can be quickly disassembled and taken outside for drying and treatment against parasites.
If necessary, you can make a stationary shelf base. At the same time, determine the size of the box and make the width of the shelf slightly larger than the depth of the booth. This will help replace the landing board with part of the nesting base itself. Then proceed as follows:
- nail the support beam to the wall and strengthen 2-3 transverse support strips on top of it (the distance between the supports is no more than 1 m);
- a jib is mounted under each plank, sawing its ends at an angle of 45°, and nailed to the wall under the support beam;
- the front edge (ends) of all crossbars must be combined with a long board or block, attaching it to each support;
- make the flooring from slats or solid;
- place the drawers on the shelf, leaving 20-25 cm free in front of the entrance.
This design can be made multi-tiered and used to install simple open nest boxes or booths without an egg collector.
Installing a homemade nest
Homemade nests are most often attached to the wall of the chicken coop as follows:
- First, a base stand made of a strong board and measuring 30 × 4 × 2 cm is attached to it using screws.
- Another (exactly the same) part is attached at an angle of 45 degrees. The angle formed by both parts should diverge at the bottom of the fastening. The distance between the edges of the planks should be at least 40 cm.
- Having measured 45 cm, perform a similar fastening, the slats of which should meet at the top.
- A homemade socket is inserted into the compartment formed by four attached bars and attached to the obliquely located slats using screws.
Nest care
Nest boxes should be kept clean. The appearance of the products that are sold and the safety of the owners themselves who eat eggs depend on this. To collect a clean and undamaged chicken egg, you need to properly care for the nest boxes:
- replace the bedding filler as it becomes contaminated with droppings, broken eggs or other soiling substances;
- Once a week, it is recommended to treat the bottom of the nest box with a disinfectant solution (Blezna, bleach, etc.), and then dry and ventilate the boxes;
- Once a month, it is advisable to treat the inner surface of the nests with sulfur powder to prevent the reproduction and transmission of ticks, lice and lice;
- Inspect nesting sites once every 3 months, identifying defects that appeared during operation and carrying out minor repairs;
- Once a year you will have to thoroughly clean the chicken coop, removing in the spring all the litter that has accumulated over the winter and again ventilating, drying and treating the boxes from bacteria and parasites.
Sometimes nesting equipment has a mesh bottom. This saves time on processing the box, but requires the use of only large fractions of bedding: straw, shavings, dry leaves, etc. Small sawdust and similar materials will not be able to stay in such a nest for a long time, and the owner will have to constantly add more bedding.
Adviсe
Properly made nests that are convenient for laying hens are usually populated by them without problems. If for some reason this did not happen and the chickens continue to lay eggs in unexpected places, you can:
- place dummies or real eggs laid by other chickens in the nests;
- lock the stubborn ones in their new homes for a couple of nights.
If these measures do not lead to the desired result, you can try to make changes to the design of the nest or change its location.
You can make caring for laying hens easier with little tricks:
- To prevent laying hens from pecking at their own eggs, it is necessary to add coarse sand or fine gravel to their nests.
- Next to the nests you can place large containers filled with sand and wood ash. By taking ash-sand baths, chickens can avoid the appearance of parasites.
Requirements for perches
In addition to understanding the types of perches, it is necessary to understand the requirements that apply to them. The main thing is the choice of location of the structure. Typically, a great solution is to place the poles or bars in the warmest area of the coop. There should also be no light above the perches. This is important so that the chickens can rest in the dark. At the same time, there should be no cracks in the walls, windows or doors near the perches. A draft often passes through them, which can cause the development of various diseases. The height of the structure is determined by many factors. For example, these include the age and breed of chickens. Most often, perches are built at a height of 60 cm. The height can be reduced if the chickens are young. For laying hens, the poles can be raised up to a meter. This is due to the fact that they require additional physical activity.
It is advisable to make additional steps along which the chickens can safely climb to their sleeping place. The chicken should freely grasp the pole on which it sits, so for round bars, a diameter is chosen that will be half the length of the chickens’ open paw. Here, too, everything will depend on the breed and age of the bird. The number of slats will depend on the total population, as well as the type of bird. For breeds that are raised for meat, it is necessary to provide a section of 25 or more centimeters wide per chicken. If we are talking about egg-bearing breeds, then this parameter can be reduced to 20 cm.
Note! Some laying hens do not require nests; they lay eggs while on the roost.
In this case, it is necessary to equip a special inclined plane under the perch along which the eggs will roll into the tray. This is not the best option, because the eggs can get dirty very easily.
It is necessary to place one pole from another at a distance of 30 cm. This will depend on the size of the chickens. They should fit freely on the poles and not push each other. It is also worth removing the pole a sufficient distance from the wall. Typically, this parameter is observed with a size of 30 cm or more. If you do not take these dimensions seriously, then conflicts may arise in the chicken coop. In addition, the chickens will not be able to get enough rest, which can affect the number of eggs laid and the overall condition of the bird. After constructing the structure, you need to observe the chickens for some time. If they are reluctant to climb and rest on the perches, then something needs to be changed in the design.
Instructions for making various perches
To equip a chicken coop with a simple perch made of bars , you will need to do the following:
- Process and round a wooden beam measuring 40x40 mm using a plane and sandpaper;
- Cut out notches on the wooden supports for the perch and secure them in place;
- Lower the pre-prepared perches into the grooves of the supports; It is advisable to make the cross bars removable, figuring out how they can be well secured to the side bars. Thanks to this trick, the perches can be removed from their place and replaced with others, which happens when the number of poultry increases.
- Make a pallet and attach bars to the wall (at a height of 40 cm), which will serve as a platform for placing the pallet; The pallet can be created from any materials, since its purpose is to be a litter bin.
- Make a ladder and place it against the wall next to the perch at an angle.
The tray avoids contamination of the chicken coop
If the owner of the chicken coop decides to equip it with a perch in the form of a box, then he needs to study the guide below:
- The first step is to build a box from 4 boards 15 cm high and 20 mm thick and nail the bottom to it - a sheet of plywood;
- A metal mesh should be laid on top of the finished box;
- Two boards must be nailed to the two sides of the box;
- You need to cut out recesses in the boards and place bars treated with a plane and sandpaper in them.
This is what a finished box-shaped perch looks like
Which nest is better - ready-made or homemade?
Some farmers don't want to waste time creating nests for chickens with their own hands.
There are many models of ready-made chicken nests on the market. They are functional and beautiful due to the presence of decorative elements. There are many advantages:
- compliance with GOST-R requirements;
- design safety;
- the product looks beautiful;
- there are additional functions, if the bird hatches eggs (feeder and drinker are in place, without the need for the chicken to get up);
- presence of an egg receptacle;
- absence of sharp chips and other dangers for the bird;
- use of safe materials.
All of these are arguments in favor of purchased models for chickens. There are multi-tiered models that save space. However, the cost of finished nests is often higher than purchasing lumber and other components to make them yourself.
However, creating the required model yourself is problematic without the appropriate skills and tools. The solution to the problem is to order from specialists. It is required to provide a drawing, according to which they will create an estimate and begin work. It is also possible to voice all your wishes according to which the drawing will be created.
If you have certain skills, desire and the opportunity to create nests with your own hands, you should take advantage of this. Then you can save money and complete the drawing, taking into account all the features of the chicken coop. That is, the places for laying eggs will be convenient and will also be able to meet all the requirements of the farmer. Self-production will allow you to save up to 40% of the market cost.
Video - Review of nests for chickens
Nest made from scrap materials
Sometimes poultry farmers make nests from old, used ones:
- plastic and metal buckets;
- pots;
- canisters;
- wide pipes.
All this is suitable for making a nest. However, you should carefully ensure that the materials are environmentally friendly and do not contain toxic products. There is no point in spending very expensive materials on nests. As a result, it may turn out that you need to collect eggs for a year and sell them to pay for the nests.
Nests made from plastic buckets
Nests made from plastic boxes
Nests are places where food is collected. They must be clean. The litter should be changed at least once every 5-6 days.
The chicken will quickly take a liking to properly made and installed nests. If a bird refuses to lay eggs in the nest, there is no point in forcing it, it’s better to think, feel what’s wrong and change it. The bird will reward you with good egg production.
Like the author!3
- Even more interesting:
- How to organize proper feeding of turkey poults
- How to properly and what to feed mulard ducklings
- What to feed broiler chickens for rapid growth
Choosing a suitable roost for chickens
“Sleeping places” for chickens are classified according to two characteristics - functionality and complexity of manufacture. There are three types of perches:
- Perches. They stretch from one wall to another or are located in the corner of the chicken coop. This perch looks like a ladder. It is often used in the household because it takes up little space and is created without much difficulty;
Chickens sit on perches at several levels
However, it is better to refuse this type of perch. The chickens will peck at each other, trying to take the best place - the highest perch. As you can imagine, those who settled below have a very hard time.
- Bars. They are installed around the entire perimeter of the chicken coop and at the same height. Making such perches is a little more difficult than making perches. But, like them, the beams occupy only a small area of the house;
There is no other one installed above this bar.
On perches in the form of bars, all chickens can sit comfortably, so they have no need to fight. Since all laying hens sit on the same level, their plumage is not soiled by droppings.
- Hygienic perch. This device for resting chickens resembles a large box. Perches are attached to the top of this structure on supports. True, you have to tinker with the manufacture of such a perch;
Such structures are easy to clean
But you can remove excrement from the hygienic roost box, so the chicken coop will always be clean. In addition, such a structure is portable.
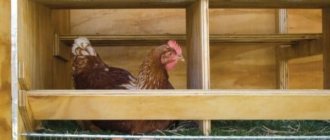
The chicken nest is a deep box. Sometimes wicker baskets or cardboard boxes are used as a place to hatch eggs. But they are only suitable if no more than five chickens live in the house. For more laying hens, more secure nests are needed.
The hen settled in the nest
Installing nests in a chicken coop
Manufactured nests are installed in the chicken coop in two ways:
- on prepared supports;
- directly on the wall.
Installation on supports is the installation of a structure on a stand that looks like a table. The height from the floor should be 30 centimeters.
Be sure to read:
How to make a cage for chickens with your own hands: photos, video instructions, sizes and options?
Another option is to mount the nests to the wall. According to experienced poultry farmers, nailing a nest to the wall is not recommended. First, a board 4-5 centimeters thick is nailed to the wall.
Two more boards are attached to the board at an angle of 45 degrees: the first angle meets at the bottom, the second at the top, and the distance between the boards is approximately 0.5 meters.
A nest or several nests in a row are placed in this niche. All fastenings must be firmly connected with bolts, nails, screws and other fastening materials.
Hanging nests
Hanging nests
You can make nests from plastic boxes for storing fruit, buckets, basins, small boxes that need to be nailed to the wall.
The nest needs to be insulated. For insulation, a sheet of plywood is nailed to the wall, placing insulating material between the plywood and the wall.
Due to the fact that the box will be attached to the wall on one side, additional fastening is required. This can be ordinary wire attached to the edges of the box and fixed higher on the wall, or a metal or wooden bracket.
Hanging outdoor nests
Hinged External Nests
Hinged nests are made so that they are located on the outside of the coop, and the owner does not need to go into the house to collect eggs.
Important! This type of nest is only possible for chicken coops made of wood. And another important detail - the device must be thoroughly insulated.
The procedure for making a hanging nest
The procedure for making a hanging nest is as follows:
- Take measurements of the chicken coop wall and draw a drawing.
- Assemble the frame of the house from 5x5 cm bars.
- Cover the bottom, roof, and side walls with plywood. Insulate all sides and the roof, best with polystyrene foam (felt insulation can harbor insects). Cover the roof with metal tiles, slate, roofing felt.
- Attach insulated doors to the front side.
- Build partitions inside the nest.
- Attach the structure to the chicken coop.
- In the wall of the chicken coop, along the marked lines, make an entrance for the chickens into the house.
- The heavy structure is secured with bolts; for greater reliability, spacers are made from below at an angle of 45 degrees.
All that remains is to fill the nest with sawdust, hay, straw and you can let the chickens into the chicken coop.
Basic rules of construction
Containers should be placed in a shaded place. Direct rays of the sun should not fall on the building. Choose insulated and not damp areas.
The flooring must remain dry. In addition, the building must be ventilated, so it is necessary to equip the room with ventilation or make the bottom mesh.
In the lower part of the building and near the doors to the chicken coop, the temperature is lower, and drafts are possible there. You should not place nests in these places, because... chickens may become ill, causing their activity to decrease.
It is not recommended to attach the structure to the walls in metal chicken coops. Such structures are inconvenient for birds, and their service life is shortened. In the autumn-winter period, the structure will cool down, and the laying hens may catch a cold.
Also, do not leave protruding nails or cuts, which could injure the hens. Before introducing hens into the nest, make sure there are no dangerous elements present.
During construction, care must be taken to ensure that there are no sharp chips left.
It is necessary to ensure comfort for the chickens and minimize the risk of damage to the eggs. To do this, a flooring, preferably made of sawdust, is placed in the nest. It is better to avoid hay, as chickens easily throw it away. Make the flaps and walls 2-3 cm above the level of the litter so that the egg cannot roll out.